background image

15

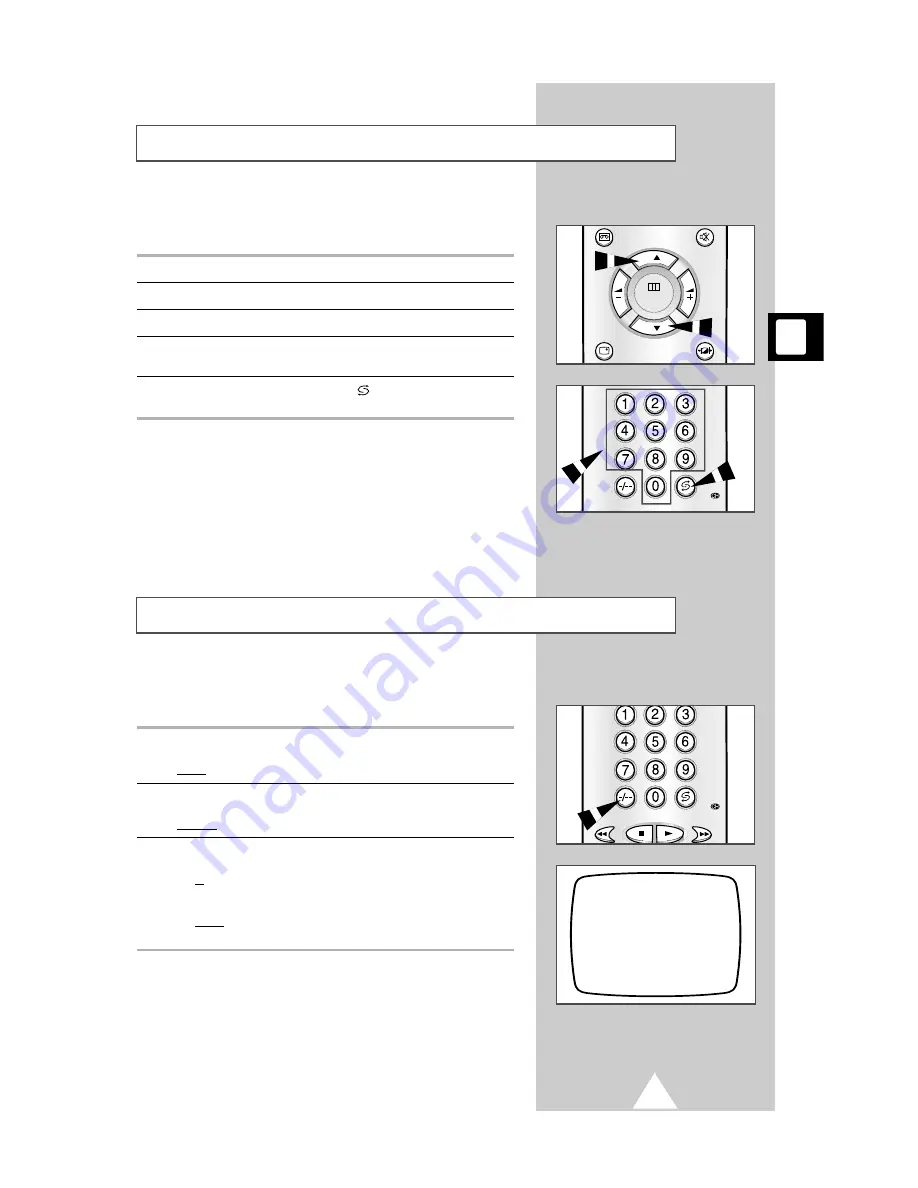
Once you have stored the channels on your COMBI VISION, 
you can select them easily via your remote control.

To switch...

Press...

To the next station

.

To the previous station

.

To the station of your choice

The appropriate numeric button(s); 
see the section below for further details.

Repeatedly between the last

PRE-CH (

) as many times as you require.

two stations displayed

When selecting a station stored at programme position ten or
higher, follow the instructions below.

1

Press the -/-- button on the remote control.

Result:

P--

is displayed in the top left-hand corner of the screen.

2

Enter the two-digit station number.

Example:

To select station 42, press 4 followed by 2.

3

To enter one-digit station numbers:

Precede the number with a zero (0)
or

Press the -/-- button again

Result:

P-

is displayed; you can now enter the required one-digit

number without a zero.

Changing Stations

Selecting a Station Numbered Ten or Over

P 02

P--

V.MENU

MUTE

DISPLAY

P.STD

MENU

P

P

Pre.

Pre.

Summary of Contents for TB15X5

Page 1: ...LOUR TELEVISION andVIDEOCASSETTE RECORDER Owner s Instructions Before operating the unit please read this manual thoroughly and retain it for future reference CRYSTAL PLAYBACK depending on the model depending on the model TM ...

Page 2: ...ing and moving your COMBI VISION Caution Main voltage 220V 240V 50Hz or Indicated on the rear of the TV set The lightning flash with arrowhead in the triangle is a warning sign alerting you to dangerous voltage inside the product The exclamation point within the triangle is a warning sign alerting you to important instructions accompanying the product WARNING TO PREVENT DAMAGE WHICH MAY RESULT IN ...

Page 3: ...n the model 17 USING THE TELEVISION FUNCTION Adjusting the Picture and Storing Your Preferences 18 Adjusting the Picture Setting 18 Adjusting the Volume 19 Adjusting the Sound and Storing Your Preferences depending on the model 20 Adjusting the Sound Setting depending on the model 20 Selecting the Sound Mode depending on the model 21 Selecting the Audio output Mode depending on the model 21 Switch...

Page 4: ... Markings 38 Repeating Playback of a Sequence or Cassette 39 USING THE TELETEXT FEATURE DEPENDING ON THE MODEL Teletext Feature 40 Displaying the Teletext Screen 41 Selecting Display Options 41 Selecting a Teletext Page 42 Storing Teletext Pages 43 Recalling a Stored Teletext Page 43 RECOMMENDATIONS FOR USE Using the Buttons on the Front Panel 44 Locking the Front Panel 44 Connecting Earphones 45 ...

Page 5: ...crambled Pay TV broadcasts Example Premiere broadcasts If you wish to connect both a decoder and an external VCR to the SCART connector you must plug The decoder into the VCR The VCR into the COMBI VISION refer to Connecting Other Video Equipment on the following page for further details 1 Plug the SCART cable supplied with the decoder into the SCART connector on the rear of the set 2 Plug the oth...

Page 6: ...onnector or RCA connectors REAR OF THE TELEVISION depending on the model Camcorder VCR SCART cable or It is an infringement of copyright laws to copy pre recorded cassettes or to re record them in any form without the permission of the owners of the corresponding copyright When external equipment is plugged into both the front or side and rear connectors the front or side connector has priority To...

Page 7: ...from the wall socket or press the Master Switch This is particularly recommended when you will not be using the set for a long period of time and you have not set the VCR unit to record a programme automatically Switching Your Combi Vision On and Off You must insert or replace the batteries in the remote control when you Purchase the television Find that the remote control is no longer operating c...

Page 8: ...educe the value of a menu option MENU Used to display the Used to exit the television menu television menu and return to normal viewing V MENU Used to display the Used to exit the VCR menu and VCR menu return to normal viewing 8 GB A degaussing coil is mounted around the picture tube so that external degaussing after moving the receiver is normally unnecessary If the receiver is moved or placed in...

Page 9: ...NU Option Function RECORD PROGRAMME Used to set the VCR to record a programme automatically REPEAT Used to repeat playback of all or part of a cassette PICTURE Used to adjust the picture contours TAPE SELECT Used to select the length of cassette V SYSTEM Used to select the video standard Only PAL System is available on UK model and so the V SYSTEM doesn t need SPEED Option Used to select the recor...

Page 10: ...es of an option or its sub menu press or To move around a sub menu and select the required function press P or 4 Follow the detailed instructions for each function channel storage adjustments etc in the rest of this booklet 5 When you are satisfied with your settings press MENU or V MENU one or more times to return to normal viewing Step 5 is optional as the menu disappears automatically after abo...

Page 11: ...anguage is selected 3 When you are satisfied with your choice press LANG SEL to return to normal viewing If you do not press this button the list disappears automatically after a few seconds Result The menus are then displayed in the language of your choice The list of languages displayed may change without notice Choosing Your Language LANGUAGE ENGLISH DEUTSCH FRANÇAIS NEDERLANDS ESPAÑOL ITALIANO...

Page 12: ...le digits must be preceded by a zero Example 3 07 p m Enter 15 07 4 To select the date press P 5 Press the numeric or buttons to enter the Day Month Year Result The day of the week is displayed automatically next to the date When a date is entered all single digits must be preceded by a zero Example 6th April 2000 Enter 06 04 00 6 When you are satisfied with your settings press MENU twice to retur...

Page 13: ...vailable if The AV input is selected press INPUT to select an ordinary station A video cassette is playing stop the cassette 3 Select the AUTO TUNE option by pressing P followed by the button Result The AUTO TUNE menu is displayed with the COUNTRY is selected 4 Select your country by pressing the The following countries are available AUSTRIA BELGIUM CROATIA DENMARK FINLAND FRANCE GERMANY ICELAND I...

Page 14: ...e to a preset station new programme number to be assigned to the station Example To move the station from programme 21 to 02 enter 02 2 Press MEMORY to store the change Result STORE is displayed briefly in red Clear a preset 1 Select CURRENT PR channel 2 Press CLEAR X Result X CLEAR is displayed briefly in red and the station is cleared The programme number can be reused for another station To ass...

Page 15: ...lecting a station stored at programme position ten or higher follow the instructions below 1 Press the button on the remote control Result P is displayed in the top left hand corner of the screen 2 Enter the two digit station number Example To select station 42 press 4 followed by 2 3 To enter one digit station numbers Precede the number with a zero 0 or Press the button again Result P is displaye...

Page 16: ...is selected press INPUT to select an ordinary station A video cassette is playing stop the cassette 3 Press the button Result The list of options is displayed 4 If you Then Know the frequency of Select the FREQUENCY option by the station to be stored pressing P the required number of times Enter the required frequency by pressing the numeric buttons or the and buttons Result The station is display...

Page 17: ... NAME SEARCH FREQUENCY 192 00MHz AFT ON SYSTEM AUTO STORE X CLEAR EXIT ADJUST SELECT This function is very useful in the situation that the TV is used in weak signal LNA amplifies the TV signal in the weak signal area but not noise This feature is working only weak signal condition and that is memorized on current channel additional 1 Press the MENU button Result The television menu is displayed 2...

Page 18: ...and will be kept next time you switch the television on These picture settings are maintained when you Place the set in Standby mode Unplug the set from the wall socket or a power failure occurs PICTURE CUSTOM CONTRAST 90 BRIGHT 50 SHARPNESS 50 COLOR 50 ADJUST SELECT EXIT CONTRAST 91 Adjusting the Picture Setting You can select the type of picture which best corresponds to your viewing requirement...

Page 19: ... moves to the right to indicate the volume Decrease the volume Result A horizontal bar is displayed and the volume decreases until you release the button The cursor moves to the left to indicate the volume The volume setting is maintained when you Place the set in Standby mode Unplug the set from the wall socket or a power failure occurs Adjusting the Volume VOLUME 10 V MENU MUTE DISPLAY P STD MEN...

Page 20: ...tereo converts a monaural sound signal into two identical left and right channels Once the Pseudo stereo is set to On or Off the setting applies to the sound effects such as Standard Music Movie and Speech SOUND CUSTOM BASS 50 TREBLE 50 BALANCE L 50 R 50 VOLUME 12 PSEUDO STEREO OFF ADJUST SELECT EXIT BASS 51 Adjusting the Sound Setting depending on the model You can select the type of special soun...

Page 21: ...al I or STEREO depending on the current transmission If the receiving conditions deteriorate listening will be easier if the mode is set to the Mono position using the S MODE button If the stereo signal is weak or if intermittent Stereo Mono and automatic switching occurs then switch to the Mono mode When receiving mono sound in the AV mode connect to the L input jack on the panels If the mono sou...

Page 22: ...he hour and minutes by pressing the numeric buttons Cancel the automatic Press the button once switch on timer Result OFF is displayed 6 Place the set in Standby mode by pressing POWER Result The set will be switched on every day at the time requested and will remain on for one hour if no other function is used during this time 22 MENU PICTURE TUNE SETUP ADJUST SELECT EXIT SETUP PANEL LOCK OFF ON ...

Page 23: ... the selected channel You can use your television to watch pictures from an external source such as a Camcorder or VCR Video disc player Decoder automatic switch over When you use a decoder with your COMBI VISION the signal from the decoder will be givin automatic priority over normal A V signals 1 Connect the AV cables referring to pages 5 and 6 if necessary 2 Switch the COMBI VISION on 3 Start p...

Page 24: ...few seconds when the cassette starts playing Current function Recording speed LP option Automatic track alignment A TRK indicator displayed for a few seconds when the cassette starts playing 1 To display the information press DISPLAY 2 To remove the information from the screen press DISPLAY again When a cassette is present in the VCR even if it is stopped the same information is displayed in telev...

Page 25: ...ab to prevent accidental erasure When this tab has been removed you cannot record on the tape 1 If you wish to protect a cassette break off the tab using a small screwdriver 2 To re record over a protected cassette safety tab broken cover the opening with adhesive tape When you insert a video cassette in the COMBI VISION playback starts automatically if the safety tab is broken protected cassette ...

Page 26: ...unction and recording speed appear on the screen 2 If the safety tab on the cassette is intact press PLAY Otherwise the cassette is played automatically When a cassette is loaded the tape position is optimised automatically to reduce disturbance Auto Tracking If the end of the tape is reached during playback the cassette is rewound automatically 3 If you wish to stop the playback temporarily press...

Page 27: ...MENU to display the VCR menu 2 Select the PICTURE option by pressing the P or buttons the required number of times 3 Press or to select one of the following options NORMAL for a standard picture SHARP for a crisper picture SOFT for a softer picture 4 When you are satisfied with the setting press V MENU one or more times to return to normal viewing VCR MENU RECORD PROGRAMME REPEAT OFF PICTURE NORMA...

Page 28: ...re than 2 seconds in the PLAY or RPS FPS Reverse Picture Search Forward Picture Search modes speed up Normal speed resumes PLAY when the REW or FF buttons are released The cassette is rewound automatically when the end of the tape is reached If you press POWER while a cassette is being rewound the COMBI VISION switches automatically to Standby mode and the cassette continues rewinding until the be...

Page 29: ... motion Example You wish to analyse a sportsperson s technique movement by movement No sound is heard when playing back a cassette in slow motion 1 During playback press P S followed by FF button Result flashes and the cassette is played back in slow motion 2 When playing back in slow motion picture interference may occur Press the TRK or buttons to minimise this effect 3 To return to normal playb...

Page 30: ...ape 3 Hold REC down for at least two seconds to start recording Result The record indicator appears on the screen An index is recorded on the tape see page 38 During recording you can also press DISPLAY to display the number of the programme being recorded and the remaining time on the cassette 4 To Then press Stop recording temporarily to avoid recording P S TV spots or to change channels for exa...

Page 31: ...television screen 4 Press REC several times to increase the recording time in 30 minute intervals up to four hours Result The length of time is displayed The selected programme is recorded for the length of time requested At the end of that time the VCR unit stops recording automatically 5 If you wish to cancel the recording before the end press REC several times until 0 00 is displayed or press S...

Page 32: ...e digit to be corrected is cleared Enter the correct digit 3 Press the V MENU button Result The information concerning the programme is displayed When using the SHOWVIEW VIDEOPLUS function for the first time with stored stations the programme number flashes This one time you must enter the number manually 4 If necessary enter the channel number by pressing the appropriate numeric buttons 5 When yo...

Page 33: ... times to return to normal viewing DO NOT press MENU to exit the menu system if you do your settings are not stored and the programme will not be recorded 13 Press POWER to activate the timer Option If you have a dual tuner model you don t have to press POWER because you can watch TV while VCR is recording a different channel Result The Timer indicator on the front panel lights up If no cassette h...

Page 34: ...mes 4 Press the button to confirm your selection Result The list of information to be entered for the recording is displayed with preset values 5 Enter the channel number by pressing the appropriate numeric buttons or press INPUT to select the AV input 6 Specify the start time by pressing the appropriate numeric buttons When you are satisfied press the P button When entering the date and time all ...

Page 35: ...s to return to normal viewing DO NOT press MENU to exit the menu system if you do your settings are not stored and the programme will not be recorded 13 Press POWER to activate the timer Option If you have a dual tuner model you don t have to press POWER because you can watch TV while VCR is recording a different channel Result The Timer indicator on the front panel lights up If no cassette has be...

Page 36: ...equired on your part You can however cancel any programmes that are Set to be recorded on a daily or weekly basis Incorrect No longer required 1 Press V MENU to display the VCR menu 2 Select the RECORD PROGRAMME option by pressing the button Result The list of preset recordings is displayed with the corresponding information date times options etc 3 Select the programme to be cancelled by pressing...

Page 37: ...o set the tape counter to zero at the beginning of a sequence Press DISPLAY to display the counter Press CLEAR X when you want to set the tape counter to zero 5 To fast forward or rewind to the sequence at which the counter was set to zero simply Press FF or REW Press STOP when the cassette reaches zero With the counter display on the screen press the MEMORY button to activate the memory MEMORY ON...

Page 38: ... direction in which the VCR unit is to search REW to search backwards FF to search forwards Result When the index is found cassette playback starts Scanning the Index Markings Using the Indexes to Search for a Sequence You can scan the various indexes on the cassette to find the beginning of the programme or sequence that you wish to watch 1 To scan through all indexes in a given direction press I...

Page 39: ...Example To repeat a sequence lasting 35 minutes enter 0 35 5 Select the location on the cassette where you wish to start repeating the sequence and set the tape counter to zero by pressing DISPLAY followed by CLEAR X 6 Press PLAY to start the playback Result The cassette is played back for the specified length of time and is then rewound When the tape counter reaches zero the sequence is played ba...

Page 40: ... A Header information such as the Selected page number Broadcasting channel identity Current page number or search indications Date and time B Text C Status information Teletext information is often divided between several pages displayed in sequence These pages can be accessed in different ways By entering the page number By selecting a title in a list By selecting a coloured heading FASTEXT syst...

Page 41: ...letext information at any time on your television screen For Teletext information to be displayed correctly channel reception must be good otherwise Information may be missing Some pages may not be displayed To activate the Teletext mode and display the contents page follow the instructions below 1 Select the channel providing the Teletext service using the P or buttons 2 Press the button to activ...

Page 42: ...again to continue the display 3 If the FASTEXT system is used by the broadcasting company the different topics covered on a Teletext page are colour coded and can be selected by pressing the coloured buttons on the remote control Press the coloured button corresponding to the topic that you wish to select the available topics are given on the status line Result The page is displayed with other col...

Page 43: ...e numeric buttons 4 Repeat Steps 3 and 4 for each page to be stored using a different coloured button each time 5 Hold down the button to store the pages until the corresponding blocks are displayed in white 6 Repeat Steps 2 to 6 if you wish to store other pages on different lines 7 When you have finished press to return to the FASTEXT mode Recalling a Stored Teletext Page You can recall any of th...

Page 44: ...trol and the VCR menu is not available via the front panel The front panel of the COMBI VISION can be locked to prevent it from being used by young children for example 1 To lock the front panel display the television menu by pressing MENU 2 Select the SETUP option by pressing the P or buttons the required number of times 3 Press the button 4 Select the PANEL LOCK option by pressing the P or butto...

Page 45: ...Service on the following page You can connect a set of earphones to your television if you wish to watch a television programme without disturbing the other people in the room 1 Plug a set of earphones into the 3 5 mm mini jack socket on the front or side of the television Result The sound is heard through the earphones and the tele vision s loudspeakers are inhibited 2 When you wish to hear the s...

Page 46: ...laying back a cassette that does not correspond to the selected video standard Try to identify the electrical appliance that is affecting the television and move it further away Plug your television into a different mains socket Check the direction location and connections of your aerial This interference is often due to the use of an indoor aerial A video cassette can only be inserted with the wi...

Page 47: ...ding Colour Down converted subcarrier phase shifted direct recording FF REW time Less than 100 seconds in FF with E 120 Wow and flutter WTD 0 4 maximum SP Frequency response 100 Hz 8 KHz Mono 100 Hz 20 KHz Hi Fi GENERAL Power supply 220 240V 50Hz 110 260V 50 60Hz option Consumption 14 15 50W 20 21 60W Audio output power 14 15 20 2W 21 1Watts x 2 Number of loudspeakers 14 15 20 1 21 2 Tube size 14 ...

Page 48: ...fety approved extension lead or consult your dealer for assistance However if there is no alternative to cutting off the plug remove the fuse and then safely dispose of the plug Do NOT connect the plug to a mains socket as there is a risk of shock hazard from the bared flexible cord IMPORTANT The wires in the mains lead are coloured in accordance with the following code BLUE NEUTRAL BROWN LIVE As ...

Page 49: ... Audio input R 13 Video chassis return RGB red 3 Audio output L 14 4 Audio chassis return 15 RGB red input 5 Video chassis return RGB blue 16 Blanking signal RGB switching 6 Audio input L 17 Video chassis return 7 RGB blue input 18 Blanking signal ground 8 Switching voltage 19 Video output 9 Video chassis return RGB green 20 Video input 10 21 Screening chassis return 11 RGB green input Pins 5 7 9 ...

Page 50: ...t Liechtenstein Malaysia Mozambique Nepal New Guinea New Zealand Nigeria Norway Oman Pakistan Papua New Guinea Portugal San Marino Sierra Leone Singapore Spain Sri Lanka Sudan Sweden Switzerland Tanzania Thailand Turkey Uganda Yemen Zambia Zimbabwe PAL I Great Britain Hong Kong PAL D K China Mongolia SECAM L Andorra France Luxembourg Monaco SECAM B G Egypt Greece Iran Iraq Lebanon Morocco Mauritan...

Page 51: ...quency of the appropriate channel Channel Frequency assigned to a given broadcasting company to enable them to transmit a series of broadcasts or programmes Station Broadcasts by a TV company which are transmitted on a specific channel number Programme Position Number assigned to a given channel on both tuners in the COMBI VISION to help you select it more easily Cable TV Coaxial cable network tra...

Page 52: ...dio Video input connectors ˇ Stand by indicator Timer indicator ˆ Record indicator Ø Remote control sensor Stop Eject button VCR mode and Menu button TELEVISION mode Rewind button Play button Fast Forward button Ô Volume adjustment buttons TELEVISION mode or Record button VCR mode Channel selection buttons Ò Stand by button Ú Master switch ...

Page 53: ...Rear View of Your Combi Vision depending on the model 75 Ω COAXIAL CONNECTOR FOR AERIAL CABLE NETWORK SCART AUDIO VIDEO CONNECTOR 75 Ω COAXIAL CONNECTOR FOR AERIAL CABLE NETWORK RCA AUDIO VIDEO CONNECTORS ...

Page 54: ...PAGE INDEX RECALL STORED PAGE LINE SELECTION LIST FASTEXT MODE SELECTION SHOWVIEW PRESET RECORDING UK VIDEOplus TELETEXT PROGRAMME MIX DISPLAY ZOOM OPTION UK VIDEOplus PREVIOUS PAGE PAGE STORAGE PAGE FREEZE HIDE TELETEXT PAGE REVEAL HIDDEN TEXT SECONDARY PAGE DISPLAY GB Operation of remote control may be affected by bright artificial light near to the TV set OPTION TELETEXT DISPLAY ...

Page 55: ...S ONE TWO DIGIT CHANNEL NUMBER SELECTION VCR MENU DISPLAY VOLUME DECREASE NEXT CHANNEL CASSETTE EJECTION VCR STOP RECORD TAPE ALIGNMENT ADJUSTMENT LANGUAGE SELECTION INDEX SCAN SEARCH PICTURE MODE SELECTION TEMPORARY SOUND SWITCH OFF PREVIOUS CHANNEL TOGGLE TELEVISION MENU DISPLAY VOLUME INCREASE VCR PLAY PAUSE STILL CRYSTAL PLAYBACK IPC PRESET CHANNEL STORAGE AUTOMATIC SWITCH OFF TIMER CLEAR VCR ...

Page 56: ...THIS APPLIANCE IS DISTRIBUTED BY ELECTRONICS AA68 02257A ENG ...

Reviews: