background image

1. Connect an audio cable to the audio output port on the external device and [AV/COM-

PONENT AUDIO IN[R-AUDIO-L]] port on the monitor, and connect the video output port

on the external device to the [AV IN [VIDEO]] port on the monitor.

2. Play the DVD, VCR or Camcorder with a DVD disc or tape inserted.

3. Select AV using the SOURCE button on the front of the PDP display or on the remote.

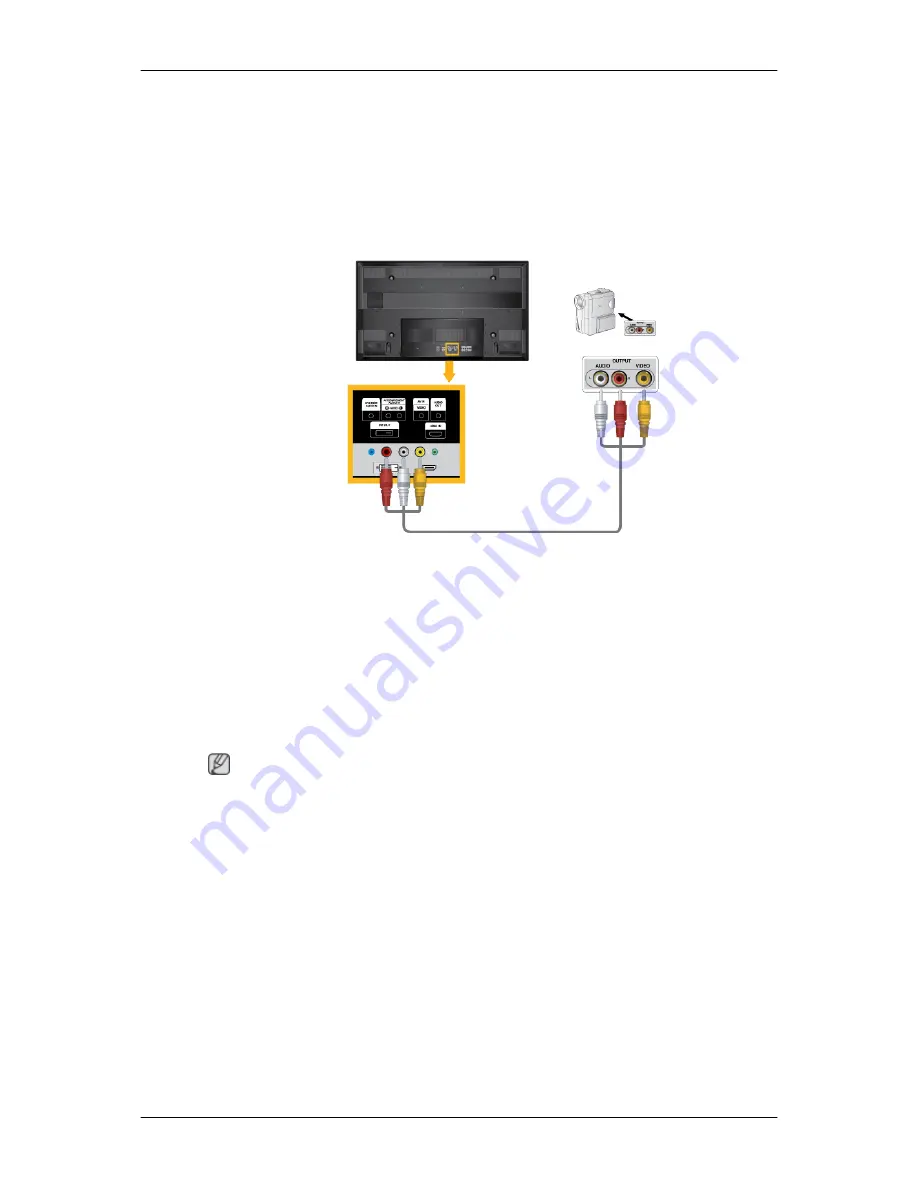
Connecting to a Camcorder

1. Locate the AV output jacks on the camcorder. They are usually found on the side or back

of the camcorder. Connect a set of audio cables between the AUDIO OUTPUT jacks on

the camcorder and the [AV/COMPONENT AUDIO IN [R-AUDIO-L]] on the PDP Display .

2. Connect a video cable between the VIDEO OUTPUT jack on the camcorder and the [AV

IN [VIDEO]] on the PDP Display .

3. Select AV for the Camcorder connection using the SOURCE button on the front of the

PDP Display or on the remote control.

4. Then, start the Camcorder with a tape inserted.

 Note

The audio-video cables shown here are usually included with a Camcorder. (If not, check

your local electronics store.) If your camcorder is stereo, you need to connect a set of two

cables.

Connections

Summary of Contents for SyncMaster P63FP

Page 1: ...ii LCD MONITOR quick start guide P50HP 2 P63FP 2 ...

Page 2: ...box as shown in the figure above Lift up the package box by holding the grooves on both sides of the package box Check the contents of the package Remove the Styrofoam and vinyl cover Note After unpacking the package make sure to check the contents of the package Make sure to keep the package box for transporting the product in the future After unpacking you may use the lower part of the package b...

Page 3: ...l Batteries AAA X 2 Not available in all loca tions Ferrite Core for Power Cord Sold separately DVI Cable Wall Mount KIT BNC to BNC Cable Network Box RGB to BNC Cable Ferrite Core The ferrite cores are used to shield the cables from interfer ence When connecting a cable open the ferrite core and clip it around the cable near the plug Introduction ...

Page 4: ... same time Enter button Activates a highlighted menu item MENU button MENU Opens the on screen menu and exits from the menu Also use to exit the OSD menu or return to the previous menu VOL Moves from one menu item to another horizontally or adjusts selected menu values When OSD is not on the screen push the button to adjust volume SEL Moves from one menu item to another vertically or adjusts selec...

Page 5: ... unattended for long periods Remote Control Sensor Aim the remote control towards this spot on the PDP Display Rear Note For detailed information concerning cable connections refer to Connecting Cables under Setup The PDP Display s configuration at the back may vary slightly depending on the PDP Display model POWER IN The power cord plugs into the PDP Display and the wall plug Introduction ...

Page 6: ...VI RGB AUDIO IN PC DVI Audio Con nection Terminal Input AV COMPONENT AUDIO IN R AUDIO L Connect the port of the DVD VCR DVD DTV Set Top Box to the R AUDIO L port of the PDP Display DVI OUT Connect a monitor to another monitor through a DVI cable Connect the DVI OUT port on the mon itor to the HDMI IN port on the other monitor using the DVI to HDMI cable DVI HDMI and network signals sent via the DV...

Page 7: ...the R G B H V ports The number of PDP Displays that can be connected to the loopout depends on the ca bles signal source etc With cables or signal source where there is no degradation up to 10 PDP Displays can be connected May not be supported depending on the connected cable BNC COMPONENT IN R PR G Y B PB H V BNC Component Connection Ter minal input During BNC input please check specifica tions f...

Page 8: ...y be different depending on its model Using the Anti Theft Kensington Lock 1 Insert the locking device into the Ken sington slot on the Monitor and turn it in the locking direction 2 Connect the Kensington Lock cable 3 Fix the Kensington Lock to a desk or a heavy stationary object Note See Connecting Cables for further information regarding cable connections Remote Control Note The performance of ...

Page 9: ...OSD adjustment or to use MagicInfo 4 DEL GUIDE but ton The button is used to select Digital channels Electronic Program Guide EPG display This button is disabled for this PDP display 5 VOL Adjusts the audio volume 6 SOURCE Press this button to switch to MagicInfo or PC mode or a connected external input source 7 D MENU DTV menu display This button is disabled for this PDP display 8 TOOLS Use to qu...

Page 10: ...fault FM Stereo Mono Mono Manual Change Stereo Mono Stereo SAP Mono SAP Mono DUAL STEREO MONO DUAL l DUAL ll and MONO NICAM MONO NICAM STEREO can be operated depending on the broadcasting type by using the DUAL button on the remote control while watching TV 14 ENTER PRE CH This button is used to return to the immediately previous channel This button is disabled for this PDP display 15 MUTE Pauses ...

Page 11: ...20 EXIT Exits from the menu screen 21 MagicInfo MagicInfo Quick Launch Button Note This button is disabled for products that do not support MagicInfo Introduction ...

Page 12: ...tions Using the D sub Analog connector on the video card Connect the D sub to the 15 pin RGB IN port on the back of your PDP Display and the 15 pin D sub Port on the computer Using the DVI Digital connector on the video card Connect the DVI Cable to the DVI IN port on the back of your PDP Display and the DVI port on the computer ...

Page 13: ... you select HDMI from both the Source List and Edit Name before selecting PC or DVI device so that normal PC screen and sound can be outputted Note that sound is only available when connected according to the option that follows Using the BNC Analog connector on the video card Connect the BNC COMPONENT IN port on the monitor to the BNC port on the PC using the BNC to BNC cable Connections ...

Page 14: ... local SAMSUNG Electronics Service Center to buy optional items Connecting to Other devices AV input devices such as DVD players VCRs or camcorders as well as your computer can be connected to the PDP Display For detailed information on connecting AV input devices refer to the contents under Adjusting Your PDP Display The PDP Display s configuration at the back may vary slightly depending on the P...

Page 15: ...lly found on the side or back of the camcorder Connect a set of audio cables between the AUDIO OUTPUT jacks on the camcorder and the AV COMPONENT AUDIO IN R AUDIO L on the PDP Display 2 Connect a video cable between the VIDEO OUTPUT jack on the camcorder and the AV IN VIDEO on the PDP Display 3 Select AV for the Camcorder connection using the SOURCE button on the front of the PDP Display or on the...

Page 16: ...play or on the remote control Connecting Using a DVI Cable 1 Connect between the DVI OUT port on the PDP Display and the input port on another monitor using a DVI cable 2 Connect between the AUDIO OUT port on the PDP Display and the audio input port on another monitor using a stereo cable 3 Select DVI using the SOURCE button on the front of the PDP Display or on the remote control Note DVI OUT doe...

Page 17: ...HDMI cable 2 Select HDMI using the SOURCE button on the front of the PDP Display or on the remote control Note In HDMI mode only PCM format audio is supported Connecting Using a DVI to HDMI Cable 1 Connect the DVI output terminal of a digital output device to the HDMI IN terminal of the PDP Display using a DVI to HDMI cable Connections ...

Page 18: ... set of audio cables between the AV COMPONENT AUDIO IN R AUDIO L on the PDP Display and the AUDIO OUT jacks on the DVD player 2 Connect a Component cable between the BNC COMPONENT IN R PR G Y B PB port on the PDP Display and the PR Y PB jacks on the DVD player Note Select Component for the connection to a DVD player using the SOURCE button on the front of the PDP Display or on the remote control T...

Page 19: ...IO IN R AUDIO L on the PDP Display and the AUDIO OUT jacks on the Set Top Box Note Select Component for the connection to a DTV Set Top Box using the SOURCE button on the front of the PDP Display or on the remote control For an explanation of Component video see your Set Top Box owner s manual Connecting to an Audio System 1 Connect a set of audio cables between the AUX L R jacks on the AUDIO SYST...

Page 20: ...nd reconnect the video cable then turn on both your com puter and the PDP Display If your PDP Display screen remains blank after using the previous procedure check your video controller and computer system your PDP Display is functioning properly Warning Messages You can even view the screen at a resolution of 1920 x 1080 However you will receive the following message for a minute You can choose t...

Page 21: ...re than 3 times when booting If it does request an a service for the main board of the computer 3 If you installed a new video card or if you assembled the PC check if you installed the Adaptor video 4 Check if the scanning ratio of the video screen is set to between 50 Hz 85 Hz Do not exceed 60Hz when using the maximum resolution 5 If you have problems in installing the Adaptor video driver boot ...

Page 22: ...ly A Check if the signal cable is securely connected Re connect it if necessary Refer to Connecting a Computer Q The image is not clear picture is blurred A Run Frequency Coarse and Fine tuning A Turn on again after removing all accessories video extension cable etc A Set the resolution and frequency to the recommended ranges Q The picture image is unstable and shakes A Check if the resolution and...

Page 23: ...ssing the MENU button check the cable connection between the PDP Display and the computer to en sure that the connector is properly connected Problems related to Audio Note Problems related to audio signals and their solutions are listed below Q No sound A Ensure that the audio cable is firmly connected to both the audio in port on your PDP Display and the audio out port on your sound card Refer t...

Page 24: ...ails Q How can I set the Power Saving function A Windows XP Configure it by selecting Control Panel Appearance and Themes Display Screen Saver Setting or configure it in the BIOS Setup of the computer Refer to the Windows Computer Manual A Windows ME 2000 Configure it by selecting Control Panel Display Screen Saver Setting or Configure it in the BIOS Setup of the computer Refer to the Windows Comp...

Page 25: ...for assistance check the information in this section to see if you can remedy any problems yourself If you do need assistance please call the phone number on the In formation section or contact your dealer Troubleshooting ...

Reviews: