background image

On-Screen Display

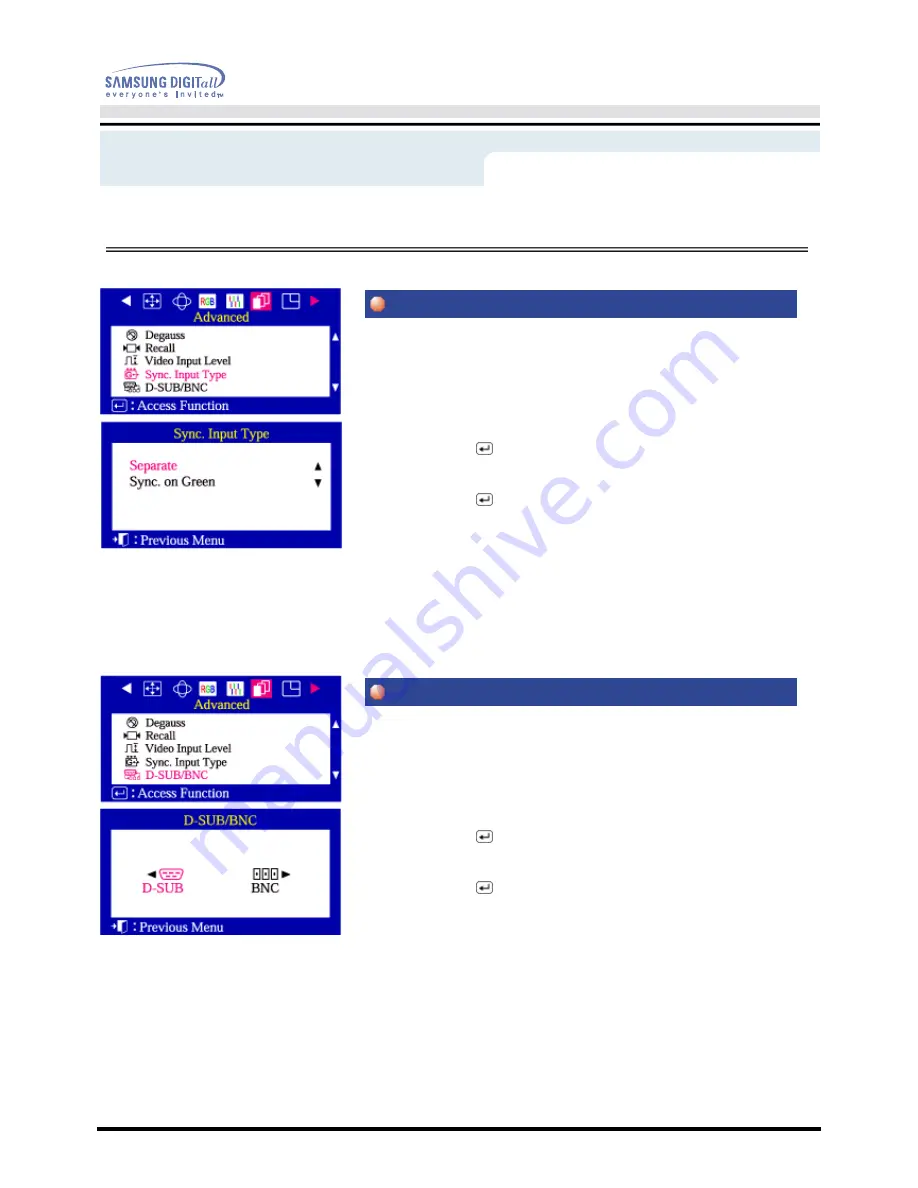
Use this menu to set your monitor to the correct type of synchronization. Select 
'Separate' if the computer is sending a separate synchronization signal. Select 
'Sync. on Green' if the computer expects the monitor to synchronize with the 
green signal it sends. Refer to your computer or video card user's manual to 
determine the correct setting.

1

Push the Menu (

) button. 

2

Push the 

button or

 button until the Advanced screen is displayed. 

Push the 

button or 

button to select Sync. Input Type. 

3

Push the Menu (

) button to open the Sync. Input Type

selection screen. 

4

Use the

 ▲

button or 

button to select Separate or Sync. on Green. 

Use this menu to choose between the signal source connected to the BNC 
connector input and the signal source connected to the D-SUB connector input. 
Note: When you are finished, wait for a few seconds and the screen will blank 
then display the image from the new signal source(other computer).
A cable must be connected to both inputs to use this function. 

1

Push the Menu (

) button. 

2

Push the

button or

 button until the Advanced screen is displayed. 

Push the 

button or 

button to select D-SUB/BNC. 

3

Push the Menu (

) button to open the D-SUB/BNC selection screen. 

4

Use the

button or

button to select D-SUB or BNC. 

     Menu          


How to adjust

D-SUB/BNC

Sync. Input Type

Summary of Contents for SyncMaster 210P PLUS

Page 1: ...SAMTRON 210P plus ...

Page 2: ... A Installation Self Test Feature Check Cleaning Other Introduction Specifications Unpacking General Specifications Front Preset Timing Modes Rear PowerSaver Bottom Setup Information Connecting Your Monitor Service Installing the Monitor Driver Terms Automatic Regulatory Manual Base Installation Authority ...

Page 3: ...n Other Failure to follow directions noted by this symbol could result in bodily harm or damage to equipment Prohibited Important to read and understand at all times Do not disassemble Disconnect the plug from the outlet Do not touch Grounding to prevent an electric shock ...

Page 4: ...ock or fire Do not pull the plug out by the wire nor touch the plug with wet hands z This may cause an electric shock or fire Use only a properly grounded plug and recepticle z An improper ground may cause electric shock or equipment damage Do not excessively bend the plug and wire nor place heavy objects upon them which could cause damage z Failure to do so may cause an electric shock or fire Dis...

Page 5: ... drop the monitor when moving it z This may cause damage to the product or human body Place the monitor on a flat and stable surface z The monitor can cause injury by falling Set down the monitor carefully z It could be damaged or broken Do not place the monitor face down z The CRT surface may be damaged Do not use the monitor without the monitor stand z It could break down or cause a fire due to ...

Page 6: ...ater before using Do not spray detergent directly on the monitor Use the recommended detergent with a smooth cloth z You can prevent the coated CRT from being damaged or the monitor cabinet from being dissolved cracked or discolored z You can buy a recommended detergent at any Samsung Service Center If the connector between the plug and the pin is dusty or dirty clean it properly with a dry cloth ...

Page 7: ...monitor z This may cause an electric shock or a fire For each hour of looking at the monitor you should let your eyes rest for 5 minutes z This will reduce eye fatigue Do not use or store inflammable substances near the monitor z This may cause an explosion or fire Do not try to move the monitor by pulling on the wire or the signal cable z This may cause a breakdown electric shock or a fire due to...

Page 8: ...Keep the monitor away from any magnetic substances z This may cause discoloring or distortion of the image ...

Page 9: ... include a stand attached Please make sure the following items are included with your monitor If any items are missing contact your dealer Power Cord Stand Signal Cable Quick Setup Guide Warranty Card Not available in all locations User s Guide and Driver Installation CD USB Hub Option ...

Page 10: ... OSD and activate a highlighted menu item 5 Power indicator This light glows green during normal operation and blinks green once as the monitor saves your adjustments 6 Power button Use this button to turn the monitor on and off Note See PowerSaver described in the manual for further information regarding power saving functions For energy conservation turn your monitor OFF when it is not needed or...

Page 11: ...the power cord for your monitor to the power port on the back of the monitor 2 Signal port Connect the signal cable to the 15 pin D sub connector on the back of your monitor 3 BNC Connectors Connect the signal cable to the BNC signal port on the back of your monitor Note See Connecting Your Monitor for further information regarding cable connections ...

Page 12: ...port Connect the signal cable to the video port on your computer video board video card or graphics card 2 Power port Connect the power cord for your monitor to the power port on the back of the monitor 3 Tilt Swivel Base You can separate the base from the monitor ...

Page 13: ...nnector on the back of your monitor Connect the signal cable to the video port on your computer video board video card or graphics card 3 If you are using a Macintosh computer connect the cable to a Macintosh adapter and set the pins on your adapter Adapter not included A PC compatible computer does not need an adapter 4 Connect the signal cable to the BNC signal port on the back of your monitor c...

Page 14: ...g system you have Prepare a blank disk and download the driver program file at the Internet web site shown here z Internet web site http www samtron com Windows ME 98 95 1 Insert CD into the CD ROM driver 2 Click Windows ME 98 95 Driver 3 Choose your monitor model in the model list then click the OK button 4 Click the Install button in the Warning window 5 Monitor driver installation is completed ...

Page 15: ...indow then click the Continue Anyway button Then click OK button This monitor driver is under certifying MS logo and this installation don t damage your system The certified driver will be posted on Samtron Monitor Homepage http www samtron com 6 Monitor driver installation is completed ...

Page 16: ...er Follow the directions as appropriate for the operating system you have Prepare a blank disk and download the driver program file at the Internet web site shown here z Internet web site http www samtron com Microsoft Windows XP Operating System 1 Insert CD into the CD ROM driver 2 Click Start Control Panel then click the Appearance and Themes Icon 3 Click Display icon and choose the Settings tab...

Page 17: ...t and click the Next button 8 If you can see following Message window then click the Continue Anyway button Then click OK button This monitor driver is under certifying MS logo and this installation don t damage your system The certified driver will be posted on Samtron Monitor Homepage http www samtron com 9 Click the Close button then click OK button continually ...

Page 18: ...ou can see the Digital Signature Not Found window then click the Yes button And click the Finish button then the Close button Case1 If the Properties button is inactive it means your monitor is properly configured Please stop installation Case2 If the Properties button is active click the Properties button then follow next steps continually Microsoft Windows Millennium Operating System 1 Click Sta...

Page 19: ...ck the appropriate monitor model and then click OK 6 Continue choosing Close button and OK button until you close the Display Properties dialogue box Version 4 00 950B 1 Click Start Settings Control Panel and then double click Display icon 2 In the Display Properties window click the Settings tab and then click Advanced Properties button 3 In the Advanced Display Properties window click the Monito...

Page 20: ...omputer 6 The next screen is for setting your monitor 7 First of all set a horizontal frequency for your monitor You can enter the frequency directly 8 Set a vertical frequency for your monitor You can enter the frequency directly 9 Enter the model name of your monitor This information will not affect the actual execution of X Window 10 You have finished setting up your monitor Execute X Window af...

Page 21: ...monitor for the most comfortable viewing angle Note The base is detachable Attaching the Base 1 Place the monitor upside down on a flat work surface 2 Align the tabs on the base with the corresponding slots on the bottom of the monitor 3 Press the base onto the monitor until the tabs are fully engaged in the slots 4 Push the base toward the front of the monitor until the release latch clicks into ...

Page 22: ... snap Removing the Base 5 Squeeze and pull up on the release latch on the base 6 Push the base toward the back of the monitor and lift up to remove the base Note The base will align with the monitor slots in only one position ...

Page 23: ... button Use this button to Exit the active menu or the OSD 2 3 Adjust buttons These buttons allow you to highlight and adjust items in the menu 4 Menu button Use this button to open the OSD and activate a highlighted menu item ...

Page 24: ...the brightness 3 Push the button to increase the contrast or the button to decrease the contrast 1 Push and hold in the Menu button for 10 seconds or more to Lock the OSD In this case even if you click the Menu button the control screen will not be printed 2 Push and hold in the Menu button for 10 seconds or more to UnLock the OSD Menu How to adjust Brightness Contrast OSD lock unlock ...

Page 25: ...ontal position of the monitor s viewing area Follow these instructions to change the size of the monitor s entire display 1 Push the Menu button 2 Push the button or button until the Position Size screen is displayed push the button or button to select Size 3 Push the Menu button to open the Size adjustment screen 4 Use the and Âbuttons to change the vertical size of the monitor s viewing area use...

Page 26: ... screen viewing area Use the button to enlarge the screen viewing area Adjust the parallelogram setting when the display is leaning left or right adjust the rotation setting when the entire display is tilted left or right 1 Push the Menu button 2 Push the button or button until the Geometry screen is displayed 3 Push the Menu button to open the Parallel Rotation adjustment screen 4 Use the button ...

Page 27: ...en the Pincushion Trapezoid adjustment screen 4 Use the button or button to adjust the pincushion setting Use the button or button to adjust the trapezoid setting Adjust the pinbalance setting when the sides of the display are bowed towards the left or right 1 Push the Menu button 2 Push the button or button until the Geometry screen is displayed Push the button or button to select Pinbalance 3 Pu...

Page 28: ...stment screen 4 Use the or buttons to adjust the SidePin Corner correction Adjust the Pinbalance Corner correction when the sides of the display are bowed in or bowed out adjust the side pinbalance corner correction when the top or bottom of the display is too large or small 1 Push the Menu button 2 Push the button or button until the Geometry screen is displayed Push the button or button to selec...

Page 29: ...ton to select R ed G reen or B lue then use the and buttons until you reach the desired color Color temperature is a measure of the warmth of the image colors The available range is between 5000 to 9300K Follow these steps to change the color temperature and adjust individual R G B color control Note Recall does not reset the color settings 1 Push the Menu button 2 Push the button or button until ...

Page 30: ...color temperature as close to the desired temperature as possible using only the and buttons To fine tune the color hue use the or button to select R ed G reen or B lue then use the and buttons until you reach the desired color A moire pattern can appear on your screen looking like a series of concentric circles or arcs To eliminate this pattern use the clear moire adjustments 1 Push the Menu butt...

Page 31: ...the button or button to adjust the vertical Linearity Use the focus control when the image displayed on the screen is not sharp in all areas 1 Push the Menu button 2 Push the button or button until the Screen OSD is displayed Push the button or button to select Focus 3 Push the Menu button to open the Focus adjustment screen 4 Use the button or button to adjust the focus along the left and right a...

Page 32: ...nce Use the button or button to adjust the vertical convergence The Degauss feature will remove color impurities caused by magnetic fields Do not use the Degauss feature more than once within a 30 minute period Note The monitor may buzz momentarily the image colors may change and the image will jiggle for a few seconds These effects are normal 1 Push the Menu button 2 Push the button or button unt...

Page 33: ... 3 Push the Menu button to open the recall selection screen 4 Push the button to select YES If you don t want to reset the monitor use the button to select NO Some video cards use video signals higher than 1 0V which causes the display to be very bright For those video cards use this feature to select the 1 0 V Level 1 Push the Menu button 2 Push the button or button until the Advanced screen is d...

Page 34: ...c Input Type selection screen 4 Use the button or button to select Separate or Sync on Green Use this menu to choose between the signal source connected to the BNC connector input and the signal source connected to the D SUB connector input Note When you are finished wait for a few seconds and the screen will blank then display the image from the new signal source other computer A cable must be co...

Page 35: ...the Menu screen is displayed 3 Push the Menu button to open the Display Timing adjustment screen 4 Use the button to see the user control mode and the default mode You can change the position where the OSD menu appears on your monitor 1 Push the Menu button 2 Push the button or button until the Menu screen is displayed Push the button or button to select Menu Position 3 Push the Menu button to ope...

Page 36: ...ault value Follow these steps to change the language used in the menu You can choose one of ten languages English German French Italian Portuguese Spanish Swedish Russian Polish or Magyar Some OSD languages may not appear in some areas The language chosen affects only the language of the OSD It has no effect on any software running on the computer 1 Push the Menu button 2 Push the button or button...

Page 37: ...en the signal from the video card exceeds the maximum resolution and frequency that the monitor can properly handle Adjust the maximum resolution and frequency that the monitor can properly handle There is no image on the screen Is the power indicator on the monitor blinking at 1 second intervals The monitor is in PowerSaver mode Press a key on the keyboard or move the mouse to activate the monito...

Page 38: ...n Is the frequency properly adjusted when checking the Display Timing on the menu Adjust the frequency properly by referring to the video card manual and the Preset Timing Modes The maximum frequency per resolution may differ from product to product There are only 16 colors shown on the screen The screen colors have changed after changing the video card Have the Windows colors been set properly Fo...

Page 39: ...the adapter video driver boot the computer in Safe Mode remove the Display Adapter at the Control Panel System Device Administrator and then reboot the computer to reinstall the adapter video driver Note If problems repeatedly occur contact an authorized service center D t d 60H h i th i l ti ...

Page 40: ...acturer for details How can I set the Power Saving function Windows 95 98 ME XP 2000 Set the function at BIOS SETUP of the computer or the screen saver Refer to Windows Computer Manual Windows 3 1 Set the function using the VGA Utility provided by the video card The monitor makes a sound when it is turned on This is normal as some sound may be generated when the metal case and the electromagnet wh...

Page 41: ...pears during normal operation if the video cable becomes disconnected or damaged 4 Turn off your monitor and reconnect the video cable then turn on both your computer and the monitor If your monitor screen remains blank after using the previous procedure check your video controller and computer system your monitor is functioning properly If there is something wrong with the input signal a message ...

Page 42: ...th the PC or the video card this can cause the monitor to become blank have poor coloring noise Sync Out of Range etc In this case first check the source of the problem and then contact a service center or your dealer z Judging the monitor s working condition If there is no image on the screen or an Sync Out of Range message comes up disconnect the cable from the computer while the monitor is stil...

Page 43: ...itive or negative Sync On Green Display Color Unlimited Maximum Pixel Clock 320MHz Power Supply 90 264VAC 60 50 Hz 3Hz Power Consumption 140W Maximum 125W Nominal Dimensions WxDxH 504 x 492 x 508mm with Stand Weight 26 1 kg Environmental considerations Operating Temperature 32 F 104 F 0 C 40 C Humidity 10 80 non condensing Storage Temperature 4 F 113 F 20 C 45 C Humidity 5 95 non condensing Plug a...

Page 44: ...hen it is not needed or when leaving it unattended for long periods The PowerSaver system operates with a VESA DPMS compliant video card installed in your computer Use a software utility installed on your computer to set up this feature State Normal Operation Power off Mode EPA ENERGY 2000 Power Indicator Green Green Blinking Power Consumption 125W Nominal 140W Maximum Less than 2W This monitor is...

Page 45: ...5 IBM 720 x 400 31 469 70 087 28 322 VESA 640 x 480 43 269 85 008 36 000 VESA 800 x 600 53 674 85 061 56 250 VESA 1024 x 768 68 677 84 997 94 500 VESA 1280 x 1024 79 976 75 025 135 00 VESA 1280 x 1024 91 146 85 024 157 50 VESA 1600 x 1200 106 250 85 000 229 50 Horizontal Frequency The time to scan one line connecting the right edge to the left edge of the screen horizontally is called Horizontal C...

Page 46: ... TS GERMANY TEL 49 0180 5121213 FAX 49 0180 5121214 DM 0 24 MIN SAMTRON TOKYO 17TH HAMACHO CENTER BLDG 2 31 1 NIHONBASHI HAMACHO CHOU KU TOKYO 103 JAPAN TEL 81 3 5641 9860 FAX 81 3 5641 9861 SAMTRON SWEDEN SAMSUNG ELECTRONICS SYENSKA AB BOX 713 S 194 27 UPPLANDS VÄSBY TEL 468 590 966 00 FAX 468 590 966 50 SAMTRON MEXICO SAMSUNG ELECTRONICS MEXICO S A DE C V Mina No 200 ESQ GAVILANCOL GUADALUPE DEL...

Page 47: ...Cycle is called Horizontal Frequency Unit kHz Interlace and Non Interlace Methods Showing the horizontal lines of the screen from the top to the bottom in order is called the Non Interlace method while showing odd lines and then even lines in turn is called the Interlace method The Non Interlace method is used for the majority of monitors to ensure a clear image The Interlace method is the same as...

Page 48: ...r s authority to operate the equipment If necessary consult your dealer or an experienced radio television technician for additional suggestions You may find the booklet called How to Identify and Resolve Radio TV Interference Problems helpful This booklet was prepared by the Federal Communications Commission It is available from the U S Government Printing Office Washington DC 20402 Stock Number ...

Page 49: ...essional use Your purchase has also contributed to reducing the burden on the environment and to the further development of environmentally adapted electronic products Why do we have environmentally labelled monitors In many countries environmental labelling has become an established method for encouraging the adaptation of goods and services to the environment The main problem as far as monitors ...

Page 50: ... co operative project between 3 logos Environmental Requirements Brominated flame retardants are present in printed circuit boards cables wires casings and housings In turn they delay the spread of fire Up to thirty percent of the plastic in a computer casing can consist of flame retardant substances These are related to another group of environmental toxins PCBs which are suspected to give rise t...

Page 51: ...internal and natural external environments Since all methods of electricity generation have a negative effect on the environment e g acidic and climate influencing emissions radioactive waste it is vital to save energy Electronics equipment in offices is often left running continuously and thereby consumes a lot of energy What does labelling involve The environmental demands has been developed by ...

Page 52: ...es that batteries may not contain any mercury It also demands that mercury is not present in any of the electrical or electronics components associated with the labelled unit There is however one exception Mercury is for the time being permitted in the back light system of flat panel monitors as today there is no commercially available alternative TCO aims on removing this exception when a Mercury...

Page 53: ...hing performance or use of this material SAMTRON and Samsung are the registered trademarks of Samsung Electronics Co Ltd Microsoft Windows and Windows NT are registered trademarks of Microsoft Corporation VESA DPMS and DDC are registered trademarks of Video Electronics Standard Association the ENERGY STAR name and logo are registered trademarks of the U S Environmental Protection Agency EPA As an ...

Reviews: