background image

ENG

RS

LS

C

L

SW

R

14

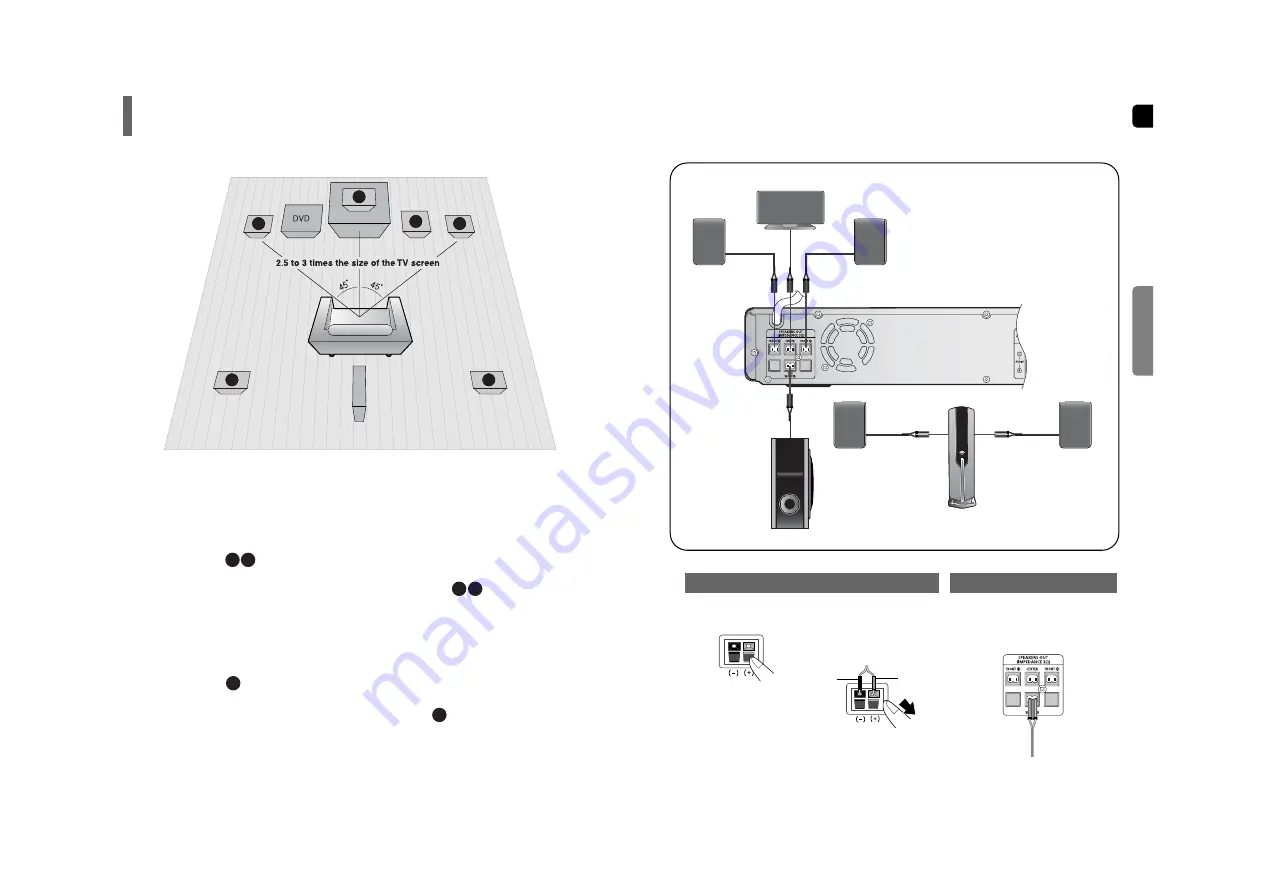
Rear Speakers

Place these speakers behind your listening position.

If there isn't enough room, place these speakers so they face each
other.

Place them about 60 to 90cm (2 to 3feet) above your ear, facing
slightly downward.

*

Unlike the front and center speakers, the rear speakers are used
to handle mainly sound effects and sound will not come from
them all the time.

Subwoofer

The position of the subwoofer is not so critical. 
Place it anywhere you like.

Front Speakers

Place these speakers in front of your listening
position, facing inwards (about 45°) toward you.

Place the speakers so that their tweeters will be at
the same height as your ear.

Align the front face of the front speakers with the
front face of the center speaker or place them
slightly in front of the center speakers.

Center Speaker

It is best to install it at the same height as the front
speakers.

You can also install it directly over or under the TV.

Position of the Home Theater

Place it on a stand, cabinet shelf, or under the
TV stand.

Selecting the Listening Position

The listening position should be located about 2.5 to 3
times the distance of the TV's screen size away from the
TV. Example: For 32" TVs 2~2.4m (6~8 feet)

For 55" TVs 3.5~4m (11~13 feet)

13

Before moving or installing the product, be sure to turn off the power and disconnect the power cord.

CONNECTIONS

R

L

C

SR

SL

SW

Connecting the Speakers

Make sure the colors of the speaker terminals
match the colors of the connecting plugs.

Black

Press down the terminal

tab on the back of the

speaker. 

1

Insert the black wire into
the black terminal (–) and
the gray wire into the gray
(+) terminal, and then
release the tab.

2

Connect the connecting plugs to
the back of the Home Theater.

3

Gray

Back of the Speakers

Back of the Main Unit

Front Speaker (R)

Subwoofer

Center Speaker

Front Speaker (L)

Purple

White

Gray

Blue

Red

Green

Wireless Rear

Speaker (R)

Wireless Rear

Speaker (L)

Wireless receiver module (SWA-4000)

(

With built-in wireless receiving antenna

)

Wireless receiver 

Summary of Contents for SWA-4000

Page 1: ...SYSTEM SWA 4000 Instruction Manual AH68 01713R V I D E O COMPACT DIGITAL AUDIO SAMSUNG ELECTRONICS AMERICA INC SERVICE DIVISION 400 Valley Road Suite 201 Mount Arlington NJ 07856 1 800 SAMSUNG 1 800 726 7864 www samsung com ...

Page 2: ...or other heat sources This could lead to overheating and malfunction of the unit The batteries used with this product contain chemicals that are harmful to the environment Do not dispose of batteries in the general household trash PREPARATION CLASS 1 LASER PRODUCT This Compact Disc player is classified as a CLASS 1 LASER product Use of controls adjustments or performance of procedures other than t...

Page 3: ...OWER LINES An outside antenna system should not be located in the vicinity of overhead power lines or other electric light or power circuits or where it can fall into such power lines or circuits When installing an outside antenna sys tem extreme care should be taken to keep from touching such power lines or circuits as contact with them might be fatal POLARIZATION This video product is equipped w...

Page 4: ...nents 19 Connecting the FM and AM Antennas 20 Before Using Your Home Theater 21 OPERATION Disc Playback 23 Selecting a Disc in the Disc changer 24 MP3 CD Playback 25 Displaying Disc Information 26 JPEG File Playback 27 DivX Playback 29 Playing a USB HOST 31 Checking the Remaining Time 33 Fast Slow Playback 34 Skipping Scenes Songs 34 Repeat Playback 35 A B Repeat Playback 36 Step Function 37 Angle...

Page 5: ...both low bit rate and high bit rate e g 32Kbps 320Kbps the sound may skip during playback A maximum of 500 tracks can be played per CD A maximum of 300 folders can be played per CD DVD Digital Versatile Disc offers fantastic audio and video thanks to Dolby Digital surround sound and MPEG 2 video compression technology Now you can enjoy these realistic effects in the home as if you were in a movie ...

Page 6: ...n COMPONENT VIDEO OUTPUT Connectors Connect a TV with component video inputs to these jacks AM Antenna Connector Video Cable AH39 40001V AM Antenna AH42 00019A Remote Control AH59 01506D FM Antenna AH42 00017A Accessories User s Manual AH68 01713R Wireless receiver module 10 Video Output Connector Connect the TV s video input jacks VIDEO IN to the VIDEO OUT connector DOLBY DIGITAL indicator P SCAN...

Page 7: ...o and to Use the correct type of batteries Batteries that look similar may differ in voltage Always replace both batteries at the same time Do not expose batteries to heat or flame PL II MODE button VOLUME button MENU button TV DVD POWER button TV indicator DISC SKIP button SLEEP button CANCEL button RETURN button Number 0 9 buttons MODE button TV VIDEO DIMMER button OPEN CLOSE button DVD RECEIVER...

Page 8: ...all it directly over or under the TV Position of the Home Theater Place it on a stand cabinet shelf or under the TV stand Selecting the Listening Position The listening position should be located about 2 5 to 3 times the distance of the TV s screen size away from the TV Example For 32 TVs 2 2 4m 6 8 feet For 55 TVs 3 5 4m 11 13 feet 13 Before moving or installing the product be sure to turn off th...

Page 9: ...finished If Power Standby mode continues repeat Steps 1 to 3 above 3 RESET Button Back of Wireless receiver module Back of Wireless receiver module Wireless Rear Speaker L Wireless Rear Speaker R Caution Caution Place the wireless receiver module at the rear of the listening position If the wireless receiver module is too close to the main unit some sound interruption may be heard due to interfere...

Page 10: ...able for dealing with moving objects Progressive Scan FULL FRAME What is Progressive or Non Interlaced Scanning This function works only on TVs equipped with component video inputs Y Pr Pb that support Progressive Video It does not work on TVs with conventional component inputs i e non progressive scan TVs Depending on the brand and model of your TV this function may not work Note 18 1 2 Choose on...

Page 11: ... Antenna supplied If AM reception is poor connect an outdoor AM antenna not supplied Example Digital signal components such as a Set Top Box or CD Recorder Analog signal components such as a VCR or TV Connecting an External Digital Analog Component Optical Cable not supplied Audio Cable If the external analog component has only one Audio Out connect either left or right External Digital Component ...

Page 12: ...icular DVD type is mentioned it is indicated separately Depending on the content of the disc the initial screen may appear different DVD Note 22 Your Home Theater is capable of playing DVD CD MP3 DivX and JPEG discs Depending on the disc you are using these instructions may vary slightly Read the instructions carefully before using Before Using Your Home Theater Groups and tracks DVD AUDIO DVD aud...

Page 13: ...r 2 Load a disc Place a disc gently into the tray with the disc s label facing up Depending on the content of the disc the initial screen may appear different Depending on the recording mode some MP3 CDs cannot be played Table of contents of a MP3 CD varies depending on the MP3 track format recorded on the disc 1 Press OPEN CLOSE button to open the disc tray 3 Press DISC SKIP button Rotate the car...

Page 14: ...e the button is pressed the display changes as follows DVD The information display disappears from the screen The information display disappears from the screen The information display disappears from the screen CD Something like you Back for good Love of my life More than words DVDRECEIVER SMARTNAVI appears on the TV screen If this symbol appears on the TV screen while buttons are being operated ...

Page 15: ...back Original Image Slide Mode 27 Place the JPEG disc on the disc tray Each time the button is pressed the slide moves backward or forward Press to skip to the next slide 1 Press the OPEN CLOSE button 2 Playback starts automatically Each time the button is pressed the image makes the transition as follows Press SLIDE MODE button 3 From top to bottom From bottom to top Rectangular shape in the cent...

Page 16: ...Supported Versions DivX3 11 5 1 V1 V2 V3 V7 DivX Digital internet video eXpress DivX is a video file format developed by Microsoft and is based on MPEG4 compression technology to provide audio and video data over the Internet in real time MPEG4 is used for video encoding and MP3 for audio encoding so that the users can watch a movie at near DVD quality video and audio 1 Supported Formats This prod...

Page 17: ...e than a file when you press the button the previous file is selected To play back the disc at a faster speed press and hold or during playback Each time you press and hold either button the playback speed will change as follows 2x 4x 8x 32x Normal OPERATION Compatible Devices 1 USB devices that support USB Mass Storage v1 0 USB devices that operate as a removable disk in Windows 2000 or later wit...

Page 18: ...y TITLE 01 05 CHAPTER 002 040 TITLE 01 05 CHAPTER 004 040 MP3 Something like you Back for good Love of my life More than words I need you My love Uptown girl DVDRECEIVER SMARTNAVI Something like you Back for good Love of my life More than words I need you My love Uptown girl DVDRECEIVER SMARTNAVI Something like you Back for good Love of my life More than words I need you My love Uptown girl DVDREC...

Page 19: ...tedly plays the selected title GROUP Repeatedly plays the selected group RANDOM Plays tracks in random order A track that has already been played may be played again TRACK Repeatedly plays the selected track DIR Repeatedly plays all tracks in the selected folder DISC Repeatedly plays the entire disc OFF Cancels Repeat Playback Repeat Playback Options Note OPERATION DVD CD MP3 JPEG To Select a Repe...

Page 20: ...n to move to ANGLE display Press INFO button 1 3 Each time the button is pressed the angle changes as follows 3 Press Cursor or numeric buttons to select the desired angle 2 3 3 3 1 3 1 3 The Angle function works only with discs on which multiple angles have been recorded Note Note OPERATION EZ VIEW OFF EZ VIEW SELECT ZOOM POSITION Step Function This function allows you to enlarge a particular are...

Page 21: ...UNING CH button on the remote control DVD AUDIO Bonus Group Navigating Pages 40 39 OPERATION Depending on the number of languages on a DVD disc a different audio language ENGLISH SPANISH FRENCH etc is selected each time the button is pressed 2 Press Cursor buttons or numeric buttons to select the desired audio language 1Press INFO button twice SP 2 3 FR 3 3 EN 1 3 EN 01 03 OFF SP 02 03 FR 03 03 OF...

Page 22: ...umeric buttons You can press on the remote control to move directly to the desired title chapter or track Depending on the disc you may not be able to move to the selected title or time 41 Note OPERATION Moving Directly to a Scene Song 2 Press Cursor button to move to Title Menu DVD 1 In Stop mode press MENU button 3 Press ENTER button The title menu appears Press MENU button to exit the setup scr...

Page 23: ...the language was set to English OSD will be displayed in English 3 Selecting the Subtitle Language recorded on the disc Selecting the Disc Menu Language recorded on the disc Select Language and then press ENTER button 5 Press Cursor button to select OSD Language and then press ENTER button Press Cursor button to select the desired language and then press ENTER button Press RETURN button to return ...

Page 24: ...n different screen size you should adjust the aspect ratio to fit your TV or monitor For a standard TV select either 4 3LB or 4 3PS option according to personal preference Select 16 9 if you have a widescreen TV Select this to view a 16 9 picture in the full screen mode on your widescreen TV You can enjoy the widescreen aspect Select this to play a 16 9 picture in the letter box mode on a conventi...

Page 25: ...NTER button Use this to restrict playback of adult or violent DVDs you do not want children to view Setting Parental Controls Rating Level 4 Enter the old password a new password and confirm new password The setting is complete 3 5 Press Cursor button to move to PASSWORD and then press ENTER button Press ENTER button Enter the password and then press ENTER button 2 1 Press MENU button Press Cursor...

Reviews: