background image

GB

9

GB

8

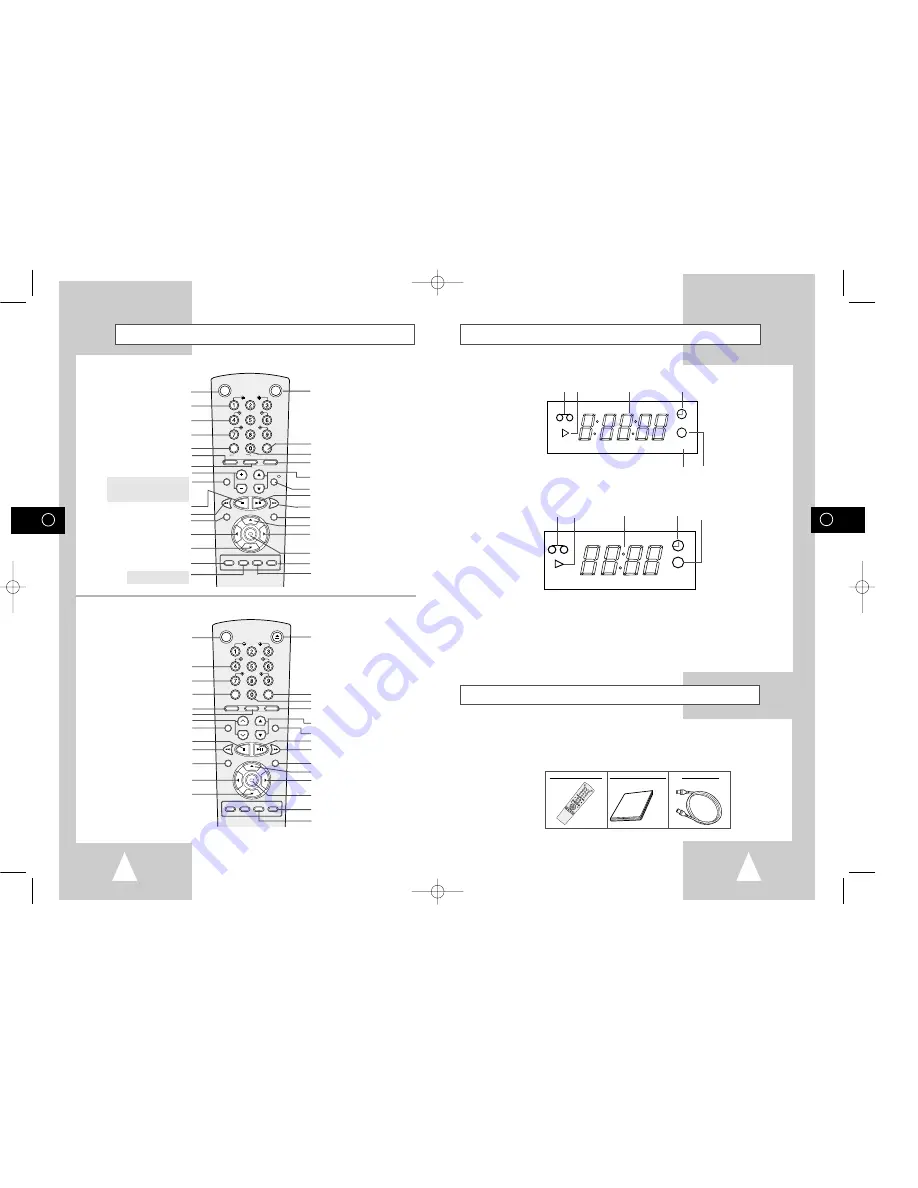
Accessories

You have just purchased a SAMSUNG Video Cassette Recorder (VCR).
Together with your VCR, you will find the following accessories in the box.

O

K

ST

AN

DB

Y/O

N   


EJ

EC

T

SL

O

W

SH

UT

TLE

V-L

OC

K

CL

R/R

ST


 F.A

DV


   IN

DE

X

A.T

RK


      I

PC


    IN

PU

T

RE

PE

AT

TR

K  


   P

RO

G

AU

DIO

RE

C


 M

EN

U

 SP

EE

D    

      D

UB


  TV

/VC

R    

   T

IM

ER

DIS

PL

AY

REMOTE CONTROL

OWNER’S INSTRUCTIONS

COAXIAL CABLE

Infrared Remote Control

OK

STANDBY/ON                                             EJECT

SLOW

SHUTTLE

V-LOCK

CLR/RST       F.ADV          INDEX

A.TRK                  IPC                INPUT

REPEAT

TRK          PROG

AUDIO

REC

      MENU

 SPEED          DUB        TV/VCR       TIMER

DISPLAY

EJECT BUTTON

INDEX BUTTON

FRAME ADVANCE BUTTON

TUNER, LINE IN 1, LINE IN 2 SELECTION / 
REPEAT SELECTION BUTTON

PROGRAMME SELECTION BUTTON

DISPLAY BUTTON

PLAY/PAUSE/STILL BUTTON

FAST-FORWARD/FORWARD 
SEARCH BUTTON

MENU BUTTON

MENU SELECTION UP BUTTON

MENU SELECTION BUTTON

OK BUTTON

TIMER BUTTON

TV/VCR SELECTION BUTTON

(SV-H620K/SV-H80K)

(SV-H30K)

OK

VCR STANDBY/ON                                                  TV STANDBY/ON

SLOW

SHUTTLE

V-LOCK

CLR/RST       F.ADV          INDEX

TV                  VCR                INPUT

REPEAT

VOL         PROG/TRK

AUDIO

REC

      MENU

 SPEED          DUB        TV/VCR       TIMER

DISP./

SELECT

-/--

VCR STANDBY/ON BUTTON

SLOW BUTTON

SHUTTLE BUTTON

V-LOCK BUTTON

CLEAR AND RESET BUTTON

TV BUTTON

VCR BUTTON

VOLUME BUTTONS

AUDIO MODE SELECTION BUTTON

(SV-H620K ONLY)

AUDIO MUTE BUTTON

(SV-H80K ONLY)

STOP BUTTON

REWIND/REVERSE PICTURE SEARCH BUTTON

RECORD BUTTON

MENU SELECTION BUTTON

MENU SELECTION DOWN BUTTON

RECORDING SPEED SELECTION BUTTON

AUDIO DUBBING BUTTON

(SV-H620K ONLY)

TV STANDBY/ON BUTTON

INDEX BUTTON

FRAME ADVANCE BUTTON

TUNER, LINE IN 1, LINE IN 2 SELECTION /
REPEAT SELECTION BUTTON

PROGRAMME SELECTION /
TRACKING BUTTONS

DISPLAY BUTTON

PLAY/PAUSE/STILL BUTTON

FAST-FORWARD/FORWARD 
SEARCH BUTTON

MENU BUTTON

MENU SELECTION UP BUTTON

MENU SELECTION BUTTON

OK BUTTON

TIMER BUTTON

TV/VCR SELECTION BUTTON

STANDBY/ON BUTTON

SHUTTLE BUTTON

V-LOCK BUTTON

CLEAR AND RESET BUTTON

AUTO TRACKING BUTTON

IPC BUTTON

TRACKING BUTTONS

AUDIO MUTE BUTTON

STOP BUTTON

REWIND/REVERSE PICTURE 

SEARCH BUTTON

RECORD BUTTON

MENU SELECTION BUTTON

MENU SELECTION DOWN BUTTON

Display Indicator

Cassette loaded indicator
PLAY indicator
3  Multi-function display
4  Timer indicator
REC indicator 

STEREO indicator

VIDEO

STEREO

STEREO

6

1

2

3

4          5

1

2

3

4

(SV-H620K)

(SV-H80K/SV-H30K)

01823S SV-H620K/DIN-GB1  3/21/03 5:02 PM  Page 8

Summary of Contents for SV-H620K

Page 1: ...VIDEO CASSETTE RECORDER SV H620K SV H80K SV H30K Instruction Manual www samsungvcr com GB F PAL SECAM 01823S SV H620K DIN GB1 3 21 03 5 02 PM Page 1 ...

Page 2: ...e Recording Speed SV H620K SV H80K Only 24 NICAM SV H620K Only 25 Protecting a Recorded Cassette 26 Recording a Programme Immediately 26 Recording a Programme with Automatic Stop 27 Using the Timer Programming Feature 28 Checking a Preset Recording 29 Cancelling a Preset Recording 29 GB 2 About this manual Thank you for purchasing a Samsung Video Cassette Recorder VCR Your Owner s Instructions con...

Page 3: ...anually 30 Intelligent Picture Control 31 Intelligent Picture Control SV H30K Only 31 Format 16 9 WIDE SCREEN 32 Selecting the Colour Mode 32 Selecting the Audio Output Mode SV H620K Only 33 Selecting the Audio Mute Mode SV H80K SV H30K Only 33 SEARCHING FOR A SEQUENCE Playing a Cassette in Slow Motion 34 Playing a Sequence Frame by Frame 34 Picture Search Fast Forward Rewind 35 Playing a Sequence...

Page 4: ...UT SOCKET AUX AUDIO L R INPUT SOCKETS SHARPNESS BUTTONS TRACKING BUTTONS INPUT SELECTION BUTTON RECORDING SPEED SELECTION BUTTON SV H80K REC PROG EJECT STANDBY ON STOP RE W F F PLAY VIDEO AUDIO AUX PROGRAMME SELECTION BUTTONS AUX VIDEO AUDIO INPUT SOCKETS VIDEO CASSETTE COMPARTMENT EJECT BUTTON PLAY BUTTON SHUTTLE RING SHUTTLE RING STANDBY ON BUTTON STOP BUTTON RECORD BUTTON SV H30K EJECT STANDBY ...

Page 5: ...CT VCR STANDBY ON BUTTON SLOW BUTTON SHUTTLE BUTTON V LOCK BUTTON CLEAR AND RESET BUTTON TV BUTTON VCR BUTTON VOLUME BUTTONS AUDIO MODE SELECTION BUTTON SV H620K ONLY AUDIO MUTE BUTTON SV H80K ONLY STOP BUTTON REWIND REVERSE PICTURE SEARCH BUTTON RECORD BUTTON MENU SELECTION BUTTON MENU SELECTION DOWN BUTTON RECORDING SPEED SELECTION BUTTON AUDIO DUBBING BUTTON SV H620K ONLY TV STANDBY ON BUTTON I...

Page 6: ... In Audio system Camcorder Other VCR SV H620K Only AUX Front Audio Video RCA In Audio system Camcorder Other VCR SV H80K SV H30K Only Audio output Rear Audio RCA Out Audio Hi Fi system SV H620K Only OUT TO TV Rear 75 Ω Out Television coaxial IN FROM ANT Rear 75 Ω In Aerial coaxial Cable television network Satellite receiver Whenever you connect an audio or video system to your VCR ensure that all ...

Page 7: ...e AV2 DEC EXT socket on the rear of the VCR After making this connection select the source by pressing the INPUT button for the AV2 input sources 2 By means of RF Coaxial Cable After making this connection you must preset the station received through the satellite tuner Satellite Receiver or other Equipment AV1 EURO AV Antenne Aerial Connector 2 TV AV2 DEC EXT AV1 EURO AV R D L G AUDIO OUT SORTIE ...

Page 8: ...clear store this channel at the desired programme position on the television Result That programme is now reserved for use with your VCR SV H620K SV H80K SV H30K OK REC MENU 4 VCRSTANDBY ON S STANDBY ON S 2 2 Plug Auto Set Up TV TV AV2 DEC EXT AV1 EURO AV R D L G AUDIO OUT SORTIE 2 AUTO SET UP PLEASE WAIT 60 I I END MENU CLOCK TUE 12 00 1 JAN 2002 END MENU Your VCR will automatically set itself up...

Page 9: ...atically stop programme recording Preset your VCR to record a programme automatically You must set the date and time when The power supply remains off for more than 1 hour SV H620k only The power supply remains off for more than 30 sec SV H80K SV H30K only Do not forget to reset the time when you change clocks from winter to summer time and vice versa 1 Press MENU on the remote control Result The ...

Page 10: ...MANUAL SET UP TV SYSTEM K VCR OUTPUT CH CH36 END MENU GB 18 Your VCR output channel may need to be changed if the pictures suffer from interference or if your TV cannot find the pictures Also you can change the VCR output channel to adjust the frequency in which information is displayed on the screen 1 Press MENU on the remote control Result The programming menu is displayed 2 Press the correspond...

Page 11: ... MANUAL TUNING menu is displayed 8 Press the corresponding or buttons until the CH is selected Press the or buttons to start scanning Result The frequency band is scanned and the first station found is displayed If you know the number of the channel you want press the numeric buttons on the remote control for example for channel E21 first press 0 and then press 2 1 see page 46 9 Press the button u...

Page 12: ...the OK button to select this option Result The INSTALLATION menu is displayed 4 Press the corresponding or buttons until the MANUAL SET UP option is selected And then press the button to select this option Result The TV STATION TABLE menu is displayed 5 Press the corresponding or buttons until the required preset TV programme is selected Result The selected station is displayed at the same time on...

Page 13: ...isplayed In long play mode LP is displayed OPTIONS OSD ON TAPE SELECT E180 COLOUR SYSTEM AUTO FORMAT 16 9 AUTO IPC ON END MENU USER SET PROG OPTIONS INSTALL CLOCK BONUS LANG OK END MENU OPTIONS NICAM SV H620K Only NICAM programmes are divided into 3 types NICAM Stereo NICAM Mono and Bilingual transmission in another language NICAM programmes are always accompanied by a standard mono sound broadcas...

Page 14: ...AT RK PROG DISPLA 4 4 4 4 SV H620K SV H80K SV H30K Recording a Programme Immediately Protecting a Recorded Cassette Video cassettes have a safety tab to prevent accidental erasure When this tab has been removed you cannot record on the tape 1 If you wish to protect a cassette break off the tab using a small screwdriver 2 To re record over a protected cassette safety tab broken cover the hole with ...

Page 15: ...lect the recording start time 7 Select the required hour value by pressing the or buttons 8 Press to select the minutes 9 Select the required minute value by pressing the or buttons 10 Press to select the recording end time 11 Select the required recording end time by pressing the or buttons following the same procedure as when selecting the recording start time With SV H620K SV H80K you can selec...

Page 16: ...button again Intelligent Picture Control SV G35K SV G30K Only OPTIONS OSD ON TAPE SELECT E180 COLOUR SYSTEM AUTO FORMAT 16 9 AUTO IPC ON END MENU CLR RST F ADV INDEX A TRK IPC INPUT REPEAT TRK PROG AUDIO DISPLAY 1 PICTURE IPC OFF SOFTEN SHARPEN ON OFF USER SET PROG OPTIONS INSTALL CLOCK BONUS LANG OK END MENU OPTIONS This function allows you to play back any pre recorded cassette 1 Switch on both ...

Page 17: ...corresponding or buttons until the FORMAT 16 9 option is selected 5 Press the button to select AUTO ON OFF AUTO Set when you use a wide TV The VCR detects wide TV programmes and normal TV programmes automatically when playing back and recording ON The VCR always plays back and records in the mode compatible with 16 9 wide screen Set if the VCR cannot detect wide TV programmes with AUTO set OFF Set...

Page 18: ... can Stop the cassette at a given frame image Advance one frame at a time No sound is heard when playing back frame by frame 1 Press II to start playing the cassette II to stop the tape at a given frame F ADV to advance frame by frame 2 To return to normal playback press II When you have been using the Frame by Frame function for more than about five minutes the VCR will auto matically play to pro...

Page 19: ...arding you press the or button the VCR will enter the Picture Search mode Playing a Sequence at Variable Speeds SLOW SHUTTLE V LOCK CLR RST F ADV INDEX You can vary the playback speed using the Shuttle function up to nine times the normal speed Example You wish to analyze a sportsperson s technique movement by movement The Shuttle function is available on the Remote control Front panel of the VCR ...

Page 20: ...s II Index Skip Search This feature will enable you to fast forward rewind to a specific point on a tape E g if you have recorded 3 different programmes on a tape and you have rewound the tape to the beginning by using this feature you can go directly to the start of programme 2 simply by pressing the INDEX button 1 Press the INDEX to start the Index search 2 Press the or buttons twice more This w...

Page 21: ...a cassette is inserted in the VCR Allows you to find the beginning of a sequence easily If the remaining time is to be calculated correctly you must indicate the type of cassette being used 1 Insert a cassette in your VCR 2 To set the tape counter to zero at the beginning of a sequence Press DISP or DISPLAY twice to display the counter Press CLR RST when you want to set the tape counter to zero 3 ...

Page 22: ...he appropriate input on your VCR AV1 or AV2 for the SCART input AUX for the RCA input 5 Start playing back the cassette to be copied 6 Hold REC down for a while to start recording on your VCR 7 When you have finished recording press on both VCRs If you wish to view the cassette being copied Your VCR must be connected as usual to the television see page 11 for further details F ADV OK REC MENU OK R...

Page 23: ...14 22 to 24 GRUNDIG 09 17 21 SONY 15 16 LOEWE 02 THOMSON 13 14 24 PANASONIC 08 23 to 27 TOSHIBA 07 16 to 19 21 Result If your television is compatible with the remote control it is switched off It is now programmed to operate with the remote control If several codes are indicated for your television brand try each one in turn until you find one that works When you change the batteries in the remot...

Page 24: ...erial plug into the socket marked aerial symbol on the rear of the VCR 5 Re tune your TV to the VCR again by following instructions Tuning Your Television for the VCR page 15 6 If the problem still exists repeat steps 1 to 5 moving several more channels away from the original setting If you are unable to solve the problem after reading the above instructions note The model and serial number on the...

Page 25: ... E69 UHF 855 25 CCIR 071 X V L 69 25 CCIR 072 Y V L 76 25 CCIR 073 Z V L 83 25 CCIR 074 Z 1 V L 90 25 CCIR 075 Z 2 V L 97 25 CCIR 101 S01 V L 105 25 CCIR 102 S02 V L 112 25 CCIR 103 S03 V L 119 25 CCIR 104 S04 V L 126 25 CCIR 105 S05 V L 133 25 CCIR 106 S06 V L 140 25 CCIR 107 S07 V H 147 25 CCIR 108 S08 V H 154 25 CCIR 109 S09 V H 161 25 CCIR 110 S10 V H 168 25 CCIR 111 S11 V H 231 25 CCIR 112 S1...

Reviews: