background image

ENG-26

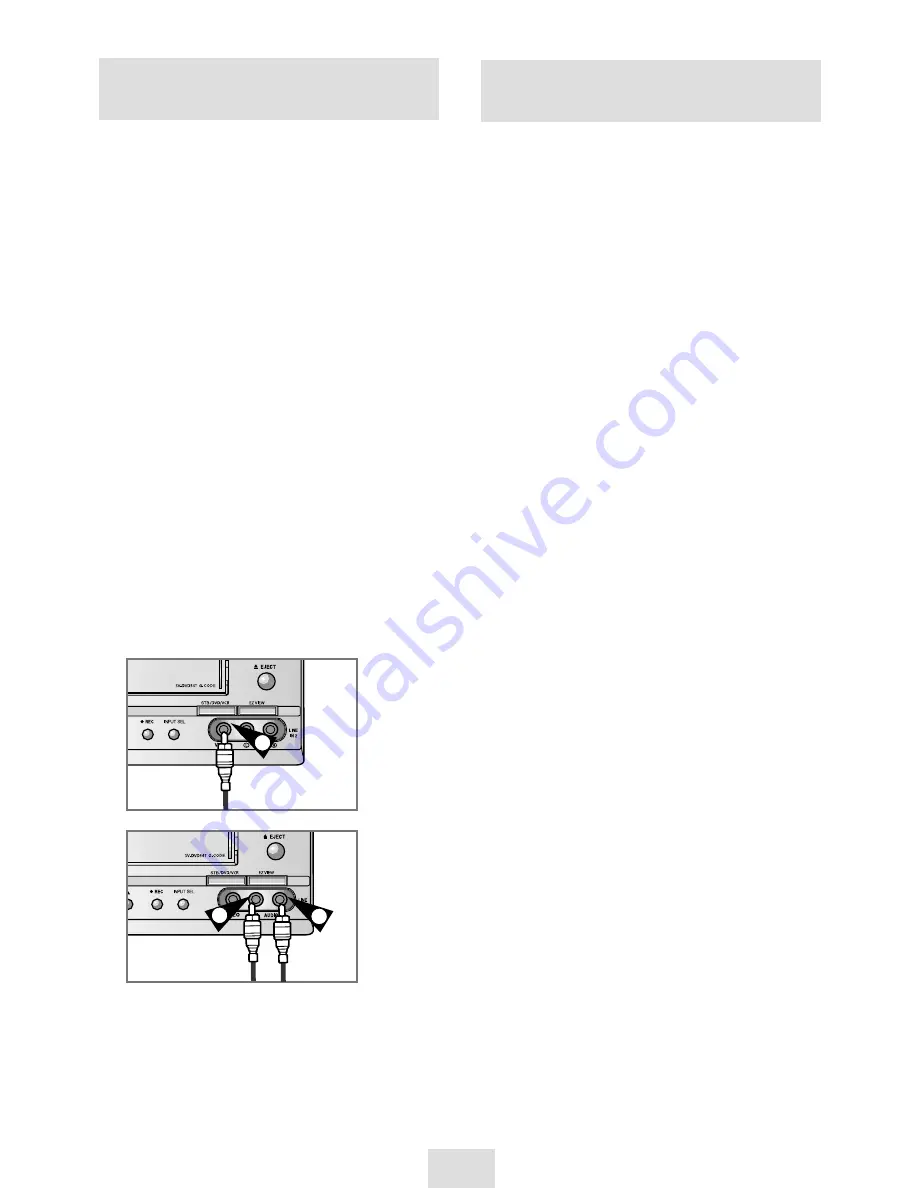
Connecting an RCA Audio/Video
Input Cable 

You can connect other audio/video equipment to your
STB-DVD-VCR using audio/video cables if the
appropriate outputs are available on the equipment
chosen.

Examples:

You wish to copy a video cassette with 

the help of a second VCR.

You wish to play back and/or copy 

pictures taken with a camcorder .

Make sure that both the television and the STB-DVD-
VCR are switched off before connecting the cables.

1

Connect one end of the RCA video cable into 
the VIDEO INPUT socket on the front of the STB-DVD-
VCR.

2

Plug the other end of the video cable into the 
appropriate output connector on the other system 
(VCR or camcorder).

3

Connect one end of the RCA audio cable supplied 
into the AUDIO INPUT sockets on the front of the 
STB-DVD-VCR.

➢  

Take care to respect the colour coding of the 

left and right channels.

4

Plug the other end of the audio cable into the 
appropriate output connectors on the other system 
(VCR, camcorder or Hi-Fi sound system).

1

3

3

Recording from Another VCR or
Camcorder

You can copy a cassette to your STB-DVD-VCR from
another video source, such as another VCR or a
camcorder.

It is an infringement of copyright laws to copy 
prerecorded cassettes or to re-record them in any 
form without the permission of the owners of the 
corresponding copyright.

1

Connect the other audio/video equipment, from
which the cassette is to be copied, to the
appropriate RCA audio and video input connectors
on the front of your STB-DVD-VCR, as indicated on
page 26.

2

Insert a blank cassette in your STB-DVD-VCR.

3

Insert the pre-recorded cassette in the other video 
source (VCR or camcorder).

4

Press the INPUT SEL. button to select the 
appropriate input on your STB-DVD-VCR: 

LINE 2 for the front RCA input and LINE 1 for
the rear RCA input.

5

Start playing back the cassette to be copied.

6

Hold REC (

) down for a while to start recording 

on your STB-DVD-VCR.

7

When you have finished recording, press 

on 

both other audio/video equipment and STB-DVD-
VCR.

If you wish to view the cassette being copied:

Your STB-DVD-VCR must be connected as
usual to the television (see page 7 for further
details)

Summary of Contents for SV-DVD54T

Page 1: ...PAL www samsung com STB DVD VCR SV DVD54T Instruction Manual ...

Page 2: ...Remote Control Overview ...

Page 3: ...DVD VCR Output Channel 14 Selecting the Colour Mode 14 Intelligent Picture Control 15 G Code Extend 15 Auto Power off 16 Screen Messages 16 Selecting the Cassette Type 17 Repeat Play 17 Recording Television Broadcasts Selecting the Recording Speed 17 Protecting a Recorded Cassette 17 Recording a Programme Immediately 18 Recording a Programme with Automatic Stop 18 Using the G Code Feature 19 Modif...

Page 4: ...Selecting the Subtitle Language 36 Repeat Play 37 Selecting the Audio Language 37 Using the Mark Function 38 MP3 WMA Play 38 Picture CD Playback 39 STB Functions Main Menu 41 Volume Control 41 Select Soundtrack 41 Select Videotrack 42 Service Favorites 42 Program Information 42 Subtitle 42 Teletext VBI 43 Installation 43 Channel Organising 44 Parental Lock 45 System Setup 46 Solving Problems Techn...

Page 5: ... During a storm and or lightning unplug the STB DVD VCR from the mains socket and aerial If the remote control is not used for a long period of time remove the batteries and store it in a cool dry place THIS DEVICE IS NOT FOR USE IN INDUSTRIAL ENVIRONMENTS This product incorporates copyright protection technology that is protected by method claims of certain U S patents and other intellectual prop...

Page 6: ...tics 12 Cm 8 Cm Single sided 240 min Double sided 480 min Single sided 80 min Double sided 160 min Audio Video AUDIO CD DVD DVD contains excellent sound and video due to Dolby Digital and MPEG 2 system Various screen and audio functions can be easily selected through the on screen menu 74 min 20 min 12 Cm 8 Cm Audio An LP is recorded as an analog signal with more distortion CD is recorded as a Dig...

Page 7: ... SOCKET 5 OUT TO TV SOCKET 6 LINE IN1 LINE OUT COMPOSITE 7 S AUDIO OUT SOCKETS 8 S VIDEO OUT SOCKET 9 DIGITAL AUDIO OUT SOCKET OPTICAL 10 RS 232 SOCKET 11 ANT OUT SOCKET 5 6 7 8 9 10 11 1 2 3 4 1 DVD DECK 2 OPEN CLOSE BUTTON 3 VIDEO CASSETTE COMPARTMENT 4 EJECT BUTTON 5 STANDBY ON BUTTON 6 REW SKIP BACK BUTTON 7 STOP BUTTON 8 PLAY STILL BUTTON 9 F F SKIP NEXT BUTTON 10 PROGRAMME SELECTION BUTTON 1...

Page 8: ... A DVD CD is loaded 3 The time counter position time remaining or current deck status is displayed 4 VHS tape is inserted 5 The VCR Deck is active 6 3D sound 7 DTS disc 8 STEREO indicator 9 REC Mode 10 A Timer Recording is programmed or in progress 1 2 3 4 5 6 TV 1 Connecting STB DVD VCR to the TV using the RCA Cable You can connect your STB DVD VCR to the television using the RCA cable if any app...

Page 9: ...tion possibilities The RCA input output connectors on the rear of the STB DVD VCR are used for equipment such as camcorders VCRs or sound systems REAR OF THE STB DVD VCR Camcorder VCR Sound system To receive television programmes a signal must be received from one of the following sources An outdoor aerial An indoor aerial A cable television network A satellite receiver Make sure that both the tel...

Page 10: ...VD VCR by pressing STANDBY ON on the front of the STB DVD VCR or STANDBY ON on the remote control 3 Select a programme position on the television to be reserved for use with your STB DVD VCR 4 Insert the video cassette in the STB DVD VCR Check that the STB DVD VCR starts playing the cassette if not press II button 5 Start tuning your television or set the television to UHF channel 38 6 Fine tune t...

Page 11: ...ou purchase the STB DVD VCR Do not forget to reset the time when you change clocks from winter to summer time and vice versa 1 After pressing the MENU press the OK or Result The Setup menu is displayed 2 Press the corresponding buttons to select the Clock option 3 Press the OK or to select this option Result The Clock Set menu is displayed 4 Press or to select the hour minutes day month and year R...

Page 12: ...al Setup Install 4 Press the corresponding or buttons until the Auto Setup is selected And then press the OK or to select this option Result The Please Wait indication highlight on the television screen The first frequency band is scanned and the first station found is displayed and stored The STB DVD VCR then searches for the second station and so on When the automatic scanning procedure has fini...

Page 13: ...requency band and display the next station Go back to the beginning of Step 9 13 Repeat this procedure from Step 6 onwards until all the required stations have been stored 14 On completion press the RETURN button three times to exit the menu Presetting the Stations Manually You do not need to preset the stations manually if you have already set them automatically 1 After pressing the MENU press th...

Page 14: ...tion Table and give different programme numbers to the stations listed according to your own preferences 1 After pressing the MENU press the OK or Result The Setup menu is displayed 2 Press the corresponding buttons to select the Install option 3 Press the OK or buttons to select this option Result The Install menu is displayed PR CH NAME 1 27 2 3 4 5 TV STATION TABLE SWAPPING OK DELETE CLEAR RETU...

Page 15: ...d 5 Select the required output channel CH28 CH69 by pressing the OK or buttons CH28 CH38 CH69 6 On completion press RETURN to exit the menu Then tune your television again see page 9 Before recording or playing back a cassette you can select the required system standard Otherwise the system automatically selects the reception standard when you select AUTO When playing back a cassette the standard ...

Page 16: ...anually press the button to turn the IPC mode OFF 8 Press the or buttons until the picture is displayed according to your preferences If you do not press a button within ten seconds the PICTURE menu disappears automatically 9 On completion press RETURN three times to exit the menu You can use the IPC function with ease by using the ANGLE key on the REMOCON To prevent delays or over runs the STB DV...

Page 17: ...es On Install Auto Power Off Off Off 1Hour 2Hour 3Hour Your STB DVD VCR displays most information both on the STB DVD VCR and the television You can choose to display or hide this information on the television screen except for the SEARCH Programming MENU and Timer functions which cannot be hidden 1 After pressing the MENU press the OK or Result The Setup menu is displayed 2 Press the correspondin...

Page 18: ...hours E 260 260 mins or 4 hours and 20 mins E 300 300 mins or 5 hours Selecting the Cassette Type Repeat Play If you wish to use the tape counter to display the time remaining on a cassette you must indicate the type of cassette inserted 1 After pressing the MENU press the corresponding buttons to select the VCR option 2 Press the OK or buttons to select this option Result The VCR Setup menu is di...

Page 19: ... function key is not operated for Play FF REW on STB view Recording a Programme with Automatic Stop This function enables you to record up to nine hours LP of programmes Your STB DVD VCR stops automatically after the requested length of time 1 Switch on the television 2 To monitor the programme being recorded select the television channel reserved for use with your STB DVD VCR or the LINE input if...

Page 20: ...e with stored stations the programme number flashes This one time you must enter the station number manually by pressing the or buttons Refer to the following page if Before presetting your STB DVD VCR Switch on both the television and your STB DVD VCR Check that the date and time are correct Insert the cassette on which the programme is to be recorded safety tab intact Up to six programmes can be...

Page 21: ... changing any other value Record a programme every day Press the or buttons until the DAY selection flashes Monday to Sunday at the same time Press the or buttons until the DLY Daily value is displayed Record a programme every week Press the or buttons until the DAY selection flashes on the same day and at the same time Press the or buttons until the W Week value is displayed followed by the requi...

Page 22: ...ill be recorded 1 Press TIMER on the remote control Result The timer selection is displayed 2 Press the OK button to select Standard option Result The TIMER PROGRAMMING menu is displayed 3 Press the or buttons to select the required programme 4 Press the or buttons to select and change any values as required For more details refer to the previous page 5 On completion press RETURN twice Standard G ...

Page 23: ...rded in Hi Fi the sound switches to Hi Fi after five seconds of Mono To select the sound mode simply press the AUDIO button on the remote control until the required option is displayed The selection of audio output is impossible on STB view Adjusting Picture Alignment Manually The Picture Adjustment feature allows you to adjust the alignment manually to obtain the best possible picture When noise ...

Page 24: ...ed Example You wish to analyze a sportsperson s technique movement by movement The Shuttle function is available on the Remote control No sound is heard when playing a sequence at variable speeds 1 Press ll during playback 4 buttons to play the cassette backwards 6 buttons to play the cassette forwards 2 Each time you press a the 4 or 6 buttons the speed is changed as shown in the following illust...

Page 25: ...ex and start playback from that point Depending on the direction selected the indexes are numbered as follows 2 1 1 2 etc Prev Seq Seq being played Next Seq etc STB End Search Use this feature when you want to search for a blank position to record a program on a cassette The VCR will fast forward searching for a blank position and then automatically stop at that position If the VCR reaches the end...

Page 26: ...ges mode refer to page 16 Press INFO Once to display the current function programme number recording speed date time and counter Twice to display the counter only Three times to display the time remaining on the cassette Four times to clear the display Using the Tape Counter Index Skip Search This feature will enable you to fast forward rewind to a specific point on a tape E g if you have recorded...

Page 27: ...or Hi Fi sound system 1 3 3 Recording from Another VCR or Camcorder You can copy a cassette to your STB DVD VCR from another video source such as another VCR or a camcorder It is an infringement of copyright laws to copy prerecorded cassettes or to re record them in any form without the permission of the owners of the corresponding copyright 1 Connect the other audio video equipment from which the...

Page 28: ...3 14 24 PANASONIC 08 23 to 27 TOSHIBA 07 16 to 19 21 Result If your television is compatible with the remote control it will switch off It is now programmed to operate with the remote control If several codes are indicated for your television brand try each one in turn until you find one that works Button Function TV STANDBY ON Used to switch the television on and off TV or VCR Used to switch betw...

Page 29: ...e MENU button 2 Select DVD using buttons then OK or button 3 Select Language Setup using buttons then press the OK or button 4 Select Disc Menu using buttons then press the OK or button 5 Use the buttons to select English Select Others if the language you want is not listed 6 Press the OK button English is selected and the screen returns to Language Setupmenu Language Setup Disc Menu English Audio...

Page 30: ...Language Setup Disc Menu English Audio English Subtitle Automatic 1 With the unit in Stop mode press the MENU button 2 Select DVD using buttons then OK or button 3 Select Language Setup using buttons then press the OK or button 4 Select Subtitle using buttons then press the OK or button 5 Use the buttons to select English Select Automatic if you want the subtitle language to be the same as the lan...

Page 31: ...he Digital Audio Output DTS 1 Off Doesn t output digital signal 2 On Outputs DTS Bitstream via digital output only Select DTS when connecting to a DTS Decoder DTS Dolby Digital Out MPEG 2 Digital Out PCM Down Sampling Setup Setup Setup Display Setup STB Dynamic Compression 1 On To select dynamic compression 2 Off To select the standard range PCM Down Sampling 1 On Select this when the amplifier co...

Page 32: ...bottom of the screen NTSC Disc Output TV Aspect Black Level Display Setup 4 3 L Box PAL 60 Hz DVD STB Component Setup Setup Setup Display Setup STB 2 4 3 Pan Scan Select this for conventional size TVs when you want to see the central portion of the 16 9 screen Extreme left and right side of movie picture will be cut off 3 16 9 Wide You can view the full 16 9 picture on your widescreen TV Black Lev...

Page 33: ...ating Level The Rating Level will work only when Use Password is set to Yes To unlock the player use to select No Use to select Rating Level Press OK Use to select the level e g Level 6 and press OK Discs that contain Level 7 will now not play To cancel the rating level use or OK to select No in Use Password About the Change Password Use to select Change Password Press OK The Change Password scree...

Page 34: ...ode for 5 minutes it will stop automatically 2 Skip Forward Back While a CD or DVD disc is in Play mode press the Skip l l buttons on the remote control or front panel to jump forward and backward through disc chapters tracks Skip Forward will jump to the next chapter track Skip Back will jump to the beginning of the current chapter track Press Skip Back again to jump to the beginning of the previ...

Page 35: ...look vertically stretched Zoom Fit The top bottom left and right of the screen are cut off and the central portion of the screen is enlarged Vertical Fit When a 4 3 DVD is viewed on a 16 9 TV black bars will appear at the left and right of the screen in order to prevent the picture from looking horizontally stretched To play back using aspect ratio DVD For 16 9 aspect ratio discs 4 3 Letter Box Di...

Page 36: ... language or if you prefer turn them off from the screen A DVD disc can have up to 32 different subtitles A surround sound effect is generated using only two front speakers TITLE CHAPTER TIME AUDIO SUBTITLE 3DSOUND acxz Using the Display Function 1 During play press the INFO button on the remote 2 Use the buttons to select the desired item 3 Use the buttons to make the desired setup You may use th...

Page 37: ...gain Using the ANGLE button acxz Selecting the Subtitle Language You can select a desired subtitle quickly and easily with the subtitle button Using the SUBTITLE button 1 Press the SUBTITLE button 2 Use the buttons to select the desired subtitle language 3 Use the buttons to determine whether or not the subtitle will be displayed The subtitle languages are represented by abbreviations This functio...

Page 38: ...hapter Title A B Off Track Disc A B DVD CD 3 Press OK 4 To return to normal play press REPEAT again then press the buttons to select Off and press OK It is available to press CLEAR button on the remote controller in order to stop REPEAT play acxz Selecting the Audio Language You can select a desired language quickly and easily with the AUDIO button Using the Audio button 1 Press the AUDIO button 2...

Page 39: ...ss OK to begin playback of the song file Total 1 3 ROOT 20020822094 MP3 A B C acxz Using the Mark Function This feature lets you mark sections of a DVD so you can quickly find them at a later time Using the Mark Function DVD 1 During play press the MARK button on the remote The Mark icons will be displayed Recalling a Marked Scene Clearing a Mark 2 Use the buttons to move to the desired Mark icon ...

Page 40: ... most widely used When naming your MP3 or WMA files do not exceed 8 characters and place mp3 wma as the file extension General name format of Title mp3 or Title wma When composing your title make sure that you use 8 characters or less have no spaces in the name and avoid the use of special characters including Use a decompression transfer rate of at least 128Kbps when recording MP3 files Sound qua...

Page 41: ...ayed The name of the JPEG file may not be longer than 8 characters and should contain no blank spaces or special characters Only a consecutively written multisession disc can be played If there is a blank segment in the multisession disc the disc can be played only up to the blank segment A maximum of 500 images can be stored on a single CD Only Kodak Picture CDs can be played When playing a Kodak...

Page 42: ...d information for current programme can be displyed on another banner if there is more information When this information is more than one page can be used for page up and down This service depends on service provider 1 Press the ALT key to see the soundtrack list 2 Press the and OK key to select one Logical Channel Number Signal Status Programme Information The number of soundtrack in current chan...

Page 43: ...y pressing key and press the OK key to watch this channel Select Favorites 1 Press the FAV key see the Favorite list 2 Press the and OK key to select one Select Videotrack 1 Press the ALT key twice to see the videotrack list 2 Press the and OK key to select one EPG Electronic Programme Guide The electronic programme guide gives you a channel list for the channels 1 This service depends on service ...

Page 44: ...the OK key to start the scanning process Teletext VBI When the current broadcasting program provides Teletext press the TEXT key two times to see the current Teletext VBI list If Teletext VBI is available on current programme is displayed on the banner after changing programme channel To change the Teletext VBI 1 Use the keys to select a Teletext VBI you want 2 Press the OK key and then the Telete...

Page 45: ...ut deletes the list of channels registered for frequency The Channel Organising menu has six functions The Channel Organising menu is used to delete the Frequencies and Channels or to make Favorite channels or move channel as you want 1 Enter the PIN Code If you have not entered your own PIN Code PIN Code 0000 applies which was set at the factory STB STB STB Channel Organising Reset to Factory Def...

Page 46: ...ect another favorite list To delete channels from Favorite Group 7 Select a channel list to delete with or keys 8 Press the INFO key to delete the selected channel from the favorite channels Move Channel 1 Select the TV RADIO list with keys 2 Select channel by pressing the INFO key 3 Press the key to change the position of the channel you want and press the OK key for confirmation Parental Lock Th...

Page 47: ...s 3 Select the channel lock by pressing INFO key 4 Press the OK key for confirmation This will lock the channel Whenever you need to view the channel you will have to enter the PIN at the request window After entering PIN Code to able to access a parental locked channel it will work on all parental locked channels It means that you can access all parental locked channels with entering PIN Code on ...

Page 48: ...ack 8dBm 47Kohm unbalanced RF out UHF 28 69 Initial CH38 Audio DVD VCR RCA jack Output Audio DVD only Digital audio out RCA jack Video DVD VCR RCA jack Video DVD only S Video out COMPONENT out Tape format VHS type video tape Colour system PAL MESECAM NTSC4 43 NTSC playback on PAL TV VCR Tuning system B B Video S N Above 43dB standard recording Resolution Above 240 lines standard recording Audio S ...

Page 49: ...tem decoding MPEG 2 ISO IEC 13818 transport stream Profile and level MPEG 2 MP ML 4 2 2 Video decoder Data rate 1 15 Mb s Video formats 4 3 normal 16 9 widescreen Picture resolution 720 H x 576 V x 50 fields sec System decoding MPEG 1 ISO IEC 11172 3 layer I II Audio Decoder Audio mode single channel dual channel stereo joint stereo Sampling frequency 32 44 1 48 KHz The specification of the STB ma...

Page 50: ...ictures appear on a variety of cassettes the video heads may need cleaning This is not a common problem and unless it appears the heads should not be cleaned When cleaning the video heads read all instructions provided with the head cleaning cassette Incorrect head cleaning can permanently damage the video heads If when tuning in your TV to the STB DVD VCR 1 Remove the aerial input plug from the s...

Page 51: ...the feature e g angles 3 The feature is not available at the moment 4 You ve requested a title or chapter number or search time that is out of range Some of the functions selected in the Setup Menu may not work properly if the disc is not encoded with the corresponding function The Screen Ratio is fixed on your DVDs Make sure you have selected the correct Digital Output in the Audio Options Menu P...

Page 52: ...connected Check connection and correct Searching for signal or not tight incorrect position of the Check position and correct antenna Check the signal strength in the Auto Scanning menu On Screen Error Message Rereiver not yet set Scanning of in Automatic scanning Channel data or Manual scanning menu does not exist Problem Possible cause Solution of the problem In some region the digital terrestri...

Page 53: ...THIS APPLIANCE IS DISTRIBUTED BY www samsung com ELECTRONICS AK68 00467C ...

Reviews: