background image

1-8

Samsung Electronics

Disassembly and Reassembly

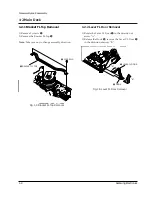
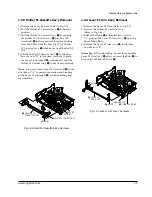
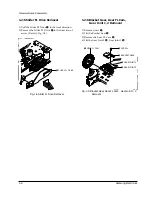
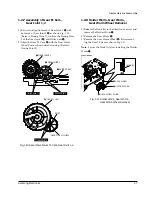
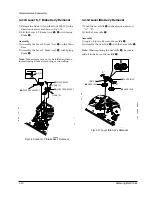
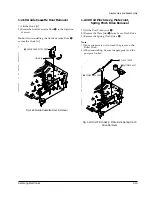
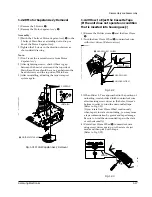
1-2-9 Motor Loading Ass’y Removal

1) Remove the screw 

Œ

.

2) Remove the Motor Loading AssÕy 

´

.

Œ 

SCREW

´ 

MOTOR LOADING ASS'Y

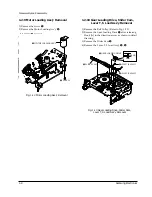
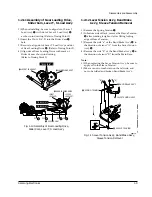
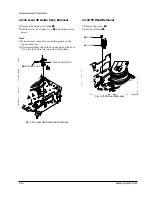
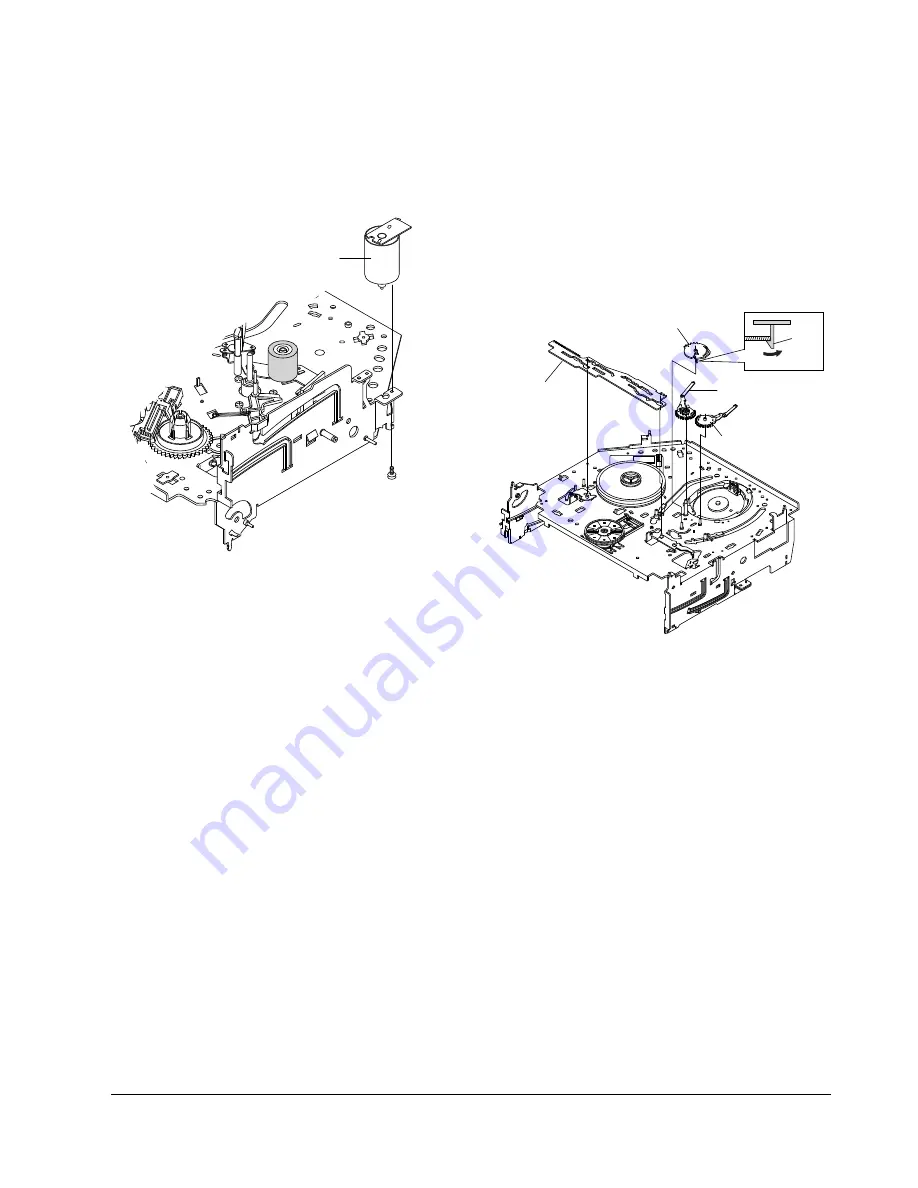
1-2-10 Gear Loading Drive, Slider Cam, 

Lever T, S Load Ass’y Removal

1) Remove the Belt Pulley. (Refer to Fig. 1-29)
2) Remove the Gear Loading Drive 

Œ

after releasing

Hook [A] in the direction arrow as shown in detail 
drawing.

3) Remove the Slider Cam

´

.

4) Remove the Lever T, S Load AssÕy 

ˇ

¨

.

Œ 

GEAR LOADING DRIVE

ˇ 

LEVER T LOAD ASS'Y

HOOK [A]

´ 

SLIDER CAM

¨ 

LEVER S LOAD ASS'Y

Fig. 1-12 Motor Loading Ass’y Removal

Fig. 1-13 Gear Loading Drive, Slider Cam, 

Lever T, S Load Ass’y Removal

Summary of Contents for SV-DVD1EA

Page 1: ... COPY ELECTRONICS For mechanical disassembly and adjustment refer to the Mechanical Manual TS 10 AC68 01504A This model name is SV DVD1EA that is the second generation DVD VCR COMBINATION model There is no difference between the first and second generation because the model name SV DVD1E marked on ASS Y PANEL FRONT is same as the first generation We can identify 1 st and 2 nd generation by the mod...

Page 2: ...How to identify 1 st and 2 nd generation by Label Rating SV DVD1E 1 st generation SV DVD1E SV DVD1EA 2 nd generation Marking A 2 nd generation SV DVD1EA ...

Page 3: ...rewheads and control shafts The current measured should not exceed 0 5 milliamp Reverse the power plug prongs in the AC outlet and repeat the test 6 Antenna Cold Check With the unit s AC plug disconnected from the AC source connect an electrical jumper across the two AC prongs Connect one lead of the ohmmeter to an AC prong Connect the other lead to the coaxial connector 7 Some semiconductor solid...

Page 4: ... leads and components do not touch thermally hot parts 13 Product Safety Notice Some electrical and mechanical parts have special safety related characteristics which might not be obvious from visual inspection These safety features and the protection they give might be lost if the replacement component differs from the original even if the replacement is rated for higher voltage wattage etc Compo...

Page 5: ... sheet This gives them the same ground as the sheet 4 Remove the optical pick up block 5 Perform work on top of the conductive sheet Be careful not to let your clothes or any other static sources to touch the unit Be sure to put on a wrist strap grounded to the sheet Be sure to lay a conductive sheet made of copper etc Which is grounded to the table Fig 1 2 6 Short the short terminal on the PCB wh...

Page 6: ...Pick up See Fig 1 3 4 Disassembly the Pick up 1 3 2 Assembly 1 Replace the Pick up 2 Remove the soldering 4 points on Pick up 3 Reassemble the Deck Assy PICK UP ASS Y CD DVD SOLDER LAND 4 POINTS SHORT Note If the assembly and disassembly are not done in correct sequence the Pick up may be damaged Fig 1 3 1 3 Pick up disassembly and reassembly ...

Page 7: ...o DVD VCR Headphones RCA jack Euro Scart socket OUTPUT Audio DVD only Digital audio out OPTICAL COAXIAL Video DVD VCR RCA jack Euro Scart socket Video DVD only S Video out RGB out Euro Scart socket Tape format VHS type video tape S VHS type video tape Playback only Color system PAL MESECAM NTSC4 43 NTSC playback on PAL TV SECAM OPTION VCR Tuning system B G D K I U K L FRANCE Video S N Above 43dB s...

Page 8: ...Product Specifications 2 2 Samsung Electronics MEMO ...

Page 9: ...CREWS REMOVE 1 SCREW Fig 3 1 Cabinet Top Removal 3 1 3 Ass y Front Panel Removal Œ RELEASE 4 HOOKS RELEASE 3 HOOKS Top View Bottom View Fig 3 3 Ass y Front Panel Removal 3 1 2 Bottom Cover Removal Œ REMOVE 7 SCREWS Fig 3 2 Bottom Cover Removal 3 1 4 Function Timer PCB Removal Œ RELEASE 6 HOOKS Fig 3 4 Function Timer PCB Removal ...

Page 10: ...VE 2 SCREWS Œ REMOVE 2 CONNECTORS DVD MAIN PCB DVD DECK VCR MAIN PCB Fig 3 5 Chassis Removal 3 1 6 VCR Main PCB Removal Œ REMOVE 3 SCREWS MODE SWITCH When installing the ass y full deck on the Main PCB be sure to align the assembly point of mode switch ASSEMBLY POINT Fig 3 6 VCR Main PCB Removal ...

Page 11: ...Disassembly and Reassembly 3 3 Samsung Electronics 3 2 Circuit Board Locations VCR MAIN PCB DVD MAIN PCB S M P S PCB FUNCTION TIMER PCB Fig 3 7 Circuit Board Locations ...

Page 12: ...Slider Housing ˇ in the direction arrow A 2 When the Tray Disc comes out a little pull it in the direction arrow B by hand 3 Pull the Tray Disc to disassemble while simultaneously pushing 2 Stoppers ˆ left right in the direction arrow C D Fig 3 8 Tray Disc Removal A Œ SCREW DRIVER EMERGENCY HOLE ˇ SLIDER HOUSING TRAY DISC B C ˆ STOPPER ˆ STOPPER D ...

Page 13: ...3 2 Assy P U Deck Removal 1 Disconnect DCN2 Œ DCN3 2 Lift down the Assy P U Deck ˇ while simultaneously pushing 2 Hooks ˆ in the direction of arrow A B Fig 3 9 Assy P U Deck Removal Œ DCN2 ˆ HOOK HOOK DCN3 ˇ ASSY P U DECK A B Assembly Point SLIDER HOUSING ...

Page 14: ... Tray 4 Lift up the Slider Housing ˆ 5 Remove the soldering Ø of 2 points Red Black 6 Remove 2 Screws and lift down the Motor Load Assy 7 Push the 3 Hooks bottom side in the direction arrow C and lift up the Housing PCB 8 Push the Hooks Ô and remove Deck PCB Fig 3 10 Housing Ass y Removal Œ BELT ˇ PULLEY GEAR GEAR TRAY MOTOR LOAD ASSY 3 HOOKS HOUSING PCB DECK PCB Ô HOOK Ø SOLDERING 2 SCREWS ˆ SLID...

Page 15: ...7 Samsung Electronics 3 3 4 Sub Chassis Removal 1 Remove the Soldering of Motor Feed wire Œ 2 Remove the 4 Screws 3 Lift up the Ass y Brkt Deck ˇ Fig 3 11 Sub Chassis Removal 4 SCREWS ˇ ASSY BRAK DECK Œ SOLDERING OF MOTOR FEED WIRE ...

Page 16: ...d B Gear Feed A ˇ 3 Remove 2 Screws 4 Remove Shaft Pick Up ˆ and Pick Up Assy Ø 5 Remove 1 Screw 6 Remove 2 Screws 7 Remove 3 Spring Spindle and Motor Spindle Ass y Fig 3 12 Ass y Brkt Deck Removal 2 SCREW Œ WASHER GEAR FEED B 2 SCREWS 1 SCREW ˆ SHAFT PICK UP ˇ GEAR FEED A Ø PICK UP ASS Y SPRING SPINDLE MOTOR SPINDLE ...

Page 17: ...adjust the X Point and Head switching adjustment 4 How to adjustment Press the SW710 TEST button on Function Timer PCB to set the adjustment mode If the corresponding adjustment button is pressed the adjustment is performed automatically 4 1 1 Location of adjustment button of remote control Fig 4 1 STANDBY ON OPEN CLOSE PROG VOLUME MUTE SPEED M E N U T IT L E C L E A R ZOOM AUDIO FRAME STEP REC MA...

Page 18: ...4 2 Alignment and Adjustments Samsung Electronics 4 1 2 SW710 TEST location for adjustment mode setting Fig 4 2 Function Timer PCB Top View TEST SW710 BUTTON ...

Page 19: ...tion of test point 4 2 2 ACE Head position X Point Adjustment See the 4 2 1 d ACE Head Position X Point Adjustment on page 4 2 of the Mechanical Manual 1 Playback the alignment tape Color bar 2 Press the SW710 TEST button on F Timer PCB to set the adjustment mode See Fig 4 2 3 Press the 5 button of remote control then adjustment is operated automatically See Fig 4 1 4 Connect the CH 1 probe to TP0...

Page 20: ...PTION DIODE CNG SAVE OK 01 02 03 04 05 06 07 08 09 10 11 12 13 14 15 16 17 18 19 20 21 22 23 24 25 26 27 28 29 30 31 32 33 34 35 36 37 38 39 40 41 42 43 44 45 46 47 48 49 50 51 52 53 54 55 56 Fig 4 4 OPTION DIODE PLEASE WAIT CNG SAVE OK 01 02 03 04 05 06 07 08 09 10 11 12 13 14 15 16 17 18 19 20 21 22 23 24 25 26 27 28 29 30 31 32 33 34 35 36 37 38 39 40 41 42 43 44 45 46 47 48 49 50 51 52 53 54 5...

Page 21: ...DE NO NO NO YES NO PB VIDEO SEE VIDEO MISSING IN PLAY MODE NO YES YES YES DOES NOT OPERATE OR OPERATES BUT STOP SOON YES VCR Section No Power Standby LED OFF Fuse F01 is OK SMPS PCB AL5 8V DV32 DV32 SMPS PCB Check IC701 DT701 Change Fuse F01 Check Trans PT01 DV32 DD32 Yes Yes No AL5 8V CN1P2 Pin3 SMPS PCB Check CN1P2 Cable No AL5 8V IC601 41 69 92 VCR MAIN PCB Check D692 L605 W475 W476 Check XT602...

Page 22: ...S NOT ROTATE NO DC STOP MODE YES PULSE YES A LOAD A TAPE AND PRESS PLAY BUTTON TURN VCR POWER ON MECHANISM DOESN T OPERATE IN PLAY MODE TAPE LOADING OPERATION LOAD IC601 38 HIGH IC601 39 LOW END SENSOR IC601 74 CYLINDER ROTATION SW 30Hz IC601 25 CYL FG PG IC601 96 97 IC610 7 8 SEE IC610 2 CYLINDER DOES NOT ROTATE CHECK START END SENSOR S601 S602 IC601 NO NO NO NO LOW YES YES HIGH YES YES CHECK TAP...

Page 23: ...MOTOR ROTATION SEE CAPSTAN DOES NOT ROTATE SEE MECHANISM DOES NOT OPERATE IN PLAY MODE STOP YES F FWD ROTATE VCR Section RECORD MODE DOESN T OPERATE PLAY OPERATION LOAD VCR WITH A BLANK TAPE AND PRESS RECORD BUTTON REC MODE SAFETY TAB D REC A H IC601 1 FULL ERASE H IC601 68 SEE AUDIO MISSING IN RECORD MODE CHANGE SW602 CHECK IC601 CHANGE TAPE SEE PLAY MODE DOESN T OPERATE EJECT NO NO YES NO REC VI...

Page 24: ...ARD DOESN T WORK NO NO NO YES STOP DOES CAPSTAN MOTOR ROTATE CHECK IC601 25 CM F R SEE MECHANISM DOES NOT OPERATE IN PLAY MODE NO YES YES REW YES VCR Section FWD SEARCH DOESN T OPERATE PLAY OPERATION PRESS F FWD FOR FORWARD SEARCH CHECK IC601 CHECK CAPSTAN MOTOR IS CAPSTAN SPEED CHANGED SEARCH OPERATION NOISE BAR LOCKING END ADJUST A CE HEAD CHANGE DECK CHANGE IC601 SEE PLAY DOESN T OPERATE NO NO ...

Page 25: ...8 HIGH 5V IC610 13 HIGH 5V IC610 15 LOW 0V CHECK CASSETT LOADING MECHANISM YES YES NO IC610 9 12V YES NO YES VCR Section REV SEARCH DOESN T OPERATE PLAY OPERATION PRESS REWIND BUTTON FOR REV SEARCH CHECK CAP F R LINE IS CAPSTAN SPEED CHANGED SEARCH OPERATION FWD SEARCH END CHECK IC601 CHANGE DECK CHANGE IC601 SEE PLAY DOESN T OPERATE NO PLAY MODE NO YES CAP F R IC601 25 HIGH SEARCH MODE YES NO LOW...

Page 26: ...ACE VCR IN STOP MODE VIDEO MISSING IN EE MODE TUNER MODE OPERATION NO VIDEO SIGNAL IC801 2 APPLY VIDEO SIGNAL TO REAR VIDEO INPUT JACK AND SET TO AUX MODE BY TV VIEW BUTTON CHECK AVJ1 VIDEO SIGNAL CHECK C874 R859 CHECK IC801 2 TO TM401 24 LINE VIDEO SIGNAL TM401 24 CHECK SV DVD1E TO TV CONNECTION CHECK TM401 ANTTENNA IN NO NO NO YES YES YES YES YES CHANGE IC801 IIC CLK DATA IC801 63 64 CHECK IIC C...

Page 27: ... YES NO YES NO YES YES NOTE XT301 Always 4 433619MHz VCR Section VIDEO MISSING IN PLAY MODE VIDEO EE MODE OPERATION PLACE THE VCR PLAY MODE CHANGE IC301 CHECK Q802 CHECK VIDEO HEAD CHECK Q303 E CHECK IC601 24 CHECK VIDEO OUT LINE SEE PAGE 6 6 VIDEO MISSING IN EE MODE NO YES YES NO YES YES VIDEO FM IC301 74 VIDEO IC301 20 VIDEO IC301 29 VIDEO IC801 12 VIDEO IC801 19 NO H D SW IC301 11 NO YES YES NO...

Page 28: ... C6P05 CHECK Q6P03 R6P11 NO NO NO YES NO YES 2fsc 8 86MHz OSC IN 5 10MHz VCR Section COLOR MISSING IN PLAY MODE FM ENV IC301 74 COLOR IC301 59 61 SW 25Hz IC301 10 CHECK XT301 CHANGE IC301 CHECK IC601 29 CHANGE XT301 CHECK Q308 C330 C328 SEE PAGE 6 7 VIDEO MISSING IN PLAY MODE NO NO NO NO NO COLOR IC301 71 NO YES YES YES YES YES NOTE XT3X1 Always 4 433619MHz VCR Section ...

Page 29: ...CK TM401 YES YES YES H NO L YES LINE OUT TUNER YES IC801 25 30 AUDIO SIGNAL IC801 36 H IC801 43 55 9V NO CHECK C820 C842 CHECK R823 R825 IC4N01 YES NO CHECK C868 CHANGE IC801 NO TM401 2 AUDIO SIGNAL B B YES VCR Section TUNER OUT SELECT LINE MODE WITHOUT INPUT SIGNAL BLUE MISSING IN STOP MODE CHANGE IC6P01 IC6P01 8 L SYNC JUDGE IC601 72 L CHECK IC6P01 8 TO IC601 72 CHECK OSD VIDEO IN LINE NO YES NO...

Page 30: ...GNAL IC301 98 AUDIO SIGNAL IC301 7 AUDIO SIGNAL IC301 6 MIX SIGNAL AUDIO 70KHz FL3A01 6 OSCILLATION NO CHECK AUDIO MISSING IN PB MODE CHECK PB MODE CHECK A CE HEAD MONO YES MISSING AUDIO IC501 52 61 AUDIO SIGNAL IC501 27 AUDIO FM IC501 26 AUDIO FM IC801 27 32 AUDIO SIGNAL CHECK CYLINDER CHECK IC501 CHECK C861 C863 R510 R518 CHECK R504 CHANGE IC501 CHECK IC801 CHECK AUDIO MISSING IN EE MODE AUDIO M...

Page 31: ... YES YES YES VCR Section CHECK AUDIO MISSING IN EE MODE PLACE THE VCR IN PB MODE CHANGE IC501 AUDIO MISSING IN PB MODE CHECK R3A10 C3A04 AND IC301 100 AUDIO SIGNAL CHECK ACE HEAD C3A15 C3A16 R3A06 R3A07 R3A08 AND CHANGE IC301 AUDIO SELECT IC501 18 AUDIO FM MIXED CHECK IC501 35 A H D SW C514 C513 R503 AND CHANGE CYLINDER OR IC501 NO HIFI MONO YES IC301 1 AUDIO SIGNAL NO YES VCR Section ...

Page 32: ...12V LINE IN THE POWER BLOCK NO FASTER NO YES SLOWER YES VCR Section CAPSTAN DOES NOT ROTATE PLACE THE VCR IN PLAY MODE CN604 5 24V CN604 8 AL 5V CN604 3 2 7V CN604 4 2 7V CN601 10 OUTPUT PWM IC601 3 OUTPUT PWM CHECK CAPSTAN MOTOR CHECK R685 R609 C623 CHECK R660 C691 CHANGE IC601 CHECK IC601 CHECK B IN THE POWER BLOCK CHECK 5 8V AT AL5 8V LINE IN THE POWER BLOCK NO NO NO NO YES NO YES NO YES YES YE...

Page 33: ...n specified range SIC3 26 27 output are normal Check open state from SIC3 to pick up Check RIC1 and A B C D input Check SIC3 Yes Yes No No C DVD Section No Disc recognition LD is outputted from object lens at play key input No focus incoming and no disc occurs Yes No D C DVD Section ...

Page 34: ...eck in related circuit Check MIC1 Yes Yes Yes No No Divide RQ1 emitter terminal voltage and 5V real voltage difference into 10ohm D DVD Section No pick up home positing SLD SIC1 34 output is normal Check the Sled Motor and connection Check MIC1 Yes No LED SLED SIC3 32 33 output are normal Check SIC3 Yes No DVD Section ...

Page 35: ...erminal outputs are normal Check DCN1 and pick up Check MECHA Check RIC1 26 terminal Check SIC3 peripheral circuit Yes Yes Yes Yes Yes Yes Yes No No No No No No No DVD Section No Search Operation MIRR SIC1 157 output is normal Actual velocity occurs at SIC1 34 terminal Actual velocity occurs at SIC4 32 33 terminal Check RIC1 peripheral circuit RFAGCO RIC1 72 output level is normal Check SIC1 perip...

Page 36: ...al rotation of disc motor Input of RF signal is normal SIC1 15 SPD output is normal SIC1 35 After resoldering SIC1 SIC3 2 output FG is normal SIC3 9 signal MON is H Check or replace disc motor Check SIC1 MIC1 Check SIC3 soldering and power Check path to RIC1 and SIC1 Check RIC1 soldering and power RIC1 70 output are normal RIC1 71 output is normal Check RIC1 peripheral circuit and A B C D Yes Yes ...

Page 37: ...No No Yes DVD Section CD VCD DVD L R output error Mixed Audio output Normal DATA 0 is input in AIC1 3 Analog output of AIC1 9 10 11 12 is normal Check AVJ1 JC801 Audio out peripheral soldering shot IC801 Check ZIC1 121 output Check ZIC1 125 CD VCD 16 9344MHz DVD 18 432MHz Yes Yes No No AOP1 1 7 output is normal Check AOP1 peripheral circuit Yes No IC801 36 L VCR MAIN PCB Check IC601 50 mute Yes No...

Page 38: ...2 10 Check the connection between CN1 VCR MAIN and CN8 DVD MAIN Yes No No Y Pb Pr VIC1 9 11 13 Check VIC1 Yes Yes E DVD Section S Video output error DVD SETUP in OSD Alt video is Component VIC1 6 Y signal VIC1 4 C signal Change the Alt video mode to off or S Video Check VIC1 No Yes Yes Video signal CN1 10 12 Check the connection between CN1 VCR MAIN and CN8 DVD MAIN Yes No Yes E DVD Section ...

Page 39: ...ZIC1 Check the connection between pin 6 in ZIC4 and pin 129 in ZIC1 Check the soldering of ZIC1 Yes No No Yes No Check the connection between CN1 16 to IC801 10 Pin of VDD_2 5 VDD 3 3 in Zic1 has normal level Check the connection between pin 1 in PCNS1 and pin 3 in ZIC5 Yes No Video signal IC801 10 Yes Check the JC801 scart cable E DVD Section ...

Page 40: ...Troubleshooting 5 20 Samsung Electronics MEMO ...

Page 41: ...Samsung Electronics 6 1 6 Exploded View and Parts List 6 1 Cabinet Assembly 6 2 6 2 VCR Mechanical Parts Top Side 6 4 6 3 VCR Mechanical Parts Bottom Side 6 6 6 4 DVD Mechanical Parts 6 8 ...

Page 42: ...2 12 13 155 200 601 VCR MAIN PCB 603 DVD MAIN PCB CN8A 602 S M P S PCB S601A LD601A CN3A1B S602A CN602B 155 155 155 157 157 2 21 22 1 701 FUNCTION TIMER PCB STANDBY ON OPEN CLOSE PROG VOLUME MUTE SP EE D ME NU TIT LE CLE AR ZO OM AU DIO FRAME STEP REC MARK REPEAT INDEX MODE LAST PR TRK ATR TRK SHUTTLE SVHS 3DSOUND A DUB TV VCR DVD TV VIEW VCR 100 DVD DECK 153 ...

Page 43: ...A K 601 Refer to table 6 1 below ASSY PCB VCR MAIN 602 AC92 01069A ASSY OPT PCB SMPS SV DVD2E XEF SMPS 603 Refer to table 6 2 below ASSY PCB DVD MAIN 701 AC92 01068A ASSY OPT PCB TIMER SV DVD2E XEF TIMER 702 3711 003460 CONNECTOR HEADER NOWALL 20P 1R 1 5mm STR CN3A1B 3809 001206 CABLE FLAT 30V 20to 80C 140mm 6P 1 25mm CN602B 3809 001131 CABLE FLAT 30V 80C 110MM 7P 1 25MM UL289 CN8A 3809 001264 CAB...

Page 44: ...Electronics 6 2 VCR Mechanical Parts Top Side G001 G555 G510 G480 K546 G680 G681 B410 B575 B440 B448 B452 G546 G060 G520 G527 K188 K182 K110 K240 K248 K350 K330 K140 K340 G070 K470 B474 B473 K250 K530 K490 G530 G420 G450 K502 OPTIONAL OPTIONAL ...

Page 45: ... AC61 60553A SPRING 9 GUIDE ES SUS304 WPB OD3 1 0 G530 AC33 00007A HEAD FE HVFHPOO43A G542 AC66 60051A BELT PULLEY X 9 5CM 70 2 2 71 3 G546 AC66 00005A LEVER FL DOOR TS 10 POM NAT G555 AC66 00032A LEVER UNIT PINCH ASS Y TS 10 G680 AC66 00046A LEVER HEAD CLEANER ASS Y TS 10 POM URETH OPTIONAL G681 AC61 50686A SLEEVE HEAD CLEANER POM TS OPTIONAL K110 AC66 10267A REEL DISK S X 9 POM K140 AC66 10268A ...

Page 46: ...Exploded View and Parts List 6 6 Samsung Electronics 6 3 VCR Mechanical Parts Bottom Side G542 B462 B560 B501 B484 B488 B500 B456 B458 B464 B468 K222 K200 K225 K221 B478 B570 B460 B489 ...

Page 47: ... 10 SECC E20 20 1 0 B478 AC66 00016A LEVER TENSION DRIVE TS 10 SECC E20 20 1 B484 AC66 00030A GEAR LOADING DR ASS Y TS 10 POM SWPB B488 AC66 00023A LEVER S LOADING TS 10 POM NAT B489 AC66 00021A LINK LOADING S TS 10 SECC E20 20 0 8 B500 AC66 00024A LEVER T LOADING TS 10 POM NAT B501 AC66 00022A LINK LOADING T TS 10 SECC E20 20 0 8 B560 AC31 00010A MOTOR CAPSTAN SANKYO B570 AC60 10514A SCREW CAPSTA...

Page 48: ...ded View and Parts List 6 8 Samsung Electronics 6 4 DVD Mechanical Parts H108 H106 H101 H105 H107 H102 H240 H211 H203 H241 905 H104 H250 H103 H207 H208 H201 H202 H210 H204 H205 H209 H206 901 900 904 906 903 ...

Page 49: ...AR CR T1 2 4 3 1 2X25 1 B H106 AH66 00124A GEAR TRAY DP 7 POM M90 44 H107 AH66 00125A SLIDER HOUSING DP 7 POM H108 AH63 00217A TRAY DISC POM BLK DP 7 H201 AH97 00561C ASSY BKRT DECK SECC POM DP 7 TSEC H202 AH73 00023C RUBBER INSULATOR DP 7 BUTYL RUBBER 10 H203 AH61 50327A SHAFT P U DP 3 SUS420J2 L84 7 OD3 H204 AH66 00075A GEAR FEED A POM M90 44 H205 AH66 00076A GEAR FEED B POM M90 44 H206 AC60 303...

Page 50: ...Exploded View and Parts List 6 10 Samsung Electronics MEMO ...

Page 51: ... DIODE SWITCHING 1N4148 100V 200mA DO 35 D692 0402 000127 DIODE RECTIFIER 1N4002 100V 1A DO 41 TP IC601 AC09 00030A IC MCU UPD78F4928 100PIN QFP 16BIT PLA IC604 AC14 12009W IC RESET PST572K TO 92 R59 1766 2 5V IC605 1103 001171 IC EEPROM L51DC 16KBit DIP 8P 300MIL 10m IC608 1203 000515 IC VOL DETECTOR 7042 TO 92 3P 177MIL PL IC610 1003 001318 IC MOTOR DRIVER LB11880 DIP 30P 417MIL J601 2007 000029...

Page 52: ...0nF 10 50V X7R TP 2012 C392 2203 000634 C CERAMIC CHIP 0 022nF 5 50V NP0 TP 201 C393 2203 000192 C CERAMIC CHIP 100nF 80 20 50V Y5V TP C3A01 2401 003122 C AL 4 7uF 20 50V LL TP 4X7 1 5 C3A02 2203 000192 C CERAMIC CHIP 100nF 80 20 50V Y5V TP C3A04 2203 000192 C CERAMIC CHIP 100nF 80 20 50V Y5V TP C3A08 2203 001105 C CERAMIC CHIP 6 8nF 10 50V X7R TP 2012 C3A09 2301 001014 C FILM PEF 6 8nF 5 50V TP 7...

Page 53: ...1 10W DA TP 2012 R3D01 2001 000793 R CARBON 47OHM 5 1 8W AA TP 1 8X3 2MM R3D02 2007 000586 R CHIP 22KOHM 5 1 10W DA TP 2012 R3D03 2001 000745 R CARBON 4 7OHM 5 1 8W AA TP 1 8X3 2MM R3Q1 2007 000872 R CHIP 4 7KOHM 5 1 10W DA TP 2012 R3Q2 2007 000300 R CHIP 10KOHM 5 1 10W DA TP 2012 R3Q3 2007 000766 R CHIP 330OHM 5 1 10W DA TP 2012 R3Q4 2007 001055 R CHIP 6 2KOHM 5 1 10W DA TP 2012 R3Q5 2007 000766 ...

Page 54: ...16 C CERAMIC CHIP 3 3nF 10 50V X7R TP 2012 C517 2203 000891 C CERAMIC CHIP 4 7nF 10 50V X7R TP 2012 C518 2401 000922 C AL 22uF 20 16V GP TP 5x5 5 C519 2203 000260 C CERAMIC CHIP 10nF 10 50V X7R TP 2012 C520 2401 001250 C AL 4 7uF 20 35V GP TP 4x5 5 C521 2401 000922 C AL 22uF 20 16V GP TP 5x5 5 C522 2401 001915 C AL 1uF 20 50V GP TP 3x5 5 C523 2203 000192 C CERAMIC CHIP 100nF 80 20 50V Y5V TP C524 ...

Page 55: ... 2mm D801 0401 000101 DIODE SWITCHING 1N4148 100V 200mA DO 35 D802 0402 000127 DIODE RECTIFIER 1N4002 100V 1A DO 41 TP IC801 AC14 12015T IC SV1274 LA7274M QFP 64PIN J804 2007 000029 R CHIP 0OHM 5 1 10W DA TP 2012 J805 2007 000029 R CHIP 0OHM 5 1 10W DA TP 2012 J808 2007 000029 R CHIP 0OHM 5 1 10W DA TP 2012 JC801 3722 001573 JACK SCART 42P 2R SN BLK BLU 20 28 L803 0402 000127 DIODE RECTIFIER 1N400...

Page 56: ...20PPM 28 AAA 16PF SECAM OPTION C3S01 2203 000408 C CERAMIC CHIP 0 18nF 5 50V NP0 TP 2012 C3S02 2401 000665 C AL 2 2uF 20 50V GP TP 3 5x5 5 C3S03 2203 000260 C CERAMIC CHIP 10nF 10 50V X7R TP 2012 C3S04 2203 000260 C CERAMIC CHIP 10nF 10 50V X7R TP 2012 C3S05 2203 000192 C CERAMIC CHIP 100nF 80 20 50V Y5V TP C3S06 2203 000361 C CERAMIC CHIP 0 15nF 5 50V NP0 TP 2012 C3S07 2401 001507 C AL 47uF 20 16...

Page 57: ... IC01 1203 001803 IC PWM CONTROLLER STR F6552 TO 220 5P IC02 0604 000186 PHOTO COUPLER TR 200mW DIP 4 ST IC03 AC14 12006D IC KA431Z TO 92 TAPING ICDP1 1203 000122 IC NEGA FIXED REG 7908 TO 220 3P PLAS ICDP2 1203 002185 IC VOLTAGE REGULATOR 3RD13 TO 220 4P 402 L01 AC29 00002A FILTER LINE NOISE 30mH BLF 2116 L02 AC29 30050B FILTER LINE NOISE 400uH AC250V TR12 L31 AC27 12001N COIL CHOKE 10UH 15 RA K ...

Page 58: ...608 R3 2007 000078 R CHIP 1Kohm 5 1 16W DA TP 1608 R4 2007 000080 R CHIP 2Kohm 5 1 16W DA TP 1608 RC1 2203 000560 C CERAMIC CHIP 220nF 80 20 25V Y5V TP RC14A 2203 005148 C CERAMIC CHIP 100nF 10 16V X7R TP 1608 RC15 2203 005148 C CERAMIC CHIP 100nF 10 16V X7R TP 1608 RC16 2203 000257 C CERAMIC CHIP 10nF 10 50V X7R TP 1608 RC17 2203 000975 C CERAMIC CHIP 47nF 10 25V X7R TP 1608 RC18 2203 000975 C CE...

Page 59: ...AL 10uF 20 16V GP TP 4x7 5 SE2 2401 000414 C AL 10uF 20 16V GP TP 4x7 5 SE3 2401 000414 C AL 10uF 20 16V GP TP 4x7 5 SE4 2401 000414 C AL 10uF 20 16V GP TP 4x7 5 SE6 2401 001225 C AL 4 7uF 20 16V GP TP 3x5 5 SE7 2401 001225 C AL 4 7uF 20 16V GP TP 3x5 5 SE8 2401 001225 C AL 4 7uF 20 16V GP TP 3x5 5 SE9 2401 002144 C AL 47uF 20 16V GP TP 5x11 5 SIC1 AH13 00006A IC ASIC KS1454 DVD 611 XAA 160 3 3V S...

Page 60: ... DA TP 1608 ZR18 2007 000074 R CHIP 100ohm 5 1 16W DA TP 1608 ZR2 2007 000113 R CHIP 33ohm 5 1 16W DA TP 1608 ZR23 2007 000078 R CHIP 1Kohm 5 1 16W DA TP 1608 ZR27 2007 000084 R CHIP 4 7Kohm 5 1 16W DA TP 1608 ZR28 2007 000084 R CHIP 4 7Kohm 5 1 16W DA TP 1608 ZR29 2007 000078 R CHIP 1Kohm 5 1 16W DA TP 1608 ZR3 2007 000113 R CHIP 33ohm 5 1 16W DA TP 1608 ZR35 3301 001309 CORE FERRITE BEAD AB 47oh...

Page 61: ...08 SWITCH TACT 15V 20mA 160gf 6x7 9x3 5mm S SW710 3404 001008 SWITCH TACT 15V 20mA 160gf 6x7 9x3 5mm S SW712 3404 001008 SWITCH TACT 15V 20mA 160gf 6x7 9x3 5mm S SW713 3404 001008 SWITCH TACT 15V 20mA 160gf 6x7 9x3 5mm S SW714 3404 001008 SWITCH TACT 15V 20mA 160gf 6x7 9x3 5mm S SW715 3404 001008 SWITCH TACT 15V 20mA 160gf 6x7 9x3 5mm S SW716 3404 001008 SWITCH TACT 15V 20mA 160gf 6x7 9x3 5mm S SW...

Page 62: ...7 12 Electrical Parts List Samsung Electronics MEMO ...

Page 63: ...Samsung Electronics 8 1 8 Block Diagram ...

Page 64: ...Block Diagram 8 2 Samsung Electronics MEMO ...

Page 65: ...Samsung Electronics 9 1 9 PCB Diagrams 9 1 S M P S 9 2 9 2 VCR Main 9 3 9 3 DVD Main 9 4 9 4 Function Timer 9 5 9 5 DVD Deck 9 5 ...

Page 66: ...PCB Diagrams 9 2 Samsung Electronics 9 1 S M P S ...

Page 67: ...PCB Diagrams 9 3 Samsung Electronics 9 2 VCR Main ...

Page 68: ...PCB Diagrams 9 4 Samsung Electronics 9 3 DVD Main COMPONENT SIDE SOLDER SIDE ...

Page 69: ...PCB Diagrams 9 5 Samsung Electronics 9 4 Function Timer 9 5 DVD Deck ...

Page 70: ...PCB Diagrams 9 6 Samsung Electronics MEMO ...

Page 71: ...Samsung Electronics 10 1 10 Wiring Diagram ...

Page 72: ...Wiring Diagram 10 2 Samsung Electronics MEMO ...

Page 73: ...stors are in ohms 1 8W unless otherwise noted Note Special note Most semiconductor devices are electrostatically sensitive and therefore require the special handling techniques described under the electrostatically sensitive ES devices section of this service manual Note Do not use the part number shown on this drawing for ordering The correct part number is shown in the parts list may be slightly...

Page 74: ...Schematic Diagrams 11 2 Samsung Electronics Block Identification of Main PCB Component Side Conductor Side VCR MAIN PCB Component Side DVD MAIN PCB ...

Page 75: ...Schematic Diagrams 11 3 Samsung Electronics 11 1 S M P S ...

Page 76: ...Schematic Diagrams 11 4 Samsung Electronics 11 2 Power Drive ...

Page 77: ...11 3 Function Timer Schematic Diagrams 11 5 Samsung Electronics ...

Page 78: ...Schematic Diagrams 11 6 Samsung Electronics 11 4 System Control Servo ...

Page 79: ...Schematic Diagrams 11 7 Samsung Electronics 11 5 A V ...

Page 80: ...Schematic Diagrams 11 8 Samsung Electronics 11 6 TM Blcok ...

Page 81: ...Schematic Diagrams 11 9 Samsung Electronics 11 7 Digital Audio ...

Page 82: ...Schematic Diagrams 11 10 Samsung Electronics 11 8 Hi Fi ...

Page 83: ...Schematic Diagrams 11 11 Samsung Electronics 11 9 OSD ...

Page 84: ...Schematic Diagrams 11 12 Samsung Electronics 11 10 Input Output ...

Page 85: ...Schematic Diagrams 11 13 Samsung Electronics 11 11 A2 NICAM ...

Page 86: ...Schematic Diagrams 11 14 Samsung Electronics 11 12 SECAM OPTION ...

Page 87: ...Schematic Diagrams 11 15 Samsung Electronics KEY OPTION 11 13 DVD Main Micom AV Decoder ...

Page 88: ...Schematic Diagrams 11 16 Samsung Electronics 11 14 Servo ...

Page 89: ...Schematic Diagrams 11 17 Samsung Electronics 11 16 DVD Deck ...

Page 90: ...Schematic Diagrams 11 18 Samsung Electronics MEMO ...

Page 91: ...sembly and Reassembly 2 Alignment and Adjustment VHS DECK CONTENTS 3 File with the SERVICE MANUAL MECHANICAL MANUAL DX 9R ELECTRONICS Samsung Electronics Co Ltd NOV 1998 Printed in Korea AC68 00001A MECHANICALManual ...

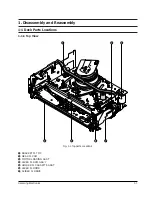
Page 92: ...ˆ Ø Fig 1 1 Top parts Location 1 Œ BRACKET FL TOP GEAR FL CAM ˇ MOTOR LOADING ASS Y LEVER FL ARM ASS Y ˆ HOLDER FL CASSETTE ASS Y Ø LEVER FL DOOR SLIDER FL DRIVE 1 Disassembly and Reassembly 1 1 Deck Parts Locations 1 1 1 Top View ...

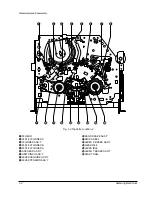
Page 93: ... Parts Location 2 Œ FE HEAD PLATE CYLINDER C ˇ CYLINDER ASS Y PLATE CYLINDER B ˆ PLATE CYLINDER A Ø ACE HEAD ASS Y UNIT PINCH ASS Y LEVER 9 GUIDE ASS Y LEVER TENSION ASS Y BAND BRAKE ASS Y Ô DISK S REEL LEVER S BRAKE ASS Y Ò GEAR IDLE Ú LEVER IDLE Æ LEVER T BRAKE ASS Y ı DISK T REEL ...

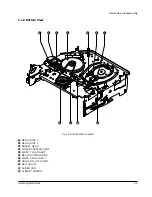
Page 94: ...s 1 3 1 1 2 Bottom View Œ ˇ ˆ Ø Ô Fig 1 3 Bottom Parts Location Œ GEAR JOINT 1 GEAR JOINT 2 ˇ BRAKET GEAR MOTOR CAPSTAN ASS Y ˆ LEVER T LOAD ASS Y Ø GEAR LOADING DRIVE LEVER S LOAD ASS Y HOLDER CLUTCH ASS Y BELT PULLEY SLIDER CAM Ô SLEEVE TENSION ...

Page 95: ...e Take care not to change assembly direction Œ 2 SCREWS BRACKET FL TOP 1 2 2 Lever FL Door Removal 1 Rotate the Lever FL Door Œ in the direction of arrow ÒAÓ 2 Release the Hook remove the Lever FL Door Œ in the direction of arrow ÒBÓ HOOK Œ LEVER FL DOOR A B 1 2 Main Deck Fig 1 4 Bracket FL Top Removal Fig 1 5 Lever FL Door Removal ...

Page 96: ...mpletely Note Be sure to insert Lever FL Cassette R in the direction of ÒAÓ to prevent separation and breakage of the Lever FL Cassette R at disassembling and reassembling Œ HOLDER FL CASSETTE ASS Y LEVER FL CASSETTE R BOSS A BOSS B RAIL C RAIL D A B 1 2 4 Lever FL Arm Ass y Removal 1 Remove the Lever FL Door Refer to Fig 1 5 2 Remove the Holder FL Cassette AssÕy Refer to Fig 1 6 3 Release the Hoo...

Page 97: ...the direction of arrow Refer to Fig 1 8 Œ SLIDER FL DRIVE 1 2 6 Bracket Gear Gear FL Cam Gear Joint 1 2 Removal 1 Remove screw Œ 2 Lift the Bracket Gear 3 Remove the Gear FL Cam ˇ 4 Lift the Gear Joint 2 Gear Joint 1 ˆ Œ SCREW BRACKET GEAR ˇ GEAR FL CAM ˆ GEAR JOINT 1 GEAR JOINT 2 Fig 1 8 Slider FL Drive Removal Fig 1 9 Bracket Gear Gear FL Cam Gear Joint 1 2 Removal ...

Page 98: ...ng Point 3 Œ GEAR JOINT 1 GEAR JOINT 2 ˇ SLIDER CAM TIMING POINT 1 GEAR FL CAM GEAR WORM WHEEL POST TIMING POINT 2 TIMING POINT 3 1 2 8 Holder Worm Gear Worm Gear Worm Wheel Removal 1 Release the Hook A in the direction of arrow and remove the Holder Worm Œ 2 Remove the Gear Worm 3 Remove the Gear Worm Wheel ˇ After remov ing the Gear FL Cam as shown Fig 1 9 Note Secure the Hook A after installing...

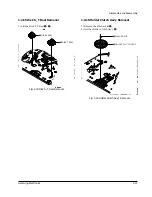
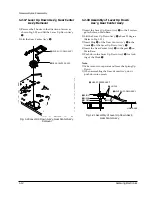
Page 99: ...S Load Ass y Removal 1 Remove the Belt Pulley Refer to Fig 1 29 2 Remove the Gear Loading Drive Œ after releasing Hook A in the direction arrow as shown in detail drawing 3 Remove the Slider Cam 4 Remove the Lever T S Load AssÕy ˇ Œ GEAR LOADING DRIVE ˇ LEVER T LOAD ASS Y HOOK A SLIDER CAM LEVER S LOAD ASS Y Fig 1 12 Motor Loading Ass y Removal Fig 1 13 Gear Loading Drive Slider Cam Lever T S Load...

Page 100: ... 1 TIMING POINT 2 TIMING POINT 3 1 2 12 Lever Tension Ass y Band Brake Ass y Sleeve Tension Removal 1 Remove the Spring Tension Œ 2 In bottom side of Deck remove the Sleeve Tension after rotating it right or left as lifting locking edge of Sleeve Tension 3 Remove the side ÒaÓ of the Band Brake AssÕy in the direction of arrow ÒAÓ from the Lever Tension AssÕy ˇ 4 Remove the side ÒbÓ of the Band Brak...

Page 101: ...care not to be folded and trans formed spring Brake at removing or reinstalling ˇ SPRING BRAKE LEVER T BRAKE ASS Y Œ LEVER S BRAKE ASS Y HOOK A HOOK C HOOK B 1 2 14 Lever Idle Ass y Removal 1 Push the Lever Idle Œ in the direction of arrow ÒAÓ ÒBÓ 2 Lift the Lever Idle Œ Assembly 1 Apply oil in two Bosses of Lever Idle Œ 2 Assemble the Gear Idle with the Lever Idle Œ Note When replacing the Gear I...

Page 102: ... S T Reel Removal 1 Lift the Disk S T Reel Œ DISK T REEL Œ DISK S REEL 1 2 16 Holder Clutch Ass y Removal 1 Remove the Washer Slit Œ 2 Lift the Holder Clutch AssÕy HOLDER CLUTCH ASS Y Œ WASHER SLIT Fig 1 18 Disk S T Reel Removal Fig 1 19 Holder Clutch Ass y Removal ...

Page 103: ... Base 2 Lift the Lever Up Down AssÕy Œ about 35 degree Refer to Fig 1 21 3 Insert Ring of the Gear Center AssÕy in the Guide ˆ of the Lever Up Down AssÕy Œ 4 Insert the Gear Center AssÕy in the post Ø on Main Base 5 Push down the Lever Up Down AssÕy Œ for lock ing of the Hook Note 1 Take care not to separate and loose the Spring Up Down 2 When assembling the Gear Center AssÕy donÕt push down too m...

Page 104: ... 2 20 Unit Pinch Ass y Plate Joint Spring Pinch Drive Removal 1 Lift the Unit Pinch AssÕy Œ 2 Remove the Plate Joint from Lever Pinch Drive 3 Remove the Spring Pinch Drive ˇ Note 1 Take extreme care not to touch the grease on the Roller Pinch 2 When reinstalling be sure to apply grease on the post pinch roller Œ UNIT PINCH ASS Y PLATE JOINT ˇ SPRING PINCH DRIVE Fig 1 22 Guide Cassette Door Removal...

Page 105: ...ion of arrow Note 1 Take extreme care not to touch the grease on the tape Guide Post 2 After reinstalling check the bottom side of the Post 9 Guide to stick to the top side of Main Base LEVER 9 GUIDE ASS Y Œ SPRING 9 GUIDE 1 2 22 FE Head Removal 1 Remove the screw Œ 2 Lift the FE Head Œ SCREW FE HEAD Fig 1 24 Lever 9 Guide Ass y Removal Fig 1 25 FE Head Removal ...

Page 106: ...connector of ACE Head AssÕy 2 Remove the screw Œ 3 Lift the ACE Head AssÕy Œ SCREW ACE HEAD ASS Y 1 2 24 Slider S T Ass y Removal 1 Move the Slider S T AssÕy Œ to slot and then lift it to remove Refer to arrow SLIDER T ASS Y Œ SLIDER S ASS Y Fig 1 26 ACE Head Removal Fig 1 27 Slider S T Ass y Removal ...

Page 107: ...ylinder C 3 Take care not to touch the Cylinder AssÕy with screw driver at reinstalling the Plate Cylinder C ˆ SCREW CYLINDER ASS Y Œ SCREW PLATE CYLINDER C ˇ SCREW PLATE CYLINDER B Ø PLATE CYLINDER A 1 2 26 Belt Pulley Removal 1 Remove the Belt Pulley Œ Note Take extreme care not to touch the grease on Belt Pulley Œ at assembling or reassembling Œ BELT PULLEY Fig 1 28 Cylinder Ass y Removal Fig 1...

Page 108: ... 29 How to Eject the Cassette Tape If the unit does not operate on condition that is inserted into housing ass y 1 Remove the Holder worm Œ and the Gear Worm 2 Turn the Gear Worm Wheel ˇ counterclockwise with screw driver Refer to arrow Œ HOLDER WORM GEAR WORM SCREW DRIVER ˇ GEAR WORM WHEEL Fig 1 31 Motor Capstan Ass y Removal Fig 1 32 3 When Slider S T are approached in the position of unloading ...

Page 109: ...STAN SHAFT 9 GUIDE POST 3 GUIDE POST GUIDE ROLLER S T O O O O O O O CYLINDER ASS Y O O O O O O O O O FE HEAD O O O O O O O ACE HEAD O O O O O O O O O PINCH ROLLER O O O O O O O O O POST REEL S T 3 3 3 3 3 SLEEVE TENSION 3 3 3 3 3 POST CENTER 3 3 3 3 3 LEVER IDLE BOSS 2Point 3 3 3 3 3 CAPSTAN MOTOR PULLEY O O O O O BELT PULLEY O O O O O O O HOLDER CLUTCH ASS Y O O O O O O O O O GEAR CENTER ASS Y O ...

Page 110: ...LER GUIDE ROLLER S GUIDE ROLLER T 8 GUIDE POST 9 GUIDE POST CAPSTAN SHAFT ACE HEAD 3 GUIDE POST 2 Alignment and Adjustment 2 1 Tape Transport System and Adjustment Locations The tape transport system has been adjusted precisely in the factory Alignment is not necessary except for the following 1 Noise observed on the screen 2 Tape damage 3 Parts replacement in the tape transport system Lower flang...

Page 111: ...ghtly turn the screw A tilt adjust on the ACE head assÕy 4 Reconfirm the ACE head height Fig 2 5 Tape Guide Check 2 2 1 c AUDIO AZIMUTH ADJUSTMENT 1 Load alignment tape Mono scope and playback the NTSC 7KHz PAL 6KHz signal 2 Connect channel 1 scope probe to audio output test point 3 Adjust screw B to achieve maximum audio level See Fig 2 3 2 2 1 d ACE HEAD POSITION X POINT ADJUSTMENT 1 See page 5 ...

Page 112: ...he video RF envelope at the exit side 4 If the section A in Fig 2 7 does not meet the speci fication adjust the guide roller S up or down 5 If the section B in Fig 2 7 does not meet the speci fication adjust the guide roller T up or down Fig 2 6 Envelope Waveform Adjustment a a b c d c b d a 63 b c d Fig 2 7 Adjustment Points A B A B H D SWITCHING PULSE ENVELOPE 6 Play back the Mono Scope alignmen...

Page 113: ...ng with T 120 E 120 The video envelope should meet the specification as shown in Fig 2 10 In SP mode A should equal B If the head gap is wide upper cylinder should be checked A B Fig 2 10 Envelope Output and Output Level 2 2 5 Tape Wrinkle Check 1 Run the T 160 E 180 tape in the playback FPS RPS and Pause modes and observe tape wrinkle at each guide 2 If excessive tape wrinkle is observed perform ...

Page 114: ...cting it with Back Tension Meter 1 0mm 0 5mm ˇ LEVER TENSION ASS Y Œ DISK S REEL ADJUSTING ADJUSTING SLIT 1 3 Fig 2 13 Tension Pole and Back Tension Adjustment 1 Remove the holder cassette assÕy and then push the lever FL Arm R to the direction of loading 2 Push the lever tension drive Œ in the direction of arrow See Fig 2 11 3 Turn the gear worm wheel clockwise so that ÒTiming PointÓ of the slide...

Page 115: ...2 6 Samsung Electronics Alignment and Adjustment MEMO ...

Reviews: