GB
25
GB
24
Auto Repeat Play
ShowView EXTEND
★
(SV-657GX/
SV-655GX/SV-455GX/SV-255GX Only)
Using the Tape Counter
Interval Repeat Play
You can set interval repeat play to repeat the
cassette several times for special interval.
1
Press MENU on the remote control.
Result: The programming menu is displayed.
2
Press the corresponding
"
,
❷
or
➛
,
❿
buttons to
select the
EASY OPERATION
option.
3
Press the OK button to select this option.
Result: The
EASY OPERATIONN
menu is displayed.
4
Press the corresponding
"
or
❷
buttons, until the
NO. OF INTERVAL REPEAT
option is selected.
5
To...
Press
❿
, until...
Interval repeat play
5, 10, 15 is displayed.
(choose repeat time 5 times,
10 times, 15 times)
Cancel interval
OFF
is displayed.
repeat play
6
On completion, press MENU twice to exit the menu.
7
To select interval during playback, press the
INPUT/REPEAT button at the desired start point.
Result: “
INTERVAL REPEAT SETTING
” is
displayed.Press the INPUT/REPEAT button
one more time at the desired end point.
Result: The tape is automatically rewound to the start
point. “
INTERVAL REPEAT
” is displayed.
The tape counter:
◆
Indicates the elapsed time in the play and record
modes (hours, minutes and seconds)
◆
Is reset when a cassette is inserted in the VCR
◆
Allows you to find the beginning of a sequence easily
☛
If the remaining time is to be calculated correctly,
you must indicate the type of cassette being used.
1
Insert a cassette in your VCR.
2
To set the tape counter to zero at the beginning of a
sequence:
◆
Press DISP./
or DISPLAY twice to display the
counter
◆
Press CLR/RST when you want to set the tape
counter to zero
3
When you are ready,
◆
Start playback or Recording.
◆
Press the
■
button.
◆
To fast-froward or rewind to the sequence at
which the counter was set to zero, press
➛➛
or
❿❿
.
➢
Some VCR information, such as the counter, can
be displayed on the television screen (unless you
have deactivated the OSD mode; refer to page 16).
Press DISP./
or DISPLAY:
◆
Once to display the current function,
programme number, recording speed, date,
time and counter
◆
Twice to display the counter only
◆
Three times to display the time remaining
on the cassette
◆
Four times to clear the display
You can set repeat play to repeat the tape
continuously from beginning to end.
1
Press MENU on the remote control.
Result: The programming menu is displayed.
2
Press the corresponding
"
,
❷
or
➛
,
❿
buttons to
select the
EASY OPERATION
option.
3
Press the OK button to select this option.
Result: The
EASY OPERATION
menu is displayed.
4
Press the corresponding
"
or
❷
buttons, until the
REPEAT PLAY
option is selected.
5
To...
Press
➛
or
❿
, until...
Repeat play
ON
is displayed.
Do not wish to repeat play
OFF
is displayed.
6
On completion, press MENU twice to exit the menu.
To prevent delays or over-runs the VCR has a
function called ShowView EXTEND allowing you to
extend the recording time by up to 60 minutes.
➢
Only use if PDC is not available or set to
OFF.
1
Press the MENU button on the remote control.
2
Press the corresponding
"
,
❷
or
➛
,
❿
buttons to
select the
EASY OPERATION
option.
3
Press the OK button to select this option.
Result: The
EASY OPERATION
menu is displayed.
4
Press the corresponding
"
or
❷
buttons, until the
SHOWVIEW EXTEND
option is selected.
5
Press
➛
or
❿
buttons to set the ShowView EXTEND
time by increments of 10 minutes.
6
To turn off, press
➛
or
❿
buttons repeatedly until
OFF
shows.
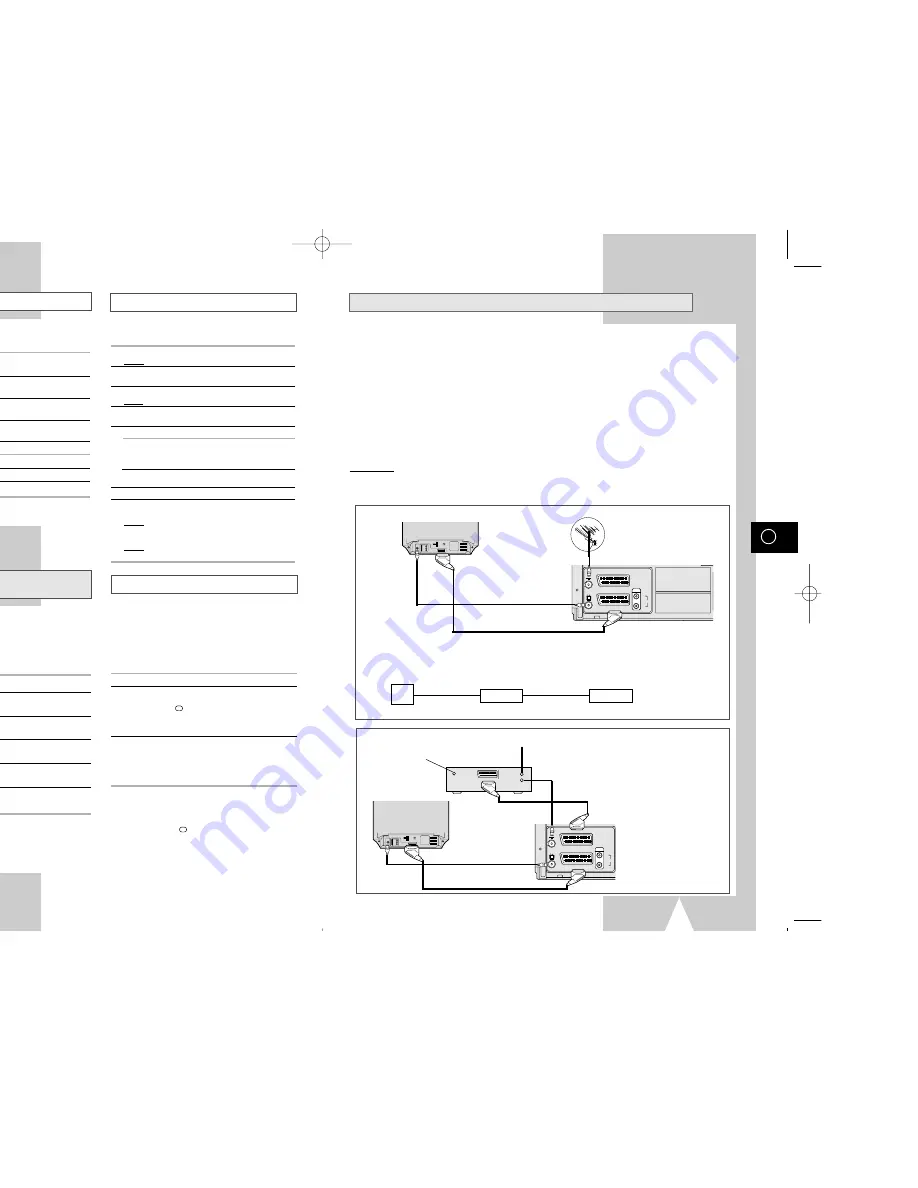
AV-Link Function of this VCR
★
(SV-657GX Only)
If your TV has “Easy Link / nexTViewLink / AV-Link” function, the VCR can automatically store stations
memorized in the TV in the same channel position as those of the TV.
Using a SCART cable (21 pins), a mutual control is available with the TV, VCR, SAT receiver, etc.
●
The VCR automatically stores all your current TV stations in the VCR in the same position order as the
TV channels. (“TV CH DOWNLOAD”)
●
Even if the TV is in standby mode, the TV automatically turns on and displays the video picture when
you start playback on the VCR.
●
The VCR automatically selects the same picture as you are watching on the TV, and record it. (“TV
PICTURE”)
●
The VCR takes in the data and turns to timer standby mode, after a program data reserved is
transferred to the VCR by a TV using such as a EPG (Electronic Program Guide). In this case, the TV’s
and the VCR’s channel position must be set to the same TV station. The position could be stored from
1 to 80. Also the VCR’s clock must be set.
Connection
Connect your EasyLink / nexTViewLink / AV-Link TV to the AV1 (EURO AV) socket on the rear of the VCR using the
SCART cable. Refer to your TV’s manual additionally.
TV
AV2 (SATELLITE) IN
AV1 (EURO AV)
R/D
L/G
AUDIO
OUT/SORTIE
IN/OUT (SCART) SCART Cable
AUDIO/VIDEO
AERIAL INPUT
AERIAL OUTPUT
AERIAL IN
TV
When connecting another VCR supporting EasyLink / nexTViewLink / AV-Link functions
The “nexTViewLink” system can connect 2 VCRs (VCR1 and VCR2) at the same time. This VCR is adjusted to
“VCR1”, so it should be connected to VCR2.
TV
VCR2
this VCR
IN/OUT(SCART)
SCART cable
SCART cable
VCR1
SCART cable
SATELLITE IN
AERIAL INPUT
AERIAL OUTPUT
AERIAL INPUT
TV
AV2 (SATELLITE) IN
AV1 (EURO AV)
R/D
L/G
AUDIO
OUT/SORTIE
AERIAL IN
TV
IN/OUT(SCART)
AUDIO/VIDEO
Satellite antenna
- Connection to your EasyLink / nexTViewLink / AV-Link TV and a satellite receiver
- Connection to your EasyLink / nexTViewLink / AV-Link TV
21 pins SCART cable
01823H SV-657GX/EUR-GB2 4/19/02 5:02 PM Page 24


