Disassembly and Reassembly
Samsung Electronics
1-17
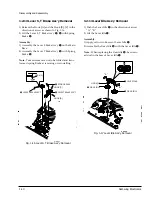
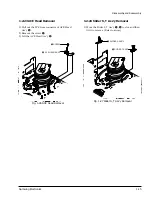
1-2-28 Motor Capstan Ass’y Removal
1) Remove the 3 Screws
Œ
.
2) Remove the Motor Capstan AssÕy
´
.
Assembly
:
1) Match the 3 holes of Motor Capstan AssÕy
´
to the
3 holes of Main Base as attending not to drop or
knock the Motor Capstan AssÕy.
2) Tighten the 3 Screws in the direction of arrow as
shown detail drawing.
Note
:
1) DonÕt reuse the removed screws from Motor
Capstan AssÕy.
2) After tightening screws, check if there is gap
between the head of screws and the top side of
Main Base. There should have no gap between the
head of screws and the top side of Main Base.
3) After reinstalling, adjusting the tape transport
system again.
Œ
3 SCREWS
´
MOTOR CAPSTAN ASS'Y
B
C
A
<DETAIL>
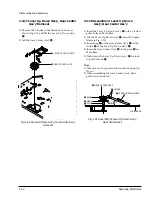
1-2-29 How to Eject the Cassette Tape
(If the unit does not operate on condition
that is inserted into housing ass’y)
1) Remove the Holder worm
Œ
and the Gear Worm
´
.
2) Turn the Gear Worm Wheel
ˇ
counterclockwise
with screw driver. (Refer to arrow)
Œ
HOLDER WORM
´
GEAR WORM
SCREW DRIVER
ˇ
GEAR WORM WHEEL
Fig. 1-31 Motor Capstan Ass’y Removal
Fig. 1-32
3) When Slider S, T are approached in the position of
unloading, rotate holder Clutch counterclockwise
after inserting screw driver in the hole of frameÕs
bottom in order to wind the unwounded tape.
(Refer to Fig. 1-33)
(If you rotate Gear Worm Wheel continuously
when tape is in state of unwinding, you may cause
a tape contamination by grease and tape damage.
Be sure to wind the unwounded tape in the state
of set horizontally.)
4) Rotate Gear Worm Wheel
ˇ
counterclockwise
using screw driver again up to the state of eject
mode and then pick out the tape.
(Refer to Fig. 1-32)
FRAME
Fig. 1-33
Summary of Contents for SV-625X
Page 12: ...2 8 Samsung Electronics Alignment and Adjustment MEMO ...
Page 22: ...Exploded View and Parts List 3 10 Samsung Electronics MEMO ...
Page 35: ...Schematic Diagrams Samsung Electronics 5 3 5 1 S M P S 230 Voltage HI FI MONO ...
Page 36: ...Schematic Diagrams 5 4 Samsung Electronics 5 2 S M P S Free Voltage HI FI MONO ...
Page 37: ...Schematic Diagrams Samsung Electronics 5 5 5 3 Power Drive ...
Page 39: ...Schematic Diagrams Samsung Electronics 5 7 5 5 Audio Video ...
Page 40: ...Schematic Diagrams 5 8 Samsung Electronics 5 6 Hi Fi ...
Page 42: ...Schematic Diagrams 5 10 Samsung Electronics 5 8 SECAM ...
Page 44: ...Schematic Diagrams 5 12 Samsung Electronics 5 10 Input Output ...
Page 45: ...Schematic Diagrams Samsung Electronics 5 13 5 11 OSD VPS PDC ...
Page 46: ...Schematic Diagrams 5 14 Samsung Electronics 5 12 OSD Without VPS PDC ...
Page 47: ...Schematic Diagrams Samsung Electronics 5 15 5 13 Function Timer VFD AV Link V F D VFD AV LINK ...
Page 48: ...Schematic Diagrams 5 16 Samsung Electronics 5 14 Function Timer LED LED MODULE LED SINGLE ...
Page 50: ...Schematic Diagrams 5 18 Samsung Electronics 5 16 Remote Control Multi TV ...
Page 51: ...Schematic Diagrams Samsung Electronics 5 19 5 17 Remote Control VCR Only ...
Page 52: ...Schematic Diagrams 5 20 Samsung Electronics MEMO ...
Page 77: ...2 6 Samsung Electronics Alignment and Adjustment MEMO ...

