background image

GB

38

With the Audio Dubbing function, you erase the previously
recorded sound and replace it with a new soundtrack from:

A CD player

A microphone connected to a sound system

A cassette player

Restriction:
Audio dubbing is applicable only to the longitudinal audio track
(normal audio).

1

Connect an RCA audio cable to the appropriate output on your
sound system (CD/cassette player for example).

2

Connect the other end of the RCA audio cable to the audio input
connectors (L, R) on the front of your VCR.

3

Insert the pre-recorded cassette on which the audio track is to be
replaced, and press the 

II  to start playback.

4

Find the scene that you want to over-dub and press 

II on the

remote control. 

5

Press DUB.
Result:

Your VCR is now in the Audio dubbing Pause mode.

6

On the sound system, locate the point on the CD or cassette at
which you wish to start playback.
Example: The track that you wish to record on the cassette.

7

When you are ready:

Start playback on the sound system

Press REC on the remote control.

Result:

The soundtrack is replaced on the pre-recorded cassette.

The new sound will be recorded on the normal sound
track of the tape, and the original sound will remain on
the Hi-Fi sound track.
To hear the new sound and original sound mixed
together, press the Audio button on the remote control
until the MIX option is displayed (see page 31).

Audio Dubbing a Pre-recorded Cassette

(SV-656I Only)

4            

 5

6

10

A.DUB

A.DUB

VIDEO EDIT

A.DUB

-0:05:23

 SPEED          DUB        TV/VCR       TIMER

5

OK

REC

      MENU

4

3

3

GB

39

Your VCR remote control will work with Samsung televisions and
compatible brands. 

To determine whether your television is compatible, follow the instructions
below.

1

Switch your television on.

2

Point the remote control towards the television.

3

Hold down the TV button and enter the two-figure code
corresponding to the brand of your television, by pressing the
appropriate numeric buttons.

Brand

Codes

Brand

Codes

SAMSUNG

01 to 06

PHILIPS

02, 20, 22

AKAI

09, 23

SABA

13, 14, 22 to 24

GRUNDIG

09, 17, 21

SONY

15, 16

LOEWE

02

THOMSON

13, 14, 24

PANASONIC

08, 23 to 27

TOSHIBA

07, 16 to 19, 21

Result:

If your television is compatible with the remote control, it
will switch off. It is now programmed to operate with the
remote control.

If several codes are indicated for your television brand, try
each one in turn until you find one that works.

When you change the batteries in the remote control, you
must reprogramme the code, following the same procedure.

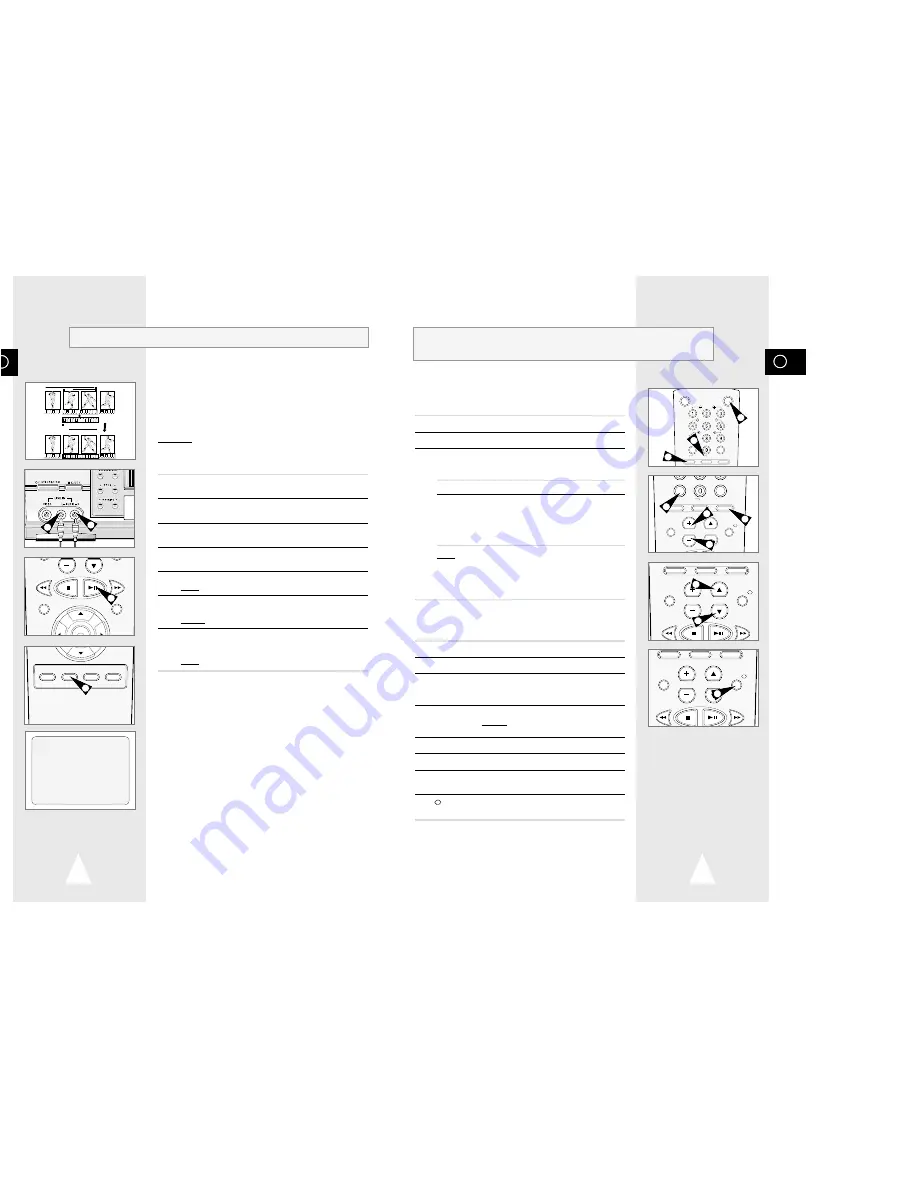
You can then control the television using the following buttons.

Button

Function

TV STANDBY/ON

Used to switch the television on and off.

TV or VCR 

Used to switch between the TV and VCR modes.
Only the VOL (

+

or 

) and TV STANDBY/ON 

buttons are operational in VCR mode.

-/--  

Used to enter a two-figure programme number.
Example: For programme 12, press -/-- followed

by numeric buttons 1 and 2.

INPUT  

Used to select an external source.

VOL 

+

or 

Used to adjust the volume of the television.

PROG/TRK   

Used to select the required programme.

(

$

or

)

DISP./

Used to switch between an external source and
the television tuner.

The various functions will not necessarily work on all
televisions. If you encounter problems, operate the
television directly.

Using the TV Buttons on the Remote Control 

(SV-656I/SV-456I Only)

VCR STANDBY/ON                                                  TV STANDBY/ON

SLOW

SHUTTLE

V-LOCK

CLR/RST       F.ADV          INDEX

TV                  VCR                INPUT

REPEAT

SELECT

-/--

TV                  VCR                INPUT

REPEAT

VOL         PROG/TRK

AUDIO

DISP./

CLR/RST       F.ADV          INDEX

TV                  VCR                INPUT

REPEAT

VOL         PROG/TRK

AUDIO

DISP./

SELECT

-/--

TV                  VCR                INPUT

REPEAT

VOL         PROG/TRK

AUDIO

DISP./

1

2

2

6

6

7

3

5

5

4

Summary of Contents for SV-252I

Page 1: ...VIDEO CASSETTE RECORDER SV 656I SV 456I SV 256I SV 252I Instruction Manual PAL www samsungvcr com ...

Page 2: ...he Recording Speed 22 NICAM SV 656I Only 23 Protecting a Recorded Cassette 24 Recording a Programme Immediately 24 Recording a Programme with Automatic Stop 25 Using the Timer Programming Feature 26 Checking a Preset Recording 27 Cancelling a Preset Recording 27 GB 2 About this manual Thank you for purchasing a Samsung Video Cassette Recorder VCR Your Owner s Instructions contain much valuable inf...

Page 3: ...cally SV 256I SV 252I Only 28 Adjusting Picture Alignment Manually 28 Intelligent Picture Control 29 Intelligent Picture Control SV 256I SV 252I Only 29 Selecting the Colour Mode 30 Selecting the Audio Output Mode SV 656I Only 31 Selecting the Audio Mute Mode SV 456I SV 256I SV 252I Only 31 SEARCHING FOR A SEQUENCE Playing a Cassette in Slow Motion SV 656I SV 456I Only 32 Playing a Sequence Frame ...

Page 4: ...SOCKET AUDIO INPUT SOCKET VIDEO INPUT SOCKET VIDEO OUTPUT SOCKET OUT TO TV CONNECTOR TV LINE IN 1 VIDEO AUDIO LINE OUT R L AERIAL IN CONNECTOR AUDIO L R OUTPUT SOCKETS AUDIO L R INPUT SOCKETS VIDEO INPUT SOCKET VIDEO OUTPUT SOCKET OUT TO TV CONNECTOR I I I I REC CHANNEL EJECT STANDBY ON STOP I I P S PLAY REW F F EJECT BUTTON VIDEO CASSETTE COMPARTMENT PAUSE STILL BUTTON STANDBY ON BUTTON STOP BUTT...

Page 5: ... TRK IPC INPU T REPE AT TRK PRO G AUD IO REC MEN U SPEE D DUB TV VC R TIMER DISP LAY REMOTE CONTROL OWNER S INSTRUCTIONS COAXIAL CABLE Display Indicator 1 Cassette loaded indicator 2 PLAY indicator 3 Multi function display 4 Timer indicator 5 REC indicator 6 STEREO indicator VIDEO STEREO STEREO 5 6 1 2 3 4 5 1 2 3 4 SV 656I SV 456I SV 256I SV 252I OK VCRSTANDBY ON TVSTANDBY ON SLOW SHUTTLE V LOCK ...

Page 6: ...ing the cables 1 Connect the coaxial cable as indicated in the above section 2 Connect one end of the RCA Audio Video cable to the Video output and Audio output socket on the rear of the VCR 3 Plug the other end into the appropriate connector on the television Deciding How to Connect Your VCR You must take into account various factors when connecting audio or video systems Types of connectors avai...

Page 7: ...ions that it has found 6 On completion press MENU twice to exit the menu TV TV LINE IN 1 VIDEO AUDIO LINE OUT AUTO SET UP PLEASE WAIT 60 I I END MENU CLOCK TUE 12 00 1 JAN 2002 END MENU 2 Connecting Other Equipment to Your VCR You can connect other audio and or video equipment to your VCR in different ways The following illustrations give a few examples of the connection possibilities The RCA inpu...

Page 8: ...television or set the television to UHF channel 40 6 Fine tune the television until the pictures and sound are obtained clearly 7 If you cannot find the pictures and sound or there is interference from nearby channels it may be necessary to change the setting of the VCR output channel see Setting the VCR Output Channel on page 17 and Problems and Solutions on page 42 8 When the picture and sound a...

Page 9: ...the TV SYSTEM option is selected 5 Press the button to select I K or G 6 On completion press MENU twice to exit the menu Selecting the RF OUT Sound Mode Displaying Hiding On Screen Information Choosing Your Language You can change the language in which information is displayed on the screen 1 Press MENU on the remote control Result The programming menu is displayed 2 Press the corresponding or but...

Page 10: ...n stored 11 On completion press the MENU button three times to exit the menu INSTALL AUTO SET UP MANUAL SET UP TV SYSTEM I VCR OUTPUT CH CH36 END MENU TV STATION TABLE PR CH 1 002 2 3 4 5 SWAPPING OK DELETE CLR RST MENU MANUAL TUNING PR 1 CH MFT MEMORY OK END MENU Presetting the Stations Automatically You do not need to preset the stations if you have already set them automatically see Plug Auto S...

Page 11: ...tton three times to exit the menu INSTALLATION PROG OPTIONS INSTALL CLOCK BONUS LANG INSTALL OK END MENU INSTALL AUTO SET UP MANUAL SET UP TV SYSTEM I VCR OUTPUT CH CH36 END MENU TV STATION TABLE PR CH 1 002 2 3 4 5 SWAPPING OK MENU TV STATION TABLE PR CH 1 2 3 002 4 5 SWAPPING OK MENU If you have stored a TV station That you do not require At the wrong programme position you can cancel it 1 Press...

Page 12: ...g play mode LP is displayed OPTIONS OSD ON TAPE SELECT E180 COLOUR SYSTEM AUTO IPC ON END MENU SPEED DUB TV VCR TIMER USER SET PROG OPTIONS INSTALL CLOCK BONUS LANG OPTIONS OK END MENU NICAM SV 656I Only NICAM programmes are divided into 3 types NICAM Stereo NICAM Mono and Bilingual transmission in another language NICAM programmes are always accompanied by a standard mono sound broadcast and you ...

Page 13: ... Result The record indicator appears on the television and VCR display An index is recorded on the tape see page 33 7 To stop recording press once If the cassette is ejected when you start recording check that the safety tab is intact or the opening is covered with adhesive tape If you reach the end of the tape while recording the cassette rewinds automatically This function enables you to record ...

Page 14: ...e cassette Auto Tape Speed Select The VCR s Auto Tape Speed Select function compares the duration of the timer recording to the actual recording time remaining on the tape loaded If there is insufficient tape to complete a timer recording in AUTO mode the VCR automatically switches to LP mode to record the whole programme E g If there is a one hour AUTO mode timer recording to be started but only ...

Page 15: ... adjust the alignment manually to obtain the best possible picture When noise bars or streaks appear during playback adjust alignment manually by pressing the PROG TRK or TRK or buttons until the picture is clear and stable Result The tracking bar appears The image is adjusted The tracking bar disappears when you release the button Adjusting Picture Alignment Automatically SV 256I SV 252I Only The...

Page 16: ...dard is automatically selected by the VCR B W Black and White 6 On completion press MENU twice to exit the menu OPTIONS OSD ON TAPE SELECT E180 COLOUR SYSTEM AUTO IPC ON END MENU USER SET PROG OPTIONS INSTALL CLOCK BONUS LANG OPTIONS OK END MENU When monitoring a TV programme or playing back a Hi Fi recorded video tape press the AUDIO button to select a desired sound output As the AUDIO button is ...

Page 17: ...ndex Skip Search This feature will enable you to fast forward rewind to a specific point on a tape E g if you have recorded 3 different programmes on a tape and you have rewound the tape to the beginning by using this feature you can go directly to the start of programme 2 simply by pressing the INDEX button 1 Press the INDEX to start the Index search 2 Press the or buttons twice more This will ta...

Page 18: ...isplayed 2 Press the corresponding or buttons to select the EASY OPERATION option 3 Press the OK button to select this option Result The EASY OPERATION menu is displayed 4 Press the corresponding or buttons until the REPEAT PLAY option is selected 5 To Press or until Repeat play ON is displayed Do not wish to repeat play OFF is displayed 6 On completion press MENU twice to exit the menu You can se...

Page 19: ...INPUT button to select the appropriate input on your VCR LINE IN 1 for the rear input LINE IN 2 for the front input SV 656I SV 456I only 5 Start playing back the cassette to be copied 6 Hold REC down for a while to start recording on your VCR 7 When you have finished recording press on both VCRs If you wish to view the cassette being copied Your VCR must be connected as usual to the television see...

Page 20: ...ructions below 1 Switch your television on 2 Point the remote control towards the television 3 Hold down the TV button and enter the two figure code corresponding to the brand of your television by pressing the appropriate numeric buttons Brand Codes Brand Codes SAMSUNG 01 to 06 PHILIPS 02 20 22 AKAI 09 23 SABA 13 14 22 to 24 GRUNDIG 09 17 21 SONY 15 16 LOEWE 02 THOMSON 13 14 24 PANASONIC 08 23 to...

Page 21: ...dB SP Better than 43 dB SP Horizontal resolution More than 240 lines More than 240 lines AUDIO Input 8 dBm 47 Kohm unbalanced 8 dBm 47 Kohm unbalanced Output 8 3 dBm 1 Kohm unbalanced 8 3 dBm 1 Kohm unbalanced Wow and flutter WTD 0 4 max SP 0 4 max Signal to noise ratio 68 dB min IHF A filter 42 dB min IHF A filter Frequency response 20Hz 20kHz 100Hz 8kHz Power requirement 100 240V 50 60 Hz 100 24...

Page 22: ... V H 196 25 CCIR 009 E09 V H 203 25 CCIR 010 E10 V H 210 25 CCIR 011 E11 V H 217 25 CCIR 012 E12 V H 224 25 CCIR 013 A V L 53 75 Italy 014 B V L 62 25 Italy 015 C V L 82 25 Italy 016 D V H 175 25 Italy 017 E V H 183 25 Italy 018 F V H 192 25 Italy 019 G V H 201 25 Italy 020 H V H 210 25 Italy 021 E21 UHF 471 25 CCIR 022 E22 UHF 479 25 CCIR 023 E23 UHF 487 25 CCIR 024 E24 UHF 495 25 CCIR 025 E25 UH...

Page 23: ...THIS APPLIANCE IS DISTRIBUTED BY www samsungvcr com AC68 01823V ELECTRONICS ...

Reviews: