background image

ENGLISH-

21

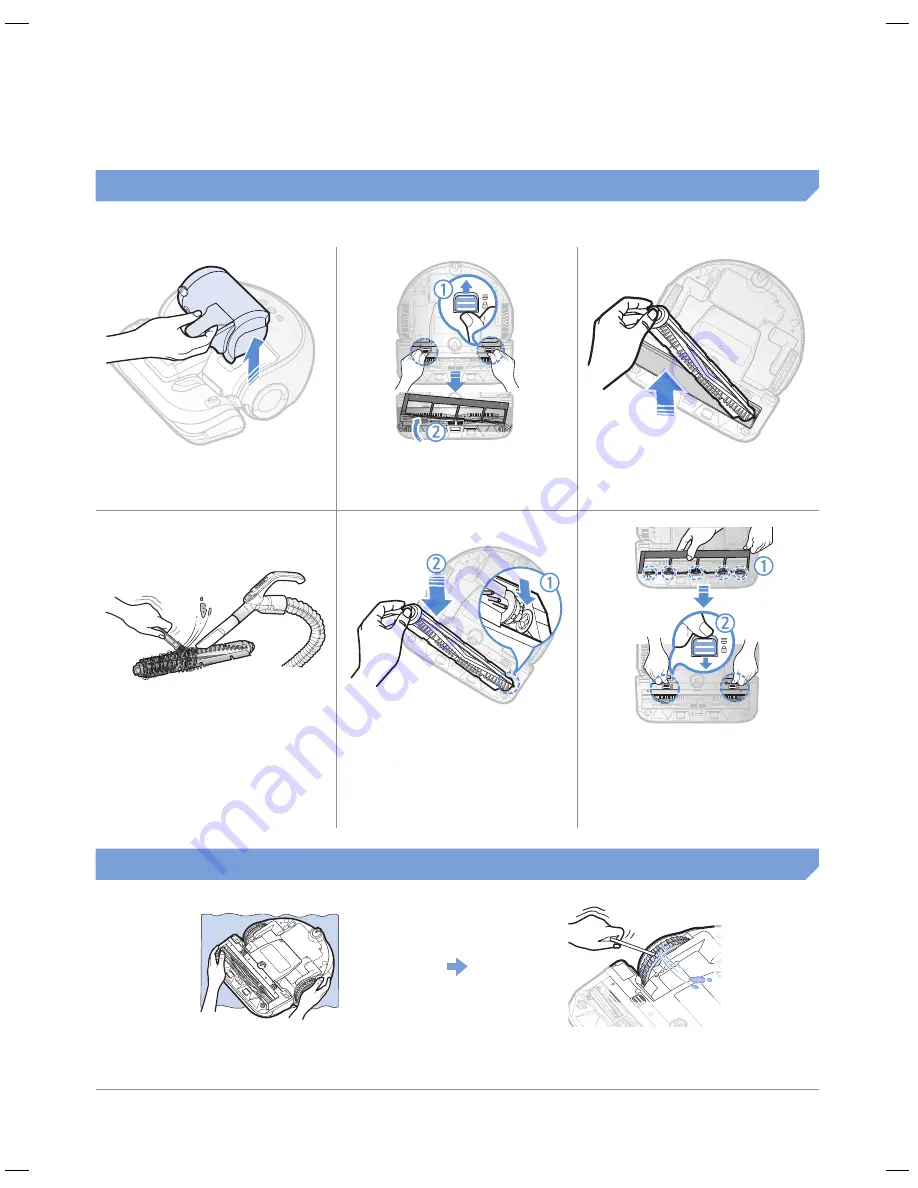
Cleaning the power brush

1

  Remove the dustbin

2

  Remove the Power 

brush cover

3

  Remove the Power 

brush

ON

OFF

ON

OFF

4

  Clean the Power brush

5

  Reassemble the Power 

brush

6

  Reassemble the Power 

brush cover

Cleaning the Driving wheel

1


Put a soft cloth on the floor and place 
POWERbot upside-down.

2


Use a blunt rod or tweezers to remove the 
foreign matters.

SR20H9050U-EN_DJ68-00716C-03_SA.indd   21

2015-02-05   오전 11:34:56

Summary of Contents for SR20H9050U

Page 1: ...20H9050U SR20H9030U POWERbot user manual imagine the possibilities Thank you for purchasing a Samsung product English Before operating this unit please read the instructions carefully For indoor use only ...

Page 2: ...Using the remote control Power Recharging Cleaning mode Additional function Direction control Point cleaning 18 Name of each part Top Bottom Display panel 19 Setting time schedule Setting the time Setting the schedule 20 Cleaning and maintaining Cleaning the dustbin Cleaning the sensors and the camera Cleaning the Power brush Cleaning the Driving wheel 22 Notes and cautions Charging In use Cleanin...

Page 3: ...ng instructions cover various models the characteristics of your vacuum cleaner may differ slightly from those described in this manual CAUTION WARNING SYMBOLS USED WARNING Indicates that a danger of death or serious injury exists caution Indicates that a risk of personal injury or material damage exists OTHER SYMBOLS USED note Indicates that a risk of personal injury or material damage exists ...

Page 4: ...tand the hazards involved Children shall not play with the appliance Cleaning and user maintenance shall not be made by children without supervision BATTERY Charger station Do not modify the polarized plug to fit a non polarized outlet or extension cord Do not use outdoors or on wet surfaces Unplug the charger station from the outlet when not in use and before servicing Use only the charger statio...

Page 5: ...matches or hot ashes Do not use to pick up flammable or combustible liquids such as gasoline nor use on areas where they may be present Locations with candles or desk lamps on the floor Locations with unattended fires fire or embers Locations with distilled alcohol thinner ashtrays with burning cigarettes etc Do not use POWERbot in an enclosed space filled with vapours given off by oil based paint...

Page 6: ... POWERbot can be damaged or malfunction Install the Virtual guard in front of dangerous areas such as stairs or railings to prevent damaging the product or getting injured For your safety always keep the cliff sensor clean Be sure POWERbot does not pass through or touch any kind of liquids The POWERbot can be severely damaged and it may contaminate other areas if the wheels pass through liquid Do ...

Page 7: ...hat may disturb POWERbot s movement such as children s indoor swing or slides before cleaning CAUTION In use Using POWERbot on thick carpet may damage both POWERbot and the carpet The POWERbot cannot pass over carpet that is thicker than 1 cm Do not use POWERbot on tables or other high surfaces There is a risk of damage if it falls The POWERbot may bump into chair desk legs therefore move them awa...

Page 8: ...e adapter the side with the sticker attached must face down 3Connect the power plug to the outlet Power lamp Red will turn on Installation Power of the charger must be on at all times DC IN DC IN Power lamp Red About 1 m About 0 5 m About 0 5 m Install it in a place without obstacles and danger of falling ...

Page 9: ...oden floors If the emergency switch is off POWERbot will not charge even if it is docked on the charger Always turn on the power of the charger If power is not supplied to the charger POWERbot cannot find it and cannot automatically recharge If POWERbot is left detached from the charger the battery will drain naturally If POWERbot is in energy saving mode power will not come on even if the emergen...

Page 10: ...rging 1 Turn on the emergency switch on the bottom You must turn on the emergency switch to turn on POWERbot 2 Manually charge POWERbot by placing it on the charger Make sure charge pins of POWERbot and the charger is aligned 3Check the charging status will turn on according to charging progress and FULL will turn on when charging is complete WARNING Rated input voltage of this product is 100 240 ...

Page 11: ...ion status of the charger when charger is located in a place where POWERbot cannot easily access distance of the charger and POWERbot is over 5 m apart It may take a long time for POWERbot to return to the charger for recharging Manually charge POWERbot when charger is located in a corner battery is fully exhausted POWERbot is stuck by obstacles furniture etc POWERbot can t climb threshold near ch...

Page 12: ... Power lamp Red will blink 2Install the Virtual guard where you want to restrict POWERbot s entrance Make sure that distance sensor is facing at the desired direction you want to create a invisible barrier which will restrict POWERbot s approach The distance of virtual wall is 2 5 m at minimum and may differ depending on surroundings and movement status of POWERbot Minimum 2 5 m ...

Page 13: ...ry cover Inserting batteries Batteries for Virtual guard must be purchased separately 1 Open the battery cover of the Virtual guard by pressing the locking tab and lift it up 2 Insert the alkaline batteries D type as shown in the illustration check the polarity 3 Insert the tip of the cover into the slot and push the other end to close the battery cover Specification type D LR20 batteries ...

Page 14: ...utomatically until it cleans entire space once Stop cleaning Press the button shortly Recharging You may command POWERbot to recharge at the charger automatically while it is in cleaning process Using the cleaning modes You can select the desired cleaning mode WARNING When POWERbot is not used for 30 minutes power will turn off automatically You can turn on the power only by using the buttons on P...

Page 15: ...ean mode When cleaning is done within 15 minutes in Auto clean mode the cleaner will repeat cleaning one more time Cleaning method for each modes About 1 5 m About 1 5 m Auto clean Cleans automatically until entire space is cleaned once Spot clean Cleans a localized area intensely It can be used to clean bread or cookie crumbs Max clean Cleans until the battery is depleted Manual clean You can mov...

Page 16: ...start or stop cleaning process 3 Additional function Silence mode Select to clean with lower operation noise Turbo mode is not available Dust sensor mode In Auto clean mode When dust intake is detected suction of POWERbot will become stronger and it will move around that area to focuses on cleaning the surrounding area In Spot Max Manual clean When dust intake is detected suction of POWERbot will ...

Page 17: ...will follow the light while cleaning 50 cm Operating distance of the remote control Height of the remote control Operating distance Height of the remote control 0 5 m 1 m 1 5 m Operating distance About 1 5 m About 2 m About 3 m 5 Point cleaning Only available in A type remote controll A Type 1 2 4 3 Refer to page 19 N A 5 B Type 1 2 4 Refer to page 19 3 4 Direction control A Type B Type Select to ...

Page 18: ...Power brush 3 Power brush cover 4 Cliff sensor 5 Roller 6 Battery cover 7 Power brush cover button 8 Driving wheel 9 Emergency switch 11 12 7 10 9 8 5 6 14 15 1 3 2 4 13 Display panel 1 Mute 2 Error indicator Refer to page 24 3 One time Daily schedule 4 Filter inspection 5 Battery indicator 6 Number display 7 Auto clean 8 Spot clean 9 Max clean 10 Manual clean 11 Silence mode 12 Dust sensor mode 1...

Page 19: ...le can only be done while POWERbot is docked on the charger Start setting Select One time or Daily schedule Select Hour Select Minute Select AM PM Select cleaning mode Only Auto clean Max clean can be selected Setting complete or Skip to previous next setting Cancelling during setup Setting will be canceled automatically when there s no input for 1 minute Cancelling One time Daily schedule When bo...

Page 20: ... in the dustbin 1 Remove the dustbin 2 Remove the dustbin cover 3 Remove dust in the dustbin and cyclone unit Click 4 Detach the cyclone unit from the dustbin cover then wash the dustbin and the filter 5 Reassemble the dustbin 6 Reinsert the dustbin into the main body until it clicks Cleaning the sensors and the camera Lightly wipe with soft cloth Camera Front sensor window Rear sensor window Clif...

Page 21: ...cover 3 Remove the Power brush ON OF F ON OFF 4 Clean the Power brush 5 Reassemble the Power brush 6 Reassemble the Power brush cover Cleaning the Driving wheel 1 Put a soft cloth on the floor and place POWERbot upside down 2 Use a blunt rod or tweezers to remove the foreign matters ...

Page 22: ...ot enter such as corners between the wall and sofa etc Please use another cleaning tool to clean them regularly The POWERbot cannot vacuum clumps of dirt so some may remain on the floor after cleaning Please use another cleaning tool to clean them regularly If POWERbot is turned off power cannot be turned on by the Power button of the remote control Press and hold the Start Stop button on POWERbot...

Page 23: ...vice center The battery warranty period is 6 months from the date of purchase About the IrDA sensor Caution The infrared signal transmission may not be smooth in locations exposed to halogen lamps or in outdoor locations The POWERbot uses 3 types of infrared devices and a device may not work in front of another device with a higher priority Infrared signal Priority Remote control Virtual guard Cha...

Page 24: ...l Turn off the emergency switch and remove the foreign matter from the Driving wheel Bumper sensor needs to be checked Turn off the emergency switch and turn it back on When error code does not disappear check if there s any small foreign matter between the bumper and the main body If there is pull the bumper slightly and remove the foreign matter Foreign matter accumulated on the obstacle sensor ...

Page 25: ... the emergency switch and empty the dustbin The POWERbot cannot find the charger Check if there s power failure or whether the power plug is unplugged Remove any obstacles around the charger that may disturb POWERbot from returning to the charger When there s foreign matters on the charge pins that affects charging clean the foreign matter The POWERbot suddenly cleans diagonally Check if the charg...

Page 26: ... there s no dust at the surrounding area Check if foreign matters are caught between the dustbin and power brush and then remove them Open Source Announcement The software included in this product contains open source software You may obtain the complete corresponding source code for a period of three years after the last shipment of this product by sending an email to mailto oss request samsung c...

Page 27: ...ng plus TM Button type of POWERbot Touch type Power specifications Power voltage 100 240 V 50 Hz 60 Hz Power consumption 70 W Battery specifications Lithium ion 21 6 V 84 Wh Cleaning Charging type Automatic charging Manual charging Cleaning mode Auto Spot Max Manual One time schedule Daily schedule Charging time Approximately 160 minutes Cleaning time Approximately 60 minutes Normal mode On the ba...

Page 28: ...center Country Customer Care Center Web Site U K 0330 SAMSUNG 7267864 www samsung com SOUTH AFRICA 0860 7267864 SAMSUNG www samsung com AUSTRALIA 1300 362 603 www samsung com HONG KONG 852 3698 4698 www samsung com hk www samsung com hk_en MALAYSIA 1800 88 9999 www samsung com SINGAPORE 1800 SAMSUNG 7267864 www samsung com ch_fr French ...

Reviews: