background image

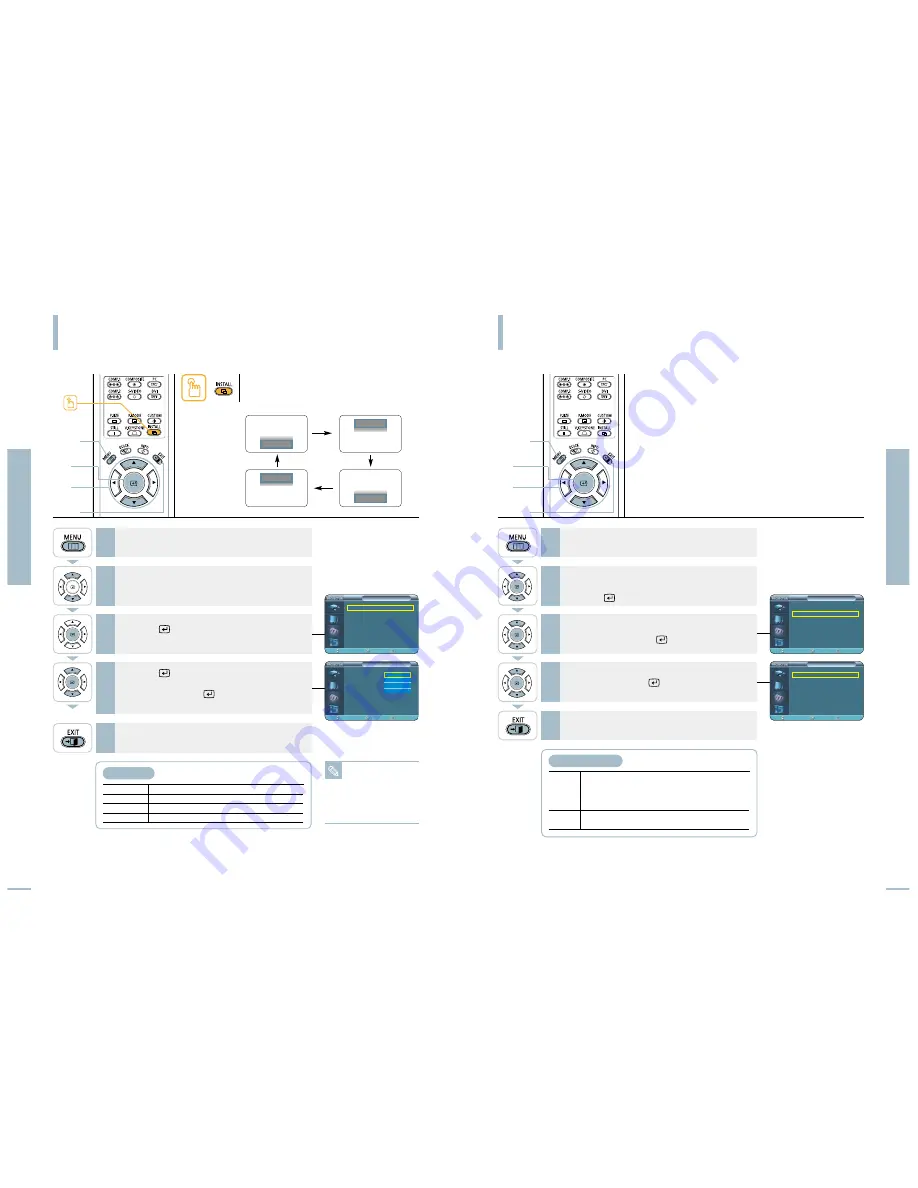
Flipping/Reversing the Projected Image

To support positioning of the projector, horizontal/vertical flipping and picture reversal are available.

Setup

Flipping/Reversing the Projected Image

Setup

Light Setting

46

47

Press the 

INSTALL

button.

The screen will flip over horizontally or vertically with each

press of the button.

NOTE

This function is used to
set up reversed image
projection for ceiling
installation. To install
projector, refer to page
18.

One Touch

1

MENU

3, 4

Select

2, 4

/

5

EXIT

1

MENU

2, 3, 4

Select

2, 3, 4

/

5

EXIT

Front-Floor

Normal Image

Front-Ceiling

Horizontally Reversed Image

Rear-Floor

Vertically Reversed Image

Rear-Ceiling

Horizontal/Vertical Reversed Image

Install Menu

Press the 

MENU

button.

The main menu is displayed.

1

Press the 

or 

button to move to 

Setup

.

The Setup menu is displayed.

2

Press the 

button again.

Press the 

or 

button to move to desired

mode, then press the 

button.

Setup is switched to the selected mode.

4

Press the 

EXIT

button to exit the menu.

5

Press the 

button.

Install is selected.

3

Light Setting

Used to set the image brightness by adjusting the amount of light generated by the lamp.

Theater

Used to reduce the brightness of the lamp in dark 
ambient light to prevent reflection in the eye. It also 
lowers power consumption and extends the life of the 
lamp.

Bright

Used to enhance the brightness in relatively bright 
ambient light.

Light Setting Mode

Press the 

MENU

button.

The main menu is displayed.

1

Press the 

or 

button to move to 

Setup

.

The Setup menu is displayed.

Press the 

button.

2

Press the 

EXIT

button to exit the menu.

5

Press the 

or 

button to move to 

Light

Setting

, then press the 

button.

3

Press the 

or 

button to move to desired

mode, then press the 

button.

Setup is switched to the selected mode.

4

Setup

Install

: Front-Floor 

Light Setting

: Theater

V-Keystone

Test Pattern 

PC

Factory Default

Information

Move

Enter

Return

Setup

Install

: Front-Floor 

Light Setting

: Theater

V-Keystone
Test Pattern
PC
Factory Default
Information

Move

Enter

Return

Front-Floor

Front-Ceiling

Rear-Floor

Rear-Ceiling

Setup

Install

: Front-Floor 

Light Setting

: Theater

V-Keystone

Test Pattern 

PC

Factory Default

Information

Move

Enter

Return

Light Setting

Theater

Bright

Move

Enter

Return

Front-Floor

Rear-Floor

Front-Ceiling

Rear-Ceiling

Summary of Contents for SP-H700

Page 1: ...MSUNG 1 800 726 7864 Samsung Electronics America Service Division 400 Valley Road Suite 201 Mount Arlington NJ 07856 www samsungusa com Samsung Electronics Canada Inc Samsung Customer Care 7037 Financial Drive Mississauga Ontario L5N 6R3 www samsung ca BP68 00232A 00 ...

Page 2: ...hts To prevent damage which may result in fire or electric shock hazard do not expose this appliance to rain or moisture CAUTION Always be careful when using your set To reduce the risk of fire electrical shock and other injuries keep these safety precautions in mind when installing using and maintaining your set Read all safety and operating instructions before operating your set Keep the safety ...

Page 3: ...ces au Canada PCT Notice VCCI This is a Class B product based on the standard of the Voluntary Control Council for Interference by Information Technology Equipment VCCI If this is used near a radio or television receiver in a domestic environment it may cause radio interference Install and use the equipment according to the instruction manual Preparation FCC Information 5 FCC Information Preparati...

Page 4: ...g 47 Correcting Vertical Keystone 48 Test Patterns 49 Restoring the Factory Default Settings 50 Information 51 Picture Adjustment Selecting Picture Mode 34 Custom Settings of the Picture 35 Selecting and Adjusting Color Temperature 36 Gamma Correction 37 Saving Custom Picture Settings 38 Setting up DNle 39 Selecting Picture Size 40 Film Mode 42 Overscan 43 Still Picture 44 Menu Option Setting the ...

Page 5: ...s in nature depending on time of use and using environment Refer to the installation and other recommended operational sections of the user s manual to avoid rapid degradation of performance and deterioration of picture quality The projector lamp requires regular replacement Free servicing will be offered within 90 days after purchasing of the product or within 300 hours of product use if the prob...

Page 6: ...Preparation Projector and Accessories 12 Installation and Basic Adjustments 18 V I S U A L R E A L I S M ...

Page 7: ...cting the lamp unit is not closed properly Power is turned off automatically when temperature inside of the projector goes beyond the control limit Refer to measure 3 Refer to measure 4 below if the life span of the lamp is running out or a problem with the lamp is detected When the cooling fan system is not in normal operating condition When the lamp cover protecting the lamp unit is not properly...

Page 8: ...h to DVI Mode 1 16 6 COMPOSITE Pages 27 30 Used to switch to COMPOSITE Mode 1 17 7 CUSTOM Page 35 Used to select Picture User Adjust Mode 1 18 8 INSTALL Page 46 Used to flip or reverse the projected image 1 19 9 INFO Page 51 Used to check source signals picture setup PC screen adjustment and lamp lifespan 2 20 0 EXIT Used to make Menu Screen disappear 1 2 3 4 5 6 7 11 12 13 17 16 15 14 18 19 20 8 ...

Page 9: ...e remote controller for five seconds The remote control buttons are lit for about 5 seconds and turn off automatically Setting the Adjustment right or move to lower item 1 Press on the part of the lid to remove it 2 Insert two AAA sized 1 5V batteries by matching 3 Close the lid LIGHT PROJECTOR AND ACCESSORIES Operating the Remote Control Operating Move Select Button Inserting Batteries into Remot...

Page 10: ... will show the horizontally flipped image Rotate the image projected from the projector horizontally Page 46 Install the projector at the viewers side 2 3 1 INSTALLATION AND BASIC ADJUSTMENTS Installation and Turning On PREPARATION Installation and Basic Adjustments To Install the Projector Installing Projector on Backside of Screen Installing Projector in Front of the Screen Turning On Projector ...

Page 11: ...g the Focus Ring 1 2 NOTE You may adjust the level of the projector up to 5 degrees Depending on the position of the projector Keystone distortion of image may appear Page 48 NOTE Focus may appear dim if the projector is installed at a shorter than recommended distance Page 23 Zoom Knob Adjustable Feet Focus Ring INSTALLATION AND BASIC ADJUSTMENTS Zoom and Focus Adjustment INSTALLATION AND BASIC A...

Page 12: ...3 2 131 2 311 0 122 4 288 7 113 7 266 5 104 9 244 3 96 2 222 1 87 4 199 9 78 7 177 7 70 0 155 5 61 2 133 3 52 5 111 143 7 95 5 37 6 88 8 35 0 73 3 28 9 67 5 26 6 374 6 147 2 312 2 122 9 249 7 98 3 237 2 93 4 224 7 88 5 212 3 83 6 199 8 78 7 187 3 73 7 174 8 68 8 162 3 63 9 149 8 59 0 137 3 54 1 124 9 49 2 112 4 44 3 99 9 39 3 87 4 34 4 74 9 29 5 62 4 24 6 53 7 21 1 49 9 19 6 41 2 16 2 37 9 14 9 10...

Page 13: ...V I S U A L R E A L I S M Connections and Source Setup Before Connections 26 Connecting to Video Equipment 27 Setting up the External Input Source 30 Naming the External Connections 31 ...

Page 14: ...COMPOSITE yellow input port of the projector to the VIDEO yellow OUT port of video equipment using the video cable If the video equipment has S VIDEO OUT port connect it to S VIDEO input port of the projector Turn on the projector and press the COMPOSITE button to select Composite Connect the projector and the video equipment via S Video cable and press the S VIDEO button to select S Video When Co...

Page 15: ...Mode is not available check that the component cables are in place DVI PC Component1 DVI Rear side of Projector Digital TV Receiver Set Top Box DVI Video Cable PC Video Cable Rear side of Projector DVD Component Cable Component Cable CONNECTING TO VIDEO EQUIPMENT Connecting to DVD CONNECTING TO VIDEO EQUIPMENT Connecting to the Digital TV Receiver or Rear Connection Rear Connection Connect COMPONE...

Page 16: ...he or button to move to desired input mode then press the button The source input you chose is displayed If the input mode is not selected check that cables are in place 4 Press the EXIT button to exit the menu 5 Press the MENU button The main menu is displayed 1 Press the button to select Input The Input menu is displayed 2 Press the or button to move to Edit Name then press the button The Edit N...

Page 17: ...ustment Selecting Picture Mode 34 Custom Settings of the Picture 35 Selecting and Adjusting Color Temperature 36 Gamma Correction 37 Saving Custom Picture Settings Save 38 Setting up DNIe 39 Selecting Picture Size 40 Film Mode 42 Overscan 43 Still Picture 44 ...

Page 18: ...de is selected 3 Press the button again Press the or button to move to desired mode then press the button Setup is switched to the selected mode 4 Press the EXIT button to exit the menu 5 Picture Color Gamma Modes Temperature Dynamic 9300K Gamma Mode3 Graphic Mode Standard 8000K Gamma Mode2 Video Mode Movie1 6500K Gamma Mode1 Film Mode Movie2 5500K Press the MENU button The main menu is displayed ...

Page 19: ...is set to the Dynamic Mode 9300K With both Sharpness and Brightness enhanced this dynamic mode can be effectively used in bright ambient light conditions Press the or button to move to Color Temperature then press the button The Color Temperature is selected 4 Press the button again Press the or button to move to desired mode then press the button Setup is switched to the selected mode 5 Press the...

Page 20: ...he button Setup is switched to the selected mode 6 Press the MENU button The main menu is displayed 1 Press the or button to move to Picture The Picture menu is displayed Press the button 2 Press the or button to move to DNIe then press the button 3 Press the EXIT button to exit the menu 5 Press the or button to move to On then press the button Setup is switched to the selected mode 4 Off DNle Mod...

Page 21: ...utton Setup is switched to the selected mode 4 Supported Picture Sizes 1080i 720p 576p 480p 16 9 Mode 4 3 Mode 1080i 720p 576p 480p 16 9 Mode 4 3 Mode 1080i 720p 576p 480p 576i 480i 480i O O O O O O O O O O O O O O O O O O O X X X X X X X X X X X X X X X X O O O X X X X X X X X X X X X X X X X O O O X X X X X X X X X X X X X X X X O O O O X O O X O O X O O X O O O O O O O O Signal Input Mode Full ...

Page 22: ...ss the button Setup is switched to the selected mode 4 Press the MENU button The main menu is displayed 1 Press the or button to move to Picture The Picture menu is displayed Press the button 2 Press the or button to move to Overscan then press the button 3 Press the EXIT button to exit the menu 5 Press the or button to move to On then press the button Setup is switched to the selected mode 4 Pict...

Page 23: ... Picture 44 Press the STILL button Each press of the button pauses and resumes play back One Touch V I S U A L R E A L I S M Setup Flipping Reversal of Projected Image 46 Light Setting 47 Correcting V Keystone 48 Test Patterns 49 Restoring the Factory Default Settings 50 Information 51 ...

Page 24: ...ting Used to set the image brightness by adjusting the amount of light generated by the lamp Theater Used to reduce the brightness of the lamp in dark ambient light to prevent reflection in the eye It also lowers power consumption and extends the life of the lamp Bright Used to enhance the brightness in relatively bright ambient light Light Setting Mode Press the MENU button The main menu is displ...

Page 25: ...jector are provided by JKP JK Production Press the MENU button The main menu is displayed 1 Press the or button to move to Setup The Setup menu is displayed Press the button 2 Press the EXIT button to exit the menu 5 Press the or button to move to Test Pattern then press the button 3 Press the or button to move to desired pattern then press the button The selected pattern is displayed 4 Crosshatch...

Page 26: ...enu 4 Press the or button to move to Information then press the button You can check external source signals picture setup PC picture adjustment and lamp use time 3 Information Input Source PC Picture Mode Movie1 Picture Size Full Brightness 50 Contrast 50 Color Temperature 6500K R Gain 50 G Gain 50 B Gain 50 R Offset 0 G Offset 0 B Offset 0 DNIe On Install Front Floor Light Setting Theater V Keys...

Page 27: ...V I S U A L R E A L I S M Menu Option Setting the Language 54 Setting the Menu Position 55 Setting the Menu Translucency 56 Setting the Menu Display Time 57 Selecting the Quick Menu 58 ...

Page 28: ...age 4 Press the EXIT button to exit the menu 5 Press the MENU button The main menu is displayed 1 Press the or button to move to Menu Option The Menu Option menu is displayed Press the button 2 Press the or button to move to Menu Position then press the button 3 Press the EXIT button to exit the menu 5 Press the œ or button to move to desired position The menu screen is displayed on the given posi...

Page 29: ... button The main menu is displayed 1 Press the or button to move to Menu Option The Menu Option menu is displayed Press the button 2 Press the or button to move to Menu Display Time then press the button 3 Press the EXIT button to exit the menu 5 Press the or button to move to desired time then press the button Setup is switched to the selected time 4 Menu Option Language English Menu Position Men...

Page 30: ...iously will appear V I S U A L R E A L I S M One Touch Connecting to PC Before Connecting to PC 60 Setting up the PC Environment 61 Connecting to PC 62 Automatic Picture Adjustment 64 Frequency Adjustment 65 Fine Tuning with the Phase Adjustment 66 Positioning the Screen 67 Zooming the Screen 68 Reset the PC 69 ...

Page 31: ...0 1 75 60 02 60 50 60 50 60 50 60 50 N N P P N N N N N N P P P P P N N N P P X X X X X X X X 25 175 31 5 28 322 35 5 25 175 30 24 31 5 31 5 36 36 40 50 49 5 56 25 57 284 65 75 78 75 108 74 25 74 25 74 25 74 25 27 27 13 5 13 5 O O O O O O O O O O O O O O O O O O O O O O O O O O O O O O O O O O O O O O O O O O O O O X X X X X X X X X X X X X X X X X X X X X X X X X X X X SOY SOY SOY SOY SOY SOY SOY ...

Page 32: ...DVI D Video Cable PC Video Cable or Rear Connection Using PC Video Cable or DVI Cable 1 DVI D Port Viewing the PC Screen This appliance supports VESA Plug Play and recognizes connection to PC automatically VESA Plug Play Pin Configuration of PC Video Port Plug Connect PC RGB In port on the rear side of the projector to the monitor output port of PC using PC video cable If PC has a DVI output port ...

Page 33: ...n is adjusted automatically 4 Frequency Adjustment Used to adjust frequency when vertical lines appear on PC screen Before adjusting Set the input mode to PC PC Press the MENU button The main menu is displayed 1 Press the or button to move to Setup The Setup menu is displayed Press the button 2 Press the or button to move to PC then press the button The PC menu is displayed 3 Press the EXIT button...

Page 34: ...n of the PC screen when it does not fit into the screen Before adjusting Set the input mode to PC PC Press the MENU button The main menu is displayed 1 Press the or button to move to Setup The Setup menu is displayed Press the button 2 Press the or button to move to PC then press the button The PC menu is displayed 3 Press the EXIT button to exit the menu 6 Press the œ or button to move to desired...

Page 35: ... or 8 times 5 Press the or button to move to Zoom then press the button 4 Reset the PC Used to reset PC mode settings to the Factory Default values Before adjusting Set the input mode to PC PC Press the MENU button The main menu is displayed 1 Press the or button to move to Setup The Setup menu is displayed Press the button 2 Press the or button to move to PC then press the button The PC menu is d...

Page 36: ...Connecting to PC V I S U A L R E A L I S M Troubleshooting Before Contacting Service Personnel 72 ...

Page 37: ...s 27 30 Symptoms Troubleshooting Note Be sure that the power cord of the projector is in place Be sure that the proper input source is selected Be sure that cable is properly connected to the rear panel of the projector Check the Remote Control batteries Be sure that the Color Brightness settings are not at their lower limit Cannot see picture images Page 19 Page 30 Pages 27 29 Page 16 Page 35 Con...

Page 38: ...V I S U A L R E A L I S M Other Information Storage and Maintenance 76 Purchasing Accessories 77 Structure of Screen Menu 78 Lamp Replacement 81 Specifications 82 Remote Control Specifications 83 ...

Page 39: ...lt in malfunction Do not clean the lens using a fingertip or a sharp object It may leave scratches Cleaning the Inside of the Projector Contact your dealer or service personnel to clean the inside of the projector Contact your dealer if particles or other objects are stuck inside of the projector Remote Control Power Cable Owner s Instructions Optional Parts You can purchase at electronics shops o...

Page 40: ...lue Select Composite S Video Component Input Mode Custom Picture Contrast 0 100 Brightness 0 100 Sharpness 0 100 Color 0 100 Tint 0 100 Not supported in 480p mode or above Color Temperature 5500K 6500K 8000K 9300K Gamma Gamma Mode1 Gamma Mode2 Gamma Mode3 Save User1 User2 User3 Install Front Floor Front Ceiling Rear Floor Rear Ceiling Light Setting Theater Bright V Keystone 50 50 Test Pattern Cros...

Page 41: ...er BP47 00010A Check that the power cord is unplugged before replacing lamps Wait for at least 30 minutes before replacing lamps to cool off the lamp unit after disconnecting power Lamp is a high pressure product Do not place near flammable materials or children Remove dirts or foreign materials around or inside the lamp unit using a proper vacuum device Be careful not to touch the lamp itself whe...

Page 42: ...al Type Y Pb Pr 2 Available Format 480i 480p 576i 576p 720p 1080i 3 Frequency Refer to page 60 Signal Format NTSC PAL SECAM Service Port Operating Temperature 32 104ºF 0 40ºC Humidity 10 80 Storage Temperature 4 113ºF 20 45ºC Humidity 5 95 Class B Max 33dB Model Classification SP H700 Panel Lamp Power Key Features Input Output User Environment Dimensions Weight Accessories Button System Code Full ...

Reviews: