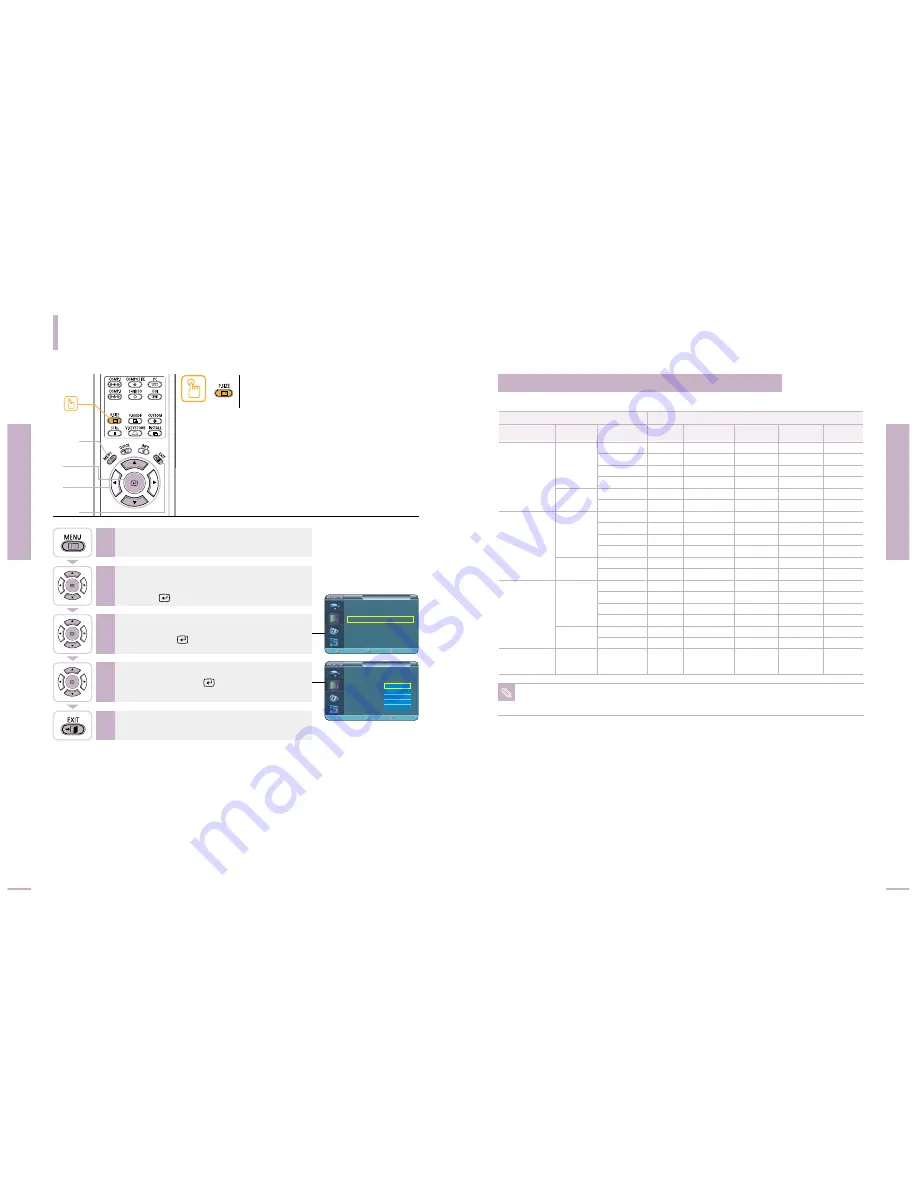
Selecting Picture Size
Picture Adjustment
Selecting Picture Size
Picture Adjustment
Selecting Picture Size
41
40
1
MENU
2, 3, 4
Select
2, 3, 4
…
/
†
5
EXIT
Press the
P.SIZE
button.
Each press of the button, picture size is switched to Full,
Panorama, Zoom1, Zoom2 and 4:3.
One Touch
O : Supported Modes X : Unsupported Modes
Press the
MENU
button.
The main menu is displayed.
1
Press the
▲
or
▼
button to move to
Picture
.
The Picture menu is displayed.
Press the
button.
2
Press the
▲
or
▼
button to move to
Picture Size
,
then press the
button.
3
Press the
EXIT
button to exit the menu.
6
Press the
▲
or
▼
button to move to desired
mode, then press the
button.
Setup is switched to the selected mode.
4
Supported Picture Sizes
1080i
720p
576p
480p
16:9 Mode
4:3 Mode
1080i
720p
576p
480p
16:9 Mode
4:3 Mode
1080i
720p
576p
480p
576i
480i
480i
O
O
O
O
O
O
O
O
O
O
O
O
O
O
O
O
O
O
O
X
X
X
X
X
X
X
X
X
X
X
X
X
X
X
X
O
O
O
X
X
X
X
X
X
X
X
X
X
X
X
X
X
X
X
O
O
O
X
X
X
X
X
X
X
X
X
X
X
X
X
X
X
X
O
O
O
O
X
O
O
X
O
O
X
O
O
X
O
O
O
O
O
O
O
O
Signal
Input
Mode
Full
Panorama
Zoom1
Zoom2
Picture Size
HD
HD
PC
HD
SD
SD
Source
DVI
PC
(D-Sub)
Composite &
S-Video
4:3
PC
Component
Picture
Picture Mode
: Movie 1
√
Custom Picture
√
Picture Size
: Full
√
DNIe
: Off
√
Film Mode
: On
√
Overscan
: On
√
Move
Enter
Return
Picture
Picture Mode
: Movie 1
Custom Picture
Picture Size
: Full
DNIe
: Off
Film Mode
: On
Overscan
: On
Move
Enter
Return
Full
Panorama
Zoom1
Zoom2
4 : 3
NOTE
Refer to page 60 for display modes supported.


