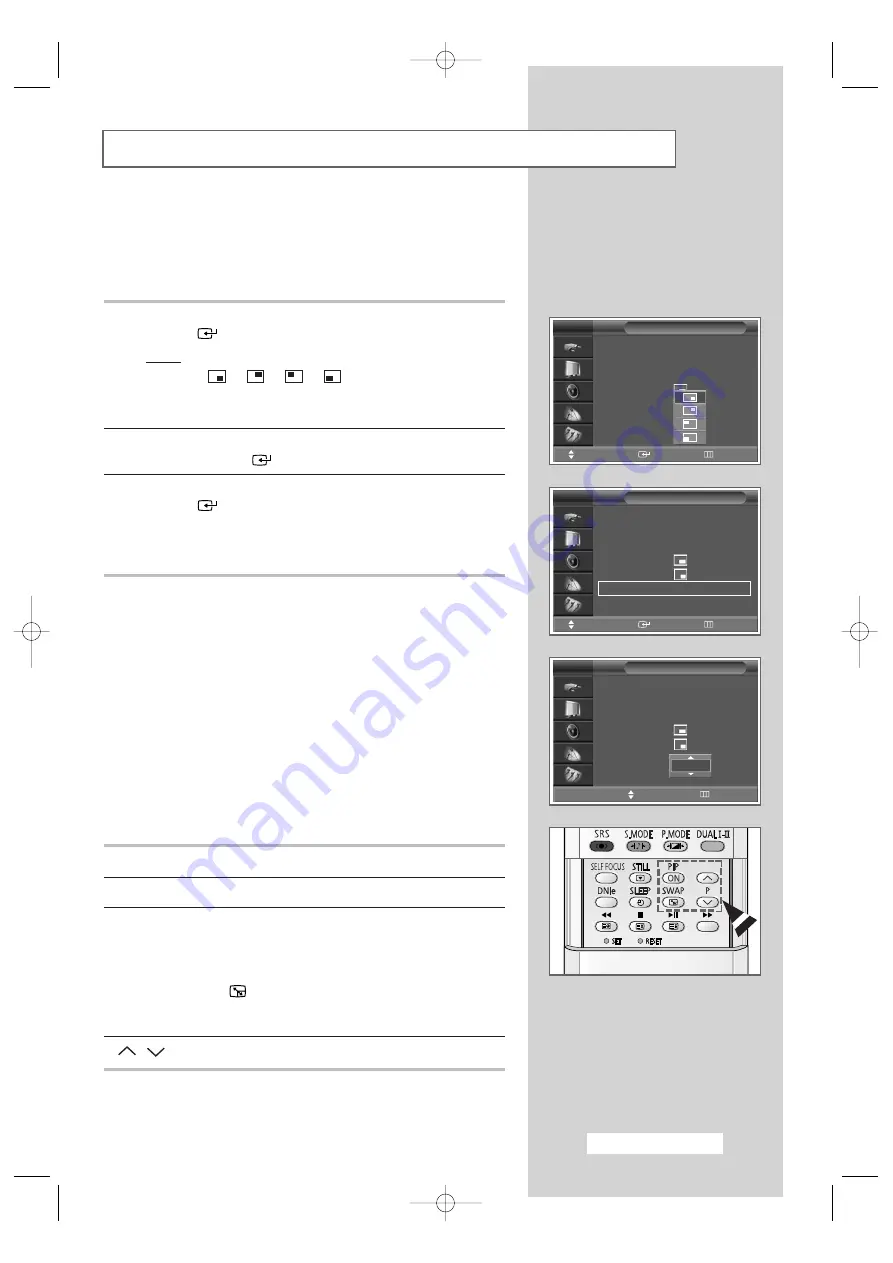
background image

English - 39

11

Press the 

or 

button until the 

Position

is selected. Press the

ENTER

(

) button.

Result:

The positions available are displayed.

-

-

-

The 

Position

menu is available when the 

Size

is Large or

Small.

12

Select a position of the sub picture by pressing the 

or 

button.

Press the 

ENTER

(

) button.

13

Press the 

or 

button until the 

Prog.

is selected. Press the

ENTER

(

) button. You can select the channel that you want to

view through sub picture by pressing the 

or 

button.

When the 

Source

is set to 

TV

, you can select the channel of

sub picture.

Easy functions of remote control.

Buttons

Feature

PIP ON

Used to activate or deactivate the PIP function directly.

SWAP

Used to interchange the main picture and the sub picture.

When the main picture is in the Video mode and the
sub picture is in the TV mode, you might not hear
the sound of main picture when pressing the 

SWAP

(

)  button after changing the sub picture

channel. At this time, reselect the channel of main
picture.

P

/

Used to select the channel of sub picture.

Viewing the Picture In Picture (PIP) 

(continued)

PIP

TV

Move

Enter

Return

PIP

: On

Source

: TV

Swap

Size

:

Position

:

Prog.

: P  1

PIP

TV

Adjust

Return

PIP

: On

Source

: TV

Swap

Size

:

Position

:

Prog.

: P  1

PIP

TV

Move

Enter

Return

PIP

: On

Source

: TV

Swap

Size

:

Position

:

Prog.

: P  1

P  1

BP68-00280A (J59A_Euro_ENG)  4/13/04  1:59 PM  Page 39

Summary of Contents for SP-43Q1

Page 1: ...1 SP43T8 54T8 SP43W6 Owner s Instructions Before operating the unit please read this manual thoroughly and retain it for future reference PICTURE IN PICTURE PIP TELETEXT SELF FOCUS BP68 00280A J59A_Euro_ENG 4 13 04 1 58 PM Page 1 ...

Page 2: ...BP68 00280A J59A_Euro_ENG 4 13 04 1 58 PM Page 2 ...

Page 3: ...such as the dark side bars on non expanded standard format television video and programming should be limited to no more than 15 of the total television viewing per week Additionally viewing other stationary images and text such as stock market reports video game displays station logos web sites or computer graphics and patterns should be limited as described above for all televisions Displaying a...

Page 4: ...6 Adjusting the Screen Automatically Self Focus 17 Deactivating the Automatic Execution of the Self Focus 18 Removing the Self Focus from the Display 19 SETTING THE CHANNELS Storing Channels Automatically 20 Sorting the Stored Channels 21 Storing Channels Manually 22 23 Skipping Unwanted Channels 24 Assigning Names to Channels 25 Locking the Channel 26 Fine Tuning Channel Reception 27 USING YOUR T...

Page 5: ...EATURE Teletext Feature 50 Displaying the Teletext Information 51 Selecting Display Options 52 Selecting a Teletext Page depending on the model 53 Storing Teletext Pages 54 ADDITIONAL INFORMATION AND CONNECTIONS Connecting to the External Input Outputs 55 Connecting to the Audio Output 56 Connecting to the RCA Input 56 Connecting to the S Video Input 57 Connecting to the Component Input 57 Redirec...

Page 6: ... Switch among Video input modes SOURCE and access to the selected option on the menu system Control Panels depending on the model The actual configuration on your TV may be different depending on your model a Input Source Selection b Menu Display c Accessing to the Selected Option on the Menu System d Volume Adjustment e Channel Selection f Remote Control Sensor g Standby Timer Indicator h Power O...

Page 7: ...elevision ensure that all elements are switched off Refer to the documentation supplied with your equipment for detailed connection instructions and associated safety precautions Video Input S Video Input Audio Input Side of the TV Rear of the TV Audio Output 75Ω Coaxial Connector for Aerial or Cable Network SCART Audio Video Input Output Component Input Video Input S Video Input Audio Input BP68 ...

Page 8: ...n the direction of arrow 2 After placing a component you have in the display deck hold the center of the door and pull it down You should display only the component that is within 126mm high When displaying a component in the display deck please space it out 30mm from the front 20mm from either end SP54T8 SP43W6 SP43Q1 47Q1 BP68 00280A J59A_Euro_ENG 4 13 04 1 58 PM Page 8 ...

Page 9: ... PREVIOUS CHANNEL TELETEXT PREVIOUS PAGE DNIe ON OFF DEMO TELETEXT SUB PAGE PIP FUNCTIONS PIP ACTIVATING OR DEACTIVATING PIP ON SWAPPING THE MAIN AND THE SUB PICTURE SWAP SELECTING THE CHANNEL OF SUB PICTURE P MAKE THE REMOTE CONTROL WORKS FOR TV VCR CATV DVD PLAYER STB VCR DVD FUNCTIONS REWIND STOP PLAY PAUSE FAST FORWARD PICTURE SIZE TELETEXT SIZE SELECTION VOLUME INCREASE TEMPORARY SOUND SWITCH...

Page 10: ... 22 Connecting to an Aerial or Cable Television Network Rear of the TV Cable Television Network or You must insert or replace the batteries in the remote control when you Purchase the television Find that the remote control is no longer operating correctly 1 Remove the cover on the rear of the remote control by pressing the symbol downwards and then pulling firmly to remove it 2 Insert two R03 UM4...

Page 11: ... receiver or decoder SCART cable to one of the SCART connectors on the rear of the television Using a coaxial cable Connect a coaxial cable to the Receiver or Decoder output socket Television aerial input socket If you wish to connect both a satellite receiver or decoder and a VCR you should connect the Receiver or Decoder to the VCR VCR to the television Otherwise connect the receiver or decoder ...

Page 12: ...Automatically on page 20 or Storing Channels Manually on page 22 4 To switch your television off press the I button On Off again Placing Your Television in Standby Mode Your television can be placed in Standby mode in order to reduce the power consumption The Standby mode can be useful when you wish to interrupt viewing temporarily during a meal for example 1 Press the POWER button on the remote c...

Page 13: ...nel number PRE CH Press the PRE CH button The TV will switch to the last channel viewed To quickly switch between two channels that are far apart tune to one channel then use the numeric buttons to select second channel Then use the PRE CH button to quickly alternate between them Used to increase the volume Used to decrease the volume MUTE Used to switch the sound off temporarily To turn the sound...

Page 14: ...end automatically Channels are sorted and stored in an order which reflects their position in the frequency range with lowest first and highest last When it has finished the Clock menu is displayed To stop the search before it has finished or return to normal viewing press the MENU button 7 Press the œ or button to move to the Hour or Minute Set the hour or minute by pressing the or button You can...

Page 15: ...ENTER button Result This feature starts with the message Start Plug Play is displayed 5 For further details on how to set refer to the opposite page Plug Play Feature continued Setup Move Enter Return Time Plug Play Language English Self Focus Blue Screen Off Melody On More TV You can view the channel information and setting status you select by pressing the INFO button on the remote control Displ...

Page 16: ...s the or button until the Language is selected Press the ENTER button Result The languages available are listed 5 Select the appropriate language by pressing the or button Press the ENTER button to confirm your choice Choosing Your Language Setup Move Enter Return Time Plug Play Language English Self Focus Blue Screen Off Melody On More TV Setup Move Enter Return Time Plug Play Language English Se...

Page 17: ...ton again Result The self focus process begins with the message Self Focus and horizontal bar is displayed During the process minor distortions of the picture may occur At this time the colors may diffuse and a searching action will appear on the edges of the screen This is a normal part of the adjustment When it is finished all of things will disappear and the optimum picture quality can be enjoy...

Page 18: ...the screen image is then fully stabilised 1 Press the Press the MENU button Result The main menu is displayed 2 Press the or button until the Setup is selected Result The options available in the Setup group are displayed 3 Press the ENTER button 4 Press the or button until the Self Focus is selected Press the ENTER button Result The options available in the Self Focus group are displayed 5 Press ...

Page 19: ... options available in the Setup group are displayed 3 Press the ENTER button 4 Press the or button until the Self Focus is selected Press the ENTER button Result The options available in the Self Focus group are displayed 5 Press the or button until the Message Display is selected Press the ENTER button 6 To remove the message Self Focus and horizontal bar on the screen during the self focus proce...

Page 20: ...are sorted and stored in an order which reflects their position in the frequency range with lowest first and highest last The programme originally selected is then displayed To stop the search before it has finished or return to normal viewing press the MENU button 9 When searching and storing are complete the Sort menu is displayed To sort the stored channels into the desired numerical order go t...

Page 21: ...nu is displayed 5 Select the channel that you wish to move by pressing the or button Press the ENTER button 6 Select the number of the programme to which the channel is to be moved by pressing the or button Press the ENTER button Result The channel is moved to its new position and all other channels are shifted accordingly 7 Repeat Steps 5 to 6 until you have moved all the channels to the required...

Page 22: ...nd the correct number by pressing the or button 7 If necessary select the broadcasting standard required Press the œ or button until the Colour System is selected and press the or button The colour standards are displayed in the following order AUTO PAL SECAM NT4 43 8 Press the œ or button until the Sound System is selected and press the or button The sound standards are displayed in the following...

Page 23: ...o be stored Channel mode P Programme mode When completing tuning the broadcasting stations in your area have been assigned to position numbers from P00 to max P99 You can select a channel by entering the position number in this mode C Real channel mode You can select a channel by entering the assigned number to each air broadcasting station in this mode S Cable channel mode You can select a channe...

Page 24: ...nnel group are displayed 3 Press the ENTER button 4 Press the or button until the Add Delete is selected Press the ENTER button Result The Add Delete menu is displayed with the current channel selected 5 To delete or add the required channel select the Delete or Add and press the ENTER button 6 Repeat Step 5 for each channel to be erased or added Skipping Unwanted Channels Add Delete Delete P 1 In...

Page 25: ...elected 5 If necessary select the channel to be assigned a new name by pressing the or button Press the ENTER button Result Arrow indications are displayed around the name box 6 Press the or button to select a letter A Z a number 0 9 or a symbol space Move on the previous or next letter by pressing the œ or button 7 When you have finished entering the name press the ENTER button to confirm the nam...

Page 26: ...utton until the Child Lock is selected Press the ENTER button Result The Child Lock menu is displayed and the current channel is shown as selected 5 Press the or button to select the channel to be locked 6 Press the ENTER button To lock the channel select Locked by pressing the or button to unlock the channel select Unlocked Press the ENTER button to confirm Locking the Channel Channel Auto Store ...

Page 27: ...4 Press the or button until the Fine Tune is selected Press the ENTER button Result The horizontal bar is displayed 5 To obtain a sharp and clear picture and good sound quality press the œ or button until you reach the setting 6 To store the fine tuning setting in the TV s memory press the ENTER button 7 To reset the fine tuning to 0 select Reset by pressing the or button then press the ENTER butt...

Page 28: ...signal in the weak signal area but not noise This feature is working only in a weak signal condition and that is memorized on relevant channel s additional information 1 Press the MENU button Result The main menu is displayed 2 Press the or button until the Channel is selected Result The options available in the Channel group are displayed 3 Press the ENTER button 4 Press the or button until the L...

Page 29: ... Select the required option by pressing the or button Result The following modes are available Dynamic Standard Movie Custom 6 Press the ENTER button to confirm You can select these options by simply pressing the P MODE Picture Mode button on the remote control Changing the Picture Standard Picture Mode Dynamic Custom Colour Tone Normal Size Scan Mode Auto Digital NR Off More TV Move Enter Return ...

Page 30: ...ENTER button Result The horizontal bar is displayed Pess the œ or button until you reach the setting 6 Press the MENU button to return to the Picture menu Press the or button until the Colour Tone is selected Press the ENTER button 7 Select the required colour tone Warm1 Warm10 Normal Cool1 Cool10 by pressing the œ or button Customizing the Picture Settings Contrast 100 Colour Tone Normal Picture ...

Page 31: ...rmal aspect ratio Prolonged use in 4 3 mode may cause the lifespan of the CRT to be reduced Zoom 1 Vertically enlarges the picture approximately 130 Zoom 2 Vertically enlarges the picture about approximately 150 Cinema When the top and bottom of the screen margin are black blank they will change to gray Lifting is available in the Zoom1 or Zoom2 mode by pressing the or button You can select these ...

Page 32: ... approximately 130 Zoom 2 Vertically enlarges the picture about approximately 150 4 3 Adjusts the picture to fit into a 4 3 normal aspect ratio Prolonged use in 4 3 mode may cause the lifespan of the CRT to be reduced Cinema1 To maintain optimum screen display the picture is vertically enlarged and the letterboxed black margin area is filled with gray instead Cinema2 When the top and bottom of the...

Page 33: ...de 16 9 Panorama Zoom1 Zoom2 4 3 Cinema1 Cinema2 16 9 Signal Auto Wide 16 9 Panorama Zoom1 Zoom2 4 3 Cinema1 Cinema2 Auto Wide 16 9 Panorama Zoom1 Zoom2 4 3 Cinema1 Cinema2 Auto Wide 16 9 Panorama Zoom1 Zoom2 4 3 Cinema1 Cinema2 BP68 00280A J59A_Euro_ENG 4 13 04 1 59 PM Page 33 ...

Page 34: ...Press the ENTER button 4 Press the or button until the Scan Mode is selected Press the ENTER button 5 Select the required option by pressing the or button Result The following modes are available Auto Natural Digital Progressive 6 Press the ENTER button to confirm Selecting the Scan Mode Picture Mode Dynamic Custom Colour Tone Normal Size Scan Mode Auto Digital NR Off More TV Move Enter Return Pic...

Page 35: ...elected Press the ENTER button 5 Select Off or On by pressing the or button Press the ENTER button to confirm Using the Digital NR Digital Noise Reduction Feature You can freeze the picture when watching a television programme simply by pressing the STILL button To return to normal viewing press it again Freezing the Current Picture Picture Mode Dynamic Custom Colour Tone Normal Size Scan Mode Aut...

Page 36: ...ed 3 Press the ENTER button 4 Press the or button until the DNIe is selected Press the ENTER button 5 Press the or button to change the setting Press the ENTER button to confirm On Switches on the DNIe mode Off Switches off the DNIe mode Demo Option The screen before applying DNIe appears on the right and the screen after applying DNIe appears on the left You can select these options by simply pre...

Page 37: ... Result The options available in the Setup group are displayed 3 Press the ENTER button 4 Press the or button until the Blue Screen is selected Press the ENTER button 5 Select Off or On by pressing the or button Press the ENTER button to confirm Setting the Blue Screen Mode Setup Move Enter Return Time Plug Play Language English Self Focus Blue Screen Off Melody On More TV Setup Move Enter Return ...

Page 38: ...e by pressing the or button Press the ENTER button 8 Press the or button until the Swap is selected Press the ENTER button Result The main picture and the sub picture are interchanged Not available in 12 PIP or 3 PIP modes 9 Press the or button until the Size is selected Press the ENTER button Result The sizes available are displayed Large Small Double 3 PIP 12 PIP 12 PIP You can view up to 12 mem...

Page 39: ...ote control Buttons Feature PIP ON Used to activate or deactivate the PIP function directly SWAP Used to interchange the main picture and the sub picture When the main picture is in the Video mode and the sub picture is in the TV mode you might not hear the sound of main picture when pressing the SWAP button after changing the sub picture channel At this time reselect the channel of main picture P...

Page 40: ... pressing the or button Result The following modes are available Standard Music Movie Speech Custom 6 Press the ENTER button to confirm You can select these options by simply pressing the S MODE Sound Mode button on the remote control Changing the Sound Standard Sound Mode Standard Equalizer Auto Volume Off Audio Output Fixed Internal Mute Off SRS TSXT Off TV Move Enter Return Sound Mode Custom Eq...

Page 41: ...eturn Each broadcasting station has its own signal conditions and so it is not easy for you to adjust the volume every time the channel is changed This feature lets you automatically adjust the volume of the desired channel by lowering the sound output when the modulation signal is high or by raising the sound output when the modulation signal is low 1 Press the MENU button Result The main menu is...

Page 42: ...ust the volume level with the volume control on the TV or external amplifier set to Variable If you set to Fixed You can adjust the volume level with the volume control on the audio amplifier The volume control buttons MUTE of the television and remote control do not work 6 Press the or button until the Internal Mute is selected Press the ENTER button If you set to On no sound outputs of all inter...

Page 43: ...the or button until the SRS TSXT is selected Press the ENTER button 5 Select the required option Off 3D Mono or Stereo by pressing the or button 6 Press the ENTER button to confirm TruSurround XT SRS and Symbol are trademarks of SRS Labs Inc TruSurround XT technology is incorporated under license from SRS Labs Inc You can select these options by simply pressing the SRS button on the remote control...

Page 44: ...TER button 4 Press the or button until the Melody is selected Press the ENTER button 5 Select the required option Off or On by pressing the or button 6 Press the ENTER button to confirm Setting the Melody Sound Setup Move Enter Return Time Plug Play Language English Self Focus Blue Screen Off Melody On More TV Setup Move Enter Return Time Plug Play Language English Self Focus Blue Screen Off Melod...

Page 45: ...s then switch to the Mono When receiving a mono sound in the AV mode connect to the AUDIO L input connector on the panel front or side If the mono sound comes out only from left speaker press the DUAL I II button Type of broadcast Regular broadcast Standard audio Regular NICAM Mono NICAM Stereo NICAM Dual I II Regular broadcast Standard audio Bilingual or Dual I II Stereo On screen indication Mono...

Page 46: ...button 4 Press the or button until the Time is selected Press the ENTER button Result The options available in the Time group are displayed with Clock is selected 5 Press the ENTER button 6 Press the or button to move to the Hour Minute Set the hour or minute by pressing the or button You can also set the hour and minute by pressing the numeric buttons directly Setting and Displaying the Current T...

Page 47: ... Select the preset time interval Off 30 60 90 120 150 180 for staying on by pressing the or button Press the ENTER button to confirm You can also set these options simply by pressing the SLEEP button If the sleep timer is not yet set Off is displayed If the sleep timer is already set the remaining time before which the television switches to Standby mode is displayed Setting the Sleep Timer Setup ...

Page 48: ...sing the œ or button then select Yes by pressing the or button 8 Press the MENU button Result The options available in the Time group are displayed again 9 Press the or button until the Off Timer is selected Press the ENTER button Result The Off Timer menu is displayed 10 Set the Off Timer as methods for On Timer setting Absent Power Off When you set the timer On your television will eventually be...

Page 49: ... The options available in the Input group are displayed again 6 Press the or button until the Edit Name is selected Press the ENTER button 7 Press the or button to select the external source to be edited Press the ENTER button Result The device names available are listed VCR DVD Cable STB HD STB Satellite STB AV Receiver DVD Receiver Game Camcorder DVD Combo DHR DVD HDD Recorder PC 8 Select the re...

Page 50: ...s see diagram Part Contents A Selected page number B Broadcasting channel identity C Current page number or search indications D Date and time E Text F Status information FASTEXT information Teletext information is often divided between several pages displayed in sequence which can be accessed by Entering the page number Selecting a title in a list Selecting a coloured heading FASTEXT system Telet...

Page 51: ...xt mode Result The contents page is displayed It can be redisplayed at any time by pressing the index button 3 Press the TTX MIX button again Result The screen will be split into two This Double Teletext feature lets you view the actual broadcast and teletext information separately on the screen 4 If you wish to display the actual broadcast at the same time as the teletext page press the TTX MIX b...

Page 52: ... normal screen reveal again A secondary page sub page The broadcast when searching for a page cancel The next page page up The previous page page down Double size letters in the size Upper half of the screen Once Lower half of the screen Twice Normal screen Three times To return to the normal display after using the reveal or size feature press the TV button TV BP68 00280A J59A_Euro_ENG 4 13 04 2 ...

Page 53: ...fferent topics covered on a Teletext page are colour coded and can be selected by pressing the coloured buttons on the remote control Press the coloured button corresponding to the topic that you wish to select the available topics are given on the status line Result The page is displayed with other coloured information that can be selected in the same way 3 To display the previous or next page pr...

Page 54: ...h between the LIST and FLOF modes 2 Press the coloured button corresponding to the page that will be replaced 3 Enter the new page number using the numeric buttons 4 Repeat steps 2 and 3 for each page to be stored using a different coloured button each time 5 Press the store button until the corresponding blocks blink Storing Teletext Pages depending on the model BP68 00280A J59A_Euro_ENG 4 13 04 ...

Page 55: ...put from EXT2 Rear of the TV VCR Decoder Video game device Video disc player Satellite receiver This end can be fitted with A SCART connector An S Video connector and two audio RCA connectors L R EXT 2 Three RCA connectors VIDEO AUDIO L and R If you have a second VCR and wish to copy cassette tape connect the source VCR to EXT1 and the target VCR to EXT2 so that you can redirect the signal from EX...

Page 56: ...me video game devices Side of the TV depending on the model Camcorder Video game device Video disc player Connecting to the Audio Output The RCA AUDIO OUT L and R connectors are used for equipment such as an audio system to take full advantage of the Surround sound effect Rear of the TV Audio system BP68 00280A J59A_Euro_ENG 4 13 04 2 00 PM Page 56 ...

Page 57: ...R Camcorder VCR To play pictures and sound both the S VIDEO INPUT and RCA connectors must be used and Side of the TV depending on the model Connecting to the Component Input The COMPONENT IN connectors are used for equipment with a DVD or DTV receiver output 480i 480p 576i 576p 1080i DVD Rear of the TV DTV receiver BP68 00280A J59A_Euro_ENG 4 13 04 2 00 PM Page 57 ...

Page 58: ... the AV Setup is selected Press the ENTER button Result The AV Setup menu is displayed with the Ext 3 is selected 5 Press the ENTER button Select the source to be directed to the output of Ext 3 by pressing the or button Ext 1 Default TV Ext 2 Default Monitor Out Ext 3 Variable TV Ext1 Ext2 AV 6 Press the ENTER button to confirm your choice Setup More AV Setup TV Move Enter Return AV Setup Ext 1 T...

Page 59: ...R Cable box or DVD code listed on next page for your VCR Cable box or DVD Example To enter the code 6 press 0 0 and 6 To enter the code 76 press 0 7 and 6 5 Press the POWER button Your VCR Cable box or DVD should turn on If it turns on your remote control is now set correctly If it does not turn on repeat steps above but try one of the other codes listed for the brand of particular yours 6 Once yo...

Page 60: ...07 018 019 021 026 037 041 054 056 007 008 018 021 026 037 007 008 018 026 037 070 025 038 025 021 036 056 059 Marantz Marta MEI Memorex MGA Midland Minolta Mitsubishi Montgomery Ward MTC Multitech NEC Optimus Panasonic Pentax Pentex Research Philco Philips Pioneer Portland PROSCAN Quartz Quasar Radio Shack Realistic RCA Samsung Sansui Sanyo Scott Sears Sharp Shimom Signature Sony 007 008 018 021 ...

Page 61: ...ion GI Hamlin Hitachi Jerrold Macom Magnavox Oak Panasonic Philips Pioneer RCA Regal 017 018 041 003 024 031 025 030 038 039 025 030 019 023 028 026 003 022 027 037 044 019 021 023 028 004 018 020 044 014 022 040 003 Regency SA Samsung Scientific Atlanta Sprucer Stargate 2000 Sylvania Texscan Tocom Universal Viewstar Wamer amex Zenith 015 023 042 043 000 001 002 003 004 005 006 007 042 043 022 036...

Page 62: ...u have pressed the I button On Off and the POWER button Check the picture contrast and brightness settings Check the volume Check the volume Check whether the volume MUTE button on the remote control has been pressed Adjust the colour settings Check that the broadcast system selected is correct Try to identify the electrical appliance that is affecting the television then move it further away Plug...

Page 63: ...English 63 Memo BP68 00280A J59A_Euro_ENG 4 13 04 2 00 PM Page 63 ...

Page 64: ...00 AFTER SALES SERVICE Do not hesitate to contact your retailer or service agent if a change in the performance of your product indicates that a faulty condition may be present BP68 00280A J59A_Euro_ENG 4 13 04 2 00 PM Page 64 ...

Reviews: