background image


23 

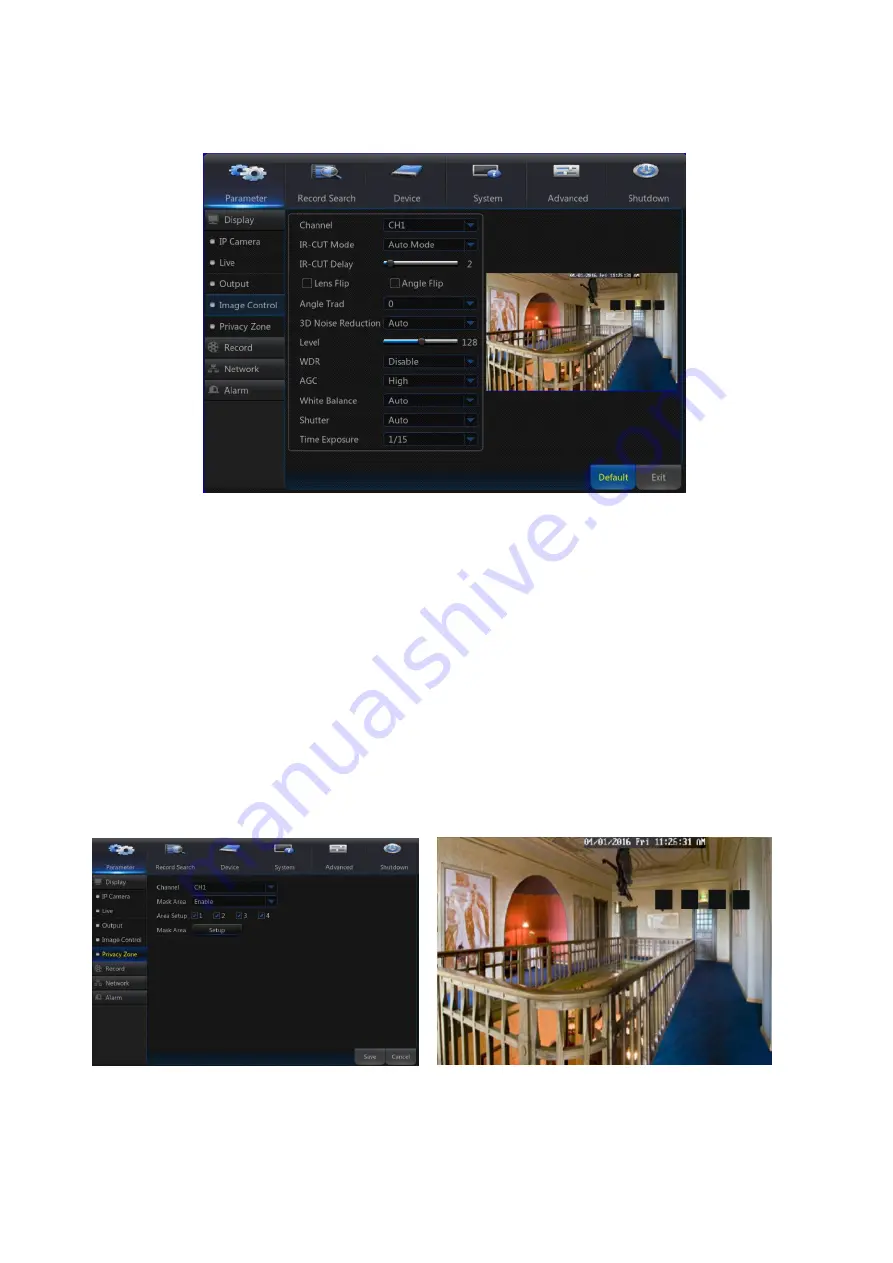
3.2.1.4 Image control   


You  can  configure  some  settings  of  IPC,  such  as  white  balance,  3D  noise  reduction  and  image 

reversal etc. 

3.2.1.5 Privacy Zone 

Privacy Zone is 

a feature to block certain area(s) in the camera‟s field of view from recording in the 

selected channel. 

1. Select the number of the zone(s) to be blocked (maximum of 4 zones can be set for single 

channel). 

2. Click “Setup” to adjust the position of the zone. 

3. After finish setting, right click the mouse to return to the 

“Privacy Zone”

 page. 

4. Click “Save” to save the setting. 


Summary of Contents for SNK-D5081

Page 1: ...1 ...

Page 2: ...E TO A LAN CABLE 10 1 9 POWER CABLE WATER PROOFING 13 1 10 INSTALLING THE CAMERA 14 CHAPTER 2 NVR BOOT UP 15 2 1 SYSTEM INITIALIZATION 15 2 2 STARTUP WIZARD 15 2 3 MAIN INTERFACE 17 CHAPTER 3 NVR MENU 18 POPUP MENU 18 MAIN MENU GUIDE 19 3 1 MAIN MENU 20 3 2 PARAMETER 21 3 2 1 Display 21 3 2 2 Record 24 3 2 3 Network 25 3 2 4 Alarm 29 3 3 RECORD SEARCH 30 3 3 1 Record Search 30 3 3 2 Event Search 3...

Page 3: ... 47 4 1 DOWNLOAD AND INSTALLATION OF PLUGIN 47 4 1 1 Download and Installation of Plugin for IE 48 4 1 2 Download and installation of plugin for Mac SAFARI 50 4 2 WEB APPLICATION MANAGER LOGIN 52 4 3 LIVE INTERFACE 53 4 3 1 LIVE 53 4 3 2 Playback 55 4 3 3 Remote Setting 58 4 3 4 Local Setting 70 4 3 5 Logout 70 CHAPTER 5 MOBILE APP 71 CHAPTER 6 APPENDIX 73 6 1 TROUBLESHOOTING 73 6 2 USAGE MAINTENA...

Page 4: ...lt do not block the ventilation vents on the top bottom sides and the back of the NVR 10 The power adapter should only be connected to the NVR Do not connect it to additional equipment or else the NVR may restart repeatedly due to insufficient power 11 Do not install near any heat sources such as radiator stove and other machinery or devices including speakers that produce large amount of heat 12 ...

Page 5: ...erence when the equipment is operated in a commercial environment This equipment generates uses and can radiate radio frequency energy and if not installed and used in accordance with the instruction manual may cause harmful interference to radio communications Operation of this equipment in a residential area is likely to cause harmful interference in which case the user will be required to corre...

Page 6: ...ion Port For reception of IR remote control signal 4 USB USB USB Port 1 2 Back Panel NVR Back Panel Model SNR D5401 SN Physical Interface Connection Instructions 1 e SATA Connect to a e SATA HDD 2 VGA Output Connect VGA display device such as PC monitor 3 AUDIO OUT No Function 4 LINE IN No Function 5 Power Switch Power the NVR on off 6 Power Port Connect to power cable provided along with the devi...

Page 7: ...nu Enter into Main menu Exit 5 Submenu Go to Submenu 6 Up arrow key 7 SEL Select key Edit key 8 Left Right key Decrease increase parameter value of control bar 9 Down arrow key 10 Rewind key 11 Forward key 12 Enter into record search menu Play key 13 Record key 14 Stop manual record stop playing 15 Pause Step forward key ...

Page 8: ...emove top cover of NVR 2 Connect data and power cables of hard drive to motherboard Mount the hard drive by mounting it onto the rack and connecting the power and data cables Two groups of screw mounting holes are provided in the base frame of the NVR respectively for installation of 3 5 hard drive and 2 5 hard drive User should make selection based on their hard drive size 3 First mount the screw...

Page 9: ... the camera enables you to monitor at all times day and night The camera is suitable for both indoor and outdoor use Do not fully expose the camera to rain The camera must be installed under a shelter to avoid exposure to excessive rain or moisture Name Description 1 Lens 3 6mm focal length enables you to monitor at a wider field of view 2 IR LED Infrared LED lights are controlled by the illuminat...

Page 10: ...del SNR D5401 1 8 How to connect the RJ45 waterproof cable to a LAN cable Components Introduction RJ45 female modular jack mold RJ45 male connector Fastening rubber gasket male Fastening back cover Waterproof rubber gasket Female RJ45 connector protector cap ...

Page 11: ...ough each components as shown below Fastening back cover Waterproof rubber gasket RJ45 connector protector cap Install step 2 RJ45 male connector Caution Gasket direction RJ45 male and female connectors Remark keep waterproof gasket separate ...

Page 12: ...p 4 Tightly screw the protector cap Fit the rubber gasket into the RJ45 connector protector cap so that the inner diameter of waterproof rubber gasket is tighten when the back cap is screwed on Tightly screw the back cap clockwise ...

Page 13: ...r cables 2 Wrap the cable jacket Area A and the cable connection area with waterproof butyl rubber tape so that more than half of the butyl rubber tape is overlapped If the connected cable jacket is poorly wrapped water can leak into the connectors causing damage to the camera Waterproofing butyl tape is made of butyl rubber that can extend twice as long as its original length If the power cable t...

Page 14: ...ciently support the weight of the camera to be installed 3 Attach the camera bracket to the wall using the supplied screws 4 Adjust the direction of the camera to the desired direction and tighten the bracket 5 Adjust the camera angle as needed 6 Connect the camera cable to the camera Take caution when installing the camera outdoors because the cable connectors may be wet with moisture or with dir...

Page 15: ...rtup Wizard after reboot to cancel Wizard setting menu includes Homepage Network setup IPC setup Record Schedule and hard disk maintenance 1 Homepage Set admin password Please create a user name and password for your Device Password MUST be 8 13 characters long and the combination of two kinds of characters at least ex Letter number and special character After restart use the user name and passwor...

Page 16: ...etwork setup page user may set the network for the NVR 2 User may add and delete IPC Record Schedule Picture In this page user may set recording time and scheduled recording for the NVR 3 HDD formatting and overwriting type ...

Page 17: ...rface Note When there is no HDD pre installed or pre installed HDD is not formatted buzzer will be activated If you want turn off the buzzer please go to Advanced Events Disk Full or Disk Error to set the buzzer to Off ...

Page 18: ...ck Replay video recorded 11 Record Enable or disable manual recording 12 Instant Playback Display channel name Quick playback of video of last 5 minutes 13 Zoom Hold and drag mouse cursor to select a frame of current video to zoom in 14 Color Adjust the color of video After finishing system initialization right click the mouse to preview interface or slide the mouse to the bottom of screen to ente...

Page 19: ...ecord Mainstream Parameter Switch Email Network RTSP Motion Main Menu Alarm Record Search Record Search Event Search Device General Users System Info Log Maintain Advanced Events Shutdown Substream Mobliestream DDNS HDD Cloud storage Network IP Camera General DST NTP Info Channel Info ...

Page 20: ...click icon on the toolbar to enter the main menu screen If system interface is locked please enter the password to log in If you forgot your password please contact technical support In Main Menu mode you can make adjust the settings for Parameter Record Search Device System Advanced and Shutdown ...

Page 21: ...main IP address of the IPC connected of the channel Subnet Mask IPC camera Subnet mask Port Connection port number of the currently set IPC Manufacturer Manufacturer for different IPC Device type Add IPC with different protocols Protocol The selected access protocol for IPC to connect to NVR MAC Address Physical address for device Software Display current version of IPC Auto Assign IP to Camera s ...

Page 22: ...2 hour or 24 hour Refresh Rate IPC Refresh Rate 50Hz or 60Hz OSD Position Freely set the position of IPC name and time Color Adjust the hue brightness contrast and saturation of the IPC of the channel Video Output Live Output Seq Mode Set sequence mode SEQ Dwell Time Sequence dwell time is set 5 seconds by default User may set it as required VGA HDMI Resolution VGA output or HDMIoutput Including10...

Page 23: ...is a feature to block certain area s in the camera s field of view from recording in the selected channel 1 Select the number of the zone s to be blocked maximum of 4 zones can be set for single channel 2 Click Setup to adjust the position of the zone 3 After finish setting right click the mouse to return to the Privacy Zone page 4 Click Save to save the setting ...

Page 24: ...atus Enable Disable of each channel Stream Mode Select Mainstream or Substream PreRecord Enable status supports pre record for motion detection record Select the channel and the date to be set One week s schedule can be set The record schedule of the current channel can be copied to any other channel or all channels Note In the Record menu and Record Search menu No Color stands for no record Green...

Page 25: ... mode or user defined mode Bitrate Set IPC bitrate Take DHCP as an example In this mode the router automatically assigns IP address for the NVR After restarting the NVR or DHCP server the IP address obtained by the NVR may be different As a result user should check the IP address and port number for each remote access of the NVR The operation procedure is as follows 1 Select DHCP click Save and re...

Page 26: ...Auto Mode Switch Mode Auto Mode If Switch Mode is set to Auto Mode NVR will assign IP address to the IP cameras automatically And the IP address of IP cameras will be 10 10 25 151 to 10 10 25 166 for LAN1 to LAN16 Manual Mode If Switch Mode is set to Manual Mode you need to search and add the IP cameras to the NVR 3 2 3 3 E mail Go to Main Menu Parameter Network Email to enter into the menu interf...

Page 27: ...be sent in case of object motion 2 Red stands for Exception Email will be sent in case of exception e g Disk Full Disk Error and Video Loss 3 2 3 4 RTSP Go to Main Menu Parameter Network RTSP Set user name and password to view video by PC software VLC RTSP Enable Enable Disable Verify Enable Disable RTSP Port 00554 RTSP User Name admin RTSP Password 111111 Instruction rtsp IP Port chA B A 01 ch1 0...

Page 28: ...ing dynamic domain service User may remotely access the NVR by using domain http applied domain mapped HTTP port number through web browsers such as http wsktest123 no ip biz 80 When using DDNS domain name to access the NVR confirm that the port can be normally connected to current IP on the public network and the settings for server address host name user password setting should be consistent wit...

Page 29: ...m is turned on disable 10 seconds 20 seconds 40 seconds and 60 seconds Show Message Messages will be displayed on the screen when a moving object is detected and alarms are enabled Send Email When a moving object is detected an email will be sent to the address entered Full Screen When a moving object is detected a message will be displayed in full screen Post Recording The duration time of the al...

Page 30: ...ers set in the setting HDD Status Alarm will appear when HDD does not work due to damage power failure HDD auto overwrite off and insufficient space 3 3 Record Search 3 3 1 Record Search Go to Main Menu Record Search Record Search to enter into the interface Channel Select the channel you want to search Type Select the type the playback record There are three options All Normal and Motion Start Ti...

Page 31: ...ion that means the processing control bar covers two hour of content The time range refers to 1 hour before and after the middle point 2 Record clip and backup function and playback zoom in out function Clip and backup When it is under single channel playback the icon will appear in the Play Control bar Click the icon to start video clip function click the icon again to end the function and pop up...

Page 32: ...y search details by date time channel and record type The relevant operations are as follows Next page Click the button to go to next page when viewing events except the last page When viewing the last page click this button to display the event list in the last page Previous page Click the button to go to previous page when viewing events except the first page When viewing the first page click th...

Page 33: ... the record means it has been selected and click Backup to enter into Select backup type Make sure USB flash drive or other portable storage device are connected If you want to back up with USB select USB and click OK to start processing and you may see the backup progress After backup finishes message Backup Finishes will appear at down right corner Note Before backup connect devices for backup U...

Page 34: ...ick to stop playback Frame Forward step forward by frame Slow forward Click to play at 8x 4x 2x 1x 1 2 1 4 1 8 1 16 speed Fast forward Click to play at 16x 8x 4x 2x 1x 1 2x 1 4x 1 8x speed Open file Open Directory Expand pack up the list Screenshot Save path C Users Administrator SVideoPlayer picture Cut Save path C Users Administrator SVideoPlayer video Full screen display Never on top Always on ...

Page 35: ...one Repeat ALL are optional Delete all files in the list Search File Language Settings Basic Settings Set on top mode Capture Settings Set the path to save image Note It is recommended to use SVideo Player contained in compact disk for playback Use of any other player may cause compatibility problem ...

Page 36: ...will be shown as Normal No Number of HDD connected to system Status It shows the current status of HDD HDD status include OK and Full etc Free Total Space Remaining or total space of the HDD Free Time Remaining time for the HDD recording according to currently set Resolution Encoding Rate and Frame Rate of image Auto overwrite When set to Auto the NVR will overwrite the oldest files on the hard dr...

Page 37: ... normal operation of NVR network 3 Configure Cloud Enable Cloud and set the channel and interval for the NVR to periodically captured pictures Enable Motion Detection to get captured pictures for motion detection 4 Driver Name refers to the name created in the folder of Dropbox and the name can be defined by the user e g CloudNVR The folder is to store the NVR periodically captured pictures 5 Clic...

Page 38: ... the icon at the upper left to view the folder CloudNVR referred to in Step 4 8 Enter the folder to view the NVR captured pictures 9 Click Upgrade Cloud storage to Check and update the new version 3 5 System 3 5 1 General 3 5 1 1 General Go to Main Menu System General to enter into the interface User may set Date Time Date Format Time Format Language Video Format Menu Timeouts and Show Wizard in t...

Page 39: ...nd End Time NTP service Enable Disable NTP function Server Address Select NTP server time windows com time nist gov pool ntp org Time Zone Corresponding time zones for various nations or regions Update Now Enable NTP function and save parameters and click Update Time to calibrate the system time Note When NTP function is set to Enable system will calibrate the system time at every 00 07 50 and eve...

Page 40: ...even users including one administrator and six users Click Edit button to enter into the User Edit interface to input user name and password The user name must consist of 1 8 letters characters or figures Password MUST be 8 13 characters long and the combination of at least two types of characters ...

Page 41: ...llow you manage and control the HDD and USB drive Remote Login allow you remotely login into the NVR SEQ Control allow you sequence live screens for all the channels Backup Select the ENABLE option and select channel for backup the user is allowed to back up the record in the selected channel Live Select the ENABLE option and select a channel and the user is allowed to view all the live images in ...

Page 42: ... can view system information including Device ID Device Name Device Type Hardware Version Software Version IE Client Version IP Address Domain MAC Address HDD Capacity Video Format Media Port Web Port P2P ID etc User may view the information of various connected IPC including state Mainstream Substream Mobilestream motion detection privacy zone etc ...

Page 43: ... the interface Auto Reboot Enable the auto maintenance function to reboot system regularly at every day week month When Auto Reboot is enabled the NVR should be in the main interface and no user operation Upgrade Decompress update file package and copy the upgrade file folder named nvrupgrade the upgrade program is inside to root directory of USB flash drive Insert the USB flash drive into USB por...

Page 44: ... you want to upgrade Click Upgrade to start upgrading IPC IPC Load Default Click IPC Load Default and then click OK to confirm Then it will prompt that IPC is loaded default successfully and IPC will be restarted Click Select All is to select all channels to do load default for all cameras Clear is to clear all selection and Exit is to exit Note Do not take out the USB memory or turn the power off...

Page 45: ...User Name and Password so as to shut down or reboot system Event Type Support three abnormal types Disk Full Disk Error and Video Loss Enable Active alarms for abnormal situations Show Message You can set show message on the screen when sensor alarm is detected Buzzer How long the buzzer will sound 10s 20s 40s 60s Send Email Select to send Email to specified Email address when abnormal events appe...

Page 46: ...ve limitations for authorization and have to get authorization from administrator 3 9 Split Mode There are many display modes in video channel including single channel display SEQ display and split mode 3 10 Stream Switch Click to switch to Main Stream and click to switch to Sub Stream When you switch to 16 channels live view mode you can only view 12 channels at Main Stream If you would like to v...

Page 47: ...icon on the toolbar to start sequence Chapter 4 Web Application Manager 4 1 Download and Installation of Plugin If your computer system is Windows 7 you may need to setup the user authority for remote control or you may be unable to backup or record Vista System Start Setup Control Panel Set user authority in control pane shown as the following picture Remove the Tick in front of the option Use UA...

Page 48: ...loaded successfully please check if your browser s safety level or firewall setting is set too high Please open IE browser Menu Bar Tools Internet options Security Internet Custom level Enable the options Open your web browser and input the IP address of NVR such as http 192 168 1 200 80 ...

Page 49: ...lick on download and then click on Run in being downloaded File Security Warning box Click on Run in warning box reading Do you want to run this software Click on Install in the dialog box Setup Web Plugin ...

Page 50: ...ddress bar to access login page 4 1 2 Download and installation of plugin for Mac SAFARI Enter IP address of NVR in address bar of Mac SAFARI for example http 192 168 1 200 and click on download to download the plugin Locate the downloaded plugin SurveillanceClient dmg and double click on it ...

Page 51: ...51 Install the plugin by double clicking on SurveillanceClient pkg Click on Continue Install Enter user name and password for login to Apple computer Click on Install Shut down to finish installation ...

Page 52: ...e that it doesn t support V45 or above When you do a firmware upgrade you have to re download and re install the plug in Based on different situations it may not be able to install the plug in through browsers In this case please copy and install the plug in on the CD attached Web_plugin_Windows_YYYY_MM_DD exe for Windows system and SurveillanceClient_Mac_YYYY_MM_DD dmg for Mac 4 2 Web Application...

Page 53: ...cord switch the remote record switch of client Record will be automatically saved to a specified position on PC after the function is enabled Capture Capture the selected live image and save it to a specified position on PC The image is saved as bmp format Open or close the images on Live window When it is in gray color the channel preview is disabled Or click the right key of mouse on each Live w...

Page 54: ...revious group of channels Display next group of channels Click to maximize the current window to full screen Right click to pop up menu option and select Exit Full Screen 4 3 1 2 Video Control Adjust the hue of video Adjust the brightness of video Adjust the contrast of video Adjust the saturation of video ...

Page 55: ...k and select 4 channels Any record files in current channel at current date will be displayed in the status bar of the interface Secondly select record type Normal record Motion record and All and channels and then click and time axis panel will display specific time quantum On the time axis green part stands for normal record yellow stands for motion record and original part stands for no record ...

Page 56: ...s the time point of current position will be displayed on the time axis screen Click the icon or to zoom in out the time bar display ratio 4 3 2 2 Playback Control Playback control bar Detailed brief description is shown as below list Key Description Key Description Play Open all the playback channels Pause Slow playing 1 2 1 4 1 8 Fast playing 1 2 4 8 Stop Stop playing all the files By frame Sing...

Page 57: ... capturing the images successfully a path prompt box will be popped up The captured file will be saved as bmp format Record file download Click download icon on the control bar to display all the matched record file according to the search conditions of channels Tick select the record file you want to download and click Start download System will download the record file in sequence and save to lo...

Page 58: ...option to find its sub options IP Camera Live and Image Control and Privacy zone 1 IP Camera Display the information of added IPC It can quickly add the on line IPC and delete the added IPC 2 Live You may change channel name position channel preview and relevant parameters If show time is set as disable current NVR system time will not appear on the screen on Live mode ...

Page 59: ... white balance 3d noise reduction image reversal and so on 4 Privacy Zone Each channel can set 4 privacy zones The relevant parameters should be consistent with NVR local setting Select zones to be deleted and click Delete and click Save at up right corner ...

Page 60: ...ameter Schedule and Stream configuration 1 Record Parameters The parameters should be consistent with NVR local setting 2 Record Schedule The parameters should be consistent with NVR local setting Green stands for Normal record Yellow stands for Motion detection Picture 4 16 ...

Page 61: ...61 3 Stream setting User may set Mainstream Substream and Mobilestream The relevant parameters should be consistent with NVR local setting ...

Page 62: ...System default network type is DHCP User can set parameters as required After the network parameters are modified successfully NVR will automatically restart 2 Email Set NVR alarm Email configuration parameters including Email address SSL Email Enable Interval and Email Schedule etc Detailed parameters should be consistent with NVR local setting ...

Page 63: ... make sure port and current IP can be normally connected in public network Details settings including server address host user and password should be consistent with NVR local setting 4 RTSP Go to Main Menu Parameter Network RTSP Set User Name and Password to view video by PC software VLC RTSP Enable Enable Disable Verify Enable Disable RTSP Port 554 User Name admin Password 111111 Instruction rts...

Page 64: ...tting 1 Cloud storage Go to Main Menu Device Cloud storage to enter into the interface A cloud storage parameters Cloud Cloud Space Network HDD It can upload the NVR periodically captured pictures and motion detection captured pictures to Dropbox 1 Register in Dropbox website Address https www dropbox com 2 Configure network to ensure the normal operation of NVR network 3 Configure Cloud Enable Cl...

Page 65: ...l box User shall input his Email 6 Click Active Cloud to activate Cloud and Email will receive the URL related to Cloud User input the registered user name to visit the above website and the following interface will be popped up 7 Click the icon at the upper left to view the folder CloudNVR made in the 4th step 8 Enter the folder to view the NVR captured pictures 9 Click Upgrade Cloud storage to C...

Page 66: ... unfold its sub options General Users and information 1 General User may check NVR language and video system and set system time date format menu display time DST and NTP parameters Detailed setting should be consistent with NVR local setting ...

Page 67: ...ng should be consistent with NVR local setting 3 Info User can view system information including Device ID Device Name Device Type Hardware Version Software Version IE Client Version IP Address Domain MAC Address HDD Capacity Video Format Media Port Web Port P2P ID etc ...

Page 68: ... Click Advance to unfold its sub options Firmware Update Load default Events and Maintain 1 Firmware Update User may remotely update NVR system Updating procedure Firstly select the update file path The file format is sw ...

Page 69: ...s and HTTP port of the NVR to log in remotely Notes Before clicking on Start be sure to exit from the menu 2 Load Default User may remotely restore default parameters of NVR with same setting method as that of NVR 3 Events User may configure Event Type Buzzer Send Email Show Message and other parameters Detailed setting should be consistent with NVR local setting ...

Page 70: ...NVR local setting 4 3 4 Local Setting User may set Record Path save Live record and Playback clip file Download Path for remote file Snapshot Path for captured pictures Interval for switching record files Packaging time and File type RF and AVI 4 3 5 Logout Click to log out and return to the Login interface ...

Page 71: ...earch WiseView and click INSTALL to install 2 After installation open WiseView and select Device Then click to add new device Scan QR code under Information page of system on local NVR Then input client port user name and password and then click Save to log in the device ...

Page 72: ...ice Click to add new device Scan QR code under Information page of system on local NVR Then input client port user name and password and then click Save to log in the device It supports max 1080P resolution during live view on mobile phones If the image resolution is above 1080P the video will not be fluent ...

Page 73: ...o ensure stability and life of the NVR 5 Q The remote controller doesn t work while the monitor screen is OK and panel keys are functional Why A Operate again by aiming the remote controller at the IR receiver on front panel If it still doesn t work please check if the batteries in the remote controller are dying If not check if the remote controller is broken 6 Q I want to take out HDD from my PC...

Page 74: ... 1 To shut down NVR please firstly shut down the system and then turn off the power Do not turn off the power directly or HDD data will be lost or damaged 2 Please keep NVR away from heat sources or places 3 Clean the internal dust regularly Make sure the good ventilation of NVR so as to ensure the good heat dissipation 4 Please do not hot plugging cables at ports or the ports may be damaged 5 Ple...

Page 75: ...tional Shutter Mode Auto Gain Control Auto White Balance Auto Wide Dynamic Range YES Digital Noise Reduction 3DNR OSD N A Refresh Rate 50 60Hz Day Night Color Black White Auto IR Distance 82ft Total darkness 130ft Ambient lighting Environmental Operating Temperature Humidity 10 C 50 C 14 F 129 F Less than 90 RH Ingress Protection IP66 Electrical Input Voltage POE 12VDC Power Consumption 5W DC 12PO...

Page 76: ... 1080P 480fps Mode Manual Schedule Continuous Event Event Pre Post Event Motion Sensitivity Level 1 8 Overwrite modes Disable Auto Pre alarm On off Post Alarm Up to 5min 30 sec 1 2 5min Search Playback Search mode Date time Normal Motion Playback function Fast forward backward 2x 4x 8x 16x Slow forward 1 2x 1 4x 1 8x 1 16x Step Forward All above is only available on the NVR itself rather than webs...

Page 77: ...d 6 Users User access log Encryption Interface Monitors VGA 1 VGA HDMI 1 HDMI Simultaneous Output VGA and HDMI Audio Inputs Output N A Compression N A Sampling Rate N A Alarm Remote notification Notification via e mail Connections Ethernet 1 WAN RJ45 10 100 1000M Base T 16 LAN USB 3 USB Ports USB 2 0 x 2EA USB 3 0 x 1EA Application Support Mouse Remote Control General Electrical Input Voltage AC 1...

Page 78: ...78 6 4 Accessories Attached SNK D5081 ...

Page 79: ...79 ...

Page 80: ...80 ...

Reviews: