background image

English – 

47

DYNAMIC IP SETTING

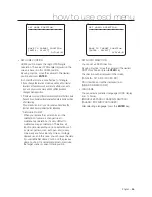
Examples of using Dynamic IP

If the camera is installed on an IP router and obtains an IP using 
DHCP.

If the camera is connected directly to a xDSL/Cable modem using 
DHCP.

If an IP is allocated by the internal DHCP server in local area 
networking.

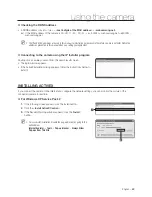
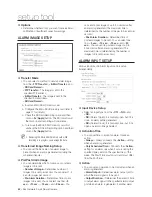
Dynamic IP Check

When you run the IP Installer on your local PC, the camera with a 
dynamic IP allocated is listed.

 Select the camera in the list and click the [

Manual Set

] button to check 

the camera for the current dynamic IP.

In this case, the ADDRESS fi eld is automatically fi lled and you can’t 
change it. However, you can still change the port settings.

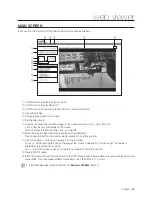
PORT FORWARDING (PORT MAPPING) SETTING

With the camera installed on an IP router, you must set the port forwarding for the IP router before an IP router external 
remote PC can connect to the IP router internal camera.

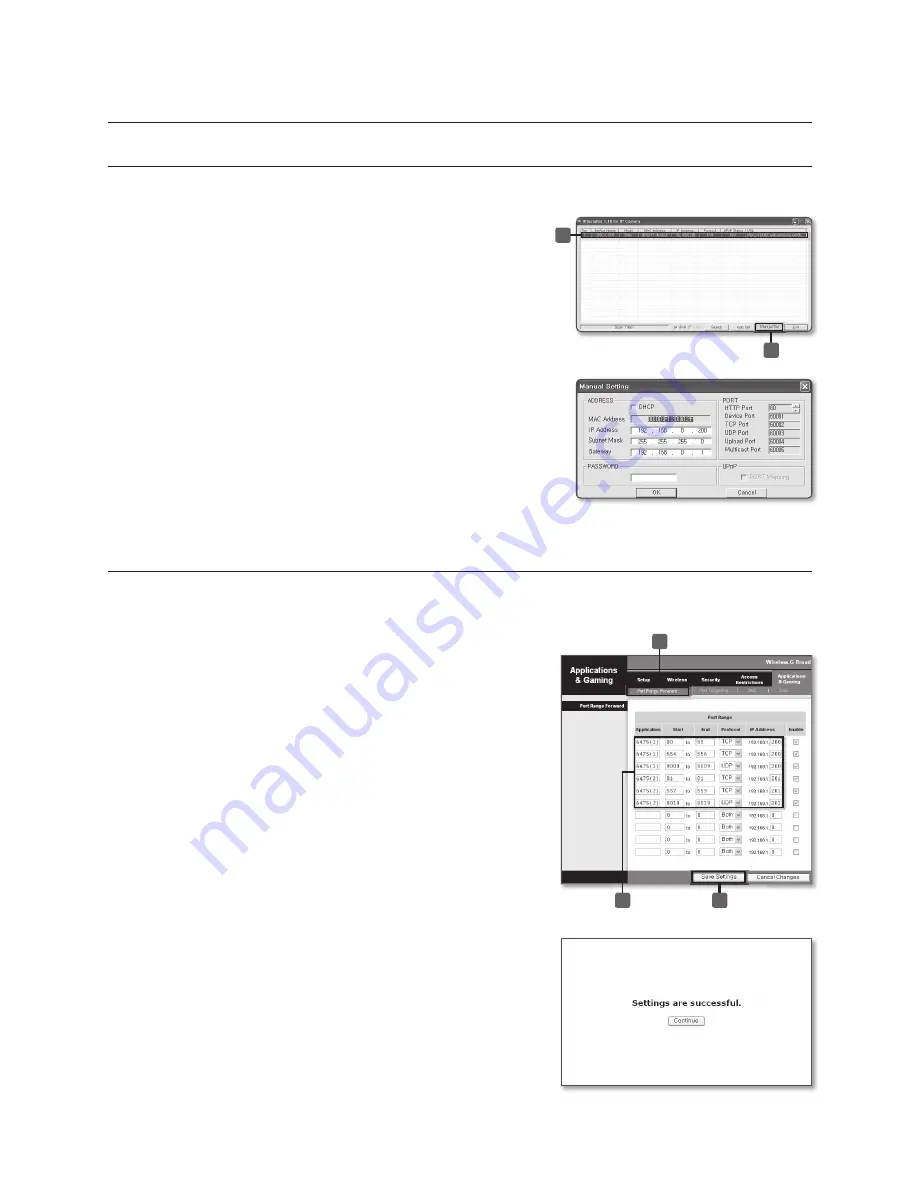
Manual Port Forwarding

Click <

Applications &Gaming

 <

Port Range Forward

> from 

the Settings menu of the IP Router.

For the menu location and the setting of Port Forwarding, refer 
to the IP router’s documentation.

Select the <

TCP

> and <

UDP Port

> for each camera connected 

to the IP Router.

Each of the port numbers for the IP Router must be according 
to those presented in <

BASIC

 <

IP

> of the SETUP screen of 

the camera.

If the setting is complete, click the [

Save Settings

] button.

The changes are saved.

1.

2.

1.

2.

3.

2

3

1

setting dynamic ip

1

2

Summary of Contents for SNC-C7478

Page 1: ...x Network Smart Dome Camera User Manual SNC C7478 imagine the possibilities Thank you for purchasing this Samsung product To receive more complete service please visit our website www samsungsecurity com ...

Page 2: ...c or containers filled with water on top of the camera Doing so may cause personal injury due to fire electric shock or falling objects Do not install the unit in humid dusty or sooty locations Doing so may cause fire or electric shock If any unusual smells or smoke come from the unit stop using the product In such case immediately disconnect the power source and contact the service center Continu...

Page 3: ... device and shall stay readily operable at any time FCC Statement This device complies with part 15 of the FCC Rules Operation is subject to the following two conditions 1 This device may not cause harmful interference and 2 This device must accept any interference received including interference that may cause undesired operation 1 2 3 4 5 6 7 8 9 safety information Caution This equipment has bee...

Page 4: ...r replacement of the obsolete outlet Protect the power cord from being walked on or pinched particularly at plugs convenience receptacles and the point where they exit from the apparatus Only use attachments accessories specified by the manufacturer Use only with cart stand tripod bracket or table specified by the manufacturer or sold with the apparatus Unplug this apparatus when a card is used Us...

Page 5: ...et 20 Auto Pan 20 Pattern 20 Scan 21 Schedule 21 Other Functions 21 OSD Display of Main Screen 22 General Rules of Key Operation for Menu 22 How to use OSD Menu Structure of the Setup Menu 23 Main Menu 25 System Information 25 Display Setup 25 Privacy Zone Mask Setup 25 Motion Setup 26 Function Setup 27 Preset Setup 28 Auto Pan Setup 29 Pattern Setup 29 Scan Setup 30 Schedule Setup 32 Camera Setup...

Page 6: ...ing to the Camera 48 Installing ActiveX 49 Web Viewer Main Screen 51 Using the Camera 52 Using the SD Search Viewer Screen 54 Setup Tool Setting the camera 55 Video Audio Configuration 56 IP 57 User 58 Language 58 Digital Image Stabilizer 58 Date Time 59 Log 59 Software Update 59 Reset 60 HTTPS 60 Transfer Setup 60 Record Setup 61 Alarm Image Setup 62 Alarm Input Setup 62 Motion 63 Schedule 64 Str...

Page 7: ...ly between two preset positions with designated speed Max 4 of Patterns can be recorded and played back This enables to move camera to follow any trajectory operated by joystick as closely as possible Max 8 set of Scan action can be stored This enables to move camera repetitively with combination of Preset or Pattern or Auto Pan A Scan is composed of max 20 entities of Preset Pattern Auto Pans Max...

Page 8: ...4 2 4GHz or higher Operating System Windows XP Service Pack 2 Windows Vista Resolution 1024x768 pixels or higher RAM 512MB or higher Web Browser Internet Explorer 6 0 or higher Video Card Radeon Nvidia Video Memory 128MB DirectX 8 1 or higher COMPATIBLE IP ROUTERS Linksys D Link Netgear ...

Page 9: ...ORIES Product Accessories Hexagonal wrench Water proof tape Housing Safety Cable Hanger Screw Plastic Anchor 4pcs User Manual IP Installer CD Quick Guide Safety Cable Hole Template Cross Cable Core Filter Wall Mount Type Ceiling Mount Type ...

Page 10: ...e dome cover from the sun rays and rain fall from In the sunshield there is the upper housing which will contain accommodate PTZ mechanism Also the upper housing will be connected to both mounting brackets and dome cover Wall Ceiling mount Bracket These are used to install the camera on the wall or ceiling and have Network box in them Network Box The network box has many important roles of connect...

Page 11: ... Protocol camera will automatically recognize the kind of Protocol If you want to control using DVR or system keyboard their protocol must be identical to camera Otherwise you can not control the camera If you changed camera protocol by changing DIP S W the change will be effective after you reboot the camera Factory default of protocol is Auto Protocol Communication Baud rate Setup Select the app...

Page 12: ...n switch of last camera Pin 8 RS 485 Termination Resistor ON OFF INSTALLATION USING POLE MOUNT BRACKET 1 Using the paper template mark the holes on the wall 2 After drilling the holes fix the four anchor bolts into the holes 3 After locating the wall mount bracket on the anchor bolts properly Tighten the nuts for anchor bolts 4 Connect cables to terminal blocks and BNC in the Network box See the c...

Page 13: ...le on the hole of pipe 2 attach the upper housing to mount bracket by turning it at least seven turns 3 To fix the upper body orientation turn the handle of double nuts to clockwise tightly 4 7 Care must be taken dome cover is hung by internal safety cable properly Plug fan heater cables into the connectors in the housing 8 Plug the connector of cable from network box into properly B A 2 1 4 3 ...

Page 14: ...echanism to the upper housing press the two black handles till it sounds snap 11 Close the dome cover Care must be taken to locate dome cover by matching the Arrow mark 12 Tighten four screws on the dome cover in sequence as shown in the picture bellow To maintain the best sealing the torque of each screw must be in the range between 0 5 1 0 N m 0 37 0 73 lbf ft G G ٻ ٻ ٻ ٻ ٻ ٻ ٻ ٻ ٻ ٻ ٻ ٻ 1 2 3 4...

Page 15: ...85 Communication For PTZ control connect this line to keyboard and DVR To control multiple cameras at the same time RS 485 communication lines of them is connected in parallel as shown below RS 485 Keyboard Controller DVR IN AUDIO OUT R ESET PW R LIN K A C T AC 24V AC 24V 1 2 3 4 1 2 3 4 G 5 6 7 8 ALARM OUTPUT ALARM INPUT POWER F G Main Cable LAN Cable BNC Video Pre Amp Microphone Pre Amp Speaker ...

Page 16: ...IN function is not supported Alarm Input Connection Sensor Input It is noted that short circuit between G and Input pin means alarm activation If you want to use Alarm Input the types of sensor must be selected in SETUP menu Refer to ALARM INPUT SETUP Page 62 in this Manual The sensor types are Normal Open and Normal Close If sensor type is not selected properly the alarm can be activated reversel...

Page 17: ...an Micro SDHC Memory Card Gently press down on the exposed end of the memory card as shown in the diagram to eject the memory card from the slot Pressing too hard on the Micro SDHC memory card can cause the card to shoot out uncontrollably from the slot when released When removing the Micro SDHC memory card disable the SD Card Recording feature refer to page 61 for instructions on disabling SD Car...

Page 18: ...d make of the memory card Your camera supports Micro SD memory cards However the maximum supported Micro SD memory card capacity is 2GB and ver 1 1 4GB or above SD memory cards are incompatible For your camera we recommend you use a memory card from the following manufacturers Micro SDHC SD Memory Card Kingston Panasonic SanDisk and Toshiba Your camera supports 128MB to 8GB of memory card capacity...

Page 19: ... you execute AUTO CALIBRATION camera will calibrate its focus at every 6 hours To turn off this function please run Preset 166 STARTING OSD MENU Function Using the OSD menu Preset Pattern Auto Pan Scan and Alarm Input function can be configured for each application Enter Menu Go Preset 95 RESERVED PRESET Description Some Preset numbers are reserved to special functions Function Go Preset 95 Enters...

Page 20: ... CCW Counterclockwise direction Speed can be set up from 1 sec to 180 sec Set Auto Pan To set Auto Pan use OSD menu Run Auto Pan Method1 Run Auto Pan Auto Pan NO ex Run Auto Pan 2 Run Auto Pan 2 Method2 Go Preset Auto Pan NO 140 ex Run Auto Pan 2 Go Preset 142 Delete Auto Pan To delete Auto Pan use OSD menu PATTERN Function Pattern Function is that a camera memorizes the path mostly curve path by ...

Page 21: ...last action executed before power down Most of actions such as Preset Pattern Auto Pan and Scan are available for this function but Jog actions are not available to resume if there are no setup for those functions like Preset Pattern Auto Pan and Scan Camera will automatically move to Home position after rebooting If Power Up Action is set to be ON camera will continue the function which is execut...

Page 22: ...nformation Current Pan Tilt angle in degree zoom magnification and a compass direction Camera ID Current Camera ID Address Action Title Followings are possible Action Titles and their meaning SET PRESET When Preset is stored PRESET When camera reach to Preset PATTERN When Pattern is in action AUPx PRESET XXX When Auto Pan x is in action UNDEFINED When undefined function is called to run Preset Lab...

Page 23: ...SPEED CLEAR APAN PATTERN NO CLEAR PATTERN EDIT PATTERN SCAN NO CLEAR SCAN EDIT SCAN 1 8 ON OFF OK CANCEL OFF ON 00 00 05 04 00 00 HOME PRESET1 128 SCAN1 8 PATTERN1 4 APAN1 8 1 128 CANCEL OK GENERAL SPECIAL OFF ON 1 8 NOT USED PRESET1 128 NOT USED PRESET1 128 1 180 SEC CANCEL OK 1 4 CANCEL OK 1 8 CANCEL OK SNC C7478_v1 XX_XXXXXX COLOR SYSTEM PROTOCOL BAUD RATE ADDRESS MAC CAMERA ID PTZ INFORMATION ...

Page 24: ...RIS LEVEL GAIN LEVEL SHUTTER SPD BRIGHTNESS AUTO MANUAL 0 255 0 255 ALLOFF WDR ON BLC ON AUTO1 AUTO2 DAY NIGHT AUTO MANUAL IRIS SHUTTER BRIGHT CLOSE F1 6 3 28dB 1 60 1 10000 0 31 FOCUS MODE DIGITAL ZOOM IMAGE FLIP FLICKERLESS WHITE BALANCE SETUP AUTO EXPOSURE SETUP SYSTEM SETUP RELAY TYPE PASSWORD SET HOME POSITION SET NORTH DIRECTION LANGUAGE RELAY 1 RELAY 2 RELAY 3 RELAY 4 ENGLISH ESPAÑOL FRANÇA...

Page 25: ...ress DISPLAY SETUP This menu defines Enable Disable of OSD display on Main Screen If an item is set to be AUTO the item is displayed only when the value of it is changed CAMERA ID ON OFF PTZ INFORMATION ON OFF AUTO ACTION TITLE ON OFF AUTO PRESET LABEL ON OFF AUTO ALARM I O ON OFF AUTO DATE TIME ON OFF PRIVACY ZONE Start Privacy Zone Mask setup Menu PRIVACY ZONE MASK SETUP Select area in image to ...

Page 26: ...ET LOCK ON OFF If Preset Lock is set to ON it is impossible to set up and delete Preset It is possible only to run those functions To set up and delete those functions enter into OSD menu PWR UP ACTION ON OFF Refer to Other Functions page 21 section D FLIP ON OFF Refer to Other Functions page 21 section JOG MAX SPEED 2 sec 200 sec Sets maximum jog speed Jog speed is inversely proportional to ratio...

Page 27: ...available which makes camera to move slowly between two preset points PATTERN SETUP Up to 4 patterns can be stored in the dome In this function path data created by manual move of Joystick are recorded and you can playback the identical path automatically whenever required SCAN SETUP Up to 8 Scans can be defined In a Scan max 20 entities are assigned from any combinations of Preset Auto Pan Patter...

Page 28: ...ing jog operation General WB AE value should be applied All Special WB AE value should not change although General WB AE value changes If SPECIAL is selected Menu to set WB AE shows on monitor ALARM OUT State of four alarm outputs can be freely controlled in conjunction with Preset run The character means OFF state and the number representing each bit means ON ex If it is set to be 23 Output relay...

Page 29: ... moves from the preset assigned as the 2nd point to the preset assigned as the 1st point in CCW Counterclockwise direction In case that the preset assigned as the 1st point is same as the preset assigned as the 2nd point camera turns on its axis by 360 in CW direction and then it turns on its axis by 360 in CCW direction APAN SPEED 1 sec 180 sec Sets Auto Pan speed from 1 sec to 180 sec CLEAR APAN...

Page 30: ...ects Scan number to edit If a selected Scan number is not defined UNDEFINED will be displayed under selected Scan number CLEAR SCAN CANCEL OK Deletes data in current Scan EDIT SCAN Starts editing Scan Edit Scan c Press ENTER key in NO list to start Scan setup d Note that Max 20 Functions are allowed in a Scan Move cursor up down and press ENTER key to set up EDIT PATTERN 1 MOVE TO START POSITION E...

Page 31: ...ting up an Action press ENTER key to one upper level menu Step d Move cursor Up Down to select Action number and repeat Step d Step f to edit selected Scan h After finishing setting up all Actions press LEFT key to exit Then cursor should be moved to SAVE Press ENTER key to save data EDIT SCAN 1 NO ACTION NO DWELL OPT 1 NONE 2 NONE 3 NONE 4 NONE 5 NONE SAVE MOVE CURSOR CANCEL CHANGE VAL EDIT SCAN ...

Page 32: ... camera will move to Preset 12 position at 7 35 on every Wednesday Note If there are rules conflicts to each other the higher number is the higher priority has Note If you assign undefined function there will be no action Hint Using reserved Preset you can make various schedules For example PRS179 are PRS178 are Day and Night mode respectively Refer to Reserved Preset page 19 List in this manual S...

Page 33: ...speed will be fixed at 1 100 second White Balance Setup WB MODE AUTO MANUAL In Manual mode Red and Blue level can be set up manually RED ADJUST 0 255 BLUE ADJUST 0 255 Auto Exposure Setup WDR BLC ALL OFF WDR ON BLC ON Select WDR Wide Dynamic Range or BLC Backlight Compensation function All OFF means turning off both functions DAY NIGHT AUTO 1 AUTO 2 DAY NIGHT The illumination condition for switchi...

Page 34: ...brightness automatically select the AUTO slow shutter BRIGHTNESS Works when AE MODE is BRIGHT Adjusts brightness of images Iris Shutter Speed and Gain are adjusted automatically in correspondence with this value Range 0 31 32 steps SYSTEM SETUP SYSTEM SETUP You can set up RELAY TYPE PASSWORD HOME POSITION NORTH DIRECTION LANGUAGE RELAY TYPE SETUP Contact types of 4 Ch RELAY OUTPUTS are defined NOR...

Page 35: ...f camera is changed due to maintenance operations it is very difficult to maintain same pan orientation Therefore all function data depending on pan orientation such as preset pattern scan auto pan and privacy zone mask are not useful any more accordingly However even in this case you can reuse the data if you redefine Set Home Position on the previous Home position It is recommendable to memorize...

Page 36: ...AUTO Preset Label AUTO Alarm I O AUTO Date Time ON Privacy Zone Undefined Motion Configuration Preset Lock OFF Power Up Action ON D Flip ON Jog Max Speed 140 sec Jog Direction NORMAL Image Hold OFF Park Action OFF Communication Setup Protocol AUTO Baud Rate 9600 Camera Configuration Focus Mode ONEAF Digital Zoom ON Image Flip OFF Flickerless OFF White Balance AUTO Backlight BLC ALL OFF Day Night A...

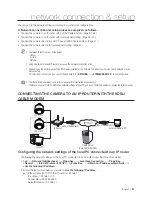
Page 37: ...P in the setup menu The IP and MAC addresses used in this manual are for illustrative purposes only Therefore you must refer to Notice the network settings of your PC and do not enter the addresses presented in this manual CONNECTING THE CAMERA TO AN IP ROUTER WITH THE XDSL CABLE MODEM Configuring the network settings of the local PC connected to an IP router Configuring the network settings of th...

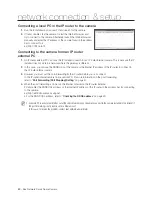
Page 38: ...to Setting Static IP on page 44 or Setting Dynamic IP on page 47 Connecting a local PC in the IP router to the camera Run the IP Installer on your local PC and search for the camera If found double click the camera to start the Internet browser and try to connect to the camera Alternately launch the Internet browser manually and enter the IP address of the camera found in the address bar to connec...

Page 39: ...ess Follow the instructions below if you select Use the following IP address ex1 If the address LAN IP of the IP router is 192 168 1 1 IP address 192 168 1 100 Subnet Mask 255 255 255 0 Default Gateway 192 168 1 1 ex2 If the address LAN IP of the IP router is 192 168 0 1 IP address 192 168 0 1 Subnet Mask 255 255 255 0 Default Gateway 192 168 0 1 ex3 If the address LAN IP of the IP router is 192 1...

Page 40: ...era or the Internet IP address of the IP router to connect to the IP router internal camera However you must set the port forwarding for the IP router before you can connect to the IP router internal camera from a remote PC For more information on the port forwarding refer to Port Forwarding Port Mapping Setting on page 47 When the port forwarding is done run the Internet browser on the IP router ...

Page 41: ...IP and the password refer to the IP router s documentation When done you will see the setup window of the IP router In the setup menu select Automatic Configuration DHCP for Internet Connection Type For the menu location of Internet Connection Type or DHCP selection refer to the IP router s documentation When done click the Save or Apply button to save the settings Connecting to the camera from a ...

Page 42: ...the IP address of the camera in the address bar of the browser A remote PC in an external Internet out of the LAN network may not be able to connect to the camera installed in the intranet if the port forwarding is not properly set or a firewall is set In this case to resolve the problem contact your network administrator 1 2 M SNC C7478 External Remote PC DDNS Server Data Center KOREA SNC C7478 L...

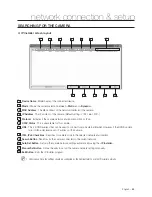
Page 43: ...This is DDNS address that can be used to connect from an external Internet However if the DDNS update fails it will be displayed as an IP address of the camera 8 IPv4 IPv6 Check Box Searches for cameras only in the selected network environment 9 Search Button Searches for the camera connected to the current network 10 Auto Set Button Sets up the camera network settings automatically using the IP I...

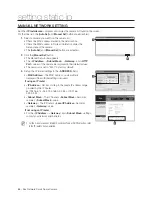
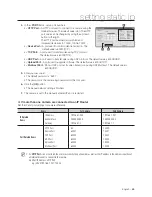
Page 44: ...n their default values The password is set to 4321 by factory default Set up the IP related settings in the ADDRESS field MAC Address The MAC Address is automatically displayed No additional setting is required If using an IP router IP Address Set it according to the private IP address range provided by the IP Router ex 192 168 1 2 254 192 168 0 2 254 or 192 168 XXX 2 254 Subnet Mask The IP Router...

Page 45: ...DP Multicast The default value is 60005 UDP Enter your password The default password is 4321 The password is the camera login password of the root user Click the OK button The manual network setting is finished The camera is set to the manually entered IP and is restarted If more than one camera are connected to an IP Router Set the IP and port settings for camera differently Items 1st Camera 2nd ...

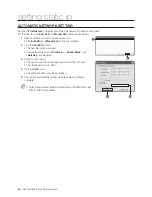
Page 46: ...n are activated Click the Auto Set button The Auto Set window appears The automatically found IP Address Subnet Mask and Gateway are displayed Enter your password The password is the camera login password of the root user The default password is 4321 Click the OK button The automatic network setting is finished The camera automatically restarts when the network setting is complete For the menu loc...

Page 47: ...owever you can still change the port settings PORT FORWARDING PORT MAPPING SETTING With the camera installed on an IP router you must set the port forwarding for the IP router before an IP router external remote PC can connect to the IP router internal camera Manual Port Forwarding Click Applications Gaming Port Range Forward from the Settings menu of the IP Router For the menu location and the se...

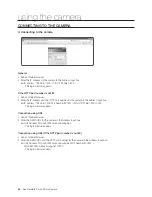
Page 48: ...mera in the Address input box ex IP Address 192 168 1 200 Port Number 10000 http 192 168 1 200 10000 The login window appears Connection using URL Run an Internet browser Enter the DDNS URL for the camera in the Address input box ex URL Address http e30002c websamsung net The login window appears Connection using URL If the HTTP port number is not 80 Run an Internet browser Enter the DDNS URL and ...

Page 49: ... click a camera you want from the search result screen The login window appears If the ActiveX installation dialog appears follow the instructions below to install it INSTALLING ACTIVEX If you connect the camera to the Internet and configure the network settings you can monitor the picture of the connected camera in real time For Windows XP Service Pack 2 If the following screen appears click the ...

Page 50: ...es make sure to change the password by clicking BASIC USER in the SETUP screen The administrator ID root is fixed and cannot be changed If you check the Remember my password the username and password are saved and will be entered automatically in the login window You are required to install DirectX 8 1 or later on your Windows based PC You can download DirectX for free at http www microsoft com do...

Page 51: ...e image in eight directions including up down left right Press a direction button to move the image release it to hold the position Press this button to zoom in out release it to stop zooming Focus While pressing this button the image stays focused release it to stop focusing This feature is available only in manual focus mode Iris Press this button to open or close the iris release it to hold the...

Page 52: ...or area in the center of the screen Click and drag the Live Screen to the lower right corner to zoom in the image Click and drag the Live Screen to the upper left corner to zoom out the image USING THE CAMERA To Capture a Video At a desired scene click the CAPTURE button The capture confirmation window appears Click OK The captured screen image is saved in the specified folder path Default save pa...

Page 53: ... the RECORD button once again When plays stored avi files use player where supports avi playing Default save paths are provided for each version of Windows Windows XP C Program Files Samsung SNC C7478 VidedClip Live To change the saving path click SAVE PATH button and then select the path you want Windows Vista C users user ID AppData LocalLow Samsung SNC C7478 VideoClip Live The save path cannot ...

Page 54: ...o search for events generated 2 Thumbnail Size The thumbnail images are displayed based on the selected size 3 Refresh If a new event occurred and the event image is saved pressing Refresh will add the event to the list 4 SCHEDULE You can select the desired time to search the schedule events 5 ALARM INPUT You can select the desired time to search the alarm events 6 MOTION You can select the desire...

Page 55: ...SETUP tab The setup window appears SETUP Screen Layout setup tool SETUP BASIC SYSTEM VIDEO AUDIO IP USER LANGUAGE DIS DATE TIME LOG SOFTWARE UPDATE RESET HTTPS TRANSFER SETUP RECORD SETUP ALARM IMAGE ALARM INPUT1 ALARM INPUT2 ALARM INPUT3 ALARM INPUT4 ALARM INPUT5 ALARM INPUT6 ALARM INPUT7 ALARM INPUT8 MOTION SCHEDULE STREAMING SETUP DDNS SNMP EVENT NETWORK ...

Page 56: ...will increase network traffic Compression Set the compression ratio of an image in MPEG4 format Adjust it from 5 to 100 where closing to 100 will increase the compression ratio GOP Size You can select a GOP size between 1 and 15 The default is 15 and if set to 15 one I Frame will be output per 15 frames as one I Frame and 14 P Frames constitute the GOP The lower the GOP size is the better the qual...

Page 57: ...TCP UDP Streaming Port A port used to transfer video using the UDP protocols The default value is 60003 UDP Upload Port TCP A port used to upgrade software Default value is 60004 TCP IPv6 Enable IPv4 and IPv6 may be enabled simultaneously When IPv6 is enabled your camera will receive an IP address according to the configuration in the network router Multicast Address Shows IP address set for video...

Page 58: ...t administrator ID is root Administrator cannot be deleted or added and you can change the password only For the ID and password up to 9 alphanumeric and some special characters are allowed You cannot register a duplicated user ID You cannot register root or guest user ID M About User Level Administrator The Administrator can use all functions and change the PTZ control setup or search Operator Th...

Page 59: ...ges System Time Change Shows time changes System Start Shows time when the camera is turned on Up to 2000 logs can be recorde If the log number is over 2000 a log in the bottom of log list will be deleted and added new log information SOFTWARE UPDATE Current Version Shows the current firmware version How to upgrade Click Browse button and select the latest version of the firmware Its file name sho...

Page 60: ...icate Name it can be arbitrarily assigned by user Certificate file issued from authority and a key file After completion press Install button If certificate is installed successfully the summarized status of Installed Certificate will be displayed Also the option button written as HTTPS Secure connection mode using the public certificate in the above becomes activated to be selected To connect the...

Page 61: ...change the port number according to the SMTP server settings Default port number for SSL TLS is 465 User ID Enter a user account ID to connect to connect the SMTP server Password Enter a user account password to the SMTP server E Mail Sender Enter the address of the Email sender If the sender address is incorrect the Email from the sender may be classified into SPAM mail by the SMTP server and may...

Page 62: ...to be sent You can select one from 5 sec 10 sec 15 sec and 30 sec You M can send a prior image of up to 30 seconds after an alarm is generated The maximum time is determined by the number of images to be sent per second Post Alarm Duration Determines time of posterior images to be sent You can select one from 5 sec 10 sec 15 sec and 30 sec You can send a posterior image of up to 30 seconds after a...

Page 63: ...ensitivity from High Medium and Low The High option provides high sensitivity of motion detection and generates motion detection event if a small motion is detected Motion Area You can set an area to detect motion M Activation Time You can set time to accept a motion detection to take an action Always Always conducts the Action setting when a motion is detected Only Scheduled Time Conducts the Act...

Page 64: ... to execute the scheduled transmission function Always Always transmits images according to the specified interval Only Scheduled Time Transmits images according to the specified interval during the specified time period on the specified day of the week The Start Time must be prior to and must differ from the End Time STREAMING SETUP You can control the data transfer rate according to the camera v...

Page 65: ...ically determined depending on the selected Bandwidth value RTP Streaming Protocol You can select a protocol for RTP streaming from the UDP Unicast UDP Multicast M DDNS DDNS is an abbreviation of Dynamic Domain Name Service that converts the IP address of a camera into a general Host Name so that the user can easily remember it and enables connecting a camera with a fixed Host Name even if the IP ...

Page 66: ...es to change the system information SNMP User Setup The version3 can set up the account information for SNMPv3 owing to authentificating the account and the password User Name Possible to input under 20 English letters of numbers to authenticate the user Authentication Password MD5 Possible to input at least 8 20 to authentificate the user Privacy Password DES Possible to input at least 8 20 to en...

Page 67: ...the system using a tab browser the same cookie information is shared resulting in errors when connected Therefore instead of using a tab browser open a new browser window to connect to the system The camera connected to the network is not detected in the IP installer program Turn off the firewall settings on your PC and then search the camera again Images overlap Check whether two or more cameras ...

Page 68: ...defective Go to Configurations Events Alarm Image Settings and verify that SD Card Recording option is checked I inserted an Micro SDHC memory card but the camera isn t working properly Make sure that the memory card has been inserted correctly in the right direction With memory cards that have been formatted from a different device their performance cannot be guaranteed when used in the camera Go...

Page 69: ...Area Pan Tilt Range Pan 0 360 Endless Tilt 180 Preset 360 sec Pan Tilt Speed Manual 0 05 200 sec Inversely Proportional to Zoom Auto Pan 1 180 sec Preset 127 Preset Label Camera Image Setting Pattern 4 Pattern 1000 Commands About 5 Minute Pattern Auto Pan 8 Auto Pan Scan 8 Scan 20 action entities per Scan Other Functions D Flip Auto Parking Power Up Action etc General Communication RS 485 Protocol...

Page 70: ...aximum User Access Max 10 Users at Unicast Mode Max 20 Users at Multicast Mode User Access Level Administrator Live Monitoring PTZ control SETUP Operator Live Monitoring PTZ control User Live Monitoring Event Alarm Input JPEG Image transfer FTP E mail Micro SDHC Card Record Notification notify to viewer Alarm Out Motion Detection JPEG Image transfer FTP E mail Micro SDHC Card Record Notification n...

Page 71: ...English 71 appendix Unit mm DIMENSION Wall Mount Bracket Ceiling Mount Bracket 3 4 PIPE THREAD 3 4 PIPE THREAD 3 4 PIPE THREAD ...

Page 72: ...e environment or human health from uncontrolled waste disposal please separate these items from other types of waste and recycle them responsibly to promote the sustainable reuse of material resources Household users should contact either the retailer where they purchased this product or their local government office for details of where and how they can take these items for environmentally safe r...

Reviews: