background image


118

_ © SAMSUNG Electronics Co., Ltd. 
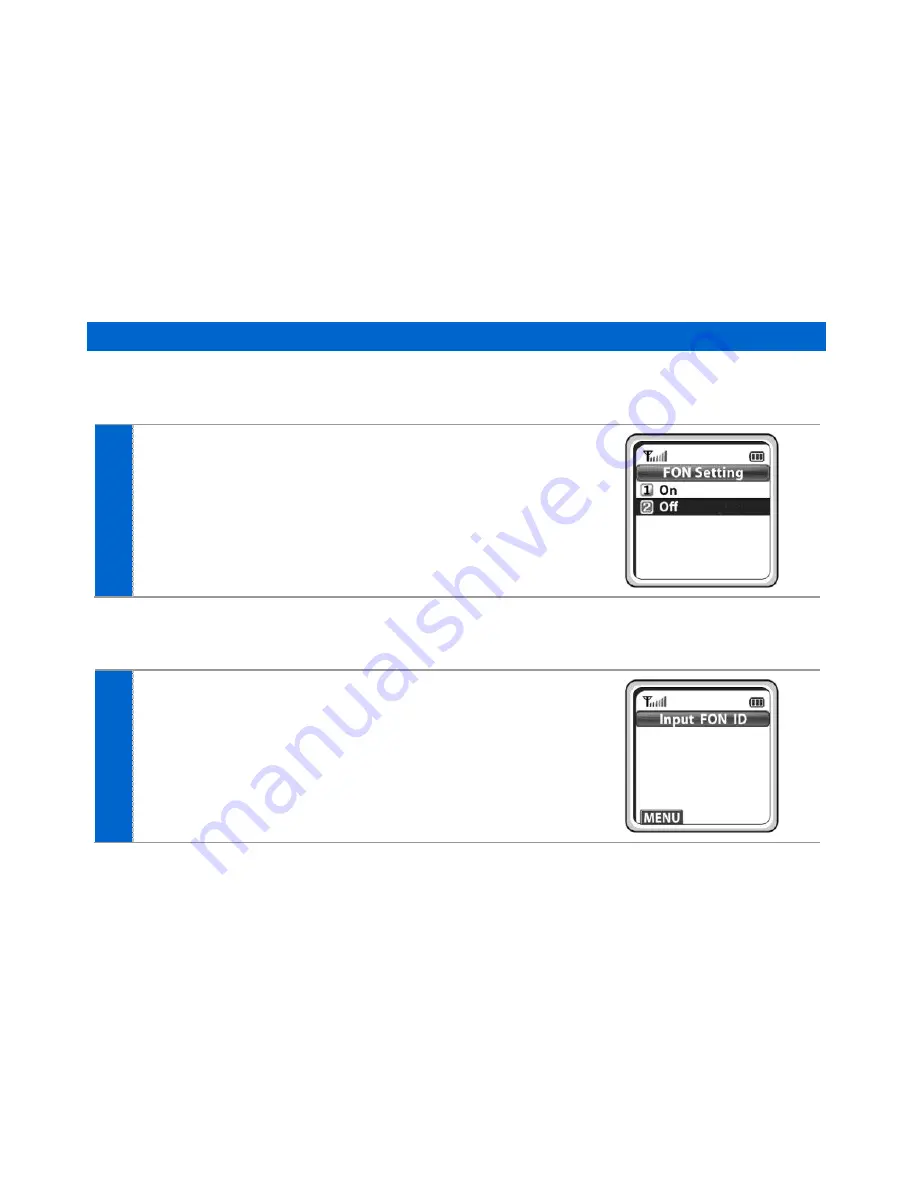
 

FON AP


You can select/cancel FON AP registration mode and change the FON ID and FON password. 

The changed value can be changed or reregistered. 


If you want to access FON AP, select 

[On]

; if not, select 

[Off]

and then press 

[OK]

.   


[If [On] has been selected at Step 1] 


Enter an ID for authentication when accessing FON AP. 


Summary of Contents for SMT-W5120

Page 1: ...SMT W5120 User Guide _1 User Guide ...

Page 2: ...2_ SAMSUNG Electronics Co Ltd ...

Page 3: ...to avoid personal injury or fatality Caution Indication of a general caution Caution Provides information or instructions that the reader should follow in order to avoid a service failure or damage to the system Restriction Indication for prohibiting an action for a product Note Indicates additional information as a reference Instruction Indication for commanding a specifically required action Che...

Page 4: ...e or transform its shape Immediately replace it with a new one Use the battery only to power the phone If the expanded battery is kept in use gas may be generated in the battery and this may cause a fire Immediately replace it with a new one Do not allow the battery to get wet or expose it to water Do not remove the battery in flammable areas and turn the battery off Do not use damaged power cord ...

Page 5: ...prone to lots of dust or where the temperature frequently changes Battery must not be put in mouth of infants or animals Do not use the phone while it is charging and do not touch with wet hands Immediately contact the Service Center if the phone makes a strange sound smell or smoke Do not place flower vases pots cups or containers including cosmetics medicines etc near the phone General Discard t...

Page 6: ...gnetic forces or places affected by magnetic forces This may cause malfunction of the phone or discharge of electricity Overcharging or frequent discharging may decrease battery lifetime Disconnect the phone from the charger after charging fully Keep the battery indoors while it is not in use ...

Page 7: ...information registered to the system will be deleted Do not strike the phone or battery and do not drop them Use a dry cloth for cleaning the phone Do not use chemicals such as alcohol wax perfume deodorant etc for cleaning Do not disassemble modify or remodel the phone Do not place the battery in high temperatures or heat it Do not strike the phone and battery severely or puncture them with a pin...

Page 8: ...Warning 4 caution 6 PREPARATION 14 Overview of SMT W5120 14 Unpacking 15 Installing the Battery 16 Removing the Battery 17 Charging the Battery 18 Checking the Battery Status 19 Phone Layout 20 Button Description 21 Icon Display Description 23 To Turn the Power On 24 To Turn the Power Off 24 ...

Page 9: ...nt 29 Voice Volume Adjustment 30 Setting the Etiquette Mode 31 To Set up the Etiquette Mode 31 To Disable the Etiquette Mode 31 Setting the Automatic Key Lock 32 To Set up the Automatic Key Lock 32 To Disable the Automatic Key Lock 32 Entering Characters 33 Buttons Used for Entering Characters 33 How to enter uppercase and lowercase 33 How to Enter Special Characters 35 How to Enter Numbers 35 ...

Page 10: ...36 Conference Call while on the Phone 37 Call Transfer 38 Holding a Call 39 Right navigation button 39 Features on a Calling Failure 40 Call Back 40 Station Message 41 Camp On 42 Features Used During Receiving a Call 43 Call Reject 43 MENUS 44 Menu Structure 44 Phonebook 45 Phonebook 46 Find Number 46 ...

Page 11: ...ew Entry 55 Delete List 56 Utilities 57 Alarm 57 Schedule 58 Calculator 60 World Time 61 Conversion 62 Timer 63 Message 64 Station Message 64 SMS Short Message Service 65 VMS Voice Mail System 71 Volume Ring 72 Incoming Calls Tone 72 Connection Tone 75 Key Tone 75 Warning Tone 76 ...

Page 12: ...p 78 Do Not Disturb 78 Page 79 Conference 80 Call Forward 83 Phone Settings 84 Phone Name 84 Background 85 Password 85 Language 86 Back Light 87 LCD Contrast 89 Cradle Hook 89 Reset 90 Program Msg Programmed Message 91 Phone Lock 92 Intern Lock Internal Lock 93 Call Answer 94 ...

Page 13: ...etting 107 Encryption key 108 Unregistration 109 QoS WMM WiFi MultiMedia 110 IP MAC Address 110 Version Info 111 Network Setting 112 SSID Setting 122 Help 124 Function Description 124 Troubleshooting 125 TROUBLESHOOTING 126 ANNEX 128 Product Specifications 128 ...

Page 14: ...ile phone The SMT W5120 Wireless IP Phone Mobile type is the wireless mobile phone that allows a voice communication through IEEE 802 11 b g wireless LAN SMT W5120 supports voice communication using IEEE802 11 b g WLAN Based on IEEE802 11 b g standard VoIP voice signals received are compressed to a voice codec and transferred as data packets ...

Page 15: ... the SMT W5120 phone you have to check that the following items have been packed in the box Battery standard type Charger Adapter Earphone SMT W5120 Quick Installation Reference Guide User Guide Quick Installation Reference Guide Leather case for phone ...

Page 16: ...16_ SAMSUNG Electronics Co Ltd Installing the Battery Put the lower part of your battery and then install the battery by pressing the upper part ...

Page 17: ...SMT W5120 User Guide _17 Removing the Battery 1 Press the button and the battery is separated and raised as shown in the figure 2 Lift up and remove the battery ...

Page 18: ...18_ SAMSUNG Electronics Co Ltd Charging the Battery After checking each component of the phone charge the battery as shown in the figure below Charging the battery Charging the battery with phone ...

Page 19: ... If the phone is still used after the warning sound and blinking the battery will be completely discharged and the power will automatically go off Battery duration varies according to service of telecommunications companies environment of use period of battery use Battery is exhausted even if the phone is not used and waiting time will be shortened if additional features are used As batteries are ...

Page 20: ... elements of your phone Etiquette mode Button Menu Button Send Button Navigation Button End Power Button Hold Button Dial Buttons Microphone Speaker LCD Screen Headset Connection Hole Volume Button Cancel Button Speaker Button Auto Key Lock Button Backlight Button Transfer Button ...

Page 21: ...d or entering the volume ring menu Used when moving the menu bar to the right direction or entering the phonebook menu Used when moving the menu bar to the left direction or entering the message menu Used when selecting or saving the selected item for function settings Speaker Button Used When selecting speaker phone function End Power Button Used when turning the power on off when returning to th...

Page 22: ...ttons Used when dialing or entering characters Auto Key Lock Button Used when applying the automatic key lock Etiquette mode Button Used when applying the etiquette mode Transfer Button Used when transferring a call Send Button Used when calling or receiving a call Menu Button Used when entering the menu mode Volume Button Used when controlling the volume of voice or key tone ...

Page 23: ...make a call and turns on when a call is connected The status that indicates an alarm is set When a message is received Etiquette function or vibration function is enabled Indicates that the automatic key lock is enabled Indicates that the ring type is set as light only silent Indicates the battery charging level fully charged sufficient insufficient fully discharged needs to be charged immediately...

Page 24: ...s When power is on without the registration the Unregistered message will be displayed Register the phone according to the following procedure refer to descriptions in 8 System 1 Registration To Turn the Power Off Press the button for more than 2 seconds The phone will automatically turn off ...

Page 25: ...ES Making a Call For your convenience there are several ways to make a call Refer to 1 Phonebook in Menus of this guide for how to use the latest outgoing call numbers incoming call numbers missed call numbers and save the new phone number ...

Page 26: ... the required number The telephone number will appear on the display Press the button for a short time to modify an incorrectly entered number one by one Press the button for a long time to completely delete all the incorrectly entered numbers at once 2 Press the button Press the button to hang up the phone ...

Page 27: ...d phone number for information or to make a call 1 Press the button 2 Using the buttons to view the call history Latest received number Latest called number Failed call 3 Select the phone number and press the button The outging calls incoming calls or missed calls lists store up to 99 entries each If they are all filled up the oldest phone number will be erased when a new phone number is saved ...

Page 28: ... your contacts Press and hold the last two digits of a speed dial number for more than two seconds Answering a Call Press any button except Volume button button or button to start a conversation while the phone is ringing You can set how to answer the incoming call Refer to 7 Phone Settings Call Answer from Menus in this guide ...

Page 29: ...rom the other party Key Button Volume Adjustment You can adjust the volume with key button while on the phone Select the one of 5 volume levels you want by pressing the Volume button in the initial screen If a key is pressed during a call the key tone will not be played unless when using an earphone ...

Page 30: ...Co Ltd Voice Volume Adjustment While having a conversation on the phone you can adjust the voice volume from the other party Select the one of 14 volume levels you want by pressing the Volume button while having a conversation ...

Page 31: ...e Etiquette Mode Press the button for more than 2 seconds on the initial screen Then the etiquette mode icon will be displayed on the top of phone screen and the phone will vibrate instead of ringing if there is an incoming call To Disable the Etiquette Mode To disable the etiquette mode press the button for more than 2 seconds on the initial screen Then the etiquette mode icon disappears ...

Page 32: ...nd functions other than answering a call cannot be used until you disable the Automatic Key Lock To Set up the Automatic Key Lock Press the button for more than 2 seconds on the initial screen The screen will then display the automatic key lock icon To Disable the Automatic Key Lock To disable the automatic key lock press the button for more than 2 seconds on the initial screen Then the automatic ...

Page 33: ...wercase Sym Special character on the lower part of the screen button Enter the desired characters from ENG eng Sym How to enter uppercase and lowercase Pressing the button allows you to enter English uppercase letters automatically and to select one type from the ENG eng Sym located on the lower part of the screen using the buttons The screen will then provide an input field for the character type...

Page 34: ...ame as the last entered character press the buttons to move the cursor right one space Dial Button count 0 1 2 3 4 5 6 7 8 9 1 space A D G J M P T W 2 B E H K N Q U X 3 C F I L O R V Y 4 S Z To enter characters press the button where a desired character is displayed repetitively to display the next character e g If the number 5 button is pressed the character J is entered If the 5 button is presse...

Page 35: ... displayed in the same order Select desired special characters using the buttons and press the button to enter the character on the screen How to Enter Numbers Press the dial button for more than 2 seconds so that numbers are entered irrespective of which character has been selected from out of the English Uppercase English Lowercase Special Characters has been entered ...

Page 36: ...ring a call Mute on a Call This is used to block your voice from your phone during a call But you can still hear the other party 1 Press the button during a phone conversation 2 Move to 1 Mute On using button and then press the button If you want to resume talking to the phone press the button again and select 1 Mute Off ...

Page 37: ...e button while on the phone with other party 2 Select the 2 Conference using button and then button 3 Enter the 3rd party phone numbers who wants to participate in a conference 4 When the call is connected with the 3rd party press the button Select the 1 Conference and then press button Up to 5 people can participate in a conference call ...

Page 38: ... party during a call conversation 1 Press the button during the conversation 2 Press the call number to be transferred 3 Press the button to hang up Then the call will be transferred to the third party on hold Press the button again in transfer mode to resume the call with the previous caller again ...

Page 39: ...e conversation 2 Re press the button in standby status to resume the hold call Right navigation button If you press the button during a call a menu will appear allowing you to save telephone numbers You can save the telephone number of the present caller You can dial a number using the Phonebook You can dial a number using the Call list ...

Page 40: ...by the other party Call Back If an internal call cannot be connected you can reserve the call 1 If the other party does not answer your call or if he or she is in Busy or in Do Not Disturb status press button 2 Move to 1 Call Back using the button and then press the button Your phone will ring when the other party either finishes the call or clears the DND function Once you pick up your phone the ...

Page 41: ...internal call cannot be connected you can send a message 1 If other party is not answering busy or rejecting call is set then press the button 2 Move to 2 Message using the button and then press the button The icon appears on the other party s phone ...

Page 42: ...e other party to answer your call 1 If the other party does not answer your call or if he or she is in Busy or in Do Not Disturb status press button 2 Move to 3 Camp On using the button and then press the button The urgent sound cannot be heard while the other party is busy The bell of the other party starts to ring when the other party hangs up the call ...

Page 43: ...n be used while receiving a call Call Reject If you don t want to receive a call when the phone rings you can use this function 1 Do a long press on the Volume button while phone is ringing 2 Phone stops ringing and the phone call is ended The number of the rejected call is saved in the missed calls list ...

Page 44: ...u screen displays the functions Phonebook Utilities Message Soft Menu Volume Ring Phone Settings System and Help as icons Phonebook 1 Find Number 2 Outgoing Calls 3 Incoming Calls 4 Missed Calls 5 New Entry 6 Delete List Utilities 1 Alarm 2 Schedule 3 Calculator 4 World Time 5 Conversion 6 Timer Message 1 Station Msg 2 SMS 3 VMS ...

Page 45: ...coming calls Tone 2 Connection Tone 3 Key Tone 4 Warning Tone Phone Settings 1 Phone Name 2 Background 3 Password 4 Language 5 Back Light 6 LCD Contrast 7 Cradle Hook 8 Reset 9 Program Msg 0 Phone Lock Intern Lock Call Answer System Help 1 Function Desc 2 Troubleshooting 1 Registration 2 System Setting 3 Encryption Key 4 Unregistration 5 QoS WMM 6 IP MAC Addr 7 Version Info 8 Network Setting 9 SSI...

Page 46: ...nebook Press the Menu button in idle mode and then select the 1 Phone book icon to find out various methods to make a call and view the call lists Find Number This function allows you to search a phone number by name number and location ...

Page 47: ... book OK 1 Find Number 1 By Name Enter a name OK If you press the OK button without entering a name all the numbers in the list saved will be displayed Use the buttons to move between phone number and press Send button to make the call Use the buttons to move between phone number and press OK button to detail information ...

Page 48: ...ne book OK 1 Find Number 2 By Number Enter a phone number OK If you press the OK button without entering a number all the numbers in the list saved will be displayed Use the buttons to move between phone number and press Send button to make the call Use the buttons to move between phone number and press OK button to detail information ...

Page 49: ...arch and make a call the desired phone number using a speed dial number MENU 1 Phone book OK 1 Find Number 3 By Location Enter a speed dial number OK If you press the OK button without entering a speed dial number all the numbers in the list saved will be displayed ...

Page 50: ...d phone number MENU 1 Phone book OK 1 Find Number 1 2 3 Enter Name Phone number Speed dial number OK MENU 1 Edit Modify phone number OK To modify the phone number select 1 Edit To delete the phone number select 2 Delete Using the Cancel and Dial buttons modify the phone number and press the OK button to save it ...

Page 51: ...s OK The maximum of 99 phone numbers can be saved in the outgoing calls list If they are all filled up the oldest phone number is erased when a new dialed phone number is saved Use the buttons to move between phone number and press Send button to make the call To see the date and time information of an outgoing call use the buttons to move the number and press OK button ...

Page 52: ...alls OK The maximum of 99 phone numbers can be saved in the incoming calls list If they are all filled up the oldest phone number is erased when a new received phone number is saved Use the buttons to move between phone number and press Send button to make the call To see the date and time information of an incoming call use the buttons to move the number and press OK button ...

Page 53: ...ls OK The maximum of 99 phone numbers can be saved in the missed calls list If they are all filled up the oldest phone number is erased when a new missed phone number is saved Use the buttons to move between phone number and press Send button to make the call To see the date and time information of a missed call use the buttons to move the number and press OK button ...

Page 54: ...ber MENU 1 Phone book OK 2 3 4 OK Move to a phone number MENU 1 Save Enter name phone number speed dial number OK To save the phone number select 1 Save To modify the phone number select 2 Edit To delete the phone number select 3 Delete Using the Cancel and Dial buttons modify the phone number and press the OK button to save it ...

Page 55: ...ws you to save the new phone number by using the menu function MENU 1 Phone book OK 5 New Entry Enter name phone number home station mobile speed dial number OK You can directly enter the phone number on the idle mode and save that number using the button ...

Page 56: ...Enter a Password Yes No OK To delete all phone number saved in the phonebook select 1 Del Phonebook To delete the list of outgoing call numbers select 2 Del Outgoing To delete the list of incoming call numbers select 3 Del Incoming To delete the list of missed call numbers select 4 Del Missed To delete all phone number saved in the phonebook and the list of outgoing incoming missed calls numbers s...

Page 57: ...nebook or calling numbers and called numbers MENU 2 Utilities OK 1 Alarm OK 1 Set Alarm OK Enter time Move to the alarm interval field Select alarm interval OK To set the alarm select 1 Set Alarm To disable the alarm select 2 Reset Alarm To change the alarm melody select 3 Alarm Melody You can choose one among 5 melodies When the alarm is set the alarm icon will appear on the screen ...

Page 58: ...hone alarms on those dates So you can easily use this function to manage a personal schedule If the alarm is set up as mute you can directly check what the schedule is on the screen MENU 2 Utilities OK 2 Schedule OK Select dates OK Enter time Move to the content field Enter contents Move to the melody field Select Melody OK ...

Page 59: ...elete the registered schedule MENU 2 Utilities OK 2 Schedule OK Select dates OK Select schedule list MENU 1 Modify Modify Time contents melody OK To modify a schedule select 1 Modify To delete a schedule select 2 Delete To add a schedule select 3 Add To delete all schedules select 4 Delete All ...

Page 60: ...n in a simple way MENU 2 Utilities OK 3 Calculator OK Enter numbers Select arithmetical operation symbol Enter numbers OK When entering negative numbers press Auto Key Lock button and When incorrect numbers are entered press the Cancel button Press the buttons to reuse the result Press the Cancel button to reset or the End Power button to terminate ...

Page 61: ...ide _61 World Time This function allows you to check current date and time in each region of the world MENU 2 Utilities OK 4 World Time OK Move the meridian line The corresponding time of each capital name will be shown ...

Page 62: ... volume area temperature After entering a value you may select a unit and convert the value into another unit MENU 2 Utilities OK 5 Conversion OK 1 Length 2 Weight 3 Volume 4 Area 5 Temperature OK Enter values Select a unit to convert Move to the target conversion unit field Select a desired conversion unit OK ...

Page 63: ...eset time is elapsed when you set the time MENU 2 Utilities OK 6 Timer OK Press the Speaker button to select Set Press the Menu button to select Start If you want to pause the timer for a while press the Menu button to select Stop When the time is up the bell stars to ring ...

Page 64: ... The Message menu consists of 3 sub menus Station Msg SMS and VMS Station Message You can send a reply by checking messages received from an extension on the busy state MENU 3 Message OK 1 Station Msg OK Select a station number OK 1 Reply OK To connect call select 1 Reply To delete the message select 2 Delete ...

Page 65: ...K Select the message OK Press the Menu button to delete selected message or to delete all messages After the message is selected Press the Menu button to reply or to resend or to delete selected message Press the Send button to make a call to the person who left the selected message However if the message does not include the phone number of the person a call cannot be made If there are unchecked ...

Page 66: ... Outbox OK 1 Write OK 1 New Text OK Enter the new message OK enter the destination number OK To write new text select 1 New Text To select the message stored in the Templates select 2 Template After editing the selected message in the Templates you can send the message Up to 80 characters numbers including the blank can be written ...

Page 67: ...message or all messages MENU 3 Message OK 2 SMS OK 2 Outbox OK 2 Sent Select the sent message OK Select the message and press the OK button to check the sent message After the message is selected press the Menu button to resend or delete the selected message Up to 10 outgoing messages can be saved If the message is sent is displayed if the message fails to be sent is displayed ...

Page 68: ...ronics Co Ltd Templates New This function allows you to register a new message to the Templates MENU 3 Message OK 2 SMS OK 3 Templates OK 1 New OK Enter the character OK Up to 10 messages can be saved in the message box ...

Page 69: ...ssages saved in the Templates MENU 3 Message OK 2 SMS OK 3 Templates OK 2 Search OK Select the message OK Press the Menu button to delete selected message or to delete all messages After the message is selected press the Menu button to send edit delete the selected message ...

Page 70: ...ctronics Co Ltd SMS Settings Alert Time This function allows you to set alert time that notifies to the user when a message arrives MENU 3 Message OK 2 SMS OK 4 SMS Settings OK 1 Alert Time OK Select the alert time OK ...

Page 71: ...lows you to check the number of the new VMS messages and hear new message contents This function is available after installing VMS and setting a VMS group MENU 3 Message OK 3 VMS OK 1 Message OK After accessing the VMS You can use the soft menu by pressing the Menu button ...

Page 72: ...function Incoming Calls Tone Ring Type You can select the modes of call sound such as the ring vibration ring after vibration and Light only MENU 4 Volume Ring OK 1 Incoming calls tone OK 1 Ring Type OK Select ring type OK For information about how to set the etiquette mode refer to the description of Setting the Etiquette Mode section in Basic Features of this guide ...

Page 73: ...on enables you to select one ring melody out of a selection of 18 melodies You can select the melody for each type of incoming call internal external MENU 4 Volume Ring OK 1 Incoming calls tone OK 2 Ring Tone OK Select call type OK Select melody OK ...

Page 74: ...s Co Ltd Ring Volume This function enables you to adjust the ring volume MENU 4 Volume Ring OK 1 Incoming calls tone OK 3 Ring Volume OK Select ring volume OK You can adjust the volume of the bell by using the Volume button ...

Page 75: ...one This function enables to set an alarm in call connection MENU 4 Volume Ring OK 2 Connection Tone OK Select On Off OK Key Tone This function enables you to set the type of key tone MENU 4 Volume Ring OK 3 Key Tone OK Select key tone OK ...

Page 76: ...76_ SAMSUNG Electronics Co Ltd Warning Tone This function enables you to hear a warning tone when you move to a shadow zone during a call MENU 4 Volume Ring OK 4 Warning Tone OK Select On Off OK ...

Page 77: ...ct the 5 Soft Menu icon Station Message You can send a reply by checking messages received from an extension on the busy state MENU 5 Soft Menu OK 1 Station Msg OK Select a station number OK 1 Reply Call is connected To connect call select 1 Reply To delete the message select 2 Delete ...

Page 78: ... the device You can take over this call MENU 5 Soft Menu OK 2 Direct Pickup OK Dial the ringing extension number OK Do Not Disturb You can deny all of call requests anytime you want to MENU 5 Soft Menu OK 3 DoNotDisturb OK Select On Off OK When DND Do Not Disturb mode is set up the DND message and the icon will appear on the initial screen ...

Page 79: ...T W5120 User Guide _79 Page This function allows you to page through your phone at the specific area in the system MENU 5 Soft Menu OK 4 Page OK Select page zone OK My voice is announced through the phone ...

Page 80: ...can participate in a conference call Group Conf Load You can load a conference group from the system and have a conference with the group MENU 5 Soft Menu OK 5 Conference OK 1 Group Conf OK 1 Load OK Group list is displayed Select a group OK Group members are connected To modify or delete the group press the Menu button in the group list and then select 1 Edit or 2 Delete ...

Page 81: ...e saved to the system as a group A group saved to the system can be conveniently used later by selecting Group Conference MENU 5 Soft Menu OK 5 Conference OK 1 Group Conf OK 2 Save OK Entering group name OK Enter phone number of member Move to next field Enter phone number of next member OK ...

Page 82: ...number of member OK Move to next field Enter phone number of next member OK The mark means that you have completed entering the phone number The mark means that you have failed the call connection The mark means that you have connected with the member You can retrieve a conference group or a phone number saved in the phone by pressing Menu button at the phone number entry screen ...

Page 83: ...de select 1 Disable To forward all incoming calls select 2 All Calls To forward incoming calls when you are using the phone select 3 Busy Calls To forward incoming calls when you cannot answer within the specified time select 4 No Answer To forward incoming calls when you are busy or cannot answer within the specified time select 5 Busy No Answer To forward incoming calls when DND mode is set up s...

Page 84: ...tion enables you to enter random characters on the screen displayed on the initial screen MENU 7 Phone Settings OK Enter a Password 1 Phone Name OK Enter your name OK If you save your name in your phone your name will be displayed on the other party s phone when you are connected to another party intercom user This applies only when your phone number is not saved in the phonebook of the intercom u...

Page 85: ...Phone Settings OK Enter a Password 2 Background OK Select a screen OK Password This function enables you to prevent others from using your phone by changing the initial factory set password of the phone The initial password is set to 0000 MENU 7 Phone Settings OK Enter a Password 3 Password OK Enter new password OK Enter new password again OK ...

Page 86: ...86_ SAMSUNG Electronics Co Ltd Language This feature enables you to set the language displayed on the screen of the phone MENU 7 Phone Settings OK Enter a Password 4 Language OK Select language OK ...

Page 87: ...ically when the keys are pressed or a messages appears MENU 7 Phone Settings OK Enter a Password 5 Back Light OK 1 Light Time OK Select light time OK Delete submenu 3 Always off The lighting of the LCD screen turns off automatically unless a button is pressed within 8 seconds You can also set the lighting duration to 20 seconds or turn off the lighting altogether Select Always Off to disable the l...

Page 88: ...88_ SAMSUNG Electronics Co Ltd Power Save You can set the mode of the energy saving lighting MENU 7 Phone Settings OK Enter a Password 5 Back Light OK 2 Light on off OK Select On Off OK ...

Page 89: ... want to change it MENU 7 Phone Settings OK Enter a password 6 LCD Contrast OK Select contrast OK Cradle Hook This function enables to select call off on when you charge your phone battery with a charger MENU 7 Phone Settings OK Enter a password 7 Cradle Hook OK Select cradle hook option OK ...

Page 90: ... status of a phone MENU 7 Phone Settings OK Enter a password 8 Reset OK Select reset option OK Enter a password Yes No OK To reset the status of a phone select 1 Reset All All the saved records as well as the phone options are deleted To reset the options for the phone functions select 2 Reset Func ...

Page 91: ...bsence MENU 7 Phone Settings OK Enter a password 9 Program Msg OK 1 On Select a message OK To set the programmed message select 1 On To cancel the programmed message setting select 2 OFF Up to 20 programmed messages can be selected In the programmed message setting the programmed message is displayed on the caller s phone screen when the called attempt to call you ...

Page 92: ...cs Co Ltd Phone Lock When the Phone lock is set no keys of the phone will work and functions other than answering a call cannot be used until you enter the password MENU 7 Phone Settings OK Enter a password 0 Phone Lock OK ...

Page 93: ... MENU 7 Phone Settings OK Enter a password Intern Lock OK Select lock option OK To disable the lock function select 1 Unlock To lock an outgoing trunk call select 2 Lock Outgoing At this time outgoing incoming calls are allowed To lock all outgoing incoming trunk station calls select 3 Lock All Calls If the lock mode is set up LCK is displayed on the phone screen ...

Page 94: ...This function enables you to select the Call Answer Mode for how to answer the incomming call MENU 7 Phone Settings OK Call Answer Select the mode OK You can answer a call by pressing the any button or Send button according to the selecting mode ...

Page 95: ...ne is available only after registered to the system MENU 8 System OK 1 Registration Select the system OK To set the phone s operation mode select from SIP mode and Non SIP mode Contact the system administrator to check which mode the system supports and then select either SIP mode or Non SIP mode If you want to access FON AP select Non SIP Mode Non SIP mode should be selected for system operation ...

Page 96: ...Enter a user password for a phone registered in the system 1 Select SSID input mode and press the OK button Auto An automatic search finds available SSIDs and the user can select an SSID from the results Manual enter an SSID manually 2 If you select Auto at Step 1 SSIDs are automatically searched Select an SSID from the list of searched SSIDs Ask the system administrator which SSID should be selec...

Page 97: ...Guide _97 3 If you have chosen Manual at Step 1 directly enter an SSID and then press OK SSID Enter the ESSID set in the WLAN connection device Consult the system administrator to verify the ESSID 4 Enter the user ID ...

Page 98: ...98_ SAMSUNG Electronics Co Ltd 5 Enter Password set in the system 6 Set the feature On Off of WMM WiFi MultiMedia Refer to your system administrator to set On Off ...

Page 99: ...atic search will run to detect encryption mode and will switch to an input screen of the relevant mode If the encryption mode is WEP ASCII mode or HEX mode screen will be displayed If encryption mode is WPA_PSK or WPA2_PSK TKIP AES mode is automatically recognized and an encryption input screen is displayed If Manual has been selected at Step 1 a screen is displayed as shown to the right As for it...

Page 100: ...on Encryption key Enter the Encryption key into the WLAN connection device Refer to your system administrator to verify the Encryption key If no Encryption key is present leave it blank and press OK 9 When the phone is successfully registered the display will appear as on the right ...

Page 101: ...SMT W5120 User Guide _101 Static IP Mode This function enables to register a phone to the system using a fixed IP address 1 Enter a phone IP address 2 Enter the System IP address ...

Page 102: ...102_ SAMSUNG Electronics Co Ltd 3 Enter the System Gateway 4 Enter the System Netmask 5 The next steps are the same as Step 1 to 9 of System DHCP mode registration ...

Page 103: ...DHCP standard protocol You can use this feature if a separate DHCP server is used You can use this feature if a separate DHCP server is used or if you attempt to access FON AP When you move to another site area shift you can still use your phone without registering it again 1 If you want to access FON AP select On if not select Off and then press OK ...

Page 104: ...104_ SAMSUNG Electronics Co Ltd If On has been selected at Step 1 FON AP access 1 Enter an ID for authentication when accessing FON AP 2 Enter a password for authentication when accessing FON AP ...

Page 105: ...SMT W5120 User Guide _105 3 Enter the System IP address 4 The next step is the same as step 1 to 9 of System DHCP mode ...

Page 106: ...106_ SAMSUNG Electronics Co Ltd If Off has been selected at Step 1 normal AP access 1 Enter the System IP address 2 The next steps are the same as Step 1 to 9 of System DHCP mode registration ...

Page 107: ...stered to the system MENU 8 System OK Enter the password OK 2 System Setting OK Select system OK Confirm the information of the system OK Inquire your system administrator for information on whether the system connected to the phone is Sytem1 System4 To newly register a phone to System2 select System2 and register the phone according to the Phone Registration procedure described earlier ...

Page 108: ...dditionally setting or clearing the encryption key without having to enter the system information again MENU 8 System OK Enter the password OK 3 Encryption Key OK 1 Disable 2 WEP 3 WPA_PSK 4 WPA2_PSK Select Encryption key OK 1 ASCII Mode 2 HEX mode or 1 AES Mode 2 TKIP mode Select Encryption mode OK Enter encryption key OK Consult the system administrator and enter the value set on the system ...

Page 109: ...phone is registered in the system The user should check the user password before performing the unregistration function MENU 8 System OK Enter the password OK 4 Unregistration OK Enter the password OK Yes No OK Before execute the Unregistration double check whether this function should be executed since all phone information registered to the system will be deleted ...

Page 110: ...ature On Off of WMM WiFi MultiMedia You can use this feature if the AP which your phone is connected to supports the QoS feature MENU 8 System OK 5 QoS WMM OK Select On Off OK IP MAC Address This function enables to show the unique MAC address for each terminal MENU 8 System OK 6 IP MAC Addr OK ...

Page 111: ...SMT W5120 User Guide _111 Version Info You can find out the version number and the date of the software of your handset MENU 8 System OK 7 Version Info OK ...

Page 112: ...ng You can view the phone s network information and change the settings MENU 8 System OK 8 Network Setting OK 1 Network info 2 System IP 3 Phone IP 4 FON AP 5 DNS setting OK Network info You can view the phone s network info system IP and phone IP ...

Page 113: ...SMT W5120 User Guide _113 System IP You can change the phone s system IP user ID and password The changed value can be changed or reregistered 1 Enter a system IP address 2 Enter a user ID ...

Page 114: ...114_ SAMSUNG Electronics Co Ltd 3 Enter a password 4 Select Save or Registration and press OK Save only saves the changed value while Registration saves the value and also performs reregistration ...

Page 115: ... DHCP 1 MENU 8 System OK 8 Network Setting OK 3 Phone IP Select 1 System DHCP 2 Static IP mode 3 Standard DHCP If 1 System DHCP or 3 Standard IP mode has been selected at Step 1 2 Select Save or Registration and press OK Save only saves the changed value while Registration saves the value and also performs reregistration ...

Page 116: ...NG Electronics Co Ltd If 2 Static IP mode has been selected at Step 1 In Static IP mode you can change the phone s IP address gateway and netmask 2 Enter the phone s IP address 3 Enter the phone s gateway address ...

Page 117: ...T W5120 User Guide _117 4 Enter the phone s netmask address 5 Select Save or Registration and press OK Save only saves the changed value while Registration saves the value and also performs reregistration ...

Page 118: ...egistration mode and change the FON ID and FON password The changed value can be changed or reregistered 1 If you want to access FON AP select On if not select Off and then press OK If On has been selected at Step 1 2 Enter an ID for authentication when accessing FON AP ...

Page 119: ... Guide _119 3 Enter a password for authentication when accessing FON AP 4 Select Save or Registration and press OK Save only saves the changed value while Registration saves the value and also performs reregistration ...

Page 120: ...SAMSUNG Electronics Co Ltd If Off has been selected at Step 1 2 Select Save or Registration and press OK Save only saves the changed value while Registration saves the value and also performs reregistration ...

Page 121: ...NS can be changed You can save the changed value or reregister it 1 Enter the system DNS address 2 Select Save or Registration and press OK Save only saves the changed value while Registration saves the value and also performs reregistration ...

Page 122: ...etting 1 MENU 8 System Setting OK 9 SSID Setting Select Auto Manual OK 2 If you select Auto at Step 1 SSIDs are automatically searched Select an SSID from the list of searched SSIDs Ask the system administrator which SSID should be selected ...

Page 123: ...h will run to detect encryption mode and will switch to an input screen of the relevant mode If the encryption mode is WEP ASCII mode or HEX mode screen will be displayed If encryption mode is WPA_PSK or WPA2_PSK TKIP AES mode is automatically recognized and an encryption input screen is displayed As for its availability refer to your system administrator 4 Select Save or Registration and press OK...

Page 124: ...elps on using functions MENU 9 Help OK 1 Function Desc Select the function description OK Soft Menu Briefly describes Soft Menu including Station Msg DoNotDisturb Page and Conference Phone Settings Briefly describes Call Forward Program Msg and Intern Lock Busy Call Function Briefly describes the functions to be used during a call such as Call back Station Msg Camp On Transfer Hold and Mute ...

Page 125: ...our station you can fix the problem with this menu MENU 9 Help OK 2 Troubleshooting Select the Troubleshooting description OK This menu describes how to troubleshoot some issues such as No ring tone Howling Can t Make a Call Unregisterable Call Disconnect and No Operation ...

Page 126: ...ng 1 Incoming calls 3 Ring Volume The battery is not empty but the phone does not turn on Take the battery out and put it in again and turn the phone on Take the battery out clean the charging phones of the battery Then put the battery back in and turn the phone on Voices echo during a call Press the Volume button and adjust the volume Move to another area Calls are disconnected frequently Move to...

Page 127: ...f the power of the system or AP is on and reregister the phone Move to a serviceable area of the system or AP and reregister the phone Screen Trouble Solution The LCD does not light up Battery is discharged Recharge the battery and turn the phone on again The indicator appears on screen and calls cannot be made Your phone may not be registered on the system Use the phone after registration Move to...

Page 128: ...ecifications of the SMT W5120 are as follows Item Specification Model Name SMT W5120 Frequency 2400 2483 5 MHz Size mm 46 width 138 4 length 18 height Weight 106 5 g Battery Charge Time 3 5 Hour Li Ion Battery Duration Call duration 3 5 Hours Standby duration 40 Hours ...

Page 129: ......

Page 130: ......

Page 131: ......

Page 132: ......

Reviews: