background image

English-9

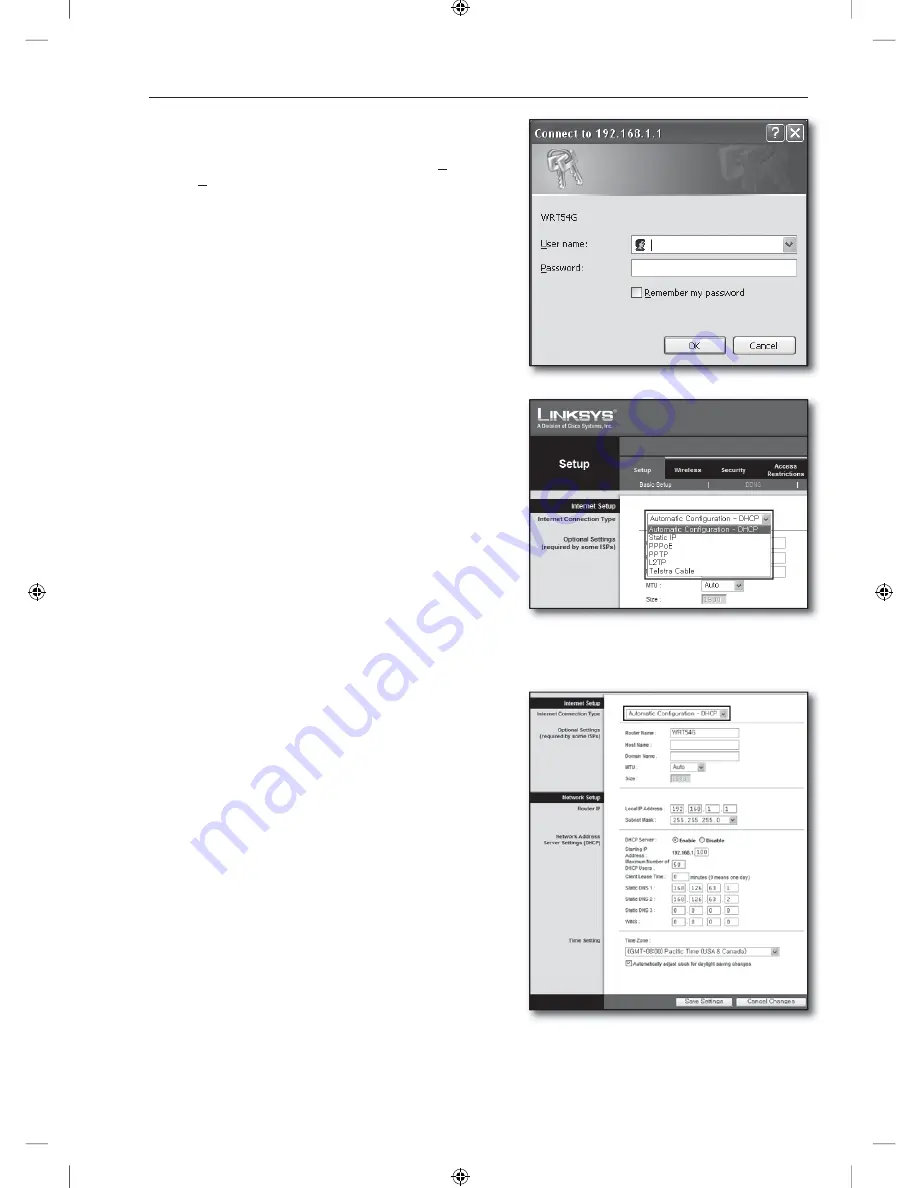
Step 4.1-Case 3. LINKSYS WRT54G

Run the Internet Explorer and enter the <

Default Gateway

>

found in Step 2 into the address field and press [

Enter

].

When the router login screen appears, enter the <

User name

>

and <

Password

>.

Refer to the router user manual for ID and password.

Click <

Internet Setup

>.

Select your <

Internet Connection Type

>.

According to your selection of connection type, different settings 
screen will appear.

Dynamic IP Address Environment

Select <

Automatic Configuration – DHCP

>.

Click [

Save Settings

] button on the bottom.

1.

2.

3.
4.

5.
6.

]_W`XYW_WXh†ztlTYYYW†y–œ›Œ™TxnT`GGG`

YWXWTW_TW`GGG㝘䟸G[aW]a[Y

Summary of Contents for SME-2220N

Page 1: ...ollow the steps 1 to 5 Configure your router computer and DVR equipments as described in the following steps Step 1 Connecting Cables Step 2 Connecting your local computer to the router Step 3 Connecting DVR to the router Step 4 Connecting the router to the internet service line Step 5 Configuring router s port forwarding Step 6 Accessing DVR using DDNS service in dynamic IP environment DVR DVR Loca...

Page 2: ...ection Setup Click Start on your computer Open the Control Panel Network Connections The Network Connections window appears Select Local Area Connection and right click on it Select Properties Local Area Connection Properties window appears Select Internet Protocol TCP IP and click Properties button 1 2 1 2 3 4 5 6 IP Router Cable ADSL VDSL Direct LAN Dynamic Static IP INTERNET or DDNS Server webs...

Page 3: ...Run On the appeared command dialog type cmd in the Open box and click OK In the DOS command window cmd exe type ipconfig and press Enter Run the Internet Explorer and enter the Default Gateway IP address found from the cmd exe window into the address field and press Enter The router s login page will appear if all connections are properly established 7 8 1 2 3 4 5 6 _W XYW_WXh ztlTYYYW y TxnTZGGGZ Y...

Page 4: ...example http www yahoo com and http www yahoo com 80 are regarded the same Hence if the WEB SERVER PORT has been changed other than 80 you need to specify the address as http IP ADDRESS WEB SERVER PORT ex http 192 168 1 200 8080 to connect to the DVR using internet browser Only when the port is set to 80 you can omit the port in the address It is recommended to set WEB SERVER PORT to port number b...

Page 5: ...nment before proceeding and select the appropriate connection type DHCP Dynamic IP environment which allocates IP address automatically Static PUBLIC FIXED IP Bigger organizations and companies usually construct their own IP network environments using public IP addresses PPPoE Common in DSL environments which requires ADSL access ID and password Ask your internet service provider for the user ID a...

Page 6: ...r manual setups click Manual Configure Select your Internet Connection Type Dynamic IP Address Environment Select Dynamic IP DHCP Click Save Settings button Static IP Address Environment Select Static IP Enter the IP Address Subnet Mask and ISP Gateway Address assigned by your ISP Click Save Settings button 3 4 5 6 7 6 7 8 _W XYW_WXh ztlTYYYW y TxnT GGG YWXWTW_TW GGG㝘䟸G aW a X ...

Page 7: ...SS Run the Internet Explorer and enter the Default Gateway found in Step 2 into the address field and press Enter Enter the user name and password when the router login window appears Refer to the router user manual for user name and password Click Setup Basic Settings on the left menu Click Setup Wizard for automatic setup 6 7 1 2 3 _W XYW_WXh ztlTYYYW y TxnT GGG YWXWTW_TW GGG㝘䟸G aW a X ...

Page 8: ...onment Select Use Static IP Address Enter IP Address IP Subnet Mask and Gateway IP Address Click Apply button It saves the changes To check the connection Once connected status indicator DHCPClient is displayed on the top side of the settings screen 4 5 4 5 6 7 _W XYW_WXh ztlTYYYW y TxnT_GGG_ YWXWTW_TW GGG㝘䟸G aW a Y ...

Page 9: ...the User name and Password Refer to the router user manual for ID and password Click Internet Setup Select your Internet Connection Type According to your selection of connection type different settings screen will appear Dynamic IP Address Environment Select Automatic Configuration DHCP Click Save Settings button on the bottom 1 2 3 4 5 6 _W XYW_WXh ztlTYYYW y TxnT GGG YWXWTW_TW GGG㝘䟸G aW a Y ...

Page 10: ...oE Enter your User Name and Password Ask your internet service provider for the username and password Click Save Settings button on the bottom Once finished completion screen appears Step 4 1 Case 4 BELKIN F5D8236 4 Run the Internet Explorer and enter the Default Gateway found in Step 2 into the address field and press Enter 5 6 7 5 6 7 8 1 _W XYW_WXh ztlTYYYW y TxnTXWGGGXW YWXWTW_TW GGG㝘䟸G aW a Y ...

Page 11: ...ed DNS addresses Static IP Address Environment Select Static for the connection type and click Next button Enter the IP Address assigned by your ISP Enter Subnet Mask and ISP Gateway Address Click Apply Changes button ADSL Environment Select PPPoE for the connection type and click Next button Enter user name and password Ask your internet service provider for the user name and password Click Apply...

Page 12: ...the user name and password when the router login window appears Refer to the router user manual for ID and password Click WAN on the left menu of he settings screen Select your Connection Type Dynamic IP Address Environment Select DHCP Client or Fixed IP Click Obtain IP Automatically If your ISP provided specific DNS addresses click WAN DNS and enter the provided DNS addresses Click Apply button on...

Page 13: ...ttom ADSL Environment Select PPPoE Select appropriate method of obtaining WAN IP address Enter the Service Name User Name and Password Ask your internet service provider for the user name and password To check the connection Click Status Device Information on the left menu and check the server s current status at DHCP Server under the LAN category When the connection establishes successfully it di...

Page 14: ... to the router Configure your router s port forwarding as followings What is port forwarding It is a port mapping function of router s WAN Internet IP Port to DVR s IP Port that helps opening a communication channel between inside and outside of the private LAN Since one DVR uses 2 ports for communication port forwarding setup for both 2 ports should be configured If only WEB SERVER PORT is configure...

Page 15: ... Step 3 ex 192 168 0 200 2 6 For the Traffic Type select Any Set the RTSP SERVICE PORT for port forwarding 3 1 Check the Checkbox to select it 3 2 Enter a name for the DVR port in the Name field ex DVR 1_RTSP SERVICE PORT 3 3 In the Public Port enter the RTSP SERVICE PORT defined in Step 3 ex 554 554 3 4 In the Private Port enter the RTSP SERVICE PORT defined in Step 3 ex 554 554 3 5 In the IP Address...

Page 16: ...h the setting Step 5 1 Case 3 LINKSYS WRT54G Click Applications Gaming Set the WEB SERVER PORT for port forwarding 2 1 Enter a name for the DVR port in the Application field ex DVR 1_WEB SERVER PORT 2 2 In the Start and End fields enter the WEB SERVER PORT defined in Step 3 ex 8080 2 3 Select Both for the Protocol 2 4 In the IP Address enter the DVR s IP address defined in Step 3 ex 192 168 1 200 2 5 ...

Page 17: ...d in Step 3 ex 192 168 1 200 2 6 In the Private port field enter the WEB SERVER PORT defined in Step 3 ex 8080 8080 Set the RTSP SERVICE PORT for port forwarding 3 1 Check the Enable checkbox to mark selected 3 2 Enter a name for the DVR port in the Description field ex DVR 1_RTSP SERVICE PORT 3 3 In the Inbound port fields enter the RTSP SERVICE PORT defined in Step 3 ex 554 554 3 4 For the Type selec...

Page 18: ...92 168 1 200 3 6 Click ADD button Settings completed Step 5 2 Checking port forwarding on your computer Confirm the router s WAN Internet IP which has been checked in Step 4 2 again Confirm the DVR s WEB SERVER PORT checked in Step 3 1 again Run the Internet Explorer and enter http WAN Internet IP WEB SERVER PORT into the address field and press Enter DVR s Web Viewer screen appears if port forwardin...

Page 19: ... DDNS address Run the Internet Explorer and enter the DDNS address found in Step 6 1 into the address field end press Enter DVR s Web Viewer screen appears If failed with accessing go to the Step 6 1 and check the settings again It may take up to 10 minutes for updating the router s IP address recorded in the DDNS server When failed with accessing retry after 10 minutes DVR reports its IP address t...

Reviews: