Samsung SM-P200 User Manual Download Page 68

Apps and features

68

Messages (SM-P205)

Introduction

Send and view messages by conversation.

Sending messages

You may incur additional charges for sending messages when you are roaming.

Launch the 

Messages

 app and tap  .

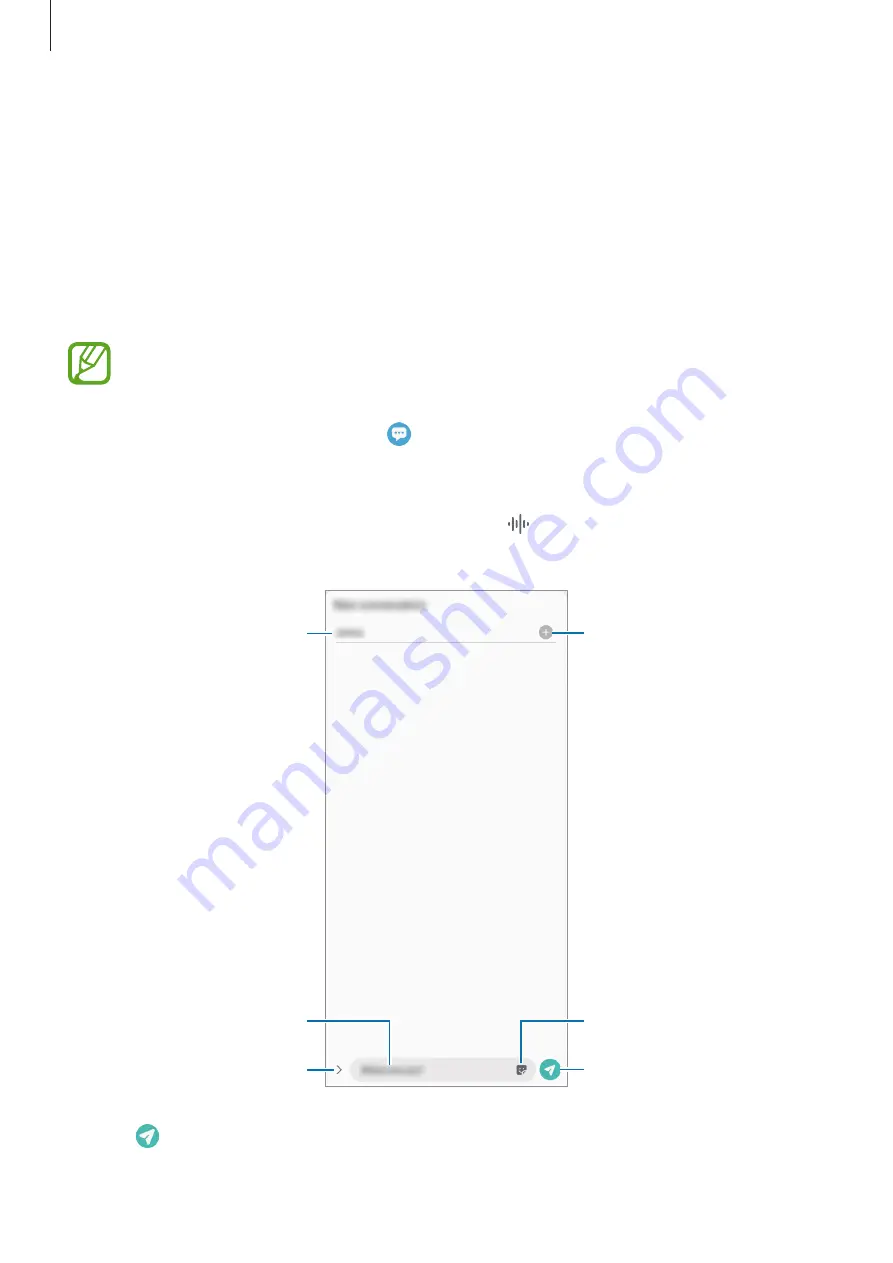
Add recipients and enter a message.
To record and send a voice message, tap and hold  , say your message, and then release 
your finger. The recording icon appears only while the message input field is empty.

Enter recipients.

Enter stickers.

Enter a message.

Attach files.

Recipient

Send the message.

Tap   to send the message.

Summary of Contents for SM-P200

Page 1: ...www samsung com USER MANUAL English 07 2020 Rev 1 0 SM P200 SM P205 ...

Page 2: ...ious device Smart Switch 26 Understanding the screen 39 Notification panel 41 Entering text Apps and features 45 Installing or uninstalling apps 47 Finder 48 S Pen features 59 Phone SM P205 64 Contacts 68 Messages SM P205 71 Internet 73 Email 74 Camera 85 Gallery 90 Multi window 93 Samsung Members 93 Samsung Notes 101 PENUP 105 Calendar 106 Samsung Flow 108 My Files 108 Clock 110 Calculator 110 Bi...

Page 3: ...Troubleshooting Settings 125 Introduction 125 Connections 126 Wi Fi 128 Bluetooth 130 Data saver SM P205 130 Mobile data only apps SM P205 131 Mobile Hotspot andTethering SM P205 132 More connection settings 134 Sounds and vibration Sound 134 Dolby Atmos surround sound 135 Separate app sound 135 Notifications 136 Display 137 Dark mode settings 137 Screensaver 138 Wallpaper 138 Lock screen 139 Smar...

Page 4: ...r apps to work improperly Software sound sources wallpapers images and other media provided with this device are licensed for limited use Extracting and using these materials for commercial or other purposes is an infringement of copyright laws Users are entirely responsible for illegal use of media You may incur additional charges for data services such as messaging uploading and downloading auto...

Page 5: ... the touchscreen To set the touchscreen to automatically adjust its brightness based on the surrounding environment launch the Settings app tap Display and then tap the Adaptive brightness switch to activate it Depending on the region or model some devices are required to receive approval from the Federal Communications Commission FCC If your device is approved by the FCC you can view the FCC ID o...

Page 6: ...se the connected USB cable is damaged Replace the damaged USB cable with a new Samsung approved one When using a wireless charger do not place foreign materials such as metal objects magnets and magnetic stripe cards between the device and the wireless charger The wireless charging or fast charging feature is only available on supported models When the device heats up during use When you use featu...

Page 7: ...ht When using the mobile hotspot and tethering feature When using the device in areas with weak signals or no reception When charging the battery with a damaged USB cable When the device s multipurpose jack is damaged or exposed to foreign materials such as liquid dust metal powder and pencil lead When you are roaming Do the following when the device heats up Keep the device updated with the lates...

Page 8: ... the device will turn off Do not use the device until the device s temperature drops below the specified level If the second warning message appears during an emergency call the call will not be disconnected by a forced shut down Precautions for operating environment Your device may heat up due to the environment in the following conditions Use caution to avoid shortening the battery s lifespan da...

Page 9: ...es and specifications are subject to change without prior notice You can purchase additional accessories from your local Samsung retailer Make sure they are compatible with the device before purchase Use only Samsung approved accessories Using unapproved accessories may cause the performance problems and malfunctions that are not covered by the warranty Availability of all accessories is subject t...

Page 10: ...ensor Speaker SM P205 SM P205 SIM card Memory card tray SM P200 Memory card tray Power key Touchscreen Volume key Multipurpose jack USB Type C S Pen Rear camera Earphone jack GPS antenna Microphone Microphone SM P205 Speaker Main antenna SM P205 ...

Page 11: ...ay not work If you attempt to remove the dust or foreign materials with a sharp object the device may be damaged and its appearance may be affected Connectivity problems and battery drain may occur in the following situations If you attach metallic stickers on the antenna area of the device If you attach a device cover made with metallic material to the device If you cover the device s antenna are...

Page 12: ...he screen Volume key Press to adjust the device volume Soft buttons Back button Home button Recents button When you turn on the screen the soft buttons will appear at the bottom of the screen The soft buttons are set to the Recents button Home button and Back button by default Refer to Navigation bar soft buttons for more information ...

Page 13: ...s such as the Air view feature S Pen button Hover the S Pen over the screen and press the S Pen button to display the Air command features While pressing and holding the S Pen button drag the S Pen over items to select them Detaching the S Pen Press the end of the S Pen to disengage it Then pull the S Pen from the slot To store the S Pen reinsert it into the slot and push it until it clicks into p...

Page 14: ...sively when inserting the nib into the S Pen Do not insert the round end of the nib into the S Pen Doing so may cause damage to the S Pen or your device Do not bend or apply excessive pressure with the S Pen while using it The S Pen may be damaged or the nib may be deformed Do not hard press on the screen with the S Pen The pen nib may be deformed If you use the S Pen at sharp angles on the screen...

Page 15: ...ious damage to the device Any damage caused by misuse is not covered by the warranty Use only USBType C cable supplied with the device The device may be damaged if you use Micro USB cable To save energy unplug the charger when not in use The charger does not have a power switch so you must unplug the charger from the electric socket when not in use to avoid wasting power The charger should remain ...

Page 16: ...ht time Decrease the screen brightness Battery charging tips and precautions When the battery power is low the battery icon appears empty If the battery is completely discharged the device cannot be turned on immediately when the charger is connected Allow a depleted battery to charge for a few minutes before turning on the device If you use multiple apps at once network apps or apps that need a c...

Page 17: ...ter If you charge the device while the multipurpose jack is wet the device may be damaged Thoroughly dry the multipurpose jack before charging the device If the device is not charging properly take the device and the charger to a Samsung Service Centre SIM or USIM card nano SIM card SM P205 Installing the SIM or USIM card Insert the SIM or USIM card provided by the mobile telephone service provide...

Page 18: ...insert the tray into your device while the tray is wet your device may be damaged Always make sure the tray is dry Fully insert the tray into the tray slot to prevent liquid from entering your device Memory card microSD card Installing a memory card Your device s memory card capacity may vary from other models and some memory cards may not be compatible with your device depending on the memory car...

Page 19: ...t recognise the card To use the memory card you must format it If your device cannot format or recognise the memory card contact the memory card manufacturer or a Samsung Service Centre Frequent writing and erasing of data shortens the lifespan of memory cards When inserting a memory card into the device the memory card s file directory appears in the My Files SD card folder SM P205 SM P200 ...

Page 20: ...back into the tray slot If you insert the tray into your device while the tray is wet your device may be damaged Always make sure the tray is dry Fully insert the tray into the tray slot to prevent liquid from entering your device Removing the memory card Before removing the memory card first unmount it for safe removal Launch the Settings app and tap Device care Storage Advanced SD card Unmount D...

Page 21: ...om user actions Turning the device on and off Follow all posted warnings and directions from authorised personnel in areas where the use of wireless devices is restricted such as aeroplanes and hospitals Turning the device on Press and hold the Power key for a few seconds to turn on the device When you turn on your device for the first time or after performing a data reset follow the on screen ins...

Page 22: ... simultaneously for more than 7 seconds to restart it Volume Down key Power key Initial setup When you turn on your device for the first time or after performing a data reset follow the on screen instructions to set up your device 1 Turn on the device 2 Select your preferred device language and select Select a language ...

Page 23: ...nd tap Accounts and backup Accounts Samsung account Help Creating a Samsung account If you do not have a Samsung account you should create one 1 Launch the Settings app and tap Accounts and backup Accounts Add account Samsung account Alternatively launch the Settings app and tap 2 Tap Create account 3 Follow the on screen instructions to complete creating your account Signing in to your Samsung ac...

Page 24: ...and then tap OK Transferring data from your previous device Smart Switch You can use Smart Switch to transfer data from your previous device to your new device Launch the Settings app and tap Accounts and backup Smart Switch This feature may not be supported on some devices or computers Limitations apply Visit www samsung com smartswitch for details Samsung takes copyright seriously Only transfer ...

Page 25: ... storage device to your device 3 On your device launch the Settings app and tap Accounts and backup Smart Switch Restore 4 Follow the on screen instructions to transfer data from external storage Transferring backup data from a computer Transfer data between your device and a computer You must download the Smart Switch computer version app from www samsung com smartswitch Back up data from your pr...

Page 26: ...Do not allow the touchscreen to come into contact with other electrical devices Electrostatic discharges can cause the touchscreen to malfunction To avoid damaging the touchscreen do not tap it with anything sharp or apply excessive pressure to it with your fingertips It is recommended not to use fixed graphics on part or all of the touchscreen for extended periods Doing so may result in afterimag...

Page 27: ...e screen for approximately 2 seconds Dragging Tap and hold an item and drag it to the target position Double tapping Double tap the screen Swiping Swipe upwards downwards to the left or to the right Spreading and pinching Spread two fingers apart or pinch on the screen ...

Page 28: ...s are set to the Recents button Home button and Back button by default The functions of the buttons can change according to the app currently being used or usage environment Button Function Recents Tap to open the list of recent apps Home Tap to return to the Home screen Tap and hold to launch the Google Assistant app Back Tap to return to the previous screen ...

Page 29: ...pear where the soft buttons are located To use the soft buttons drag the gesture hint of the desired button upwards Swipe from sides and bottom Swipe up from the bottom of the screen to move to the Home screen Swipe up and hold to view the list of recent apps Swipe inward from either side of the screen to return to the previous screen Swipe inward from one of the bottom corners to launch the Googl...

Page 30: ... of the device s features It displays widgets shortcuts to apps and more The Apps screen displays icons for all apps including newly installed apps The screen may appear differently depending on the region or service provider A widget Navigation bar soft buttons Favourite apps Screen indicator ...

Page 31: ... Apps screen Alternatively tap the Home button or the Back button Home screen Apps screen If you add the Apps button on the Home screen you can open the Apps screen by tapping the button On the Home screen tap and hold an empty area tap Home screen settings and then tap the Apps button switch to activate it The Apps button will be added at the bottom of the Home screen Apps button ...

Page 32: ...and then drag it to a new location To move the item to another panel drag it to the side of the screen To add a shortcut to an app on the Home screen tap and hold an item on the Apps screen and then tap Add to Home A shortcut to the app will be added on the Home screen You can also move frequently used apps to the shortcuts area at the bottom of the Home screen ...

Page 33: ... selected apps will be created Tap Folder name and enter a folder name Adding more apps Tap on the folder Tick the apps to add and tap Done You can also add an app by dragging it to the folder Moving apps from a folder Tap and hold an app to drag it to a new location Deleting a folder Tap and hold a folder and then tap Delete folder Only the folder will be deleted The folder s apps will be relocat...

Page 34: ...cked screen Widgets Widgets are small apps that launch specific app functions to provide information and convenient access on your Home screen Tap and hold a widget and then drag it to the Home screen The widget will be added on the Home screen Home screen settings Configure settings for the Home screen such as the screen grid or layout Displaying all apps on the Home screen Without using a separa...

Page 35: ...en the notification panel The indicator icons may appear differently depending on the service provider or model Icon Meaning No signal Signal strength Roaming outside of normal service area GPRS network connected EDGE network connected UMTS network connected HSDPA network connected HSPA network connected LTE network connected Wi Fi connected Bluetooth feature activated Location services being used...

Page 36: ...ssing the Power key turns off the screen and locks it Also the screen turns off and automatically locks if the device is not used for a specified period To unlock the screen swipe in any direction when the screen turns on If the screen is off press the Power key to turn on the screen Alternatively double tap the screen Locked screen ...

Page 37: ...ck it Pattern Draw a pattern with four or more dots to unlock the screen PIN Enter a PIN with at least four numbers to unlock the screen Password Enter a password with at least four characters numbers or symbols to unlock the screen None Do not set a screen lock method Face Register your face to unlock the screen Refer to Face recognition for more information You can set your device to perform a f...

Page 38: ...ble to capture a screenshot while using some apps and features If capturing a screenshot by swiping is not activated launch the Settings app tap Advanced features Motions and gestures and then tap the Palm swipe to capture switch to activate it After capturing a screenshot use the following options on the toolbar at the bottom of the screen Capture the current content and the hidden content on an ...

Page 39: ...wnwards To close the notification panel swipe upwards on the screen You can use the following functions on the notification panel View the notification details and perform various actions Clear all notifications Control media on your device and connected nearby devices SM P205 Access the power options Launch Settings Access the notification settings Quick setting buttons Control connected nearby d...

Page 40: ...ap and hold a button To rearrange buttons tap Button order tap and hold a button and then drag it to another location Controlling media playback SM P205 Take control of music or video playback easily using the Media feature You can also continue playback on another device 1 Open the notification panel and tap Media 2 Tap the icons on the controller to control the playback To continue playback on a...

Page 41: ...ted languages Break to the next line Delete a preceding character Enter symbols Enter uppercase For all caps tap it twice Additional keyboard functions Move the cursor Enter a space View more keyboard functions Changing the input language Tap Languages and types Manage input languages and select the languages to use When you select two or more languages you can switch between the input languages b...

Page 42: ...d button switch to activate it Additional keyboard functions Some features may not be available depending on the region or service provider Enter emoticons Enter stickers Attach animated GIFs Enter kaomojis CANGJIE QWERTY KEYBOARD Switch to qwerty keyboard PINYIN QWERTY KEYBOARD Switch to qwerty pinyin mode STROKE KEYBOARD Switch to stroke mode Tap stroke keys to enter a character Tap when you are...

Page 43: ...d an item from the clipboard Open the text editing panel Change the keyboard size Enter stickers SM P205 Copying and pasting 1 Tap and hold over text 2 Drag or to select the desired text or tap Select all to select all text 3 Tap Copy or Cut The selected text is copied to the clipboard 4 Tap and hold where the text is to be inserted and tap Paste To paste text that you have previously copied tap C...

Page 44: ...dictionary is not preinstalled on the device tap Move to Manage dictionaries tap next to a dictionary and then tap Install to download it 3 View the definition in the dictionary pop up window To switch to the full screen view tap Tap the definition on the screen to view more definitions In the detailed view tap to add the word to your favourite words list or tap SearchWeb to use the word as a sear...

Page 45: ...pp may not be available depending on the region or service provider Installing apps Browse apps by category or tap to search for a keyword Select an app to view information about it To download free apps tap Install To purchase and download apps where charges apply tap the price and follow the on screen instructions To change the auto update settings tap Auto update apps and then select an option ...

Page 46: ...pply tap the price and follow the on screen instructions To change the auto update settings tap Settings Auto update apps and then select an option Managing apps Uninstalling or disabling apps Tap and hold an app and select an option Uninstall Uninstall downloaded apps Disable Disable selected default apps that cannot be uninstalled from the device Some apps may not support this feature Enabling a...

Page 47: ...o view or change app permission settings by permission category launch the Settings app and tap Apps Permission manager Select an item and select an app If you do not grant permissions to apps the basic features of the apps may not function properly Finder Search for content on the device quickly 1 On the Apps screen tap Search Alternatively open the notification panel swipe downwards and then tap...

Page 48: ...ards on the Air command panel and select a function or app you want When the screen is off or locked with a screen lock method removing the S Pen will not open the Air command panel Create note Smart select View all notes Screen write PENUP Live messages S Pen settings Adding shortcuts to the Air command panel Add shortcuts to frequently used apps or functions to the Air command panel On the Air c...

Page 49: ... content and the hidden content on an elongated page such as a webpage Refer to Screen write for more information Live messages Instead of text message create and send a unique message by recording your actions while handwriting or drawing a live message and saving it as an animated file Refer to Live messages for more information PENUP Post your artwork view others artwork and get useful drawing ...

Page 50: ...nced features S Pen and then tap the Show floating icon switch to activate it Create note Create notes easily in a pop up window without launching the Samsung Notes app 1 Open the Air command panel and tap Create note Alternatively double tap the screen while pressing and holding the S Pen button The note screen will appear as a pop up window 2 Create a note using the S Pen Undo Redo Adjust the tr...

Page 51: ... Select a desired shape icon on the toolbar and drag the S Pen across the content you want to select To pin the selected area at the top of the screen tap select the area and then tap Pin to screen 3 Select an option to use with the selected area Extract text Extract text from the selected area Pin to screen Pin the selected area to the screen Automatically changes the appearance of the selected a...

Page 52: ...rame to resize Select a quality Adjust the position 4 Tap Record to start capturing Before capturing a video make sure that the video is playing The maximum duration you can capture an area of the video for will be displayed on the screen When capturing an area from a video its sound will not be recorded 5 Tap Stop to stop capturing 6 Select an option to use with the selected area Write or draw on...

Page 53: ...ite The current screen is automatically captured and the editing toolbar appears 2 If you capture the content on an elongated page such as a webpage tap Scroll capture to capture the hidden content Tap Scroll capture repeatedly until screen capture is complete and then tap Done 3 Write a memo on the screenshot Undo Pen type Pen colour Redo Pen radius 4 Select an option to use with the screenshot S...

Page 54: ...Customise background image and tap Done or Start drawing Gallery Set a photo or a video saved in Gallery as a background image Camera Take a photo or record a video and set it as a background image Colour Select a background colour 3 Write or draw on the live message screen Message input limit Preview Start over Undo Change the pen radius Change the file format Change the writing effect Change the...

Page 55: ...en tap Glance The app will be reduced to a thumbnail at the bottom of the screen While browsing webpages hover the S Pen over the thumbnail to open the map app on the full screen and quickly search for places Thumbnail Hover the S Pen away from the screen to reduce the app to a thumbnail again To close the minimised app tap and hold the thumbnail and drag it to Remove at the top of the screen ...

Page 56: ...y by writing or drawing on the calendar screen Open the Air command panel tap Write on calendar and then fill in your plans on the calendar When you are finished tap Save To edit it tap Pen settings Eraser Undo Redo You can use this feature only on the calendar of monthly view ...

Page 57: ...review window Action buttons If this feature is not activated launch the Settings app tap Advanced features S Pen and then tap the Air view switch to activate it Pen Select While pressing and holding the S Pen button drag the S Pen over text or item lists to select multiple items or text You can also copy and paste the selected items or text into another app or share them with others ...

Page 58: ...sung Notes If this feature is not activated launch the Settings app tap Advanced features S Pen and then tap the Screen off memo switch to activate it Creating a screen off memo 1 When the screen is off hover the S Pen over the screen and press the S Pen button 2 Write or draw a memo To extend the page tap To save the memo tap Save The memo will be saved to Samsung Notes Screen off memo ...

Page 59: ...ideo calls Making calls 1 Launch the Phone app and tap Keypad 2 Enter a phone number 3 Tap to make a voice call or tap to make a video call Preview the phone number Delete a preceding character Access additional options Search for a contact Add the number to the contacts list ...

Page 60: ... dial launch the Phone app tap Keypad or Contacts Speed dial numbers select a speed dial number and then add a phone number To make a call tap and hold a speed dial number on the keypad For speed dial numbers 10 and up tap the first digit s of the number and then tap and hold the last digit For example if you set the number 123 as a speed dial number tap 1 tap 2 and then tap and hold 3 Making call...

Page 61: ...If a call is missed the icon appears on the status bar Open the notification panel to view the list of missed calls Alternatively launch the Phone app and tap Recents to view missed calls Blocking phone numbers Block calls from specific numbers added to your block list 1 Launch the Phone app and tap Settings Block numbers 2 Tap Recents or Contacts select contacts or phone numbers and then tap Done...

Page 62: ...erphone keep the device away from your ears Mute Turn off the microphone so that the other party cannot hear you Keypad Hide Open or close the keypad End the current call During a video call Tap the screen to use the following options The video call feature may vary depending on the region or service provider Access additional options Camera Turn off the camera so that the other party cannot see y...

Page 63: ...1 Launch the Phone app and tap Recents 2 Tap a phone number and tap Add 3 Tap Create new contact to create a new contact or tap Update existing contact to add the number to an existing contact Adding a tag to a phone number You can add tags to numbers without saving them to Contacts This allows you to view the caller s information when they call without having them listed in Contacts 1 Launch the ...

Page 64: ...ts Creating a new contact 1 Launch the Contacts app and tap 2 Select a storage location 3 Enter contact information Select a storage location Add an image Open more information fields Enter contact information Depending on the selected storage location the types of information you can save may vary 4 Tap Save ...

Page 65: ...e contacts with online contacts saved in your web accounts such as your Samsung account 1 Launch the Settings app tap Accounts and backup Accounts and select the account to sync with 2 Tap Sync account and tap the Contacts switch to activate it For the Samsung account tap Sync settings and tap the Contacts switch to activate it Searching for contacts Launch the Contacts app Use one of the followin...

Page 66: ...ge with others using the profile sharing feature To use this feature you must sign in to your Samsung account The profile sharing feature may not be available depending on the region or service provider The profile sharing feature is only available for contacts who have activated the profile sharing feature on their device 1 Launch the Contacts app and select your profile 2 Tap Tap here to share y...

Page 67: ... time Launch the Contacts app tap Groups and then select a group Tap at the top of the contacts list and tap Send message Merging duplicate contacts When you import contacts from other storages or sync contacts with other accounts your contacts list may include duplicate contacts Merge duplicate contacts into one to streamline your contacts list 1 Launch the Contacts app and tap Manage contacts Me...

Page 68: ... you are roaming 1 Launch the Messages app and tap 2 Add recipients and enter a message To record and send a voice message tap and hold say your message and then release your finger The recording icon appears only while the message input field is empty Enter recipients Enter stickers Enter a message Attach files Recipient Send the message 3 Tap to send the message ...

Page 69: ... enter a message and then tap To adjust the font size spread two fingers apart or pinch on the screen Blocking unwanted messages Block messages from specific numbers added to your block list 1 Launch the Messages app tap at the top of the messages list and then tap Settings Block numbers and messages Block numbers 2 Tap Conversations and select a contact or a phone number Or tap Contacts select co...

Page 70: ...ng a message reminder You can set an alert at an interval to let you know that you have unchecked notifications If this feature is not activated launch the Settings app tap Accessibility Advanced settings Notification reminders and then tap the switch to activate it Deleting messages 1 Launch the Messages app 2 On the messages list select a contact or a phone number 3 Tap and hold a message then t...

Page 71: ... 2 Tap the address field 3 Enter the web address or a keyword and then tap Go To view the toolbars drag your finger downwards slightly on the screen To switch between tabs quickly swipe to the left or right on the address field Bookmark the current webpage Open the homepage Move between pages Access additional options Open the browser s tab manager Refresh the current webpage View your bookmarks ...

Page 72: ...o use a password for secret mode In secret mode the device will change the colour of the toolbars In secret mode you cannot use some features such as screen capture Changing security settings You can change your password or the lock method Tap Settings Privacy and security Secret mode settings Change password To use your registered biometric data as a lock method along with the password tap an opt...

Page 73: ...nt you can set one as the default account Tap Set default account Sending emails 1 Tap to compose an email 2 Add recipients and enter a subject line and text 3 Tap to send the mail Reading emails When Email is open the device will automatically retrieve new emails To manually retrieve emails swipe downwards on the top of the emails list Tap an email on the screen to read it If email syncing is dis...

Page 74: ...n places where you may violate other people s privacy If photos you take appear blurry clean the camera lens and try again Taking photos 1 Tap the image on the preview screen where the camera should focus Spread two fingers apart on the screen to zoom in and pinch to zoom out Alternatively drag the lens selection icon to the left or right Zooming features are available only when using the rear cam...

Page 75: ...he preview screen may vary depending on the shooting mode and which camera is being used The camera automatically shuts off when unused Make sure that the lens is not damaged or contaminated Otherwise the device may not work properly in some modes that require high resolutions Your device s camera features a wide angle lens Minor distortion may occur in wide angle photos or videos and does not ind...

Page 76: ... and take a photo or record a video This feature is only available in some shooting modes The wide angle lens lets you take basic photos or record normal videos The telephoto lens 2x optical zoom lets you take photos or record videos by enlarging the subject 2x optical zoom shooting Basic shooting ...

Page 77: ...ding on the surroundings to capture photos easily The intelligent camera feature automatically recognises the subject and optimises the colour and any effects On the shooting modes list tap PHOTO and tap to take a photo Scene optimiser The camera adjusts the colour settings and applies the optimised effect automatically by recognising the subject On the shooting modes list tap PHOTO When the camer...

Page 78: ...ot want to use this feature tap the scene optimiser button on the preview screen Taking selfies You can take self portraits with the front camera 1 On the shooting modes list tap PHOTO 2 On the preview screen swipe upwards or downwards or tap to switch to the front camera for self portraits 3 Face the front camera lens 4 Tap to take a photo ...

Page 79: ...ources Tap and hold the area to focus the AF AE frame will appear on the area and the focus and exposure setting will be locked The setting remains locked even after you take a photo Video mode The camera adjusts the shooting options automatically depending on the surroundings to record videos easily 1 On the shooting modes list tap VIDEO 2 Tap to record a video To capture an image from the video ...

Page 80: ...y in the following conditions The device or the subject is moving The subject has a similar colour to the background Taking portraits that stand out using the Live focus feature 1 On the shooting modes list tap LIVE FOCUS Drag the background blur adjustment bar to the left or right to adjust the blur level 2 When Ready appears on the preview screen tap to take a photo Background blur adjustment ba...

Page 81: ...oting options such as exposure value and ISO value On the shooting modes list tap MORE PRO Select options and customise the settings and then tap to take a photo Available options Select an ISO value This controls camera light sensitivity Low values are for stationary or brightly lit objects Higher values are for fast moving or poorly lit objects However higher ISO settings can result in noise in ...

Page 82: ... and then stitch them together to create a wide scene To get the best shots using panorama mode follow these tips Move the camera slowly in one direction Keep the image within the frame on the camera s viewfinder If the preview image is out of the guide frame or you do not move the device the device will automatically stop taking photos Avoid taking photos of indistinct backgrounds such as an empt...

Page 83: ...n use the following options The available options may vary depending on the shooting mode Select the length of the delay before the camera automatically takes a photo Select an aspect ratio for photos Apply a filter effect or beauty effects Select an aspect ratio for videos Select a metering method This determines how light values are calculated Centre weighted uses the light in the centre portion...

Page 84: ...tos will be saved as compressed files to conserve the device s memory Videos Rear video size Select a resolution for videos you want to take with the rear camera Using a higher resolution will result in higher quality videos but they will take up more memory Front video size Select a resolution for videos you want to take with the front camera Using a higher resolution will result in higher qualit...

Page 85: ...ying areas or in poor weather conditions Your location may appear on your photos when you upload them to the Internet To avoid this deactivate the location tag setting Shooting methods Select additional shooting methods for taking a photo or recording a video Storage location Select the memory location for storage This feature will appear when you insert a memory card Reset settings Reset the came...

Page 86: ...y the image Image and video thumbnail You can create an animated GIF or collage from multiple images On the list tap Create GIF or Create collage and then select images Searching for images Launch the Gallery app and tap to view images sorted by category such as types or locations To search for images by entering keywords tap the search field ...

Page 87: ... fast forward by dragging the bar Create an animated GIF Access additional options Rotate the screen Skip to the next video Tap and hold to fast forward Pause and resume playback Display your videos Change the screen ratio Drag your finger up or down on the left side of the playback screen to adjust the brightness or drag your finger up or down on the right side of the playback screen to adjust th...

Page 88: ...d their date and location tags sort the images and videos and then create stories To create stories automatically you must capture or save multiple images and videos Launch the Gallery app tap Stories and then select a story Creating stories Create stories with various themes 1 Launch the Gallery app and tap Stories 2 Tap Create story 3 Enter a title for the story and tap Create 4 Tick images or v...

Page 89: ...The Gallery app and the cloud will be synced When you connect your Samsung account and Microsoft account you can set the cloud storage as Microsoft OneDrive Deleting images or videos 1 Launch the Gallery app 2 Select an image or a video to delete To delete multiple files tap and hold a file to delete on the list and tick more files to delete 3 Tap or Delete Using the recycle bin feature You can ke...

Page 90: ...ndow Introduction Multi window lets you run two apps at the same time in the split screen view You can also run multiple apps at the same time in the pop up view Some apps may not support this feature Split screen view Pop up view ...

Page 91: ...n the upper window 3 On the lower window swipe left or right to select another app to launch To launch apps not on the list of recently used apps tap the Home button or Back button and select an app Adjusting the window size Drag the bar between the app windows up or down to adjust the size of the windows When you drag the bar between the app windows to the top or bottom edge of the screen the win...

Page 92: ...e to the left or right tap an app s icon and then tap Open in pop up view The app screen will appear in the pop up view Minimise the window Close the app Maximise the window Adjust the transparency level Moving pop up windows To move a pop up window tap the window s toolbar and drag it to a new location ...

Page 93: ...mit your feedback or post your comments you must sign in to your Samsung account Refer to Samsung account for more information Samsung Notes Introduction Create notes by entering text from the keyboard or by handwriting or drawing on the screen You can also insert images or voice recordings into your notes Creating notes 1 Launch the Samsung Notes app and tap 2 Select an input method from the tool...

Page 94: ...ap to write or draw with the S Pen You can enter your handwriting more easily if you magnify the screen by spreading two fingers on it Pen Favourite pens Eraser Undo Redo Convert handwriting to text Select and edit Change the background colour Change styles Change drawings into shape ...

Page 95: ...y On the note composer screen tap Add a favourite pen Delete pens Your favourite pens Changing the pen settings When writing or drawing on the screen tap to change the pen type line thickness or pen colour Select colour sets to show Change the pen colour Change the pen type Change the line thickness Select a new colour using the colour picker ...

Page 96: ...ustment bar Erase all Clear the note Even with a smaller eraser you may still not be able to precisely erase the intended part Using the easy writing pad Use the easy writing pad to enter your handwriting more easily When you write or draw on the easy writing pad your handwriting will be automatically adjusted and entered between the lines of the input field 1 On the Samsung Notes main screen tap ...

Page 97: ...e size of the selection tap the input and drag a corner of the frame that appears 3 Edit the input using the available options Cut Cut out the input To paste it to another location tap and hold the location and then tap Paste Copy Copy the input To paste it to another location tap and hold the location and then tap Paste Delete Delete the input Change style Change styles Select a colour or line th...

Page 98: ...en tap twice 2 Select a colour or line thickness you want 3 Point the S Pen toward where you want to apply the style The icon will appear 4 Tap where you want to change the style Changing drawings into shape You can change your drawings into shapes Tap and draw Your drawings will now automatically change into the corresponding shape ...

Page 99: ...ext tap Convert Painting with brushes On the note composer screen tap to paint with various brushes When you are finished tap Done to insert your painting into the note You can post your painting to PENUP to share it with others Select colour sets to show Select a new colour using the colour picker Change the brush colour Redo Post the painting to PENUP Undo Change the brush type Eraser Insert the...

Page 100: ...home screen The note will be added to the Home screen Saving a note as a reminder You can save a note as a reminder to view the note later 1 Launch the Samsung Notes app 2 Select a note and tap Send to Reminder The note will be saved as a reminder Deleting notes 1 Launch the Samsung Notes app 2 Tap and hold a note to delete To delete multiple notes tick more notes to delete 3 Tap Delete ...

Page 101: ...ork by category Your activities You can sign in to PENUP with your Samsung account or other SNS accounts Posting your artwork 1 Launch the PENUP app and tap 2 Select an option Tap Drafts finish artwork and then tap Done Tap From Gallery select your artwork to post and then tap Done Tap Photo drawing select an option to take a photo or select a photo draw on it and then tap Done Tap Drawing draw ar...

Page 102: ...ou select From Gallery 4 Enter a title description and hashtag 5 Tap Post Posting artwork from other apps To post your artwork from Gallery or other drawing apps select the artwork from an app and tap PENUP Colouring images Using the various colours create your own artwork 1 Launch the PENUP app and tap Colouring 2 Select an image 3 Tap Start colouring 4 When you are finished tap Done ...

Page 103: ...ng an image You can easily draw a nice image 1 Launch the PENUP app and tap Live drawing 2 Select an image 3 Tap Learn to draw 4 To draw on the image tap to pause the playback You can change the playback speed by tapping 5 When you are finished tap The original image will be hidden and you can see the image you drew ...

Page 104: ...rew by hiding the photo 1 Launch the PENUP app 2 Tap Photo drawing 3 Tap Take picture take a photo and then tap OK Alternatively tap Select from Gallery and select a photo 4 Select the area to draw adjust the transparency level or apply a sketch filter and then tap Done The selected area will be added as a background 5 Draw on the photo 6 When you are finished tap The photo will be hidden and you ...

Page 105: ...a calendar to save the event to Enter the location Set an alarm Enter a title Set the duration Add a note Change the event s colour Select a sticker to display with the event 3 Tap Save to save the event Creating reminders You can create tasks as reminders and receive notifications at the preset time or location for each reminder Launch the Calendar app and tap Reminder Refer to Reminder for more ...

Page 106: ...xt to the account name Samsung Flow Introduction Samsung Flow allows you to easily connect your tablet to your smartphone and use them conveniently such as checking notifications or sharing contents Samsung Flow must be installed on both devices that you want to connect If Samsung Flow is not installed download it from Galaxy Store or Play Store This feature is only available on some Samsung Andro...

Page 107: ... mobile data connection with your tablet using a mobile hotspot when the Internet connection is not available on your tablet 1 On your tablet launch the Samsung Flow app 2 Tap You can access the Internet on your tablet using your smartphone s mobile data connection Your smartphone must support the mobile hotspot feature You may incur additional charges on your smartphone when using this feature Ch...

Page 108: ...in many cities around the world time an event or set a specific duration Alarm Launch the Clock app and tap Alarm Setting alarms Tap in the alarms list set an alarm time select the days on which the alarm will repeat set other various alarm options and then tap Save To open the keypad to enter an alarm time tap the time input field To activate or deactivate alarms tap the switch next to the alarm ...

Page 109: ... select a city from the map and then tap Add To use the time zone converter tap Time zone converter Deleting clocks Tap and hold a clock tick clocks to delete and then tap Delete Stopwatch 1 Launch the Clock app and tap Stopwatch 2 Tap Start to time an event To record lap times while timing an event tap Lap 3 Tap Stop to stop timing To restart the timing tap Resume To clear lap times tap Reset ...

Page 110: ...it conversion tool tap You can convert various values such as area length or temperature into other units Bixby Home On the Bixby Home screen you can view recommended services and information that Bixby provides by analysing your usage patterns and your routine To view more content connect to aWi Fi or mobile network To fully use this feature you must sign in to your Samsung account Opening Bixby ...

Page 111: ... the cards For example on the way to the office in the morning you can view your day s schedule and play your favourite music on the Bixby Home screen The content and order of the cards update automatically at a specified interval You can update cards whenever you want by swiping downwards on the screen Editing cards list To pin a card to the top of the Bixby Home screen tap Pin to top To unpin a ...

Page 112: ...raw your agreement from the terms and conditions and privacy policies of each content provider Privacy Policy Read the privacy policies About Bixby Home View the Bixby Home version and legal information Reminder Create reminders to schedule to do items or to view content later You will receive notifications at the preset time or location for each reminder To receive more accurate notifications con...

Page 113: ...Tap When I arrive at Done 5 Tap Save to save the reminder When you arrive at home the Water the flowers notification will appear Completing reminders Mark reminders that you do not need to be reminded of as complete On the reminders list select a reminder and tap Complete Restoring reminders Restore reminders that have been completed 1 On the reminders list tap Completed Edit 2 Tick items to resto...

Page 114: ... Samsung Kids to activate it The Samsung Kids screen will appear When starting Samsung Kids for the first time or after performing a data reset follow the on screen instructions to complete the setup On the Samsung Kids screen select the app you want to use Access additional options Available apps Kids Art Studio Kids Gallery Kids Phone Kids Browser Kids Camera Your preset screen lock method or yo...

Page 115: ...eck the apps or content supported by Samsung Kids and add them Show Content page Set the device to display the Samsung partner s content page on the Samsung Kids screen Closing Samsung Kids To close Samsung Kids tap the Back button or tap Close Samsung Kids and then enter your unlock code SmartThings Introduction Control and manage smart appliances and Internet ofThings IoT products with your tabl...

Page 116: ...ung warranty When errors or defects occur on the connected devices contact the device s manufacturer Connecting to nearby devices Connect to nearby devices such as Bluetooth headsets easily and quickly Connection methods may vary depending on the type of connected devices or the shared content 1 Launch the SmartThings app 2 Tap Add device or tap Device 3 Tap Scan nearby 4 Select a device from the ...

Page 117: ...lied with the selected device is downloaded you can control the device Adding devices and scenes by locations Add devices by locations view the list of devices in a same location and control them You can also add a scene to a location to control multiple devices at the same time Adding locations 1 Launch the SmartThings app and tap Add location 2 Enter the location name To set a location tap Geolo...

Page 118: ...utomations You can also set an automation to operate devices automatically depending on the preset time the status of devices and more For example add an automation to turn on the audio automatically every day at 7 00 AM 1 Launch the SmartThings app 2 Tap and select a location 3 Tap Automations Add automation 4 Tap under If set the activation conditions for the automation and then tap Next 5 Tap u...

Page 119: ...arious sharing options The following actions are an example of sharing images You may incur additional charges when sharing files via the mobile network SM P205 1 Launch the Gallery app and select an image 2 Tap and select a sharing method such as email When you have a communication or sharing history the people you contacted will appear on the sharing options panel To directly share content with ...

Page 120: ...h others via aWeb link To use this feature you must sign in to your Samsung account Shared album Create a shared album to share photos or videos with others and download your files whenever you want To use this feature you must sign in to your Samsung account Daily Board Introduction Daily Board lets you use your tablet as a picture frame or bulletin board when it is charging with a USB cable or c...

Page 121: ...ck weather or calendar displayed on the Daily Board main screen 1 Launch the Settings app and tap Advanced features Daily Board 2 Tap Time weather and calendar and select a view mode Show sequentially Set the Daily Board main screen to display information sequentially by switching the screen All on one page Set the Daily Board main screen to display all information on one page Using Daily Board Pl...

Page 122: ...der transition speed and style You can also set the clock or weather information shown on the slide show Time weather and calendar Change the setting for Daily Board main screen You can change the view mode of the information such as clock weather or calendar that is displayed on the Daily Board main screen and the clock s layout You can also apply the dark theme or set the day s schedule to be sh...

Page 123: ...r information and browse webpages Gmail Send or receive emails via the Google Mail service Maps Find your location on the map search the world map and view location information for various places around you Play Music Discover listen to and share music on your device You can upload music collections stored on your device to the cloud and access them later Play Movies TV Purchase or rent videos suc...

Page 124: ...tch or create videos and share them with others Photos Search for manage and edit all your photos and videos from various sources in one place Google Search quickly for items on the Internet or your device Duo Make a simple video call ...

Page 125: ...nnect to aWi Fi network and access the Internet or other network devices Refer toWi Fi for more information Bluetooth Use Bluetooth to exchange data or media files with other Bluetooth enabled devices Refer to Bluetooth for more information Flight mode Set the device to disable all wireless functions on your device You can use only non network services Follow the regulations provided by the airlin...

Page 126: ...ndTethering SM P205 for more information SM P205 More connection settings Customise settings to control other features Refer to More connection settings for more information Wi Fi Activate theWi Fi feature to connect to aWi Fi network and access the Internet or other network devices Connecting to aWi Fi network 1 On the Settings screen tap Connections Wi Fi and tap the switch to activate it 2 Sele...

Page 127: ...ection request Sending and receiving data You can share data such as contacts or media files with other devices The following actions are an example of sending an image to another device 1 Launch the Gallery app and select an image 2 Tap Wi Fi Direct and select a device to transfer the image to 3 Accept theWi Fi Direct connection request on the other device If the devices are already connected the...

Page 128: ...for example pirating copies of files or illegally tapping communications for commercial purposes Samsung is not responsible for the repercussion of illegal use of the Bluetooth feature Pairing with other Bluetooth devices 1 On the Settings screen tap Connections Bluetooth and tap the switch to activate it The detected devices will be listed 2 Select a device to pair with If the device you want to ...

Page 129: ...the Gallery app and select an image 2 Tap Bluetooth and select a device to transfer the image to If the device you want to pair with is not in the list request that the device turns on its visibility option 3 Accept the Bluetooth connection request on the other device Unpairing Bluetooth devices 1 On the Settings screen tap Connections Bluetooth The device displays the paired devices in the list 2...

Page 130: ... while Data saver on and select apps Mobile data only apps SM P205 Select apps to always use the mobile data even when your device is connected to aWi Fi network For example you can set the device to use only mobile data for apps that you want to keep secure or streaming apps that can be disconnected Even if you do not deactivate theWi Fi feature the apps will launch using the mobile data On the S...

Page 131: ... device s mobile data connection with computers or other devices via Bluetooth USB tethering Use USB tethering to share the device s mobile data connection with a computer via USB When connected to a computer the device is used as a wireless modem for the computer Using the mobile hotspot Use your device as a mobile hotspot to share your device s mobile data connection with other devices 1 On the ...

Page 132: ...ing a password Tap the Auto Hotspot switch to activate it More connection settings Customise settings to control other connection features On the Settings screen tap Connections More connection settings Nearby device scanning Set the device to scan for nearby devices to connect to Printing Configure settings for printer plug ins installed on the device You can search for available printers or add ...

Page 133: ...nnections More connection settings Printing Download plugin 2 Search for a printer plug in in Play Store 3 Select a printer plug in and install it 4 Select the installed printer plug in The device will automatically search for printers that are connected to the sameWi Fi network as your device 5 Select a printer to add To add printers manually tap Add printer Printing content While viewing content...

Page 134: ...ibration pattern SM P205 System sound Set the device to sound for actions such as controlling the touchscreen Sound quality and effects Set the device s sound quality and effects Refer to Dolby Atmos surround sound for more information Separate app sound Set the device to play media sound from a specific app separately on the other audio device Refer to Separate app sound for more information Dolb...

Page 135: ... for playing the selected app s media sound Notifications Change the notification settings On the Settings screen tap Notifications Suggest actions and replies Set the device to suggest actions and replies for notifications Show snooze option Set whether to show the snooze option App icon badges Change the settings for app icon badges Status bar Set how to display notification icons and whether to...

Page 136: ...ness of the display automatically Font size and style Change the font size and style Screen zoom Change the screen zoom setting Screen timeout Set the length of time the device waits before turning off the display s backlight Home screen Configure settings for the Home screen such as the screen grid or layout Navigation bar Change the navigation bar settings Refer to Navigation bar soft buttons fo...

Page 137: ...vice to turn on dark mode at night and turn it off in the morning based on your current location Custom schedule Set a specific time to turn on and off dark mode Screensaver You can set to display images as a screensaver when the screen turns off automatically The screensaver will be displayed when the device is charging 1 On the Settings screen tap Display Screensaver 2 Select an option If you se...

Page 138: ...re information Secure lock settings Change screen lock settings for the selected lock method Clock style Change the type and colour of the clock on the locked screen Roaming clock Change the clock to show both the local and home time zones on the locked screen when roaming SM P205 FaceWidgets Change the settings of the items displayed on the locked screen Contact information Set the device to show...

Page 139: ...ock 2 Unlock the screen using the preset screen lock method 3 Select an option and follow the on screen instructions to complete the setup Biometrics and security Options Change the settings for securing the device On the Settings screen tap Biometrics and security Face recognition Set the device to unlock the screen by recognising your face Refer to Face recognition for more information Biometric...

Page 140: ... security settings Face recognition You can set the device to unlock the screen by recognising your face If you use your face as a screen lock method your face cannot be used to unlock the screen for the first time after turning on the device To use the device you must unlock the screen using the pattern PIN or password you set when registering the face Be careful not to forget your pattern PIN or...

Page 141: ... of direct sunlight 1 On the Settings screen tap Biometrics and security Face recognition 2 Read the on screen instructions and tap Continue 3 Set a screen lock method 4 Select whether you are wearing glasses or not and tap Continue 5 Hold the device with the screen facing towards you and look at the screen 6 Position your face inside the frame on the screen The camera will scan your face If unloc...

Page 142: ...itch to activate it If you want to set the device to unlock the screen without swiping on the locked screen after recognising your face tap the Stay on Lock screen switch to deactivate it If you want to reduce the possibility of recognising faces in photos or videos tap the Faster recognition switch to deactivate it This may decrease the face recognition speed If you want to set your device to rec...

Page 143: ...te secured storage area The data in Secure Folder cannot be transferred to other devices via unapproved sharing methods such as USB orWi Fi Direct Attempting to customise the operating system or modifying software will cause Secure Folder to be automatically locked and inaccessible Before saving data in Secure Folder make sure to back up a copy of the data in another secure location To use Secure ...

Page 144: ...to the Apps screen To change the name or icon colour of Secure Folder tap Customise When you launch the Secure Folder app you must unlock the app using your preset lock method If you forget your Secure Folder unlock code you can reset it using your Samsung account Tap the button at the bottom of the locked screen and enter your Samsung account password Setting auto lock for Secure Folder Set the d...

Page 145: ...l be deleted from the original folder and moved to Secure Folder To copy items tap Copy The method for moving content may vary depending on the content type Moving content from Secure Folder Move content from Secure Folder to the corresponding app in the default storage The following actions are an example of moving an image from Secure Folder to the default storage 1 Launch the Secure Folder app ...

Page 146: ...ccounts Add your Samsung and Google accounts or other accounts to sync with the apps in Secure Folder 1 Launch the Secure Folder app and tap Settings Accounts Add account 2 Select an account service 3 Follow the on screen instructions to complete the account setup Hiding Secure Folder You can hide the Secure Folder shortcut from the Apps screen Launch the Secure Folder app tap Settings and then ta...

Page 147: ...storing data 1 Launch the Secure Folder app and tap Settings Backup and restore 2 Tap Restore 3 Tap to select a device to restore the data 4 Tick items you want to restore and tap Restore Backed up data will be restored to your device Uninstalling Secure Folder You can uninstall Secure Folder including the content and apps in it Launch the Secure Folder app and tap Settings More settings Uninstall...

Page 148: ...privacy Manage personal data related to your Samsung account and change the settings for Customisation Service Advanced Configure advanced settings for privacy Location Change settings for location information permissions On the Settings screen tap Location App permissions View the list of apps that have permission to access the device s location and edit the permission settings Improve accuracy S...

Page 149: ...r service provider Backup and restore Keep your personal information app data and settings safe on your device You can back up your sensitive information and access it later You must sign in to your Google or Samsung account to back up or restore data Samsung Cloud Manage the content that you want to store securely in Samsung Cloud Check the usage status of your Samsung Cloud storage and sync back...

Page 150: ...Information and data used during a guest session is temporarily stored Each time you use this account you are asked whether to continue the previous guest session or reset it New user This account allows users to access their own apps and content and customise the device settings that affect all accounts New restricted account A restricted account can only access the apps and content allowed by th...

Page 151: ...ricted profile If you are not using a secure screen lock method with the administrator account follow the on screen instructions to set one up 3 Select the apps and content that restricted users are allowed to access Switching users Tap the user account icon at the top of the locked screen and select an account to switch to Locked screen ...

Page 152: ...by tapping Samsung Cloud Sync the data saved in your device such as images and videos with Samsung Cloud and view the data you have saved on Samsung Cloud You can also back up your device s data to Samsung Cloud and restore it later To use Samsung Cloud you must sign in to your Samsung account Syncing data You can sync data saved in your device with Samsung Cloud and access it from other devices 1...

Page 153: ...amsung Cloud Back up this tablet To view the backup data for other devices in your Samsung Cloud on the Settings screen tap Accounts and backup Samsung Cloud Restore data and then select a device you want Restoring data You can restore your backup data from Samsung Cloud to your device 1 On the Settings screen tap Accounts and backup Samsung Cloud 2 Tap Restore data and select a device you want 3 ...

Page 154: ...s signed in to your Samsung account SM P205 This feature may not be available depending on the region or service provider Smart pop up view Select apps to view their notifications via pop up windows When using this feature you can quickly view the contents via pop up windows by tapping the icon on the screen This feature is only available in apps that support the Multi window feature Screenshots C...

Page 155: ...ture Set the device to capture a screenshot when you swipe your hand to the left or right across the screen You can view the captured images in Gallery It is not possible to capture a screenshot while using some apps and features Swipe to call or send messages Set the device to make a call or send a message when you swipe to the right or left on a contact or a phone number in the Phone or Contacts...

Page 156: ...l controls DigitalWellbeing App timers Number of notifications The time the screen was on Number of unlocks Setting timers for apps You can limit the daily usage time for each app by setting a timer When you reach the limit the app will be deactivated and you cannot use it 1 On the Settings screen tap DigitalWellbeing and parental controls App timers 2 Tap No timer next to the app you want and set...

Page 157: ... On the Settings screen tap DigitalWellbeing and parental controls Wind Down 2 To set the schedule to activate wind down mode tap Turn on as scheduled tap the switch to activate it and then set the days and time Device care Introduction The device care feature provides an overview of the status of your device s battery storage memory and system security You can also automatically optimise the devi...

Page 158: ...ect a power mode that suits your device usage purposes Tap Power mode and select an option Optimised Optimised for a balance between the device s performance and battery usage Medium power saving Activate power saving mode to extend the battery s usage time Maximum power saving In maximum power saving mode the device decreases battery consumption by activating dark mode and limiting the apps and f...

Page 159: ...ting system and default apps occupy part of the memory The available capacity may change when you update the device You can view the available capacity of the internal memory in the Specification section for your device on the Samsung website Managing the memory To delete files or uninstall apps that you do not use any more select a category Then tick items to select and tap Delete or Uninstall Me...

Page 160: ...s such as keyboards and voice input types Some options may not be available depending on the selected language Refer to Adding device languages for more information Date and time Access and alter the settings to control how the device displays the time and date If the battery remains fully discharged the time and date is reset Contact us Ask questions or view frequently asked questions Reset Reset...

Page 161: ...efault language from your languages list select the language you want and tap Apply If an app does not support the default language the next supported language in the list will be used Accessibility Configure various settings to improve accessibility to the device On the Settings screen tap Accessibility Screen reader ActivateVoice Assistant which provides voice feedback To view help information t...

Page 162: ...te If emergency software updates are released for your device s security and to block new types of security threats they will be installed automatically without your agreement Download and install Check for and install updates manually Auto download overWi Fi Set the device to download updates automatically when connected to aWi Fi network Last update View information about the last software updat...

Page 163: ...t tablet To change your device s name tap Edit Status View various device information such as theWi Fi MAC address and serial number Legal information View legal information related to the device such as safety information and the open source licence Software information View the device s software information such as its operating system version and firmware version Battery information View the de...

Page 164: ...M or USIM card is blocked usually as a result of entering your PIN incorrectly several times You must enter the PUK supplied by your service provider PIN2 When you access a menu requiring the PIN2 you must enter the PIN2 supplied with the SIM or USIM card For more information contact your service provider Your device displays network or service error messages When you are in areas with weak signal...

Page 165: ...ched or damaged visit a Samsung Service Centre Your device freezes or encounters a fatal error Try the following solutions If the problem is still not resolved contact a Samsung Service Centre Restarting the device If your device freezes or hangs you may need to close apps or turn off the device and turn it on again Forcing restart If your device is frozen and unresponsive press and hold the Power...

Page 166: ...one ensure that it is properly connected Sound echoes during a call Adjust the volume by pressing theVolume key or move to another area A cellular network or the Internet is often disconnected or audio quality is poor Ensure that you are not blocking the device s internal antenna When you are in areas with weak signals or poor reception you may lose reception You may have connectivity problems due...

Page 167: ...shorter over time Error messages appear when launching the camera Your device must have sufficient available memory and battery power to operate the camera app If you receive error messages when launching the camera try the following Charge the battery Free some memory by transferring files to a computer or deleting files from your device Restart the device If you are still having trouble with the...

Page 168: ...ay not work properly Your device supports multimedia files that are authorised by your network service provider or providers of additional services Some content circulated on the Internet such as ringtones videos or wallpapers may not work properly Bluetooth is not working well If another Bluetooth device is not located or there are connection problems or performance malfunctions try the following...

Page 169: ...a stored in the device has been lost Always make backup copies of all important data stored in the device Otherwise you cannot restore data if it is corrupted or lost Samsung is not responsible for the loss of data stored in the device A small gap appears around the outside of the device case This gap is a necessary manufacturing feature and some minor rocking or vibration of parts may occur Over ...

Page 170: ...s To view the navigation bar drag upwards from the bottom of the screen The screen brightness adjustment bar does not appear on the notification panel Open the notification panel by dragging the status bar downwards and then drag the notification panel downwards Tap Quick panel layout and tap the Show brightness on top switch to activate it ...

Page 171: ...ion storage and retrieval system Trademarks SAMSUNG and the SAMSUNG logo are registered trademarks of Samsung Electronics Co Ltd Bluetooth is a registered trademark of Bluetooth SIG Inc worldwide Wi Fi Wi Fi Direct Wi Fi CERTIFIED and theWi Fi logo are registered trademarks of theWi Fi Alliance Manufactured under license from Dolby Laboratories Dolby Dolby Atmos and the double D symbol are tradema...

Reviews: