background image

Search _

53

06

 S

EA

R

C

h

SEARCH DATE AND TImE 

SELECTION

Use the calendar to move between days, months and 

years. Selecting a date that contains recording data 

enables you to search recordings for that day.

Selecting Search Date And Time

1.  From the 

calendar

, select the date you wish to 

search. 

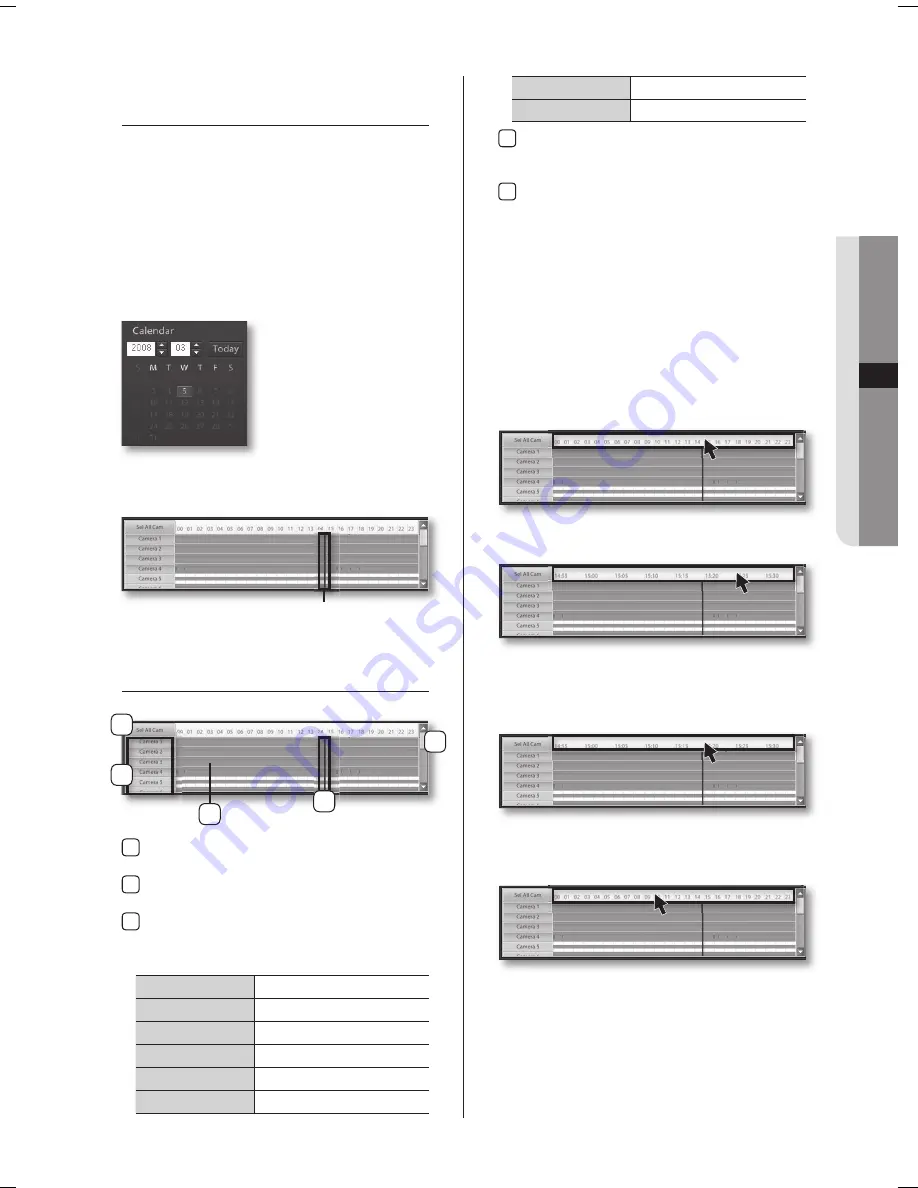
2.  Move the timeline bar left and right to select the 

timeframe you wish to search.

TImELINE

1

  Sel All Cam

Use to select or deselect all cameras.

2

  Camera

Use to manually select individual cameras. 

3

  Recording Timeline

Provides color-coded graphical display of 

recording durations and modes.

Orange

Continuous Recording

Blue

Motion Recording

Grey

Object Watch Recording

Green

Alarm In Recording

Yellowish Green

PreAlarm Recording

Dark Blue

POS Recording

Yellow

Video Loss

Purple

Instant Recording

4

  Timeline Bar

Move the timeline bar left and right to select the 

desired search time.

5

  Scroll

Move the scroll bar up or down to view additional 

camera channels that aren't currently displayed. .

It’s possible to change the scale of the timeline. Left-

click on the time scale to select up to fi ve levels of 

zoom. This feature can be used when precise control 

in a smaller interval is needed. 

Timeline Zoom-In

1. Left-click on the time scale.

2.  You will zoom-in closer with each left-click of the 

mouse.

Timeline Zoom-Out

1. Right-click on the time scale.  

2.  You will zoom-out farther away with each right-click 

of the mouse. 

Timeline Bar

2

1

3

4

5

SPR-9816-9716.indb   53

2008-07-03   오후 2:48:05

Summary of Contents for SHR-9716

Page 1: ... this Samsung product To receive a more comprehensive service please register your product at www samsung com global register imagine the possibilities SPR 9816 9716 AB82 01978A Rev 00 DIGITAL RECORDING SYSTEM user manual SPR 9816 9716 indb 1 2008 07 03 오후 2 46 1 ...

Page 2: ...resolutions 352x240 NTSC 352x288 PAL Supports hard drive overwrite mode Supports USB 2 0 backup devices Supports remote monitoring via Windows Network with SPR Smart Viewer Record and playback 16 audio channels Includes various recording options triggers continuous motion object watch sensor POS video loss and 1 ch instant recording Alarm Interface Input 16 Output 4 WHAT S INCLUDED WITH YOUR DVR P...

Page 3: ...tions can cause abnormal heat generation or fire Keep the surrounding temperature between 0 C to 40 C and keep the product off humidity Excessive temperatures can cause the DVR to malfunction Provide sufficient ventilation This will prevent abnormal operation due to high temperatures Keep the unit out of direct sunlight and away from any other sources of heat These sources of heat can cause abnorm...

Page 4: ...sult a UPS retailer Make sure that the mains plug is not covered or obstructed by any object The unit must be connected to an outlet with a protective ground connection Operating Temperature The operating temperature range of this product is 0 C to 45 C 32 F to 113 F Operating the DVR outside the temperature range can cause the unit to malfunction If the unit was stored outside the operational tem...

Page 5: ...n 16 Resource ptz playback log 18 Full screen 19 Live screen switch 20 1 Channel video playback 20 Camera channel assignment 21 ON Screen keyboard 21 System setup Basic menu 22 Hardware 29 Recording 32 Event 38 Backup 39 Network 43 System 52 Search screen 53 Search date and time selection 53 Timeline 54 Search screen playback 54 Split scren setupt 54 Screen adjustment 57 Event search 57 Printing i...

Page 6: ... 58 Event search 59 Sequential search 60 Thumbnail search 61 Object search 62 Pos search 63 Backup 64 Backup management 65 System recovery 67 WebDVR 70 SPR Smart viewer 77 Remote desktop control 78 Specifications 79 Outline drawings 80 Troubleshotings FAQ ...

Page 7: ...time DVR_03 introducing your real time DVR DVR Front View With the Panel Closed With the Panel Open 1 Power 2 USB 3 DVD RW Front and rear configurations of the system may change to reflect changes in specifications or other quality improvement purposes 2 1 3 ...

Page 8: ...RS485 Port 6 Alarm Out Ports 4 ports 7 Audio Input Port 8 Mouse Input Port PS 2 9 Keyboard Input Port PS 2 10 Printer Port LPT1 11 COM Port COM1 12 Internal VGA Port 13 USB Port Ver 2 0 14 Ethernet Port 100 Mbps 15 Microphone Input Port two way audio input 16 Audio Output Port speaker connection port 17 VGA Port 18 Spot Monitor Out Port supports 16 screen 1 7 4 11 14 17 18 9 10 3 2 5 6 13 8 12 15 ...

Page 9: ...res which can lead to a shortened lifespan or malfunction of the unit Recommendations for Mounting into a Rack 1 The inside of the rack must not be enclosed 2 The rack must feature ventilation ports to provide sufficient internal air circulation as shown in the diagram above 3 Allow sufficient space between the DVR unit and other modules mounted to the rack or install ventilation ports to facilita...

Page 10: ...3 Connect a keyboard to the PS 2 port 4 Connect a printer to the LPT1 port 5 Connect a mouse to a USB port 6 Connect a VGA monitor to the VGA port Warning Ensure the correct rated voltage is provided before powering the unit Improper voltage may cause malfunction and or permanent damage to the system Electrical Hazard Please carefully read through the Safety Warnings and Precautions section 2 3 4 ...

Page 11: ...nical or electrical switches can be connected to the Alarm In and Ground GND ports The individual Alarm In ports can be configured from the System Setup menu as either NC Normal Close or NO Normal Open Alarm In Connection 1 Connect one of the external device s signal lines to the desired Alarm In port 2 Connect the remaining line to the Ground port GND GND No 9 Sensor Alarm In GND No 1 Sensor Alar...

Page 12: ...ternal device s signal lines to the desired alarm Alarm Out port 2 Connect the remaining line to the COM port The alarms Alarm Out operate in conjunction with the sensors Alarm In When an event signal is received through a sensor an electrical signal is transmitted from the corresponding alarm to activate the external device connected to that alarm Alarms can be configured to function in unison wi...

Page 13: ...X RX TX of the external device to the of the RS485 port respectively Warning Check the polarity when making the connection Faulty wiring can damage both devices Electrical Hazard Please carefully read through the Safety Warnings and Precautions section It s not possible to connect a PTZ device and a keypad device SSC 2000 to the RS485 port and use the two devices at the same time In order to use a...

Page 14: ...hing hub for LAN WAN applications Network Cable Connection 1 Connect a Ethernet UTP cable to the network port located at the rear of the system 2 Connect the opposite end of the Ethernet UTP cable to the switch hub Before connecting your DVR system to the network please contact your network administrator to prevent the system from causing a network conflict LAN WAN Internet Switch Hub 100Mbps Rout...

Page 15: ... a RS232 connection When using a keypad device please ensure that communication settings for both the DVR and the keypad device are the same Communication settings mismatch can prevent the keypad device and the DVR from making normal communication Set communication protocols for both the keypad and the DVR as Half Duplex It s not possible to connect a PTZ device and a keypad device SSC 2000 to the...

Page 16: ... to the DVR For details on connecting VSI PRO with your DVR please refer to VSI PRO s user manual VSI PRO by AVE www americanvideoequipment com is a device that transmits all text data received from POS device to the DVR via the RS232C interface Turn off the power to all devices when connecting the POS device VSI PRO and the DVR POS System RS232C Cable RS232C Cable RS232C Cable Video Input Video O...

Page 17: ...nt of an emergency clicking on this button initiates selected camera channels to start continuous recording 4 Resource pTZ playback Log Resource Select and view the status of cameras sensors alarms and other devices connected to the DVR PTZ Displays PTZ controls Playback Displays the controls for 1 channel playback Log Displays information on the 100 most recent events that have transpired during ...

Page 18: ...min account password therefore it is important that you do not lose it Administrators should separately record and manage their registered password CAmERA CHANNEL Camera Channel Display Icons 1 Camera Type Indicates whether the camera is a normal camera or a PTZ camera Indicates a normal camera Indicates a PTZ camera 2 Channel Number Indicates the channel number of the camera 3 Camera Designation ...

Page 19: ...t to format warning window Click the Yes button to initiate formatting and the allocation of a new database drive Disabling an Allocated Database Drive 1 Right click on the allocated drive you wish to disable The drive color will turn from blue to grey 2 Click OK to disable the allocated drive The drive color will turn red 3 Right clicking on the disabled database drive will place the database dri...

Page 20: ...ition for the Auto Pan Scan Seeks out presets containing PTZ position data and moves to the position stored in memory Pattern Memorizes observation trajectories initiated by the user and then automatically moves the camera in the same pattern and speed 2 Preset Enables the user to define Pan Tile positions and Zoom Focus settings under Preset IDs that can be used on demand The number of supported ...

Page 21: ...ypes in a colored time line Orange Continuous Recording Blue Motion Recording Grey Object Detection Recording Green Alarm in Recording Yellowish Green PreAlarm Recording Dark Blue ATM POS Recording Yellow Video Loss Purple Instant Recording 6 Timeline Bar Identifies the location of the desired timeframe you wish to search Click the bar to the desired time 7 Playback Controls Controls the direction...

Page 22: ...mera feeds If all camera feeds are not visible on a single screen use this feature to flip through and view the remaining channels in sequence Sequencing Button 1 Select a single screen or a 4 6 9 10 split screen mode then click on the button 2 The system will cycle through video feeds while maintaining the selected display mode 3 Click on the button to stop the cycling 4 Channel Split Screen 1 4 ...

Page 23: ... click on the button to start playback 6 Click on the button to exit the 1 channel playback CAmERA CHANNEL ASSIGNmENT Assigning a Camera Channel 1 Click on a camera button using your mouse and drag to the live screen 2 After dragging to live screen drop over the desired location on live screen to assign that channel Reset the video feed layout The camera designations will turn from white to brown ...

Page 24: ...ectly enter text using the mouse when there is no keyboard attached to the DVR system or when using a keyboard is not a viable option Launching the On Screen Keyboard 1 Click on the button to launch the virtual keyboard 2 Using your mouse click on the characters of the virtual keyboard to make key entries 3 To terminate On Screen Keyboard either click on File then select Exit or click the button T...

Page 25: ... Saving Changes Apply Applies any change that has been made in the system setup Virtual Keyboard Click on the button to launch the virtual keyboard With the virtual keyboard key entries can be made using the mouse Camera Alarm In Alarm Camera Use to select cameras you wish to configure Alarm In Use to select sensors Alarm In you wish to configure Alarm Use to select alarms Alarm Out you wish to co...

Page 26: ...ll settings to default Automatic Gain Control is a feature that automatically adjusts the brightness level for the camera The screen adjustment functions cannot be expected to improve the quality on a low quality video signal Also make sure that the camera and monitor have been setup correctly before making video adjustments 5 Linked Alarm In Select which sensor to link with the selected camera Wh...

Page 27: ...mmunication method of the PTZ installed to the DVR 4 Click on the OK button to finish configuring the PTZ Add to PTZ List 1 To add a new PTZ model click on the Add button 2 Select the PTZ model you wish to add 3 Click on the Open button to register the selected PTZ model Covert Channel Setup 1 Select the camera channel you wish to set as a Covert Channel 2 Set Covert Channel option to Use 3 Click ...

Page 28: ... Enter the name of the audio channel Sampling Select the desired recording sampling rate 3 Apply to Live Select this option if you want to apply the current live option settings to all or selected camera channels Recording Select this option if you want to apply the current recording option settings to all or selected camera channels Sampling Select this option if you want to apply the current sam...

Page 29: ...nore all other event signals transmitted by the sensor for the set amount of time following the initial event signal So once an event signal is transmitted the set discard time must lapse before another event signal can be recognized 2 Linked pTZ Camera Select the PTZ camera channel you wish to associate to the sensor Preset Select the PTZ preset for when the sensor event is detected Spot Full up ...

Page 30: ...Camera Select camera feeds to be transmitted by spot port 1 Dwell Time Drag the slider left or right to set the delay interval between screen changes 2 SpOT 2 Camera Select camera feeds to be transmitted by spot port 2 Dwell Time Drag the slider left or right to set the delay interval between screen changes Channels configured as a Covert Channel cannot be displayed on the spot monitor 2 1 ...

Page 31: ...eypad device s address 0 through 32 Port Identify the number of the port through which the keypad device connects to the DVR mode Identify the interface method RS232 RS422 or RS485 of the port through which the keypad device connects to the DVR Parity Select the bit type None Odd Even Display Blank for detecting data transmission errors Data Bits Select from 4 5 6 7 and 8 Stop Bits Select from 1 1...

Page 32: ...rity Select the bit type None Odd or Even for detecting data transmission errors Data Bits Select from 4 5 6 7 and 8 Stop Bits Select from 1 1 5 and 2 4 OSD Display OSD Enable or disable live screen display of product information transmitted through the POS device Display Time Designate how many seconds you wish OSD data to be displayed on the DVR s live screen after product barcode gets scanned I...

Page 33: ...ier identification 2 Timeline Assign the recording type for each timeframe un der weekday Saturday and holiday categories To configure the range of the recording method select and drag the desired time using your mouse 3 Frame Set the recording fps for each camera 4 Quality Set the recording quality for each camera 5 Resolution Set the recording resolution size 6 Emergency Recording Set the fps re...

Page 34: ...ording mode that initiates recording when an object either appears or disappears from the camera s field of vision Alarm In A recording mode that initiates recording on a sensor event Alarm In Pre Rec A recording mode that records for a configured amount of time leading up to an event sensor or motion This feature is used to determine the events leading up to a sensor or motion event POS A recordi...

Page 35: ...for the entered number of months Every Year Repeat from the selected date for the entered number of years 3 List Displays a list of dates designated as a holiday 4 Range Use to define a range for a holiday Start Select the date for the holiday Unlimited Select if you do not wish to designate an unlimited range Count Times Designates the number of times the holiday will occur End Designates all day...

Page 36: ...e screen of any motion blocks 3 Rec time Pre rec time Use to configure how long to record for leading up to a motion detection event Post rec time Use to configure how long to record for following a motion detection event 4 Action Setting Full Screen Enable or disable full screen display of video feed when a motion event occurs Beep Enable or disable the buzzer for events 5 Linked pTZ Camera Use t...

Page 37: ...Use to designated the number of blocks for object detection Sensitivity Use to select the sensitivity of object detection Set All Area Selects the whole screen for object detection Erase All Area Clears the screen of any object detection blocks 3 Action Settings Full Screen Enable or disable full screen display of video feed upon an object watch event Beep Enable or disable the buzzer for events 4...

Page 38: ... increase fps stream video or send E mail to a remote client 1 Motion Select which camera channels to set as emer gency for when a motion event occurs 2 Video Loss Select which camera channels to set as emer gency for when a video loss event occurs 3 Alarm In Select which alarm in channels to set as emer gency for when a alarm in event occurs 1 2 3 ...

Page 39: ...the cameras you wish to associate to the video loss camera Video loss detection from the selected camera initiates recording in all the cameras associated to that camera regardless of their normal recording schedule 4 Linked pTZ Camera Select the PTZ you wish to associate to the video loss camera Video loss detection directs the selected PTZ to the preset position Preset Select the desired PTZ pre...

Page 40: ...ter the address of the mail sending server Server Authorization Used when security password authentication is required to access the e mail account ID Enter the email account ID for the mail server SmTP Password Enter the e mail account s password 5 Condition Setting Select from Emergency Message and Event Emergency Select to use the default emergency setting to send the E mail Event Select to cus...

Page 41: ...e Remove button to delete selected contacts from the list 4 Group Name Use the drop down menu to select a group Selecting a group will populate the names and email addresses of users assigned to that group 5 Add Click to add the selected contacts from the user list to the group 6 Del Click to remove selected contacts from the group list 7 Group List Displays a list of user names and email addresse...

Page 42: ...to backup the defined recording timeframe at the designated time on a weekly basis 4 Destination Server Select the server you wish to backup to media Select the desired backup media Device Shows the device path and type of media Path Select the desired backup folder path 5 Item Settings for defining recording data segment you wish to backup Continuous Select to backup continuous recording segments...

Page 43: ...o find out the access permission of the entered network port Contact your network administrator or internet service provider if you are not familiar with your network environment or do not know the IP address Remote connection and monitoring by a large number of users can result in a heavy load for your system and even disrupt basic system functionalities This menu is designed for situations requi...

Page 44: ...th an Ethernet card whose MAC address is 00 0c 8c ab cd ef for example the domain gets automatically assigned as aabcdef websamsung net Here abcdef designates the last six digits of the card s MAC address and the a denotes the DVR mode SPR 9x16 identification code When configuring an external DDNS dyndns com no ip com changeip com it takes approximately 30 to 60 seconds to update the URL IP to the...

Page 45: ...h to stream over the network 1 Use Enable Disable the cameras you wish to stream over the network 2 Remote Frame Adjust the network streaming frame rates for individual cameras 3 Remote Resolution Adjust the streaming resolution setting for indi vidual cameras 4 Remote Quality Adjust the streaming picture quality for individual cameras 1 2 3 4 ...

Page 46: ...Enter the emergency monitor s port number Standard 12005 4 Emergency Stream Transfer Time Configure how long you wish to stream the video feed in the event or an emergency of event detec tion 5 Condition Setting Select which notifications will transmit video feed to the remote PC s emergency monitor Emergency Select to use the DVR preset emergency setup configuration Event Select to custom configu...

Page 47: ...DVR server operation and to allocate hard drives for image data storage Stop Gives authority to terminate DVR server operation DB Alloc Gives authority to allocate the hard drives on the DVR for image data storage 5 watch Permission for 1 channel search PTZ control covert channel monitoring and instant recording authorities from the monitoring screen Login Gives authority to log into the watch scr...

Page 48: ...rd recording method system reboot and language configuration authorities Date Time Gives authority over system date and time configurations Information Gives authority to view information on system operating system and hardware DVR program etc Audio Gives authority over audio configurations Emergency monitor Gives authority over emergency remote notification settings POS Gives authority over POS c...

Page 49: ... there are user accounts assigned to the group you chose to delete Clicking on the Yes button will delete all users in the group Clicking on the No button will delete the group only 5 You can then verify the deletion Adding a User Account 1 To add a new user account click on the Add button from the following window 2 Enter the name password group association and other information about the user ac...

Page 50: ... the account you wish to delete 2 Click on the Delete button 3 A window will prompt Are you sure you want to delete the user as shown below Click on the Yes button to continue with deletion 4 Verify that the user account has been removed from the list ...

Page 51: ...meras You can choose between NTSC and PAL Once you ve selected a format method the system will restart 4 Language Your DVR system supports multiple languages From this menu you can configure the system to a desired language 5 Recording Type Once recording and Cycle overwrite recording are the available recording options Choosing single recording will suspend all ad ditional recording once the hard...

Page 52: ...otification Select to store the emergency status and other externally sourced information log 3 Date Time Filter This feature filters out the log data using defined parameters Range Select the desired range of dates for log data search Start Select the starting date and time for log data search End Select the ending date and time for log data search Search Click on the Search button to commence lo...

Page 53: ...tion will restart Import Export 1 path Displays the location for exporting importing the system profile 2 path Button Select the location for exporting importing the system profile 3 System profile List Displays system configuration components Select the desired system configuration com ponent and commence the import or export process 4 Import Imports a system profile file onto the system from an ...

Page 54: ...r the address of the NTP server you wish to synchronize with the DVR Click on the Add button to register additional NTP servers Click on the Remove button to remove a registered NTP server addresses 3 Automatic Time Synchronization Settings This feature automatically synchronizes your system s time with the NTP server Automatic Time Sync at Boot up Synchronizes the system s time with the NTP serve...

Page 55: ...on about the DVR system and Hardware 1 System This displays the DVR system operating system processor type memory graphic card LAN card and HDD information 2 System Info This displays the DVR systems name location software version model administrator name and A S Diary 1 2 ...

Page 56: ...el for audio data 8 Adj Event Info Adj These controls are used to adjust the brightness contrast sharpness level and zoom controls on the video data Event Displays the event list Selecting an event on the list will launch the playback of the selected event Info Displays recording period and the total number of days recorded 9 Calendar Indicates days on which recording data exists Selecting a date ...

Page 57: ...Motion Recording Grey Object Watch Recording Green Alarm In Recording Yellowish Green PreAlarm Recording Dark Blue POS Recording Yellow Video Loss Purple Instant Recording 4 Timeline Bar Move the timeline bar left and right to select the desired search time 5 Scroll Move the scroll bar up or down to view additional camera channels that aren t currently displayed It s possible to change the scale o...

Page 58: ...st tab to access picture adjustment controls 1 BR Use to adjust the brightness level of the video image 2 CO Use to adjust the contrast level of the video image 3 SH Use to adjust the sharpness level of the video image 4 Zoom In Use to zoom in on specific sections of the video image 5 Zoom Out Use to zoom out from specific sections of the video image 6 Move Use to move about the video recording af...

Page 59: ...annel you wish to expand or shrink 2 Click on the button to expand or shrink the screen Video Zoom In 1 Playback the recording period of interest 2 From the search screen select the channel you wish to zoom in 3 Click on the button The mouse pointer will then turn into 4 Place the mouse pointer over the section you wish to zoom in 5 Left click on the mouse to zoom in on that section 6 To deactivat...

Page 60: ...er over the section you wish to zoom out 4 Left click on the mouse to zoom out from that section 5 To deactivate the zoom out feature click on the button once more Video move 1 Zoom in on the video 2 Click on the button The mouse pointer will then turn into 3 Click on the video section you wish to move and drag 4 To deactivate the move feature click on the button once more ...

Page 61: ...lowing error message will prompt if your printer has not been configured properly printer Configuration 1 Click Start Settings printers 2 In this window double click on Add Printer 3 When Add Printer Wizard starts click Next 4 If your printer is connected to the PC select the local printer option and then click Next 5 When prompted for the make and model of your printer either click on the Have Di...

Page 62: ...f a preceding search Start End Use to define the search timeframe This timeframe can be configured by right clicking the timeline and dragging or enter manually into the boxes 3 Search Click to start the search process 4 Event List Search results are displayed in this section Se lecting an event from the list launches the video recording associated to that event Alarm In Sensor signal detection re...

Page 63: ...indow Initiating Sequential Search creates a continuing series of video images from the selected camera channel under a selected split screen mode 2 Split Buttons Use to select the desired split screen mode for the Sequential Search 3 Camera Buttons Used to designate which channel to use for Sequential Search 4 playback panel Used as the play button to initiate Sequential Search 2 3 4 1 ...

Page 64: ...x to make search continue from the last time entry of a preceding search Start End Used to define the search timeframe This timeframe can be configured by right clicking the timeline and dragging or enter manually into the boxes 3 Search Click the Search button to start the Thumbnail Search 4 Thumbnail Time Scale Up Reduces the time interval for the thumbnail search in the scale 1hour 30minutes 10...

Page 65: ...en or use select block to pick individual blocks in the grid Continued Search Set the amount of thumbnails to show for each search Tick the continued search box to make search continue from the last time entry of a preceding search Start End Use to designate the search timeframe 3 Search Click the Search button to start the object Search 4 Object Detection window Search results are displayed in th...

Page 66: ...rea 2 Options Date Time Use to designate the search timeframe Query Search POS database information using user designated parameters POS Select the ID of the POS device connected to the DVR 1 through to 16 List Count Use to define the number of returns shown in the event list 3 Search Use to search POS transaction records 4 products Displays a list of products transacted at the POS 5 Events List D...

Page 67: ...or the backup 4 Backup Destination Server Select a backup destination media Select a backup device Drive Shows the backup device drive letter Path Select a specific backup path 5 Camera Select camera channels you wish to backup In AVI and SFx backup formats only single channel backup is available 6 Option Continuous Select if you wish to back up continuous recording data only motion Object Watch S...

Page 68: ...on Displays information of the current backup 3 progress Displays the progress of the current backup 4 priority Up Moves the selected backup to a higher priority for the backup to start 5 priority Down Moves the selected backup to a lower priority for the backup to start 6 Delete Deletes selected backup events from the sched ule list Scheduled backup entries configurated in the setting menu cannot...

Page 69: ...rting the system will automatically commence backing up the operating system 12 Following operating system backup the system will automatically restart 13 Windows will load and launch the DVR software The recovery CD can be used to recover the system when replacing the Windows installed hard disk due to a malfunction or when experiencing a critical system error For situations not involving physica...

Page 70: ...e with the recovery If the mouse is unresponsive use the tab key to select the OK button 5 From the Backup and Restore menu screen click on the Restore button to start the recovery process 6 Then from the Initial Image and User Image screen click on the Initial Image button and then the OK button 7 A screen displaying the recovery progress will be shown 8 Once the process has completed the system ...

Page 71: ...ad and install Activex software To launch Internet Explorer as an administrator 1 Click on Start 2 Place the pointer over Internet Explorer in Programs and right click 3 Click on Run as Administrator from the popup menu 2 When prompted with an Activex Control installation message as shown below left click on the message 3 Click the install button from the window that appears 4 Once the installatio...

Page 72: ... time 6 Timeline Provides a graphical display of recording data for the selected camera channel 7 Refresh Refreshes the timeline with the most recent recording data 8 playback Control Controls for video recording playback Use to move to the very beginning or the end of the video recording and to play in either forward or reverse direction 9 Switch to Live This button reverts the 1 channel playback...

Page 73: ...rch date and time 4 Timeline Indicates recording data of each camera 5 playback Control Controls for video recording playback Use to move to the very beginning or the end of the video recording and to play in either forward or reverse direction 6 Refresh Refreshes the timeline with the most recent recording data 7 Speed Volume Use to configure the playback speed and volume Audio output is availabl...

Page 74: ...w the instructions of the installation wizard 3 Once the program installation has completed click on the Finish button to exit 4 An SPR Smart Viewer icon like the one shown below will be created on your desktop Double click on the icon to launch the SPR Smart Watch program 5 Enter the password from the login window password 4321 ...

Page 75: ...le This button becomes active after logging in Two Way Audio This feature is used for two way audio communication between the Viewer and DVR site 4 Log pTZ playback Tabs The Log tab displays system events the PTZ tab contains PTZ control features and the Playback tab offers selected channel playback controls 5 Menu Buttons These buttons are used to access Search E Map Backup System Setup and Serve...

Page 76: ...er will not be displayed on the server list if a connection cannot be established due to improper server connection settings or the DVR server being powered off Disconnecting from DVR Server 1 Click on the button and then the Disconnect button 2 From the Server Disconnection window select the DVR server you wish to disconnect 3 Click on the Disconnect button to sever the connection with the select...

Page 77: ...OS Recording Yellow Video Loss purple Instant Recording 7 Timeline Bar Identifies the location of the time you wish to search Move the timeline bar left and right to select the desired search time 8 Time Display Displays the current time 9 Menu Buttons These buttons are used to access Search E Map Backup System Setup and Server Con nection screens 10 Server List Displays a list of DVR servers conn...

Page 78: ...deo recording playback DVR servers connected via a network can be allocated to the video display window to search the DVR server s video recordings Allocating DVR Server to the Video Display Window 1 From the DVR server list select the remote DVR server you wish to search 2 Drag and drop the DVR server onto the video display window 3 Recording information from the selected DVR server will be displ...

Page 79: ...ns 5 Server List Provides a hierarchical view of resource informa tion for cameras alarm ins and alarm outs on each server 6 E map Control Use to register a new e map or edit delete an existing one The Reset button deletes all placed camera alarm in and alarm out controls from the e map 7 Information Display Displays information about the camera or control device selected from the e map 8 Device L...

Page 80: ...on the characters of the virtual keyboard to make key entries Viewer Configuration Click on the Viewer Setting button and the following window will prompt Software Information Displays the software version of the Viewer Language Provides multilingual support The user can select from a list of language options Emergency monitor Enter the port number for streaming the emergency monitor Display Accel...

Page 81: ...nt software required for connecting to the server from a remote PC Color Level Configuration When using remote desktop with Viewer use one that supports 32 bit color level Video cannot be displayed on screen if using a remote desktop that does not support 32 bit color The Remote Desktop Connection feature of Windows xP is limited to 24 bit color and therefore does not support video display in the ...

Page 82: ...sub 1 Port 16 Channel Cable Output Stereo 1 Port Display Max ips CIF NTSC 480 PAL 400 Division 1 4 6 9 10 13 16 Recording Max ips CIF NTSC 480 PAL 400 NTSC 120 PAL 100 Resolution NTSC 704 x 480 704 x 240 352 x 240 PAL 720 x 576 720 x 288 352 x 288 Type Continuous Motion Object Watch Alarm In Pre Alarm POS Instant REC Video Loss ALARM IN ALAM OUT 16 Ports 4 Ports PTZ Supported RS485 RS422 COM1 COM2...

Page 83: ...appendix _79 09 appendix Outline drawings ...

Page 84: ...are all connected properly Check the cable connections between camera and SPR 9816 9716 If video signals are sent to multiple systems Sometimes a video splitter can cause a weak signal and there can be no signal to the system display In this case connect the camera directly to the system to avoid this problem Try to reboot the SPR 9816 9716 system Video images are displayed but there are no record...

Page 85: ...se cables are not shorted mixed or disconnected Check the surroundings of cable connections between camera and SPR 9816 9716 Check if there is any high voltage power line around the cable connections If there is a high voltage power line nearby the cable connections it can degrade video image quality or causes noises Check the cable connections between camera and SPR 9816 9716 Check if the cables ...

Page 86: ...o copy distribute and or modify the software Also for each author s protection and ours we want to make certain that everyone understands that there is no warranty for this free software If the software is modified by someone else and passed on we want its recipients to know that what they have is not the original so that any problems introduced by others will not reflect on the original authors r...

Page 87: ...extend to the entire whole and thus to each and every part regardless of who wrote it Thus it is not the intent of this section to claim rights or contest your rights to work written entirely by you rather the intent is to exercise the right to control the distribution of derivative or collective works based on the Program In addition mere aggregation of another work not based on the Program with ...

Page 88: ...hich is implemented by public license practices Many people have made generous contributions to the wide range of software distributed through that system in reliance on consistent application of that system it is up to the author donor to decide if he or she is willing to distribute software through any other system and a licensee cannot impose that choice This section is intended to make thoroug...

Page 89: ...e Foundation Inc 51 Franklin Street Fifth Floor Boston MA 02110 1301 USA Also add information on how to contact you by electronic and paper mail If the program is interactive make it output a short notice like this when it starts in an interactive mode Gnomovision version 69 Copyright C year name of author Gnomovision comes with ABSOLUTELY NO WARRANTY for details type show w This is free software ...

Page 90: ...reedom of use specified in this license Most GNU software including some libraries is covered by the ordinary GNU General Public License This license the GNU Lesser General Public License applies to certain designated libraries and is quite different from the ordinary General Public License We use this license for certain libraries in order to permit linking those libraries into non free programs ...

Page 91: ...hat you changed the files and the date of any change c You must cause the whole of the work to be licensed at no charge to all third parties under the terms of this License d If a facility in the modified Library refers to a function or a table of data to be supplied by an application program that uses the facility other than as an argument passed when the facility is invoked then you must make a ...

Page 92: ...ary to produce a work containing portions of the Library and distribute that work under terms of your choice provided that the terms permit modification of the work for the customer s own use and reverse engineering for debugging such modifications You must give prominent notice with each copy of the work that the Library is used in it and that the Library and its use are covered by this License Y...

Page 93: ...tent issues conditions are imposed on you whether by court order agreement or otherwise that contradict the conditions of this License they do not excuse you from the conditions of this License If you cannot distribute so as to satisfy simultaneously your obligations under this License and any other pertinent obligations then as a consequence you may not distribute the Library at all For example i...

Page 94: ...TY OF SUCH DAMAGES END OF TERMS AND CONDITIONS How to Apply These Terms to Your New Libraries If you develop a new library and you want it to be of the greatest possible use to the public we recommend making it free software that everyone can redistribute and change You can do so by permitting redistribution under these terms or alternatively under the terms of the ordinary General Public License ...

Page 95: ... OR SERVICES LOSS OF USE DATA OR PROFITS OR BUSINESS INTERRUPTION HOWEVER CAUSED AND ON ANY THEORY OF LIABILITY WHETHER IN CONTRACT STRICT LIABILITY OR TORT INCLUDING NEGLIGENCE OR OTHERWISE ARISING IN ANY WAY OUT OF THE USE OF THIS SOFTWARE EVEN IF ADVISED OF THE POSSIBILITY OF SUCH DAMAGE This product includes cryptographic software written by Eric Young eay cryptsoft com This product includes s...

Page 96: ...BY ERIC YOUNG AS IS AND ANY EXPRESS OR IMPLIED WARRANTIES INCLUDING BUT NOT LIMITED TO THE IMPLIED WARRANTIES OF MERCHANTABILITY AND FITNESS FOR A PARTICULAR PURPOSE ARE DISCLAIMED IN NO EVENT SHALL THE AUTHOR OR CONTRIBUTORS BE LIABLE FOR ANY DIRECT INDIRECT INCIDENTAL SPECIAL EXEMPLARY OR CONSEQUENTIAL DAMAGES INCLUDING BUT NOT LIMITED TO PROCUREMENT OF SUBSTITUTE GOODS OR SERVICES LOSS OF USE D...

Page 97: ...ng Business users should contact their supplier and check the terms and conditions of the purchase contract This product should not be mixed with other commercial wastes for disposal Correct disposal of batteries in this product Applicable in the European Union and other European countries with separate battery return systems This marking on the battery manual or packaging indicates that the batte...

Reviews: