Samsung SF-750 User Manual Download Page 43

B

ASIC

 F

UNCTIONS

2

.10

Making a Copy

Loading Paper for Copying

The instructions for loading print materials into the paper tray are the same 
whether you are faxing or copying. For further details, see page 1.8 for 
loading in the paper tray.

For copying, you can also use the manual feeder to load special print 
material, such as transparencies or labels, if they are Letter-, A4- or Legal-
sized. For further details about print materials you can use, see page A.6.

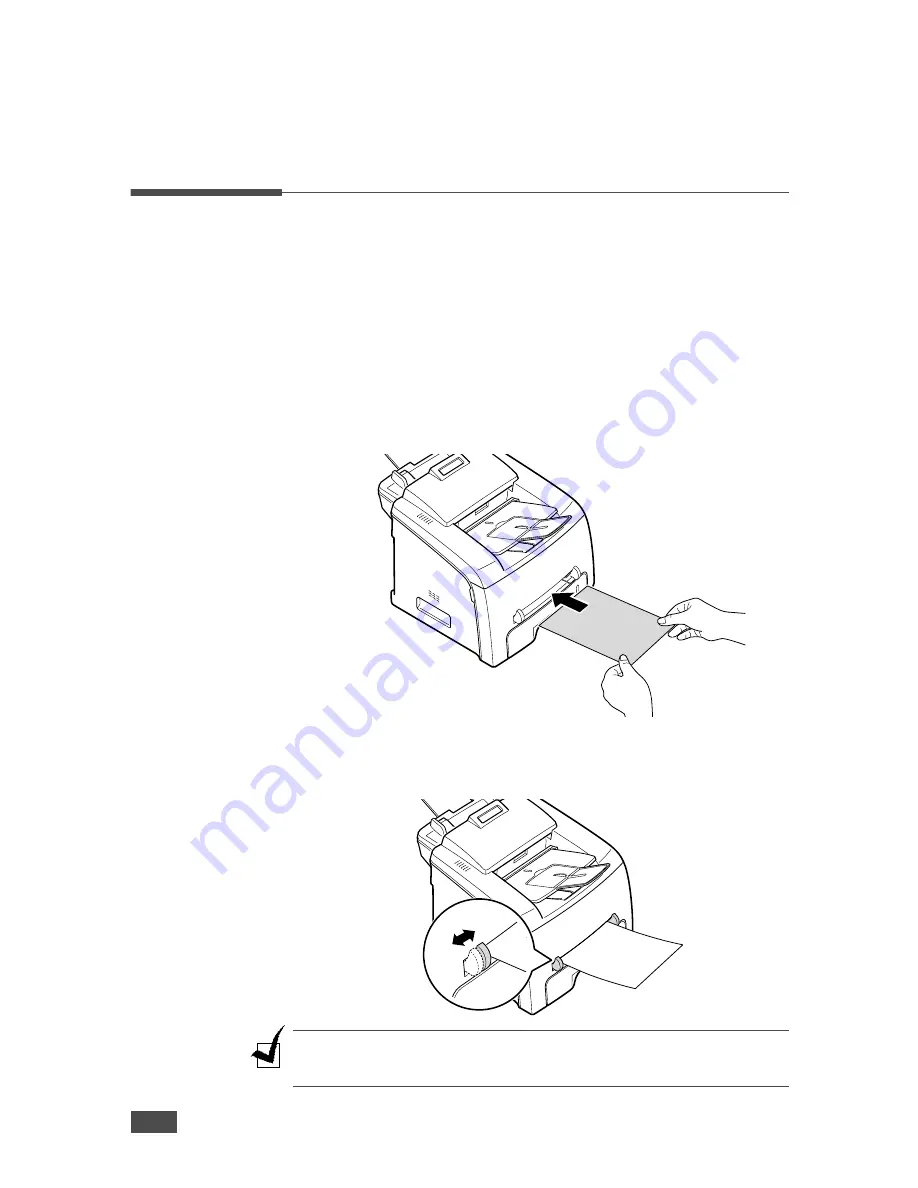
To load paper in the manual feeder:

1

Load a sheet of the print material with the print side face up into the 
center of the manual feeder.

For transparencies, hold them by the edges and avoid touching the 
print side. Oils from your finders can cause print quality problems.

2

Adjust the guide to the width of the print material.

N

OTE

: When printing on previously printed paper from the manual feeder, the 

printed side should be facing down with an uncurled edge to the machine. If 
you experience problems with paper feed, turn the paper around.

Summary of Contents for SF-750

Page 1: ......

Page 2: ...Electronics is not responsible for any changes direct or indirect arising from or related to use of this manual 2004 Samsung Electronics Co Ltd All rights reserved SF 750 and Samsung logo are tradema...

Page 3: ...Entering Characters Using the Number Keypad 1 13 Setting the Date and Time 1 14 Changing the Clock Mode 1 14 Setting the Paper Type and Size 1 15 Setting Sounds 1 16 Speaker Ringer Key Sound and Alar...

Page 4: ...the Time Out Option 2 14 Collation Copying 2 14 Automatic Dialing 2 15 One touch Dialing 2 15 Storing a Number for One touch Dialing 2 15 Sending a Fax using a One touch Number 2 15 Speed Dialing 2 1...

Page 5: ...5 6 Ignoring the Toner Empty Message 5 7 Consumables and Replacement Parts 5 7 Replacing the ADF Rubber Pad 5 8 Chapter 6 TROUBLESHOOTING Clearing Document Jams 6 2 Clearing Paper Jams 6 3 In Tray 1...

Page 6: ...risk of fire or shock Never spill liquid of any kind onto or into the machine 12 Your machine may have a heavy cover for optimal pressure on the document for the best scanning and or faxing In this ca...

Page 7: ...uirements of IEC 825 Class I laser products are not considered to be hazardous The laser system and printer are designed so there is never any human access to laser radiation above a Class I level dur...

Page 8: ...uant to Part 15 of the FCC Rules These limits are designed to provide reasonable protection against harmful interference in a residential installation This equipment generates uses and can radiate rad...

Page 9: ...customer shall be given adequate notice in writing to allow the customer an opportunity to maintain uninterrupted service Ringer Equivalence Number The Ringer Equivalence Number and FCC Registration...

Page 10: ...s of the dates indicated January 1 1995 Council Directive 73 23 EEC Approximation of the laws of the member states related to low voltage equipment January 1 1996 Council Directive 89 336 EEC 92 31 EE...

Page 11: ...e the moulded plug WARNING If you cut off the moulded plug get rid of it straight away You cannot rewire the plug and you may receive an electric shock if you plug it into a socket IMPORTANT WARNING Y...

Page 12: ...xi...

Page 13: ...of the output tray may become hot Be careful not to touch the surface especially for children British English American English Re dialling Re dialing Colour Color Emphasise Emphasize Recognise Recogn...

Page 14: ...packing Understanding the Component Location Attaching the Document Output Support Installing the Toner Cartridge Loading Paper Connecting the Telephone Line Turning the Machine On Setting Up the Mach...

Page 15: ...ountry to another You should use the telephone line cord which is supplied with your machine If you are replacing it with another vendor s it should be AWG 26 or larger telephone line cord The power c...

Page 16: ...w extra space for opening covers and trays The area should be well ventilated and away from direct sunlight or sources of heat cold and humidity Do not set the machine close to the edge of your desk o...

Page 17: ...t Tray Face down Document Input Support Automatic Document Feeder Toner Cartridge Paper Output Extension Manual Feeder Manual Feeder Guides Document Guides Paper Level Indicator Document Output Tray L...

Page 18: ...Selects the number of copies Makes a copy smaller or larger than the original document 3 Displays the current status and prompts during an operation 4 Scrolls through the options available for the se...

Page 19: ...e on toner by using less toner to print documents Allows you to save on call costs by sending a fax at a preset toll saving time Using this feature you can take advantage of lower long distance rates...

Page 20: ...maximum copies per cartridge CAUTION To prevent damage to the toner cartridge do not expose it to light for more than a few minutes Cover it with a piece of paper if necessary If the toner gets on yo...

Page 21: ...t surface to even it up 4 Insert the paper stack into the paper tray with the side you want to print on facing up NOTE If you want to load a different size of paper you need to adjust the paper guides...

Page 22: ...guide out completely to extend the paper tray to its full length 2 After inserting the paper into the tray slide in the guide until it lightly touches the end of the paper stack 3 Pinching the paper...

Page 23: ...nd or answering machine to your machine plug the cord of your extension phone or answering machine into the EXT jack UK users should plug the cord of the extension phone into the supplied TAM lead and...

Page 24: ...t telephones or answering machines Turning the Machine On 1 Plug one end of the supplied three pronged electrical type cord into the AC socket on the machine and the other end into a properly grounded...

Page 25: ...ne of the display The first available menu item Machine ID displays on the bottom line 2 Press Enter The display asks you to enter the fax number If there is a number already set that number appears 3...

Page 26: ...ed on the same button move the cursor by pressing the button and then press the button labeled with the letter you want The cursor moves to the right and the next letter appears on the display You can...

Page 27: ...er a new number 4 To select AM or PM for 12 hour format press the or button or any number button When the cursor is not under the AM or PM indicator pressing the or button immediately moves the cursor...

Page 28: ...menu item Paper Type on the bottom line 2 Press Enter to access the menu item 3 Use the scroll button or to fine the paper type you are using and press Enter to save it 4 Press the button to scroll to...

Page 29: ...Sound 1 Press Menu until Sound Volume appears on the top line of the display 2 Press the scroll button or to scroll through the options Press Enter when you see the sound option you want 3 Press the s...

Page 30: ...ith along distance phone company To turn the toll save mode on 1 Press Toll Save The button backlight turns on 2 Press Enter when Start Time displays on the bottom line 3 Enter the time when your mach...

Page 31: ...he time settings you want appears The available options are 5 10 15 30 and 45 minutes 5 Press Enter to save the selection 6 To return to Standby mode press Stop Clear Setting Up the Fax System Your ma...

Page 32: ...ment to fit the size of paper loaded in the machine Select On if you want to automatically reduce an incoming page With this feature set to Off the machine cannot reduce the document to fit onto one p...

Page 33: ...GETTING STARTED 1 20 MEMO...

Page 34: ...eiving a Fax About the Receiving Modes Loading Paper for Receiving Faxes Receiving Automatically in Fax Mode Receiving Manually in Tel Mode Receiving Automatically in Ans Fax Mode Receiving Manually U...

Page 35: ...n paper wrinkled or creased paper curled or rolled paper torn paper Remove all staples and paper clips before loading documents Make sure any glue ink or correction fluid on the paper is completely dr...

Page 36: ...s are described in the following table below NOTES For memory transmission Super Fine mode is not available The resolution setting is automatically changed to Fine When your machine is set to Super Fi...

Page 37: ...e while sending the fax Sending a Fax Manually 1 Load the document s face down into the ADF For details about loading a document see page 2 2 2 Adjust the document resolution to suit your fax needs Se...

Page 38: ...in You can set your machine to print a confirmation report automatically each time sending a fax is completed For further details see the MSG Confirm item on page 1 19 Automatic Redialing When the num...

Page 39: ...ny service which enables a user to use a single telephone line to answer several different telephone numbers For further details see page 2 8 The current receiving mode displays when the machine is in...

Page 40: ...om line You may have to repeat this action once or twice depending on the mode you re in 3 When you receive a fax call press On Hook Dial You can hear a fax tone from the remote machine 4 Press Start...

Page 41: ...r to whatever you choose For details about changing the code see page 1 19 Receiving Faxes Using DRPD Mode Distinctive Ring is a telephone company service which enables a user to use a single telephon...

Page 42: ...ing Error appears Press Enter when DRPD Mode displays and retry from step 3 6 To return to Standby Mode press Stop Clear NOTES DRPD must be set up again if you re assign your fax number or connect the...

Page 43: ...her details about print materials you can use see page A 6 To load paper in the manual feeder 1 Load a sheet of the print material with the print side face up into the center of the manual feeder For...

Page 44: ...stocks you don t need to set the paper size 5 Use the scroll button or to display Manual Feed on the bottom line Press Enter to access the menu item 6 Use the scroll button or to find the paper size...

Page 45: ...ard typed or printed documents Dark works well with light print or faint pencil markings Original Type The Original Type setting is used to improve the copy quality by selecting the document for the c...

Page 46: ...ear at the bottom of your copy Changing the Default Settings Copy options including darkness original type copy size and number of copies can be set to the most frequently used modes When you copy a d...

Page 47: ...g Off means that the machine does not restore the default settings until you press Start Copy Fax to start copying or Stop Clear to cancel 5 Press Enter to save the selection 6 To return to Standby mo...

Page 48: ...nt to store using the number keypad and press Enter To insert a pause between numbers press Redial Pause A appears on the display If you make a mistake while entering a number press the button and re...

Page 49: ...ess Redial Pause A appears on the display 6 To assign a name to the number enter the name you want For details about entering characters see page 1 13 If you do not want to assign a name skip this ste...

Page 50: ...howing the first available number 5 Enter a group number between 0 and 149 using the number keypad or scroll button or and press Enter 6 Press a one touch dial button or enter a speed number you want...

Page 51: ...9 To change the group name press Upper Level 10 Enter a new group name and press Enter 11 If you want to edit another group press Enter and repeat from step 5 Or To return to Standby mode press Stop C...

Page 52: ...group dial number These letters tell you how the number is stored 4 When the name and or the number you want displays press Start Copy Fax or Enter to dial Searching with a Particular First Letter 1 P...

Page 53: ...BASIC FUNCTIONS 2 20 MEMO...

Page 54: ...DVANCED FAX FUNCTIONS This chapter includes Sending Broadcasting Faxes Sending a Delayed Fax Sending a Priority Fax Polling a Remote Machine Adding Documents to a Scheduled Fax Canceling a Scheduled F...

Page 55: ...d You can use one touch keypad or speed dial or group dial numbers For details about storing a number see page 2 15 5 Press Enter to confirm the number The display asks you to enter another fax number...

Page 56: ...press 1 to select Yes and repeat steps 4 and 5 You can add up to 10 destinations Note that you cannot use group dial numbers for another fax number 8 When you finish entering fax numbers press 2 to se...

Page 57: ...the darkness see page 1 19 3 Press Menu until Fax Feature appears on the top line of the display 4 Press the scroll button or to display Priority Fax on the bottom line and press Enter 5 Enter the nu...

Page 58: ...eed dial number For details see page 2 15 4 Press Enter to confirm the number on the display The display asks you to enter another fax number NOTE The Another No prompt does not appear if you have add...

Page 59: ...until you see the fax job to which you want to add documents and press Enter The machine automatically stores the documents in memory and the display shows the memory capacity and the number of pages...

Page 60: ...4 ADDITIONAL FEATURES This chapter includes Using Secure Receiving Mode Printing Reports Using Advanced Fax Settings...

Page 61: ...firm it and press Enter 6 To return to Standby mode press Stop Clear When a fax is received in Secure Receiving mode your machine stores it in memory and displays Secure Receive to let you know that t...

Page 62: ...operation Message Confirmation This report shows the fax number the number of pages the elapsed time of the job the communication mode and the communication results You can set up your machine to aut...

Page 63: ...achine has various user selectable setting options for sending or receiving faxes These options are preset at the factory but you may need to change them To find out how the options are currently set...

Page 64: ...memory and send them at the specified toll saving time For details about Toll Save mode see page 1 17 Select Off to turn this feature off Select On to turn this feature on You can set the starting ti...

Page 65: ...f to turn this feature off Select On to turn this feature on ECM Mode Error Correction Mode Error Correction Mode helps with poor line quality and makes sure any fax you send are sent smoothly to any...

Page 66: ...ormation for maintaining your machine and the toner cartridge This chapter includes Clearing the Memory Adjusting Shading Cleaning Your Machine Maintaining the Toner Cartridge Consumables and Replacem...

Page 67: ...to the factory default Fax Setup Restores all of the Fax Setup options to the factory default Fax Feature Cancels all of the scheduled fax jobs in the machine s memory Advanced Fax Restores all of th...

Page 68: ...machine be careful not to touch the transfer roller located underneath the toner cartridge Oil from your fingers can cause print quality problems Cleaning the cabinet of your machine with products co...

Page 69: ...ass clean helps ensure the best possible copies We suggest that you clean the scanning glass at the start of each day and during the day as needed 1 Slightly dampen a soft lint free cloth or paper tow...

Page 70: ...Cartridge Life The life of the toner cartridge depends on the amount of toner that print jobs require When printing text at IDC 5 coverage a new toner cartridge lasts an average of 3 000 pages The ac...

Page 71: ...our machine requires a new toner cartridge when the toner cartridge needs to be replaced The fax number is preset by your dealer when you bought your machine 1 Press Menu on the control panel until Ma...

Page 72: ...Press Enter to save the selection Consumables and Replacement Parts From time to time you need to replace the toner cartridge roller and fuser unit to maintain top performance and to avoid print quali...

Page 73: ...your machine 1 Open the control panel by gripping its top and pulling on it 2 Squeeze the tab at the bottom of the ADF rubber assembly and then pull it out 3 Insert the tabs at the top of the new ADF...

Page 74: ...OUBLESHOOTING This chapter gives helpful information for what to do if you encounter an error This chapter includes Clearing Document Jams Clearing Paper Jams Clearing LCD Error Messages Solving Probl...

Page 75: ...sistance and the document does not move when you pull it continue to the next step 3 Open the control panel by gripping its top and pulling on it 4 Pull the document gently out of the ADF and close th...

Page 76: ...y 1 open 3 Remove the jammed paper by gently pulling it straight out If there is any resistance and the paper does not move when you pull or if you cannot see the paper in this area skip to the fuser...

Page 77: ...machine until it snaps into place 5 Open and close the front cover to resume printing In the Paper Exit Area 1 Open and close the front cover The jammed paper automatically exits the machine If the pa...

Page 78: ...ing In the Fuser Area or Around the Toner Cartridge NOTE The fuser area is hot Take care when removing paper from the machine 1 Open the front cover and pull the toner cartridge out lightly pushing it...

Page 79: ...follow the steps outlined in page 6 3 Follow the procedures on page 1 8 when you load paper Ensure that the adjustable guides are positioned correctly Do not overload the paper tray Ensure that the p...

Page 80: ...cument Feeder Clear the document jam See page 6 2 Door Open The front or rear cover is not securely latched Close the cover until it locks into place Group Not Available You have tried to select a gro...

Page 81: ...mber assigned to it Dial the number manually using the number keypad or assign the number For storing a number see page 2 15 No Paper Add Paper The paper tray has run out of paper Load paper in the pa...

Page 82: ...ion Stop Pressed The Stop Clear button is pressed during a copy or fax operation Try again Toner Empty The toner cartridge has run out The machine stops printing Replace with a new toner cartridge See...

Page 83: ...ly one type size and weight If multiple sheets have caused a paper jam clear the paper jam See page 6 3 Paper does not feed into the machine Remove any obstructions from inside the machine Paper has n...

Page 84: ...then turn it over in the paper tray Replace the paper in the tray with a fresh supply Check adjust the paper guides if necessary Ensure that the paper is the proper paper weight 75g m2 20 lb bond pap...

Page 85: ...ing a copy The toner cartridge may be empty Replace the toner cartridge referring to page 5 6 Some of the words on an incoming fax are stretched The fax machine sending you the fax had a temporary doc...

Page 86: ...A APPENDIX This chapter includes Installing an Optional Tray Specifications...

Page 87: ...of paper 1 Turn the machine off and unplug all cords from the machine 2 Remove the packing material from the tray and remove the tape fixing the interface cable to the tray 3 Find the location of the...

Page 88: ...n the tray you need to set the paper type and size using the control panel buttons 1 Press Menu The display shows Paper Setting on the top line and the first menu item Paper Type on the bottom line 2...

Page 89: ...artridge system Power requirements 100 127 VAC 50 60 Hz 4 5A 220 240 VAC 50 60 Hz 2 5A Power consumption Sleep mode 15 W 100 127 VAC 15 W 220 240 VAC Standby mode 75W 100 127 VAC 75 W 220 240 VAC Aver...

Page 90: ...p 3 Applicable line Public Switched Telephone Network PSTN or behind PABX Data coding MH MR MMR ECM Mode JBIG Modem speed 33600 31200 28800 26400 24000 21600 19200 16800 14400 12000 9600 7200 4800 240...

Page 91: ...pecifications may cause problems requiring repairs These repairs are not covered by Samsung s warranty or service agreements Supported Sizes of Paper NOTE You may experience jams when using print mate...

Page 92: ...r print quality or toner adhesion problems with feeding Too moist too rough too smooth or embossed faulty paper lot Try another kind of paper between 100 400 Sheffied 4 5 moisture content Dropout jamm...

Page 93: ...ot to purchase more paper than can be used in a short time about 3 months Paper stored for long periods may experience heat and moisture extremes which can cause damage Planning is important to preven...

Page 94: ...play language change control panel 1 12 document loading 2 2 preparing 2 2 document jam clear 6 2 DRPD Distinctive Ring Pattern Detection mode 2 8 drum clean 5 6 E error messages 6 7 extension phone c...

Page 95: ...ced enlarged copy 2 13 reports print 4 3 resolution set 2 3 S searching Phonebook 2 19 sending a fax automatically 2 4 manually 2 4 shading adjust 5 3 sounds set 1 16 specifications copier A 5 facsimi...

Page 96: ...m latin ECUADOR 1 800 10 7267 www samsung com latin EL SALVADOR 800 6225 www samsung com latin GUATEMALA 1 800 299 0013 www samsung com latin JAMAICA 1 800 234 7267 www samsung com latin PANAMA 800 72...

Page 97: ...2 0000 www samsung com ur AUSTRALIA 1300 362 603 www samsung com au CHINA 800 810 5858 010 6475 1880 www samsung com cn HONG KONG 2862 6001 www samsung com hk INDIA 3030 8282 1600 1100 11 www samsung...

Page 98: ...Home Visit us at www samsungprinter com P N JC68 01269A Rev 2 00...

Reviews: