background image

Samsung Document Camera Basics 

Connection 

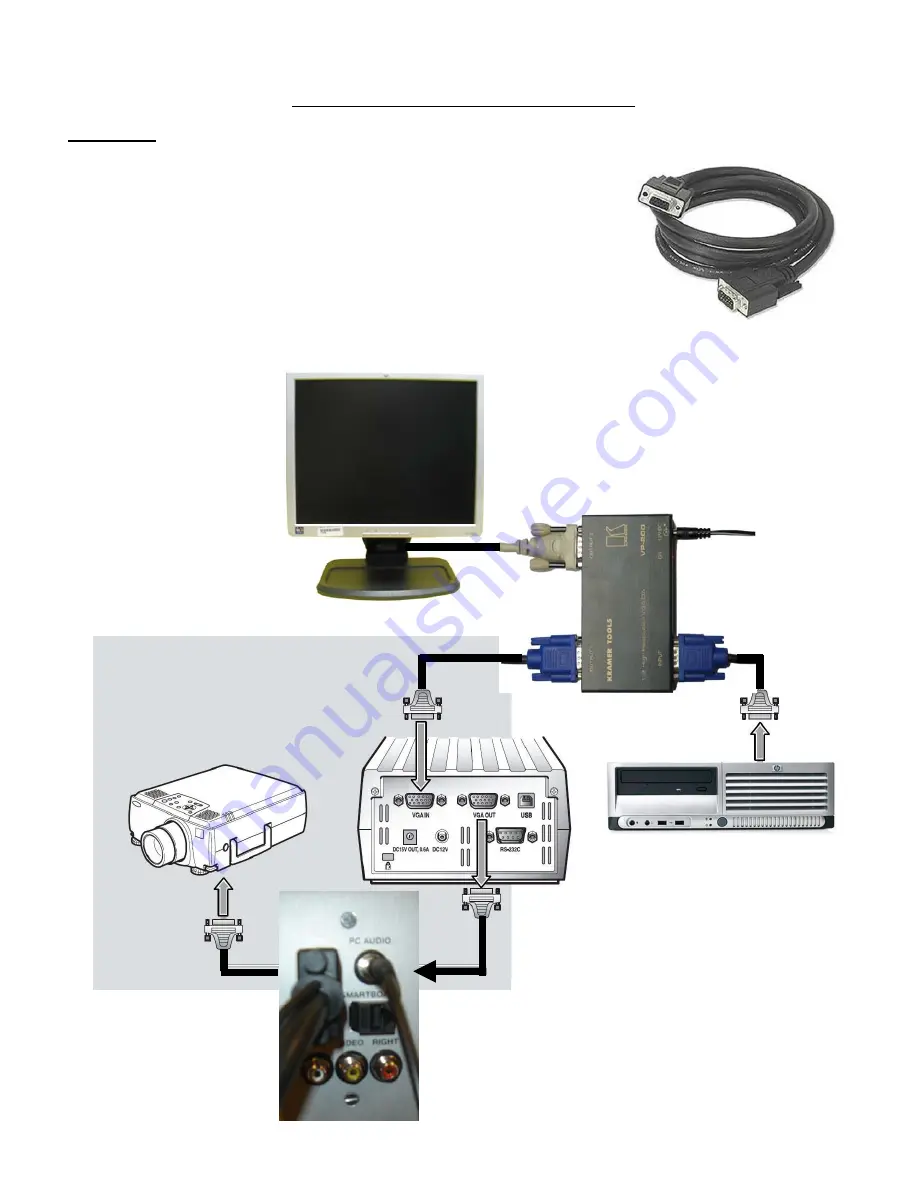
The basic connection setup should already be done for you.  If you ever 
need to reconnect the computer, document camera, and LCD projector, 
here is how it is done.  The video signal travels through three VGA 
cables as shown in the diagram below: from the computer to a splitter, 
and from the splitter to the document camera and monitor.  From the 
document camera, a VGA cable is connected to the LCD projector.  If 
the document camera is mounted on the ceiling, the VGA cable attaches 
to the media wall plate (located near the teacher workstation) instead of 
directly to the LCD projector. 

VGA Cable 


Wall Plate 

LCD Projector 

Document Camera 

Monitor 

Splitter 

Power 

Summary of Contents for SDP-850

Page 1: ...ables as shown in the diagram below from the computer to a splitter and from the splitter to the document camera and monitor From the document camera a VGA cable is connected to the LCD projector If t...

Page 2: ...ram on the right Power Connection The power is connected as shown in the diagram on the right Control Panel Overview The document camera has buttons on top All of these functions can also be controlle...

Page 3: ...t For best results and most accurate color place a white piece of paper under the lens when you turn the unit on Printed text on white paper is also OK You can re adjust the color at any time by press...

Page 4: ...mote the projected image is held on the screen This allows you to replace the picture with another one or make adjustments to the picture using your computer while the projected view remains unchanged...

Page 5: ...ther camera Touching it will leave fingerprints and or dust Use the included lens cap to cover the lens when you are not using your camera for a while Leave the lens attached for normal use when proje...

Page 6: ...ge or a video Ask your site tech to submit a CSR to have this done To capture a still image or a video using the Samsung document camera you must make one more connection using the USB cable Also the...

Page 7: ...n ask your site tech to submit a CSR for you Quick Saving a picture Now that you have set up a place for your pictures to go simply press the F2 button on your computer keyboard to take a picture The...

Page 8: ...lled in your computer If you are unable to select the Q Save button then select the Capture button to save an image to a folder located in your F drive After selecting capture select save to save the...

Page 9: ...Files SDP 850 Viewer SDP 850 AVI Capture Buttons Capture will start the video capture Stop will stop the video capture Exit closes the program when done There is a limit to how long a video you may ca...

Reviews: