background image

Reference Information

Samsung Electronics

2-15

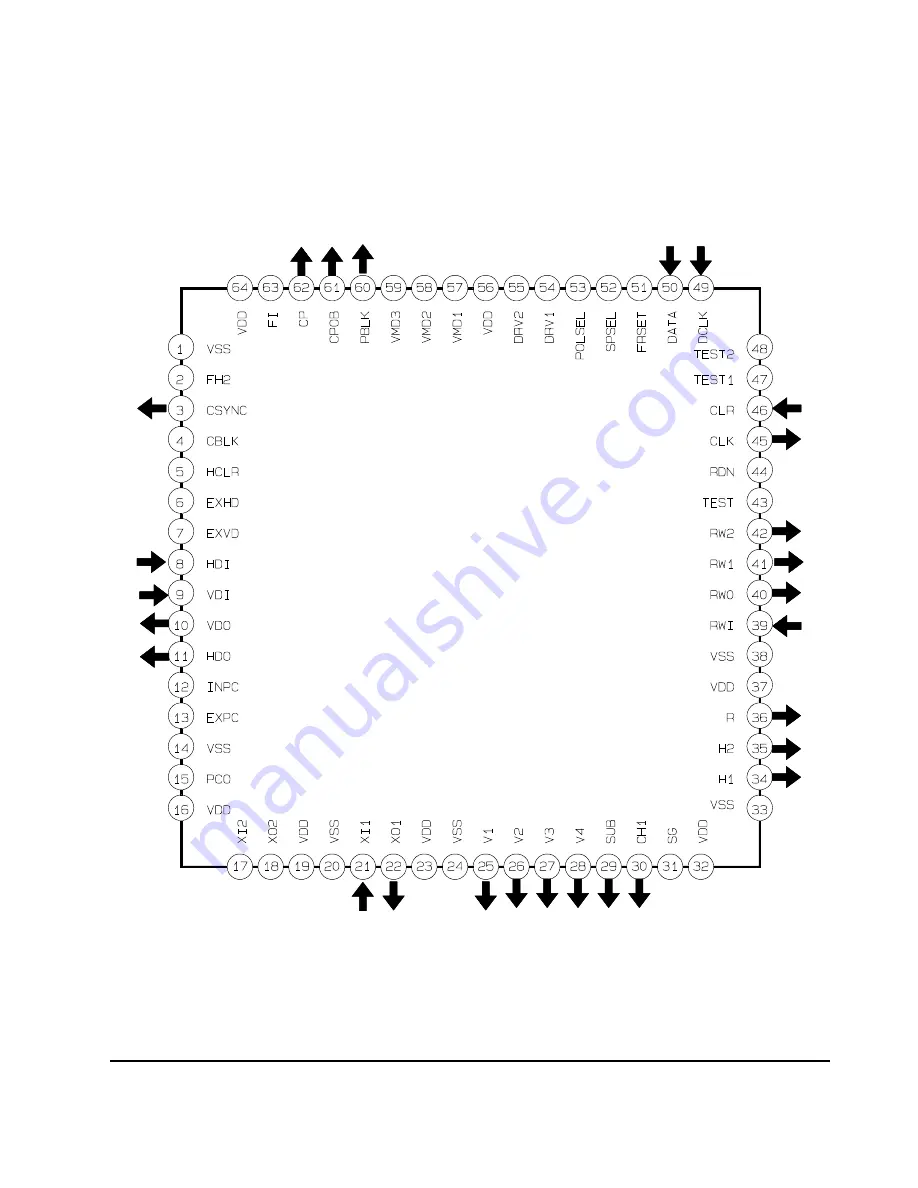
2-2-8 IC204 (NN5248)

Summary of Contents for SDC-30

Page 1: ... 3 Product Specifications 4 Disassembly and Reassembly 5 Alignment and Adjustment 6 Troubleshooting 7 Exploded View and Parts List 8 Electrical Parts List 9 Block Diagram 10 PCB Diagrams 11 Schematic Diagrams Manual DIGITAL STILL CAMERA CONTENTS Samsung Electronics Co Ltd JUN 1997 AD68 20286A AD68 20289A ...

Page 2: ...ot exceed 0 5 milliamp Reverse the power plug prongs in the AC outlet and repeat the test 6 X ray Limits The picture tube is designed to prohibit X ray emissions To ensure continued X ray protection replace the picture tube only with one that is the same type as the original Fig 1 AC Leakage Test 7 Antenna Cold Check With the unit s AC plug disconnected from the AC source connect an electrical jum...

Page 3: ... instrument s ground lead to the instrument chassis ground before connecting the positive lead always remove the instrument s ground lead last 17 Observe the original lead dress especially near the following areas Antenna wiring sharp edges and especially the AC and high voltage power supplies Always inspect for pinched out of place or frayed wiring Do not change the spacing between components and...

Page 4: ...on technique allows more image to be stored in the limited memory In the case of SDC 30 33 10 1 compression is normally executed for standard JPEG specification After compression the image information is stored in the nonvolatile flash memory Max 45 22 frame for VGA 640 480 and max 180 90 frame for QVGA 320 240 The image can be stored edited and printed by the PC image editing program that is supp...

Page 5: ... 5V Using the same technique as with camera 5V L141 IC140 Q142 and T141 the SYS 5V power drives IC301 IC302 IC303 IC304 and IC307 and is generated by SYS 5V CONT from the LCD micom EVER5V power is always output when battery and adapter are connected SYS 5V power is output only when power is turned on CAM power is output for 0 5 second only during shot operation 2 1 4 Camera 1 Camera operation Fig ...

Page 6: ... the second field consists of even line and a complete picture consists of two fields However SDC 30 33 uses a the progressive scanning method which outputs a frame every 1 30 second and has excellent vertical resolution The image is output at Pin 1 of CCD and is input to Pin39 of analog signal process IC IC203 through TR Q201 V Driver IC MN3112SA mixes each CCD driving pulse from Timing Generator...

Page 7: ...46 and then it is input to pin 2 through C232 for Row Clip and primary amplificationAGC Then it is output to Pin 35 and Pin 37 of EVR IC206 which is input to pin 36 which controls AGC Pin 35 output signal is input to Pin 26 through C218 and is amplified second time at the main amplifier The offset adjust pin 16 input is activated by EVR output signal Pin 4 and the output Pin 21 is sent to A D conv...

Page 8: ...rts the 8 bit data which is output from A D converter to 16 bit data and stores it in DRAM controlled by the 32 bit microprocessor Fig 2 5 D_OUT 15 0 A OUT 9 1 RAS CASU CASL WR OE TRI STATE OUTPUT High Z when Power Off MODE Data Register SIO SO SCK SI SCS AD_IN 9 0 ADCK IN 12 27MHz WND1 OUT WND2 OUT EXT VD IN EXT HD IN ADDR DATA BUS CONTROL VD HD GEN AE Data Detect 2 Knee 8bit to 16bit Convert OE ...

Page 9: ... information and the compressed image 3 32 bit RISC microprocessor HD6477043F28 This microprocessor is the core of the system and handles the camera control image signal processing image compression flash memory control communication with PC and communication with LCD control MICOM Refer to 2 1 6 System Control for details 8 6 CONV DRAM CTRL Camera Ctrl S W DSCP S W JPEG Memory Ctrl Power Control ...

Page 10: ...cknowledges the starting time for example when the user pushes the shot key and sends the NMI pin signal to RISC so that the standby mode can be changed to the operation mode The information is sent to RISC through communication port After RISC executes the appropriate program it returns to the standby mode 2 Main function of 4 bit MICOM Power ON OFF 4 bit MICOM turns the PC main body on and turns...

Page 11: ...p of BSC BSC generates all DRAM control signals by itself RISC uses DRAM for the image buffer temp memory for the calculation and an area that manages the flash memory and FAT File Allocation Table Camera Head control RISC handles the control of the camera head during the shot RISC controls the timing generator ASIC etc so that the image data from CCD can be transferred Signal processing RISC exec...

Page 12: ...Reference Information Samsung Electronics 2 9 2 2 IC Blocks 2 2 1 IC301 SMA9606 ...

Page 13: ...Reference Information 2 10 Samsung Electronics 2 2 2 IC302 KM416C256BLT ...

Page 14: ...Reference Information Samsung Electronics 2 11 2 2 3 IC304 HD6477043 ...

Page 15: ...Reference Information 2 12 Samsung Electronics 2 2 4 IC307 TC5832FT ...

Page 16: ...Reference Information Samsung Electronics 2 13 2 2 5 IC601 UPD75P3116GC 2 2 6 IC501 MAX232C ...

Page 17: ...Reference Information 2 14 Samsung Electronics 2 2 7 IC203 NN2038FAQ ...

Page 18: ...Reference Information Samsung Electronics 2 15 2 2 8 IC204 NN5248 ...

Page 19: ...Reference Information 2 16 Samsung Electronics MEMO ...

Page 20: ...Standard images 7 8 sec at 115Kbps ECO Economy images Under 2 sec at 115Kbps 4AA TYPE alkaline batteries 6V DC in using AC adaptor not supplied At power on below 500mA At power off below 500uA More than 200 images using new alkaline batteries 115 W X 75 H X 38 D mm 140g without batteries 350 000 pixel CCD STD 640 X 480 pixels ECO 320 X 240 pixels 24 bit true color 16million colors 4MB internal fla...

Page 21: ...Product Specifications 3 2 Samsung Electronics MEMO ...

Page 22: ...semble in the order shown Reassemble in reverse order 4 1 1 Case Side Removal Disconnect 2 tabs while lifting up the case side to the arrow direction Remove 2 screws Precision screw Driver BOTTOM SIDE Bottom Side Lift up the case side using the precision screw driver 3 1 2 Fig 1 ...

Page 23: ... 1 2 Door Battery Removal Open the Door Battery in the direction of arrow and twist it to remove 4 1 3 Case Rear Removal CASE REAR A Remove 3 tabs while pushing A area down Detach the case rear in the direction of the arrow Remove 1 screw 1 2 Fig 2 Fig 3 ...

Page 24: ...PCB Removal Remove 2 screws Disassemble MAIN PCB while disconnecting CN301 from FUNCTION PCB Disconnect the lead connector CN502 from JACK PCB 3 2 1 4 1 5 Jack PCB Removal Disconnect the lead connector from CN501 Remove 1 screw Disconnect 1 tabs 1 3 2 Fig 4 Fig 5 ...

Page 25: ...ssembly 4 4 Samsung Electronics 4 1 6 Case Top Removal Disconnect one tab and detach Case Top in the direction of arrow 1 4 1 7 Case Front Removal Detach Case Front in the direction of arrow Remove 1 screw 2 1 Fig 6 Fig 7 ...

Page 26: ...Disassembly and Reassembly Samsung Electronics 4 5 4 1 8 OVF Removal Remove 1 screw Lift up OVF 1 2 Note Take extreme care not to ieave fingerprints on the surface Fig 8 ...

Page 27: ...Disassembly and Reassembly 4 6 Samsung Electronics MEMO ...

Page 28: ...e reference at 3100 K AGC gain adjustment Extract the AGC gain of 0dB 6dB 5100 K adjustment Take a shot of the white chart 5100 K and extract the reference at 5100 K Fig 5 1 5 2 Installing and using special softwre on diskette Note Special software handles the camera adjustment and fault diagnostics This diskette isn t distributed to consumers and should be used only if a fault occurs It allows in...

Page 29: ...nitial execution and adjustment 1 Initial execution Fig 5 2 2 Initial screen of program Fig 5 3 Initial screen at execution of SVC exe 1 The window Fig 5 3 appears at execution of SVC exe 2 It should be tested or adjusted in the following sequence Turn on PC and execute Windows Turn off camera Connect PC with camera Turn on camera Execute SVC exe in Windows ...

Page 30: ...menu bar in use of mouse Two items appear as shown in Fig 5 5 Select Option to set the adjustment item Select Start for execution Finish the execution Fig 5 5 Select SDC 33 30 of menu bar Fig 5 6 Option Window 3 Option window 1 When selecting Option Fig 5 6 is displayed Fig 5 4 ...

Page 31: ...ecision Use the camera disconnection function or change the internal adjustment value Refer to Fig 5 9 When the above items are set select OK and complete the adjustment preparation 2 Follow this procedure when setting the options in Fig 5 6 3 Adjustment execution 1 SEE Fig 5 6 Press O K The screen will appear as in Fig 5 3 2 Select Start of SVC menu to display the window shown in Fig 5 8 Port num...

Page 32: ... the program in accordance with the sequence of Fig 5 6 Fig 5 9 Process and procedure of adjustment Power supply DRAM test Memory format ASIC test VSUB value adjustment 3100 K level AWB 5100 K level AWB LCD test Mode test Timer test Shot Display Power interrupt ...

Page 33: ...he next step after automatic formatting Check for disconnection state between ASIC RISC and DRAM and ASIC function Input V SUB value Always refer to the table in oppend it before inputting because picture quality is affected Fig 5 14 Adjust AWB 3100 K level This process should be done with 3100 K level chart active throughout the screen Be certain to use it because picture quality is affected Adju...

Page 34: ...ode The camera has two types of shot functions VGA 640 480 and QVGA 320 240 Test both of these mode conversions Check the delay shot On Off of camera Display the result by means of self On Off without special operation Display the thumbnail after the shot to determine normal or abnormal operation Shut off the camera s power supply after completion of all tests Proceed to the adjustment step Fig 5 ...

Page 35: ...ady formatted An error occurs in flash memory Flash Memory has defective area Flash Memory clearing error occured Flash Memory system block error occured New flash memory Flash memory is rare B value is larger than R value in NG 3100 K level test 3100 K AWB adjust error B R RG xx BG yy R value exceeds the range in NG 3100 K level test 3100 K AWB adjust error R value is out of bound RG xx B value e...

Page 36: ...omplete the installation according to the instructions on screen Note Select iPhoto Express Tour in Help menu to see the detailed instructions for Edit S W All functions of Edit S W are explained with figure Fig 5 15 2 Twain driver installation 1 Execute setup exe in TWAIN intallation diskette under Windows 95 environments 2 Complete the installation according to the instructions on screen ...

Page 37: ...l Camera TWAIN in file menu of edit program 3 Connect the digital camera with PC in use of RS 232C cable and power on 4 Select Acquire Image Acquire in file menu operate TWAIN driver and display the thumbnail image in the camera 5 Transmit the original image to PC by clicking the desired screen on TWAIN driver or pressing the select all button and Download button 6 The basic operation is finished ...

Page 38: ...ommunication rate Update Execute Update when camera state changes Delete Delete unnecessary screen Shot Shot Timer Self timer function Mode Switch the size VGA QVGA of screen Download Transmit the selected screen to PC Exit Exit TWAIN driver Select All Select entire screen PgUp PgDn Display the previous and next screen by page 5 RowUp RowDn Display the previous and next screen by row ...

Page 39: ...Alignment and Adjustments 5 12 Samsung Electronics MEMO ...

Page 40: ...Samsung Electronics 6 1 6 Troubleshooting ...

Page 41: ...Troubleshooting 6 2 Samsung Electronics ...

Page 42: ...Troubleshooting Samsung Electronics 6 3 ...

Page 43: ...Troubleshooting 6 4 Samsung Electronics ...

Page 44: ...Troubleshooting Samsung Electronics 6 5 ...

Page 45: ...and repair of digital section Option window is set as follows 6 2 Option window Communication port setting Communication rate setting Test setting OK button The current DSC sets the communication port connected with PC Select the communication rate between DSC and PC usuallg 56000 If an error occurs reduce the communication rate 9600 minimum and 115200 maximum TEST DECISION Disconnection or functi...

Page 46: ...Troubleshooting Samsung Electronics 6 7 6 3 Test procedure Power supply DRAM test Memory format ASIC test LCD test Mode test Timer test Shot Display Power interrupt Fig 6 4 Test procedure ...

Page 47: ...ep with out formatting If formatted all image data are deleted Key Stop Enter key Continue Replace with new memory when replacing with new memory due to memory error go to the next step after automatic formatting Check for any disconnections between ASIC RISC and DRAM and ASIC Check each segment of camera LCD screen Press Enter key to stop and enter the next step Test by converting the camera into...

Page 48: ...ircuit DRAM Test error A fatal error occurs during NG ASIC test ASIC Test error A fatal error occurs during NG Vsub adjustmentt V sub adjust error Memory has been previously formatted Memory was already formatted An error occurs in flash memory Flash Memory has defective area Flash Memory clearing error Flash Memory system block error New flash memory Flash memory is rare There are Many bad blocks...

Page 49: ...Troubleshooting 6 10 Samsung Electronics MEMO ...

Page 50: ...Samsung Electronics 7 1 7 Exploded View and Parts List 7 1 Cabinet Assembly 7 2 Accessory Page 7 2 7 4 ...

Page 51: ...Exploded View and Parts List 7 2 Samsung Electronics 7 1 Cabinet Assembly 1 2 3 4 5 7 8 9 10 11 12 13 14 15 16 17 18 19 20 21 22 30 32 30 30 30 31 31 ...

Page 52: ...004A SPRING BATTERY B 14 AD90 10813H ASSY FUNC BOARD 15 AD90 10813Q ASSY JACK BOARD 16 AD90 10812V ASSY MAIN BOARD SDC30 OPTION AD90 10819W ASSY MAIN BOARD SDC33 OPTION 17 AD61 11017A BRACKET CCD AL T1 2 DSC 18 0605 001010 CCD COLOR DIP 16 400MIL 325K 7 4X7 19 AD63 60088A SPACER CCD SILICON BLK DSC 20 AD29 90200J FILTER OPTICALL DP SV 4C10MM LP T 21 AD61 21047A HOLDER LENS PBT94 HB BLK 22 AD67 101...

Page 53: ...SSY ACCESSORY SDC 30 NTSC ŒAD39 42001C CABLE RS232C 9P 1000MM PLUG 3 5 20M AD63 10212A STRAP SHOULDER BLK ˇAD69 32001A BAG SOFT CASE SDC50 LEATHER BLK AD46 30001C DISC FLOPPY 3 5 INCH 1 44MB AD46 30001E DISC FLOPPY WIN3 1 3 5INCH 1 44MB SDC 33 ˆAD46 20007A DISC IPHOTO EXPRESS 120MM Ø4301 001017 BATTREY ALKALINE 1 5V AA 14 X 49 5MM PLATE ...

Page 54: ...5V Y5V TP 1608 C225 2404 000139 C TA CHIP 10UF 20 6 3V TP 3216 C226 2404 000139 C TA CHIP 10UF 20 6 3V TP 3216 C227 2404 000139 C TA CHIP 10UF 20 6 3V TP 3216 C228 2404 000139 C TA CHIP 10UF 20 6 3V TP 3216 C229 2203 001556 C CERAMIC CHIP 100NF 80 20 25V Y5V TP 1608 C230 2203 002220 C CERAMIC CHIP 56PF 5 50V CH TP 1608 C231 2203 000477 C CERAMIC CHIP 1UF 80 20 16V Y5V TP 2012 C232 2203 001567 C CE...

Page 55: ... 100NF 80 20 25V Y5V TP 1608 C321 2203 001556 C CERAMIC CHIP 100NF 80 20 25V Y5V TP 1608 C330 2404 000139 C TA CHIP 10UF 20 6 3V TP 3216 C331 2203 001556 C CERAMIC CHIP 100NF 80 20 25V Y5V TP 1608 C332 2203 001556 C CERAMIC CHIP 100NF 80 20 25V Y5V TP 1608 C333 2203 001556 C CERAMIC CHIP 100NF 80 20 25V Y5V TP 1608 C391 2203 001556 C CERAMIC CHIP 100NF 80 20 25V Y5V TP 1608 C398 2203 001556 C CERA...

Page 56: ... R CHIP 1MOHM 5 1 16W DA TP 1608 R203 2007 000102 R CHIP 100KOHM 5 1 16W DA TP 1608 R204 2007 000074 R CHIP 100OHM 5 1 16W DA TP 1608 R205 2007 000125 R CHIP 3 9KOHM 5 1 16W DA TP 1608 R206 2007 000651 R CHIP 27KOHM 1 1 16W DA TP 1608 R207 A1020 0598 R CHIP RH 1 16 CS 123 F C1608 R208 2007 000092 R CHIP 15KOHM 5 1 16W DA TP 1608 R209 2007 000637 R CHIP 270KOHM 5 1 16W DA TP 1608 R210 2007 000097 R...

Page 57: ...R CHIP 100OHM 5 1 16W DA TP 1608 R355 B1018 0099 R NETWORK RN 1 16 FV 8P 101 J T MNR14 J 101 CS96 R356 B1018 0099 R NETWORK RN 1 16 FV 8P 101 J T MNR14 J 101 CS96 R357 2007 000074 R CHIP 100OHM 5 1 16W DA TP 1608 R358 2007 000074 R CHIP 100OHM 5 1 16W DA TP 1608 R359 B1018 0099 R NETWORK RN 1 16 FV 8P 101 J T MNR14 J 101 CS96 R360 B1018 0099 R NETWORK RN 1 16 FV 8P 101 J T MNR14 J 101 CS96 R362 20...

Page 58: ... EC10QS04 40V 1A SMD TP IC100 AC14 12012F IC S 8420BF T1 SOP IC120 1203 001199 IC PWM CONTROLLER 3800 SOP 8P 250MIL PLASTIC 1 0 IC140 1203 001199 IC PWM CONTROLLER 3800 SOP 8P 250MIL PLASTIC 1 0 L101 2703 000403 INDUCTOR SMD 22UH 10 3 2X2 5X2 2MM L102 2703 000398 INDUCTOR SMD 10UH 10 3 2X2 5X2 2MM L121 2703 000403 INDUCTOR SMD 22UH 10 3 2X2 5X2 2MM L122 2703 000350 INDUCTOR SMD 10UH 20 7 3X7 3X4 7...

Page 59: ...21611 TA SB 0 2OH B502 AC29 32001B FILTER EMI BEAD CB321611 TA SB 0 2OH C501 2409 001013 C EDL 0 1F 5 0V 100UA TP 10 5X5 5 C502 2203 001556 C CERAMIC CHIP 100NF 80 20 25V Y5V TP 1608 C503 2404 000198 C TA CHIP 22UF 20 6 3V TP 3528 C504 2203 000477 C CERAMIC CHIP 1UF 80 20 16V Y5V TP 2012 C505 2203 000477 C CERAMIC CHIP 1UF 80 20 16V Y5V TP 2012 C506 2203 000477 C CERAMIC CHIP 1UF 80 20 16V Y5V TP ...

Page 60: ...7 000097 R CHIP 47KOHM 5 1 16W DA TP 1608 R612 2007 000074 R CHIP 100OHM 5 1 16W DA TP 1608 R613 2007 000074 R CHIP 100OHM 5 1 16W DA TP 1608 R615 2007 000084 R CHIP 4 7KOHM 5 1 16W DA TP 1608 R616 2007 000084 R CHIP 4 7KOHM 5 1 16W DA TP 1608 R617 2007 000102 R CHIP 100KOHM 5 1 16W DA TP 1608 R619 2007 000097 R CHIP 47KOHM 5 1 16W DA TP 1608 SW602 3404 000276 SWITCH TACT 15VDC 20MA 100GF 4 9X4 9X...

Page 61: ...Electrical Parts List 8 8 Samsung Electronics MEMO ...

Page 62: ...Samsung Electronics 9 1 9 Block Diagram ...

Page 63: ...Samsung Electronics 10 1 10 PCB Diagrams Page 10 2 10 2 10 3 10 1 Main 10 2 Jack 10 3 Function ...

Page 64: ...0 4 A IC120 2 B IC307 3 C IC206 3 C IC302 2 C IC301 2 D IC205 2 E IC202 4 F IC203 4 F 10 2 Jack Component Side Conductor Side LOCATION COORDINATES CN501 3 A CN502 1 B 1 2 3 A B 1 2 3 A B Component Side Conductor Side 1 2 3 4 A B C D E F LOCATION COORDINATES IC140 2 F IC204 4 A IC207 3 B IC303 3 D IC305 1 D Q201 3 B Q303 4 C Q198 4 E Q121 4 F Q141 4 F Q199 4 F Q142 2 F ...

Page 65: ...PCB Diagrams Samsung Electronics 10 3 10 3 Function LOCATION COORDINATES IC601 3 F CN602 4 F Component Side Conductor Side 1 2 3 4 A B C D E F G H 1 2 3 4 A B C D E F G H LOCATION COORDINATES CN601 4 F ...

Page 66: ...Samsung Electronics 11 1 11 Schematic Diagrams Page 11 2 11 3 11 4 11 5 11 6 3 Block Identification of Main PCB 11 1 DC DC 11 2 Main 11 3 Jack 11 4 Function ...

Page 67: ...der the electrostatically sensitive ES devices section of this service manual Note Do not use the part number shown on this drawing for ordering The correct part number is shown in the parts list may be slightly different or amended since this drawing was prepared Important safety notices Components identified with the mark have the special characteristics for safety When replacing any of these co...

Page 68: ...Schematic Diagrams Samsung Electronics 11 3 11 1 DC DC ...

Page 69: ...Schematic Diagrams 11 4 Samsung Electronics 11 2 Main 1 2 9 10 3 11 4 12 5 13 6 14 7 15 8 16 DC DC CN301 CN206 2 1 8 7 6 5 16 14 15 3 4 11 12 9 10 13 ANALOG SIGNAL DIGITAL SIGNAL JPEG SIGNAL ...

Page 70: ...Schematic Diagrams Samsung Electronics 11 5 11 3 Jack ...

Page 71: ...Schematic Diagrams 11 6 Samsung Electronics 11 4 Function ...

Reviews: