background image

4_ Safety information

Safety information

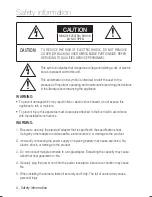
CAUTION

RISK OF ELECTRIC SHOCK. 

DO NOT OPEN

CAUTION

:

TO REDUCE THE RISK OF ELECTRIC SHOCK, DO NOT REMOVE 

COVER (OR BACK) NO USER SERVICEABLE PARTS INSIDE. REFER 

SERVICING TO QUALIFIED SERVICE PERSONNEL.

This symbol indicates that dangerous voltage consisting a risk of electric 
shock is present within this unit.

This exclamation point symbol is intended to alert the user to the 
presence of important operating and maintenance (servicing) instructions 
in the literature accompanying the appliance.

WARNING

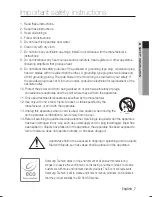
To prevent damage which may result in fire or electric shock hazard, do not expose this 
appliance to rain or moisture.
To prevent injury, this apparatus must be securely attached to the floor/wall in accordance 
with the installation instructions.

WARNING

Be sure to use only the standard adapter that is specified in the specification sheet. 
Using any other adapter could cause fire, electrical shock, or damage to the product.

Incorrectly connecting the power supply or replacing battery may cause explosion, fire, 
electric shock, or damage to the product.

Do not connect multiple cameras to a single adapter. Exceeding the capacity may cause 
abnormal heat generation or fire.

Securely plug the power cord into the power receptacle. insecure connection may cause 
fire.

When installing the camera, fasten it securely and firmly. The fall of camera may cause 
personal injury.

1.

2.

3.

4.

5.

Summary of Contents for SCO-3080R Series

Page 1: ...High Resolution IR Camera User Manual SCO 3080R Weatherproof ...

Page 2: ...fy the integrity and correctness of the contents in this document but no formal guarantee shall be provided Use of this document and the subsequent results shall be entirely on the user s own responsibility Samsung Techwin reserves the right to change the contents of this document without prior notice Warranty If the product does not operate properly in normal conditions please let us know Samsung...

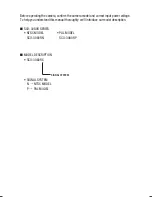
Page 3: ...d correct input power voltage To help you understand this manual thoroughly we ll introduce our model description SCO 3080R SERIES NTSC MODEL PAL MODEL SCO 3080RN SCO 3080RP MODEL DESCRIPTION SCO 3080RX _ SIGNAL SYSTEM N NTSC MODEL P PAL MODEL SIGNAL SYSTEM ...

Page 4: ...zard do not expose this appliance to rain or moisture To prevent injury this apparatus must be securely attached to the floor wall in accordance with the installation instructions WARNING Be sure to use only the standard adapter that is specified in the specification sheet Using any other adapter could cause fire electrical shock or damage to the product Incorrectly connecting the power supply or ...

Page 5: ... Do not drop objects on the product or apply strong shock to it Keep away from a location subject to excessive vibrationor magnetic interference Do not install in a location subject to high temperature over 55 C low temperature below 10 C or high humidity Doing so may cause fire or electric shock If you want to relocate the already installed product be sure to turn off the power and then move or r...

Page 6: ...ponsibly to promote the sustainable reuse of material resources Household users should contact either the retailer where they purchased this product or their local government office for details of where and how they can take these items for environmentally safe recycling Business users should contact their supplier and check the terms and conditions of the purchase contract This product and its el...

Page 7: ... apparatus Only use attachments accessories specified by the manufacturer Use only with cart stand tripod bracket or table specified by the manufacturer or sold with the apparatus Unplug this apparatus when a card is used Use caution when moving the cart apparatus combination to avoid injury from tip over Refer all servicing to qualified service personnel Servicing is required when the apparatus h...

Page 8: ...s 13 Adjust the lens s zoom and focus CONNECTION 1 14 Connecting to Monitor 14 Connecting to Power 15 Function jack 16 Using coaxial communications SETUP Menu Configration Menu Setup TROUBLESHOOTING 36 Troubleshooting Contents SPECIFICATIONS 37 Specifications 39 Dimension 36 37 4 18 18 18 ...

Page 9: ...area in the extreme darkness allowing the camera a long range visibility of up to 50 meters IP66 Approved Dust and Rain Resistant With dust and rain resistant design the camera can be installed outside under building eaves or places that are exposed to the dust and rain SSDR Samsung Super Dynamic Range For images with high contrast between bright and dark areas from difficult lighting conditions s...

Page 10: ... Russian Polish Czech Romanian Serbian Swedish Danish Turkish Portuguese WHAT S INCLUDED Check if the following items are included in the product package SCO 3080R Sunshield L type hexagon wrenches 3 0mm User Manual Sunshield Adaptor 1EA Tapping Screw 3EA User Manual Quick Set up Guide Quick Set up Guide Installation Video Output Cable NTSC English Japanese Spanish French Portuguese Korean Taiwane...

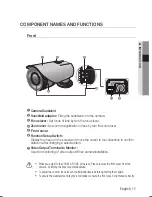
Page 11: ...d move the cursor to four directions to confirm status or after changing a selected item Video Output Terminal to Monitor Used for monitoring of video output When camera installation When you adjust to the ZOOM FOCUS of the lens Please remove the front cover from the camera by turning the cover counterclockwise To adjust the zoom focus loosen the individual levers before tightening them again To e...

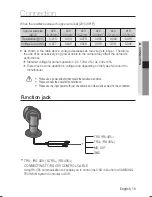
Page 12: ...utput jack Video signals are output through this port Connect this port to the Video IN port of a monitor Power input terminal Connect the power as specified for each model here Function jack It contains RS 485 communication jack MD OUT and GND ...

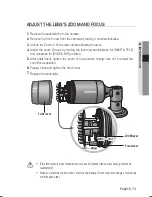
Page 13: ...or NEAR TELE and clockwise for WIDE FAR position After adjustment tighten the zoom or focus levers taking care not to adjust the zoom focus position Please close and tighten the front cover Replace the sunshield 1 2 3 4 5 6 7 Front cover Focus lever ZOOM lever If the front cover is cross threaded or not correctly tightened the camera housing will not be weatherproof When you combine the front cove...

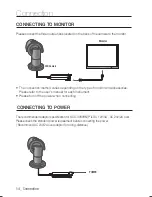
Page 14: ... accessories Please refer to the user s manual for each instrument Please turn off the power when connecting CONNECTING TO POWER The recommended adaptor specification for SCO 3080RN P is DC 12V 4A AC 24V 2A over Please check the standard power requirement before connecting the power Recommend AC 24V 2A over adaptor for a long distance y y POWER CCD Camera Connection 14_ Connection ...

Page 15: ...camera may affect the camera s performance Standard voltage for camera operation DC 12V 10 AC 24V 10 There may be some deviation in voltage drop depending on the type of wire and the manufacturer Please use a power adaptor that meets the required standards Please connect the power after installation Please use the input power with just one camera and other devices must not be connected y Function ...

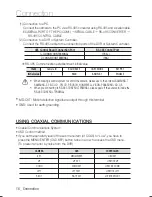
Page 16: ... RIGHT KEY JOYSTICK RIGHT Coaxial Communications System OSD Control method If you set the sensitivity level of the sub menu item of COAX to Low you have to press the MENU ENTER OSD KEY button twice in a row to access the OSD menu To prevent an error by noise from the DVR 2 Connection to a DVR or System Controller Connect the RS 485 cable to the connection ports of the DVR or System Controller 485 ...

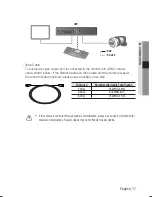
Page 17: ...ut port is connected to the monitor with a BNC coaxial cable shown below If the distance between the camera and the monitor exceeds the recommended maximum please use an auxiliary video amp 1 2 3 4 5 6 7 8 9 10 11 12 13 14 15 16 ALARM HDD NETWORK BACKUP REC DVD RECORDER REC ZOOM MODE FREEZE AUDIO BACKUP ALRAM SEARCH TELE WIDE VIEW PRESET MENU RETURN USB OPEN CLOSE MENU SEARC H MULTI REC MENU PRESE...

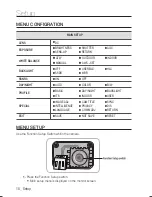
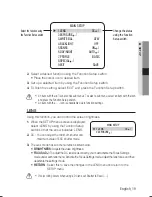
Page 18: ... ITS SPECIAL IMAGE ADJ CAM TITLE SYNC INTELLIGENCE PRIVACY DIS RETURN EXIT SAVE NOT SAVE RESET MENU SETUP Use the Function Setup Switch whitin the camera Press the Function Setup switch Main setup menu is displayed on the monitor screen 1 y BACKLIGHT OFF USER BLC HLC SSNR3 DAY NIGHT AUTO COLOR B W BACKLIGHT BASIC ON OFF USER DAY NIGHT SSDR WDR LANGUAGE COMM ADJ ...

Page 19: ...sing this function you can control the screen brightness When the SETUP menu screen is displayed select LENS by using the Function Setup switch so that the arrow indicates LENS DC You can adjust the minimum shutter and maximum value of ESC shutter mode The Lens mode has sub menu items as listed below BRIGHTNESS Adjusts the video brightness FOCUS ADJ To adjust the DC lens focus correctly you must a...

Page 20: ...EXPOSURE SETUP 䯝 1 BRIGHTNESS IIIIIÂIIIIIIIIIIIIIIII 25 2 SHUTTER 3 AGC HIGH 4 SENS UP OFF 5 RETURN MAIN SETUP 1 LENS DC 䯝 2 EXPOSURE 3 WHITE BAL ATW When the SHUTTER is set to ESC after selecting the Internal SynchronizationType the picture may becomeunstableifthecamerafacesabrightfluorescentlight Therefore takecarewhenchoosing the installation position When the SHUTTER is set to MANUAL orA FLK m...

Page 21: ...ose ATW Select this when the color temperature is between 1 700 K and 11 000 K OUTDOOR Select this when the color temperature is between 1 700 K and 11 000 K sodium light inclusion Select this when the color temperature of environment surrounding the subject is out of the control range e g clear sky or sunset INDOOR Select this when the color temperature is between 4 500 K and 8 500 K MANUAL Selec...

Page 22: ...e Function Setup switch depending on the camera purpose 1 2 MAIN SETUP 1 LENS DC 2 EXPOSURE 3 WHITE BAL ATW 䯝 4 5 BACKLIGHT OFF SSNR3 ON UseR blC Enables a user to directly select a desired area from a picture and to view the area more clearly LEVEL Adjust level of the BLC function TOP BOTTOM LEFT RIGHT Adjust the area to be enhanced BLC SETUP 1 LEVEL MIDDLE 2 TOP IIIII IIIIIIIIIIIIIIII 30 3 BOTTO...

Page 23: ...the sub menu according to the contrast between bright and dark areas WDR When there are both bright and dark areas at the same time this mode makes both areas distinctive Select WDR to adjust the WDR LIMIT and LEVEL LIMIT Adjust the WDR Sensitivity by selecting LOW MIDDLE or HIGH LEVEL Adjust the WDR Brightness by controlling the bar from 1 to 10 MODE Indoor and outdoor backlight conditions are ap...

Page 24: ...y be distorted If you use theVPS Virtual Progressive Scan function the CCD reads differently so you can not use WDR simultaneously If you set VPS to ON WDR will be automatically set to FIXED Mode M WDR ON WDR OFF SSNR3 This function reduces the background noise in a low luminance environments When the SETUP menu screen is displayed select SSNR3 by using the Function Setup switch so that the arrow ...

Page 25: ...mage may also o ccur AUTO The mode is switched to Color in a normal environment but switches to B W mode when ambient illumination is low To set up the switching time for AUTO mode press the Function Setup switch You can turn on or off the burst signal on B W mode MAIN SETUP 1 LENS DC 2 EXPOSURE 3 WHITE BAL ATW 4 BACKLIGHT OFF 5 SSNR3 ON 6 DAY NIGHT AUTO BURST MODE You can turn on or off the burst...

Page 26: ...or 3 seconds when switching to Color or B W to ensure stable camera operation PROFILE When the SETUP menu screen is displayed select PROFILE by using the Function Setup switch so that the arrow indicates PROFILE Select a desired mode using the Function Setup switch according to the picture display you want BASIC The most common environment is set to meet DAY NIGHT It will be set automatically so i...

Page 27: ...tialize when menu resets In the PROFILE menu you can configure the following camera settings at once BASIC DAY NIGHT BACKLIGHT ITS INDOOR USER SHUTTER MANUAL 1 250 A FLK AGC HIGH HIGH HIGH HIGH HIGH WHITE BAL ATW ATW ATW OUTDOOR INDOOR BACKLIGHT OFF OFF OFF OFF SSNR3 ON ON ON ON ON DAY NIGHT AUTO AUTO AUTO AUTO AUTO 1 2 3 4 3 USERBLC When ambient illumination is low the camera will change to BW mo...

Page 28: ...em when using a CRT monitor You can change the PED level color gain in the sub menus 1 2 MAIN SETUP 1 LENS DC 2 EXPOSURE 3 WHITE BAL ATW 4 BACKLIGHT OFF 5 SSNR3 ON 6 DAY NIGHT AUTO 7 PROFILE BASIC 8 SPECIAL IMAGE SETUP 1 MONITOR LCD 2 VPS OFF 3 REVERSE OFF 4 PIP OFF 5 D ZOOM OFF 6 FONT COLOR WHITE 7 SHARPNESS ON 8 RETURN LCD MONITOR GAMMA 0 55 PED LEVEL IIIII IIIIIIIIIIIIIIII 14 COLOR GAIN IIIIIII...

Page 29: ...and vertically on the screen pIp picture in picture Displays a full size image along with the thumbnail to provide more detailed information The position of the thumbnail is adjustable D ZOOm You can use a digital zoom of x1 x16 fONT COlOR You can change the OSD font color White Yellow Green Red Blue sHARpNess As you increase this value the picture outline becomes stronger and clearer Adjust this ...

Page 30: ...ss the Function Setup switch to return to the SPECIAL menu When the CAM TITLE menu is OFF no title will be displayed on the monitor screen even if you enter one Only English is available in the mode If you move the cursor to CLR and press the Function Setup switch all the letters are deleted To edit a letter change the cursor to the bottom left arrow and press the Function Setup switch Move the cu...

Page 31: ...ommands the camera to detect and trace a moving object FENCE MODE Determines whether to use the fence selected in the FENCE TYPE Two types line and area of fences are available COUNT Displays the number of times that an object enters or leaves a fenced area FILL Fill or remove color from the FENCE POSITION Defines the position and detection direction of a line or fenced area INTELLIGENCE 1 MOTION ...

Page 32: ...rs from the screen or stays onscreen without movement A detection FIXED MOVED error may occur if multiple motions occur continuously in random directions a fixed object moves in one position continuously a second object screens the first moving object DETECT BOX Outlines an object on the screen in a box when its ALARM OUT Releases a signal from the MD Output Terminal of the Motion Type DETECT AREA...

Page 33: ...en When adjusting the detection size note that the higher the level means the bigger detection size RETURN Select this to save the INTELLIGENCE menu settings and return to the SPECIAL menu pRIVACy Mask an area you want to hide on the screen 1 When the SPECIAL menu screen is displayed press the Function Setup switch so that the arrow indicates PRIVACY 2 Set up the mode using the Function Setup swit...

Page 34: ...ol device When the SPECIAL menu screen is displayed press the Function Setup switch so that the arrow indicates COMM ADJ Set up the mode using the Function Setup witch CAM ID Determines the camera s identification number between 0 and 255 BAUD RATE You can select 2400 48 00 9600 19200 38400 57600 bps UART MODE You can select NONE EVEN or ODD for the parity bits RET PKT Determines whether to send a...

Page 35: ...camera settings to the factory defaults Language and Monitor settings are not initialized COAX Specify the use of coaxial communications If you encounter an error due to noise from the DVR you can set the sensitivity level of the sub menu item to Low in an attempt to prevent the error Then you must press the MENU ENTER OSD KEY button twice in a row to access the OSD menu RETURN Select this to save...

Page 36: ...e 75Ω Hi z properly The camera is not working properly and the surface of the camera is hot Check that you have properly connected the camera to an appropriate power source The SENS UP function does not work Check that AGC of EXPOSURE SETUP menu is OFF Check that SHUTTER of EXPOSURE SETUP menu is A FLK or MANUAL Color is not correct Check the setting of WHITE BAL SETUP menu The screen flickers con...

Page 37: ...Ratio 1 1 2 Wide 2 8 Tele Angular Field of View H 94 4 Wide 28 Tele V 69 2 Wide 21 Tele Min Object Distance 0 2m Focus Control Manual Lens Type DC Auto Iris Operational On Screen Display English Japanese Spanish French Portuguese Korean Taiwanese English French German Spanish Italian Chinese Russian Polish Czech Romanian Serbian Swedish Danish Turkish Portuguese Camera Title Off On Displayed 15 ch...

Page 38: ... Coaxitron RS 485 Samsung T Samsung E Pelco D Pelco P Panasonic Bosch Honeywell Vicon AD GE Environmental Operating Temperature Humidity Ingress Protection IP66 Electrical Input Voltage Current Dual 24VAC 10 12VDC 10 Power Consumption Max 9 5W 8 2W IR LED ON Mechanical Color Material Dark Gray ALDC Dimension W 86 0 x H 86 8 x D 304 6 Weight 1Kg This specification can be changed without notice for ...

Page 39: ...Unit mm Inches English_39 SPECIFICATIONS SPECIFICATIONS DImeNsION 304 6 11 99 158 6 22 128 6 5 06 286 6 11 28 187 ...

Page 40: ... FAX 82 31 8018 3745 SAMSUNG TECHWIN EUROPE LTD Samsung House 1000 Hillswood Drive Hillswood Business Park Chertsey Surrey UNITED KINGDOM KT16 OPS TEL 44 1932 45 5300 FAX 44 1932 45 5325 SAMSUNG TECHWIN AMERICA Inc 100 Challenger Rd Suite 700 Ridgefield Park NJ 07660 Toll Free 1 877 213 1222 Direct 1 201 325 6920 Fax 1 201 373 0124 www samsungcctvusa com SALES NETWORK PT01 001040A P NO ...

Reviews: