background image

Making Your First Recording

Before you begin!

-

Insert the Lithium Ion Battery (refer to page 28)

-

Charge your battery (refer to page 28)

-

Set the Clock (refer to page 38)

-

Insert a cassette tape (refer to page 47)

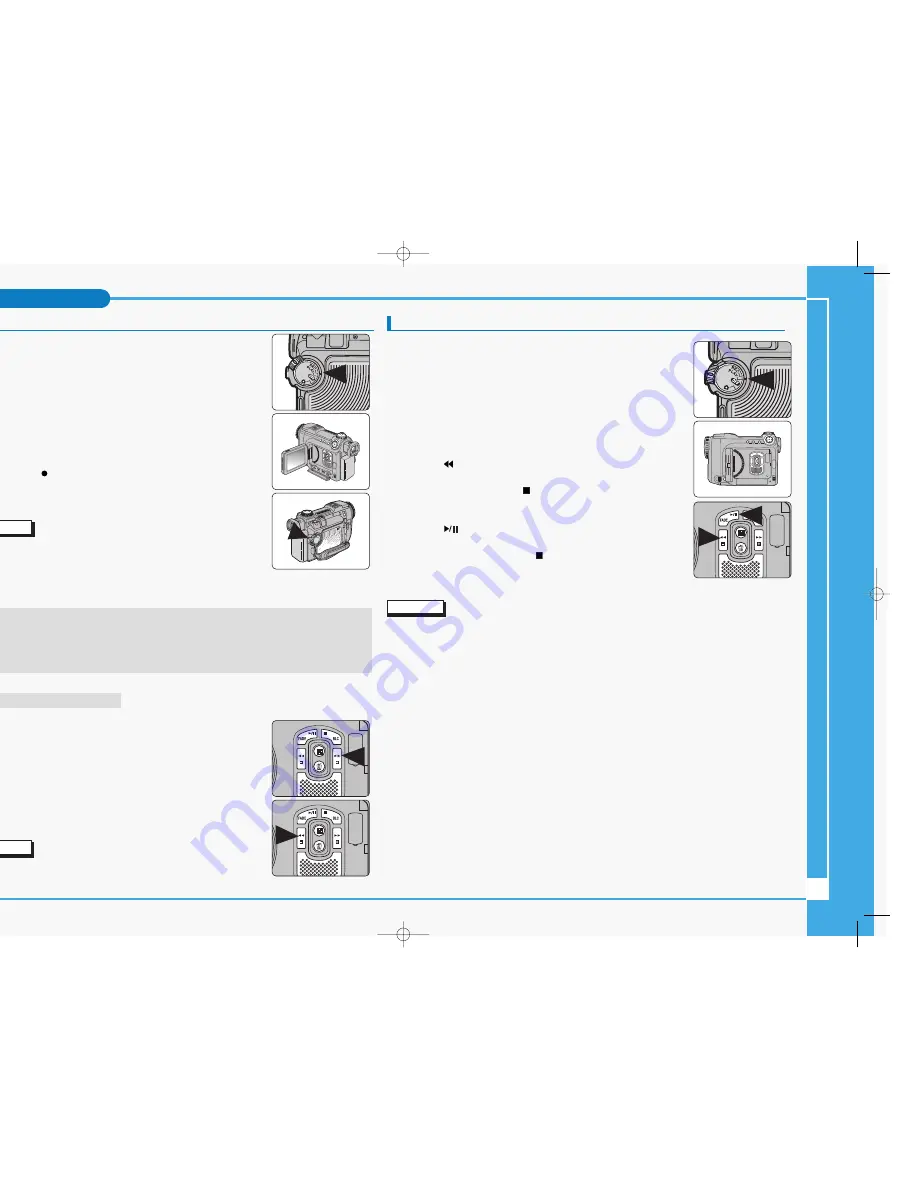
1. Turn on your camcorder and set the Power Switch to REC mode.

2. Open the LCD or viewfinder and frame your subject on the

screen.

3. To Start recording, press the START/STOP button.

The REC    indicator is displayed on LCD.

4. To Stop recording, press the START/STOP button again.

The STBY indicator is displayed on LCD.

Note

If the Write Protection Tab on the cassette tape is set to protect,
the “PROTECTION!” message appears on the screen. Release
the Write Protection Tab to record.

Detach the Battery Pack when you are finished recording to prevent unnecessary battery
power consumption.

When a cassette is loaded and the camcorder is left in STBY under REC mode for more than
5 minutes without being used, it will switch off automatically.
To resume the camcorder, press the START/STOP button or set the Power Switch to off
shortly and then set it back to REC mode.
This Auto Power Cut feature is designed to save the battery power.

Record Search (REC SEARCH)

You can view a recording using the REC , – function
while in STBY mode.

REC SEARCH – enables you to play the recording backwards
and

REC enables you to play it forwards, for as long as
you keep either button pressed down.

If you press the REC SEARCH – button just once while in STBY
mode, your camcorder will play in reverse for 3 seconds and then
automatically return to the original position.

Note

Mosaic shaped distortion may appear on the screen while in
Record Search mode.

Playing Back a Tape You Have Recorded Using the LCD Monitor

You can monitor the recorded image on the LCD monitor.

1. Turn on your camcorder and set the Power Switch to PLAY mode.

2. Insert the tape you want to playback (refer to page 47).

3. Open the LCD monitor and adjust the angle of the screen. 

Adjust the LCD Brightness or Color if necessary (refer to page 33).

4. Press the 

(REW) button to rewind the tape to the desired viewing

point.
To stop rewinding, press the  (STOP) button. The camcorder will
automatically stop rewinding when the tape is fully rewound.

5. Press the 

(PLAY/STILL) button to start the playback.

You can view the recording on the LCD.
To stop the playback, press the  (STOP) button.

Note

You can also view the recording on a TV screen, by connecting the camcorder to a TV or
VCR (refer to page 145).

For searching and viewing still images recorded onto tape, refer to page 76.

Various functions are available in PLAY mode (refer to page 74).

8

Basic Recording

1

2

3

£¥‹º

≥∏

̺

 (SCD6050)  11/19/04 8:45 AM  Page 8

Summary of Contents for SC-D6050

Page 1: ...to Know Your Camcorder 4 Miscellaneous Information 7 Basic Recording 8 Maintenance 9 Digital Video Camcorder SCD6050 D6040 Troubleshooting 10 ung Electronics Internet Home Page Kingdom http www samsungelectronics co uk º SCD6050 11 19 04 8 45 AM Page 1 ...

Page 2: ...tes for any natural shaking movements reducing unstable ages particularly at high magnification MULTI OSD LANGUAGE You can select the desired OSD Language among English Spanish French German and Italian Various Scene Modes The SCENE modes enable you to easily alternate the shutter speed and aperture settings to suit the type of scene action being filmed NITE PIX The NITE PIX function enables you t...

Page 3: ...tery power ully discharging a Lithium Ion battery damages the internal cells The battery pack may be prone to leakage when fully discharged o avoid damage to the battery pack make sure to remove the battery when no charge emains otices Regarding COPYRIGHT otes Regarding Moisture Condensation otes Regarding the CAMCORDER otes Regarding the Battery Pack When the battery reaches the end of its life p...

Page 4: ...emote Control 11 Memory Stick 12 Lens Cover ithium Ion Battery pack 4 Multi AV Cable 7 Shoulder Strap 10 Remote Control 3 AC Power Cord 6 Lithium battery for Remote Control and Clock CR2025 type 2EA nstruction Book oftware CD 2 AC Power Adapter AA E8 Type 8 USB Cable 11 Memory Stick ccessories Supplied with the Camcorder ke sure that the following basic accessories are supplied with your digital v...

Page 5: ...PIX 8 ZOOM LEVER 9 External MIC input jack 10 Memory Card Slot 11 Hand Strap Memory Card slot Memory Stick Memory Stick PRO SD MMC Usable MEMORY CARDs 11 DC Power in Jack 10 Multi AV Cable Jack 9 DV Cable Jack 8 USB Cable Jack 7 Built in Speaker 6 FF 5 Delete 4 Multiple Display 3 REW 2 STOP BLC 1 PLAY STILL FADE 12 Viewfinder 13 Battery Release 1 PHOTO 2 FOCUS ADJUST 3 Power Switch 4 START STOP 5 ...

Page 6: ...CH 6 A DUB 7 FF 8 REW 9 PLAY 10 DIRECTION 11 F ADV 12 STOP 13 STILL 14 SLOW 15 DATE TIME 16 X2 17 ZOOM 18 DISPLAY 1 Shoulder Strap Hook 2 Battery Release 3 Tripod Receptacle 4 Tape Eject Slide Button 5 Lithium Battery Holder 6 Hand Strap Ring 7 Hand Strap Hook 1 PHOTO 2 START STOP 3 SELF TIMER 4 ZERO MEMORY 5 PHOTO SEARCH 6 A DUB 7 FF 8 REW 9 PLAY 10 DIRECTION 11 F ADV 13 STILL 14 SLOW 15 DATE TIM...

Page 7: ... Connecting to a TV Set Through a VCR If there are no input terminals for external devices on your TV set and a VCR is connected to your TV set using a coaxial cable you can utilize the VCR to connect your camcorder to the TV set To Connect to a VCR that is Connected to Your TV Set 1 Connect the Multi AV cable to your camcorder s multi AV jack 2 Connect the Multi AV cable to the External Inputs LI...

Page 8: ...nables you to play the recording backwards d EC SEARCH enables you to play it forwards for as long as u keep either button pressed down you press the REC SEARCH button just once while in STBY ode your camcorder will play in reverse for 3 seconds and then tomatically return to the original position ote osaic shaped distortion may appear on the screen while in ecord Search mode Playing Back a Tape Y...

Page 9: ...memory card periodically Cleaning the Camera Body and Video Heads To Clean the Exterior of Your Device To clean the exterior use a soft dry cloth Wipe the body gently Do not apply excessive force when cleaning gently rub the surface The LCD monitor surface should not be pressed Use a soft dry cloth to clean the surface To clean the lens use an optional air blower to blow out dirt and other small o...

Page 10: ...es Measure Cancel the protection page 48 Set the Power Switch to REC Set the Mode Dial to MOVIE mode Set focus to AUTO Use strobe or lit the place Clear the lens and check the focus Insert the cassette tape properly page 47 Charge the battery or use AC adapter Insert the memory card properly page 83 Clear the memory card slot Set proper white balance page 120 Turn off the digital special effects p...

Reviews: