background image

English - 18

3D Basics

3D Active Glasses

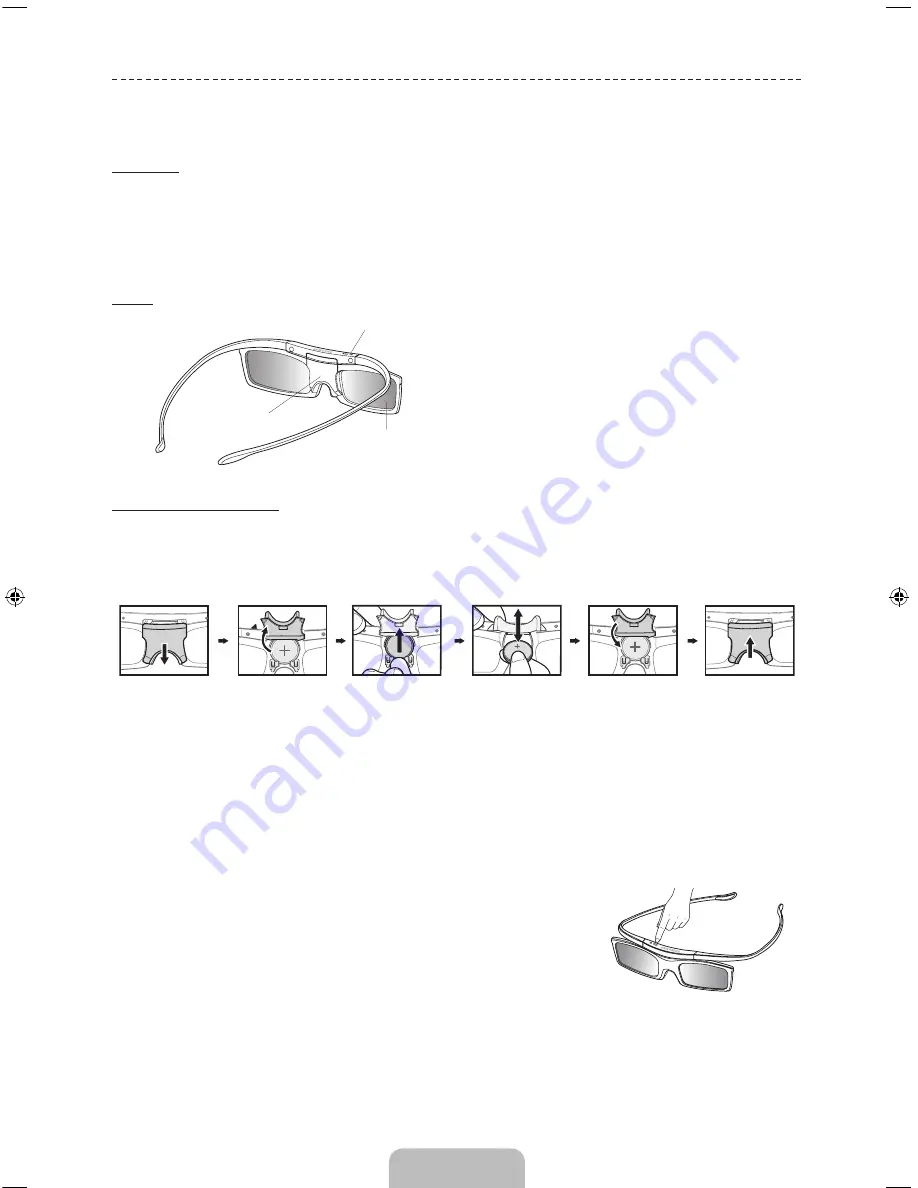
Features

Samsung's SSG-5100GB 3D glasses enable you to view 3D images on your 3D TV. The Samsung 3D 
glasses communicate with Samsung 3D TVs via the 2.4GHz RF band.


The Samsung 3D glasses are only compatible with Samsung D, E, and F series 3D TV's that are 
released 2011, 2012 and 2013. These 3D glasses cannot be connected to other Bluetooth devices.

Parts

LED Indicator & Power Button

Liquid crystal shutter

Battery Cover


For details on how to attach the glasses' 
temples and how to pair the glasses with the 
TV, refer to the separate 3D glasses manual.

Replacing the Battery

If the red LED blinks every two seconds continually, replace the battery with a new one.


Insert the "+" side of the battery into the side marked with "+" in the battery compartment.


To check the remaining battery capacity, refer to the pairing section in this manual.

Pull the battery cover 

downward

Open the battery cover

Remove the battery

Replace the battery

Push the battery cover 

downward

Close the battery cover

Pairing 3D Active Glasses


What is Pairing? Pairing is the process of connecting 3D glasses and a 3D TV so that the two devices 
can exchange data.


Ensure your Samsung TV and 3D glasses are no farther than 19.5 in (50 cm) apart from each other 
while pairing is in progress.


Turning the glasses on

Press the power button briefly. The green LED is turned on for 3 seconds. 
(Make sure that 3D is activated on the TV before using the 3D glasses.)


Turning the glasses off

Press the power button briefly. The red LED is turned on for 3 seconds.


Performing the pairing process

Turn the TV on and let it power up completely. Press and hold the Power 
button on the glasses. The green and the red LEDs blink alternately for 2 
seconds. 

[PF8500-AR]BN68-04813A-03ENG.indb   18

2013-04-03   �� 3:07:14

Summary of Contents for PS51F8500

Page 1: ...com in INDONESIA 0800 112 8888 021 5699 7777 www samsung com id JAPAN 0120 327 527 www samsung com MALAYSIA 1800 88 9999 www samsung com my PHILIPPINES 1 800 10 SAMSUNG 726 7864 for PLDT 1 800 3 SAMSUNG 726 7864 for Digitel 1 800 8 SAMSUNG 726 7864 for Globe 02 5805777 www samsung com ph SINGAPORE 1800 SAMSUNG 726 7864 www samsung com THAILAND 1800 29 3232 02 689 3232 www samsung com th TAIWAN 080...

Page 2: ...tor outlet make sure the voltage designation of the DC adaptor corresponds to the local electrical supply Never insert anything metallic into the open parts of this apparatus Doing so many create a danger of electric shock To avoid electric shock never touch the inside of this apparatus Only a qualified technician should open this apparatus Make sure to plug the power cord in until it is firmly in...

Page 3: ...s 15 Returning to the Home Page 15 Searching the Index 15 Searching Pages 15 Closing the e Manual 15 Jumping to a Menu Item 15 Updating the e Manual Network Configuration 16 Connecting to a Network 16 Network Connection Wireless 16 Wireless Network Precautions 16 Network Security Protocols 17 Network Connection Wired 3D Basics 18 3D Active Glasses 18 Pairing 3D Active Glasses 20 Watching 3D Video ...

Page 4: ...to and enjoy on your TV Photos Videos Music Play back photo video and music files from an external storage device Anynet HDMI CEC This allows you to control all connected Samsung devices that support Anynet with your Samsung TV s remote e Manual Provides a detailed on screen user s manual built into your TV SMART Interaction Using this function you can access and control menu options and functions...

Page 5: ...ind packing materials when you open the box Smart Touch Control Batteries AAA x 2 Power Cord User Manual Regulatory Guide Samsung 3D Active Glasses Warranty Card Not available in some locations Cleaning Cloth Component adapter AV Adapter Holder Wire stand IR Extender Cable Blanking Bracket Wireless Keyboard Sold Separately Assembling the Holder Wire stand Warning Screens can be damaged from direct...

Page 6: ...emote Control Press the touchpad to select a desired function e g MENU m TOOLS T INFO etc easily Changes channels Turn on and off the cable set top box connected to the TV For this the Smart Touch Control must be configured as a universal remote control Turns the TV on and off Displays and selects the available video sources Adjusts the volume Returns to the previous menu Press and hold this butto...

Page 7: ...d the Smart Touch Control press the pairing button at the back of the Smart Touch Control The pairing button can be accessed by removing the Smart Touch Control s battery cover Pressing the pairing button automatically reestablishes the connection between the control and the TV Low Battery Power Warning If the battery becomes and blanks low while using the Smart Touch Control the following alarm w...

Page 8: ...de is designed for left handed users Move your finger horizontally on the projected line at the top of the touchpad You can horizontally scroll a horizontal list or the Smart Hub panel Show Status and Notification Banner Press the MORE button on the Smart Touch Control and then select STATUS on the virtual control panel to display the status and notification banner at the top of the screen History...

Page 9: ...oved beyond the leftmost or rightmost edge Use left right scroll function on the touchpad to change the panel easily Change a position of the Virtual Remote Panel Press the MORE button on the Smart Touch Control The virtual remote panel appears on the screen Press and hold the touchpad for one second Users can change a position of the virtual remote panel of the screen Using the Number Panel Use t...

Page 10: ...u TV Controller The image is drawn as if you are facing the front side of the TV Camera Remote control sensor When you use the Smart Touch Control the standby LED does not respond except when you press the P button Built in TV Camera This TV features a built in TV camera that can be used for the Motion Control Voice Recognition built in microphone and Face Recognition features You can also use the...

Page 11: ...se a soft cloth to wipe the microphone Extending the TV Camera In order to use the TV camera you must first extend it Gently push the camera in without touching the lens until you hear a click Retracting the Camera If you are not using the TV camera keep it retracted inside the TV The Motion Control and Face Recognition features cannot be used while the TV camera is in the retracted state but Voic...

Page 12: ...control signal receiver Note that it should be no obstacle between IR Extender and external device The presence of an obstacle will interfere with the transmission of the remote control signal Add the External Device 1 Turn on the external device you wish to set up universal remote function for and then press SOURCE to bring up the Source screen 2 Select Universal remote setup from the top of the ...

Page 13: ...atus of the TV to device connection This function is only available if Anynet HDMI CEC function is set to On Edit Name You can rename devices connected to the TV to more easily identify external sources With a computer connected to the TV s HDMI DVI port via an HDMI cable for example you can change Edit Name to PC With a computer connected to the TV s HDMI DVI port via an HDMI to DVI cable for exa...

Page 14: ...s information about your TV s key features This TV has a built in user guide To read it use one of the following methods Open the Support menu and choose e Manual Press the MORE button on the Smart Touch Control to display control buttons on the screen Flick the Touch Pad until e Manual appears and select it Words in blue refer to screen menu options and words in light blue refer to remote control...

Page 15: ...e Manual press hold the RETURN button or select at the upper right corner of the screen Jumping to a Menu Item To directly jump to the menu item that is described in the current section select Try Now It is possible to jump from a menu item directly to the related section in the e Manual If you want to read an e manual entry on a specific screen menu feature press the Virtual Remote panel s or the...

Page 16: ...or the wireless router is currently being used by another device the result is usually interference and or a communications failure Most wireless networks have an optional security system To enable a wireless network s security system you need to create a security key using characters and numbers This security key is then needed to connect to the wireless network Network Security Protocols The TV ...

Page 17: ...upplied LAN Cable Not Supplied TV Rear Panel External Modem ADSL VDSL Cable TV The Modem Port on the Wall Modem Cable Not Supplied LAN Cable Not Supplied LAN Cable Not Supplied TV Rear Panel External Modem ADSL VDSL Cable TV IP Router that has a DHCP Server The LAN Port on the Wall LAN Cable Not Supplied TV Rear Panel The TV does not support network speeds less than or equal to 10Mbps Use Cat 7 ca...

Page 18: ... compartment To check the remaining battery capacity refer to the pairing section in this manual Pull the battery cover downward Open the battery cover Remove the battery Replace the battery Push the battery cover downward Close the battery cover Pairing 3D Active Glasses What is Pairing Pairing is the process of connecting 3D glasses and a 3D TV so that the two devices can exchange data Ensure yo...

Page 19: ...hile they are not in use If you leave the 3D glasses on the battery lifespan decreases Pairing steps 1 Turn on the TV and then move the glasses within 19 5 inches of the TV 2 Press the power button on the 3D glasses briefly The 3D glasses will power on and pairing will start 3 The message 3D glasses are connected to TV will be displayed on the TV screen when the pairing is successfully completed I...

Page 20: ...n settings of your TV The LED keeps blinking The battery is dead Replace the battery Specifications Model Number SSG 5100GB Optics Shutters Liquid crystal Transmittance 36 2 Recommended operating distance 2 6m 6 5 to 19 5 ft Field Rate 120 fields second Weight Glasses 21 5g 76 oz including the battery 24 0 0 5g 85 018oz Power Glasses One 3V lithium manganese dioxide battery 3V CR2025 Power consump...

Page 21: ... you Perform a factory reset your TV Install recommended firmware updates How Does it Work Having a Samsung Tech remotely service your TV is really pretty simple 1 Call Samsung Contact Centre and ask for remote support 2 Open the menu on your TV and go to the Support section 3 Select Remote Management and Provide the Pin to the agent 4 The agent will then access your TV That s it ...

Page 22: ...nstalled with their poles in the correct direction Clean the sensor s transmission window on the remote Try pointing the remote directly at the TV from 5 6 feet away The cable set top box remote control doesn t turn the TV on or off or adjust the volume Programme the Cable Set remote control to operate the TV Refer to the Cable Set Top Box user manual for the SAMSUNG TV code To keep your TV in opt...

Page 23: ... screws that are longer than the standard dimension or do not comply with the VESA standard screw specifications Screws that are too long may cause damage to the inside of the TV set For wall mounts that do not comply with the VESA standard screw specifications the length of the screws may differ depending on the wall mount specifications Do not fasten the screws that are too strongly this may dam...

Page 24: ...lation for Your TV When you install your TV maintain a distance of at least 10 cm between the TV and other objects walls cabinet sides etc to ensure proper ventilation Failing to maintain proper ventilation may result in a fire or a problem with the product caused by an increase in its internal temperature Whether you install your TV using a stand or a wall mount we strongly recommend you use part...

Page 25: ...m Eco Solution Eco Sensor Do not block the sensor with any material It can decrease picture brightness 1 Eco Sensor This power saving feature automatically adjusts the screen brightness of the TV according to the ambient light intensity detected by the Light Sensor 2 To enable or disable Eco Sensor go to System Eco Solution Eco Sensor and select On or Off 3 Precaution If you find the screen too da...

Page 26: ...ing are not supplied please purchase these additionally 2 Remove the screws from the back centre of the TV put the screws into the clamps and then fasten the screws onto the TV again Screws may not be supplied with the product In this case please purchase the screws of the following specifications Screw Specifications For PS51F8500AR PS60F8500AR PS64F8500AR M8 3 Connect the clamps fixed onto the T...

Page 27: ... 6 x 27 0 cm 139 2 x 83 1 x 5 5 cm 139 2 x 87 2 x 30 0 cm 148 2 x 88 0 x 5 5 cm 148 2 x 92 2 x 32 0 cm Weight Without Stand With Stand 20 9 Kg 23 4 Kg 29 2 Kg 32 4 Kg 32 8 Kg 36 2 Kg Display Resolution 1920 x 1080 1920 x 1080 Black White 1920 x 1080 Design and specifications are subject to change without prior notice For information about the power supply and more about power consumption refer to ...

Page 28: ...d agrément 02 12 2012 TRA REGISTERED No ER0101541 13 DEALER No 0016333 08 N A T I O N A L TELECOMMUNI C A T I O N S C O M M I S S I O N NTC TAC No ESD XXXXXXXX Approval No 18ETA12 Model SSG 5100GB TA 2012 1903 APPROVED Approved by PTA 2013 Model SSG 5100GB AGREE PAR L ANRT Mauritanie Numéro d agrément 0109 ARE 2013 Date d agrément 28 01 2013 Approved by PTA 2013 Model RMCTPF TA 2012 1902 APPROVED ...

Page 29: ...may cause permanent damage to the PDP Panel Watching the Plasma TV in 4 3 format for a long period of time may leave traces of borders displayed on the left right and centre of the screen caused by the difference of light emission on the screen Playing a DVD or a game console may cause similar effects to the screen Damages caused by the above effect are not covered by the Warranty After images on ...

Reviews: