


19
English
03
Basic
Featur
es
■
SPDIF Output
: SPDIF (Sony Philips Digital InterFace)
is used to provide digital sound, reducing interference
going to speakers and various digital devices such as a
DVD player.
Audio Format
: During the reception of a digital TV
broadcast, you can select the Digital Audio output
(SPDIF) format from the options
PCM
or
Dolby Digital
.
Audio Delay
: Correct audio-video sync problems, when
watching TV or video, and when listening to digital audio
output using an external device such as an AV receiver
(0ms ~ 250ms).
■
Dolby Digital Comp (Line / RF)
: This function minimizes
signal disparity between a dolby digital signal and a
voice signal (i.e. MPEG Audio, HE-AAC, ATV Sound).
✎
Select
Line
to obtain dynamic sound, and
RF
to reduce the difference between loud and soft
sounds at night time.
Line
: Set the output level for signals greater or less than
-31dB (reference) to either -20dB or -31dB.
RF
: Set the output level for signals greater or less than
-20dB (reference) to either -10dB or -20dB.
Sound Reset (OK / Cancel)
Reset all sound settings to the factory defaults.
¦
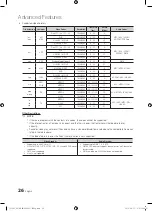
Selecting the Sound Mode
When you set to
Dual
f
-
g
, the current
sound mode is displayed on the screen.
Audio
Type
Dual
f
-
g
Default
A2
Stereo
Mono
Mono
Automatic
change
Stereo
Stereo
↔
Mono
Dual
Dual
f
↔
Dual
g
Dual
f
NICAM
Stereo
Mono
Mono
Automatic
change
Stereo
Mono
↔
Stereo
Dual
Mono
↔
Dual
f
Dual
g
Dual
f
✎
If the stereo signal is weak and an automatic switching,
occurs, then switch to the mono.
✎
Only activated in stereo sound signal.
✎
Only available when the
Input
source is set to
TV
.
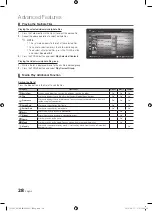
Setup Menu
¦
Setting the Time
Time
■
Clock
: Setting the clock is for using various timer
features of the TV.
O
The current time will appear every time you press
the
INFO
button.
✎
If you disconnect the power cord, you have to set
the clock again.
Clock Mode (Auto / Manual)
✎
Depending on the broadcast station and signal,
the auto time set up may not be correct. In this
case, set the time manually.
✎
The antenna must be connected in order to set
the time automatically.
Clock Set
: Set the
Day, Month, Year, Hour
and
Minute
manually.
✎
Available only when
Clock Mode
is set to
Manual
.
Time Zone
(depending on the country): Select your time
zone.
✎
When
Country
is set to
Others
, you can use this
function.
✎
This function is only available when the
Clock
Mode
is set to
Auto.
.
¦
Using the Sleep Timer
■
Sleep Timer
t
: Automatically shuts off the TV
after a preset period of time. (30, 60, 90, 120, 150 and
180 minutes).
✎
To cancel
Sleep Timer
, select
Off
.
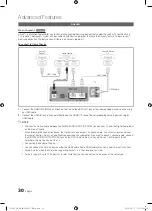
¦
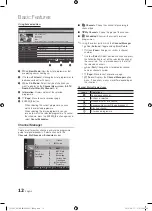
Setting the On / Off Timer
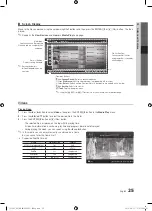
■
Timer 1 / Timer 2 / Timer 3
: Three different on / off
timer settings can be made. You must set the clock first.
DUAL
I-II
10
TV
ATV
1
00
00
▲
▼
00
00
Timer 1
On Time
Off Time
Volume
Inactivate
Inactivate
Sun
Mon
Tue
Wed
Thu
Fri
Sat
Once
Source
Antenna
Channel
Repeat
L
Move
U
Adjust
E
Enter
R
Return
[PC530_XU]BN68-02693C-02Eng.indb 19
2010-09-17 오후 12:56:44


