Samsung PS-42P4H Connection Manual Download Page 6

6

ENG

In order to watch television programmes broadcast via a satellite
network, you must connect a satellite receiver to the rear of the
PDP. Also, in order to descramble a coded transmission signal, you
must connect a decoder to the rear of the PDP.

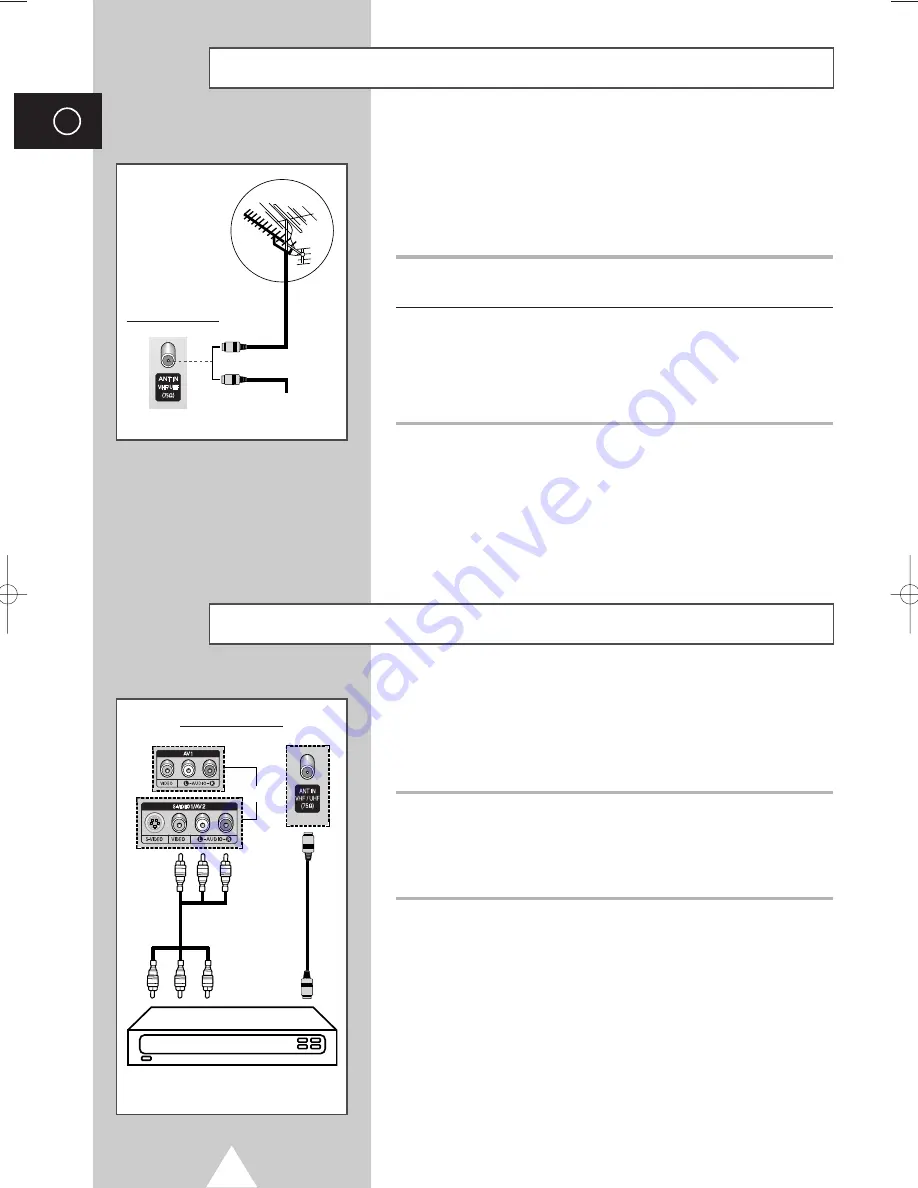
Using a Coaxial cable

Connect a coaxial cable to the:

Receiver (or Decoder) output socket.

Television aerial input socket.

If you wish to connect both a satellite receiver (or decoder)
and a VCR, you should connect the:

Receiver (or Decoder) to the VCR

VCR to the PDP

Otherwise, connect the receiver (or decoder) directly to the
PDP.

Connecting a Satellite Receiver or Decoder

Rear of the PDP

Satellite receiver/

Decoder

To view television channels correctly, a signal must be received by
the set from one of the following sources:

An outdoor aerial

A cable television network

A satellite network

1

In the first three cases, connect the aerial or network input cable to
the 75

coaxial socket on the rear of the PDP.

2

If you are using an indoor aerial, you may need to turn it when
tuning your PDP until you obtain a picture that is both sharp and
clear.
For further details, refer to

 the user manual

:

“Storing Channels Automatically” on page 18

“Storing Channels Manually” on page 19

When installing or re-installing your PDP, be sure to use the
supplied coaxial antenna cable. If you connect using a different
coaxial cable, there is risk of noise or interference to the screen
image. (You must not use another general purpose cable. 
Use the 3M/5M/7M cable supplied by Samsung.)

Connecting to an Aerial or Cable Television Network

Rear of the PDP

Cable Television

Network

or

or

BN68-00624A-02Eng_0422  5/11/04  3:43 PM  Page 12

Summary of Contents for PS-42P4H

Page 1: ...NT IN VHF UHF 75 75 Coaxial connector for Aerial Cable Network d PC INPUT RGB IN AUDIO Connect to the video and audio output jack on your PC e ONLY FOR SERVICE Connector for service only f S VIDEO1 S...

Page 2: ...E OUT THE BATTERIES AND PRESS THE RESET BUTTON FOR ABOUT 2 3 SECONDS RE INSERT THE BATTERIES AND TRY USING THE REMOTE CONTROL AGAIN TruSurround XT MODE SELECTION PREVIOUS CHANNEL TELETEXT PREVIOUS PAG...

Page 3: ...against on the remote control 3 Replace the cover by aligning it with the base of the remote control and pressing it back into place Inserting the Batteries in the Remote Control Assembling the Stand...

Page 4: ...adjusted from 0 to 15 by 2 The wall mount bracket is delivered separately Please tighten the captive screw in the direction of the arrow after assembling the bracket Installation Notes Do not install...

Page 5: ...to the wall to avoid injury from a falling PDP Connecting External Devices to the PDP 1 Be sure to remove the safety pins underneath the PDP If the safety pins are not removed the angle cannot be adj...

Page 6: ...nal must be received by the set from one of the following sources An outdoor aerial A cable television network A satellite network 1 In the first three cases connect the aerial or network input cable...

Page 7: ...y cassettes tape connect the source VCR to AV 1 AV 2 AV 3 and the target VCR to MONITOR OUT so that you can redirect the signal from AV 1 AV 2 AV 3 to MONITOR OUT When you wish to record a programme c...

Page 8: ...of the TV Camcorder VCR To play picture and sound both the S VIDEO and RCA connectors must be used and and Side of the TV Whenever you connect an audio or video system to your television ensure that...

Page 9: ...to the PC Input The RGB video and AUDIO connectors are used for interfacing with your PC Personal Computer and Rear of the TV The DVI video and L AUDIO R connectors are used for equipment with a DVI...

Page 10: ...ponent Input The COMPONENT 1 connectors are used for equipment with a DVD output 480i 480P 576i 576P 720P 1080i The COMPONENT 2 connectors are used for DTV receiver 480i 480P 576i 576P 720P 1080i DVD...

Page 11: ...sure to connect the video cable properly if desired external input AV1 AV2 AV3 Component1 or Component2 cannot be selected Play the DVD after activating the DVD Home Theater System Use the volume con...

Page 12: ...and cables Attach the Bracket Pads to the Speaker s Guide Bracket Set the Speaker Guide Bracket into the square grooves located on either side of the PDP s bottom rear and secure it with the provided...

Page 13: ...d terminals and cables Bracket Pads Attach the Bracket Pads to the Speaker s Guide Bracket Set the Speaker Guide Bracket into the square grooves located on either side of the PDP s bottom rear and sec...

Reviews: