Samsung PS-42P4H Connection Manual Download Page 5

5

ENG

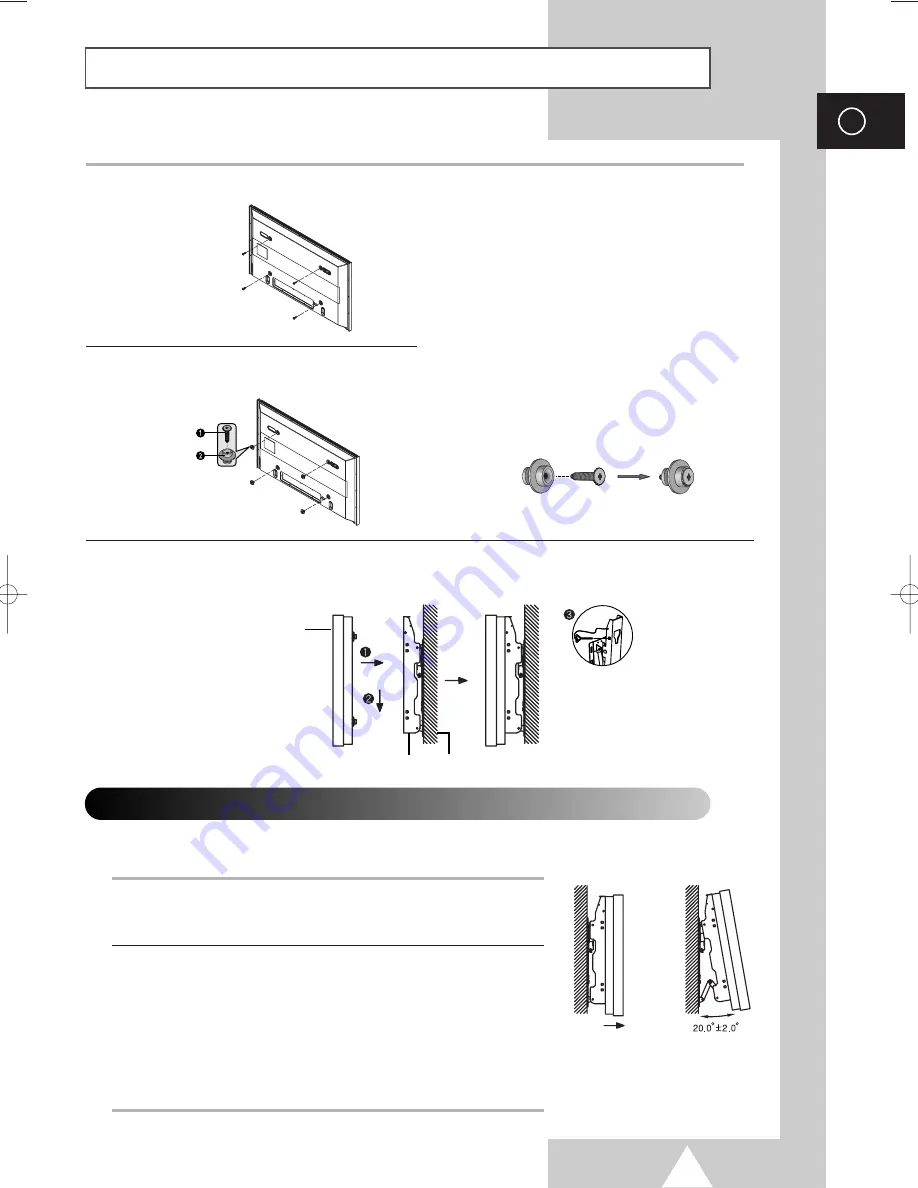
Installing the Display on the Wall Attachment Panel 

(continued)

1

Remove the screws from the back of the PDP.

3

Tighten the screws of the plastic hanger to the
back side of the PDP.

4

Put the 4 pegs on the PDP in the grooves of the wall mount bracket and pull down on the PDP (

!

) to

secure it to the wall mount bracket (

@

). Tighten the screws as shown (

#

) so that the PDP cannot be

separated from wall mount bracket.

2

Use the screws and assemble the plastic
hanger.

Please ask the installers to install the
wall mount bracket.

Please be sure to check if the plastic
hanger is completely secured on both
the left and right side after hanging
the PDP on the wall mount bracket.

Please avoid catching your fingers
while installing and adjusting the
angle.

Please tightly secure the wall mount
bracket to the wall to avoid injury
from a falling PDP.

Connecting External Devices to the PDP

1

Be sure to remove the safety pins underneath the PDP.

If the safety pins are not removed, the angle cannot be adjusted.
Any attempt to do so may cause damage to the PDP.

2

Pull out the bottom of the PDP (which has been attached to the Wall
Mount Bracket) in the direction indicated by the arrows (refer to 
the illustration) until it clicks.

Using the PDP After Connecting External Devices.
Be sure to secure the PDP by inserting the 2 safety pins after
readjusting the angle of the PDP to 0

o

.

For safety, be sure to secure the PDP using the safety pins.  
If the safety pins are not used, the PDP may fall, causing serious
injury.

The exterior of the PDP may be different than the picture.
(Assembly and installation of the plastic hanger is the same.)

To connect external devices such as a DVD or a Home Theater System to the PDP, please refer
to following instructions:

PDP panel

Wall attachment panel bracket

Wall

BN68-00624A-02Eng_0422  5/11/04  3:43 PM  Page 11

Summary of Contents for PS-42P4H

Page 1: ...NT IN VHF UHF 75 75 Coaxial connector for Aerial Cable Network d PC INPUT RGB IN AUDIO Connect to the video and audio output jack on your PC e ONLY FOR SERVICE Connector for service only f S VIDEO1 S...

Page 2: ...E OUT THE BATTERIES AND PRESS THE RESET BUTTON FOR ABOUT 2 3 SECONDS RE INSERT THE BATTERIES AND TRY USING THE REMOTE CONTROL AGAIN TruSurround XT MODE SELECTION PREVIOUS CHANNEL TELETEXT PREVIOUS PAG...

Page 3: ...against on the remote control 3 Replace the cover by aligning it with the base of the remote control and pressing it back into place Inserting the Batteries in the Remote Control Assembling the Stand...

Page 4: ...adjusted from 0 to 15 by 2 The wall mount bracket is delivered separately Please tighten the captive screw in the direction of the arrow after assembling the bracket Installation Notes Do not install...

Page 5: ...to the wall to avoid injury from a falling PDP Connecting External Devices to the PDP 1 Be sure to remove the safety pins underneath the PDP If the safety pins are not removed the angle cannot be adj...

Page 6: ...nal must be received by the set from one of the following sources An outdoor aerial A cable television network A satellite network 1 In the first three cases connect the aerial or network input cable...

Page 7: ...y cassettes tape connect the source VCR to AV 1 AV 2 AV 3 and the target VCR to MONITOR OUT so that you can redirect the signal from AV 1 AV 2 AV 3 to MONITOR OUT When you wish to record a programme c...

Page 8: ...of the TV Camcorder VCR To play picture and sound both the S VIDEO and RCA connectors must be used and and Side of the TV Whenever you connect an audio or video system to your television ensure that...

Page 9: ...to the PC Input The RGB video and AUDIO connectors are used for interfacing with your PC Personal Computer and Rear of the TV The DVI video and L AUDIO R connectors are used for equipment with a DVI...

Page 10: ...ponent Input The COMPONENT 1 connectors are used for equipment with a DVD output 480i 480P 576i 576P 720P 1080i The COMPONENT 2 connectors are used for DTV receiver 480i 480P 576i 576P 720P 1080i DVD...

Page 11: ...sure to connect the video cable properly if desired external input AV1 AV2 AV3 Component1 or Component2 cannot be selected Play the DVD after activating the DVD Home Theater System Use the volume con...

Page 12: ...and cables Attach the Bracket Pads to the Speaker s Guide Bracket Set the Speaker Guide Bracket into the square grooves located on either side of the PDP s bottom rear and secure it with the provided...

Page 13: ...d terminals and cables Bracket Pads Attach the Bracket Pads to the Speaker s Guide Bracket Set the Speaker Guide Bracket into the square grooves located on either side of the PDP s bottom rear and sec...

Reviews: