background image

English - 26

Viewing the EPG (Electronic Programme Guide) Information

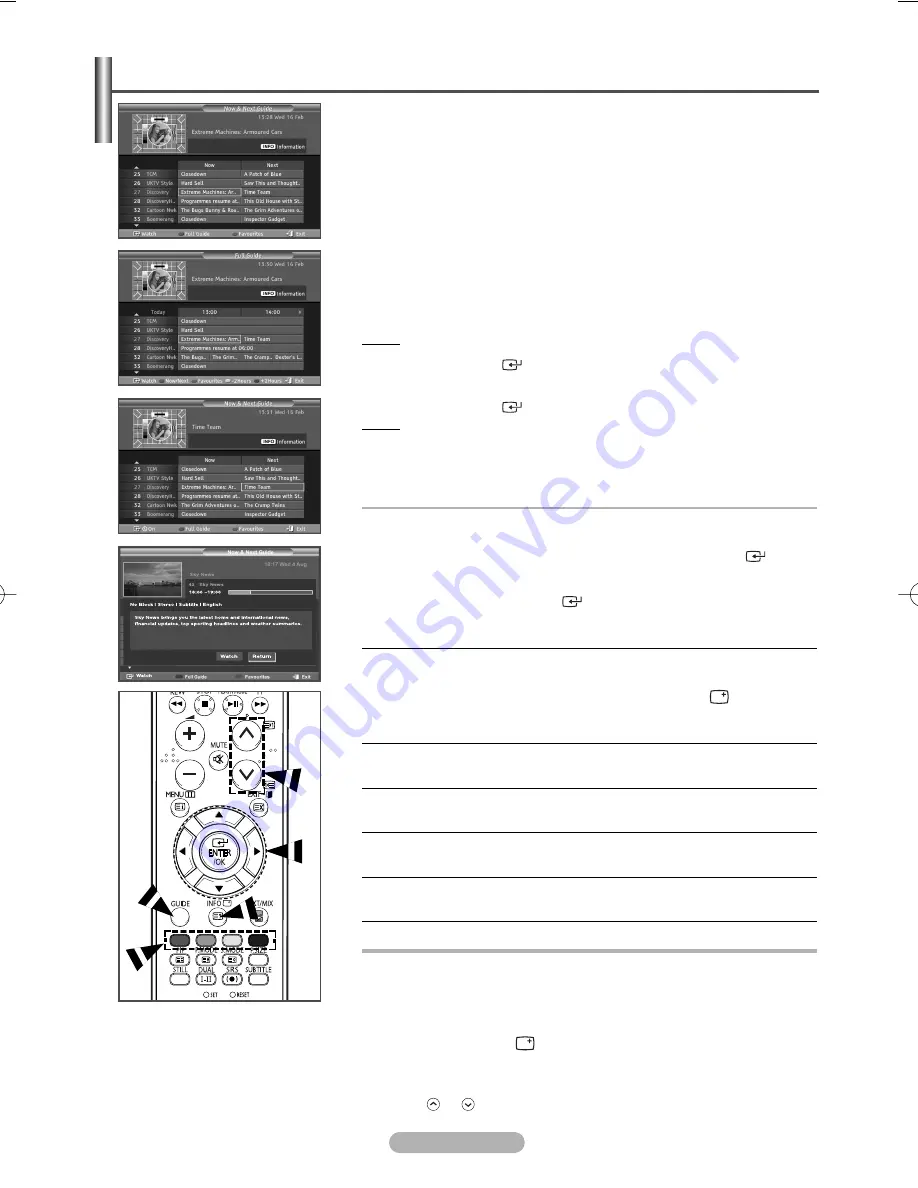
The EPG (Electronic Programme Guide) information is provided by the 
broadcasters. Programme entries may appear blank or out of date as a result 
of the information broadcast on a given channel. The display will dynamically
update as soon as new information becomes available.

Now & Next Guide

For the six channels indicated in the left-hand column, displays the Current
programme and the Next programme information.

Full Guide

Displays the programme information as time ordered One hour segments.
Two hours of programme information is displayed which may be scrolled
forwards or backwards in time.

1

Press the 

D.MENU

button.

Result: The DTV menu is displayed.

2

Press the 

ENTER/OK 

(

) button to select 

Guide

.

3

Press the 

or 

button to select 

Now & Next Guide

or 

Full Guide

.

Press the 

ENTER/OK 

(

) button. 

Result: The selected guide menu is displayed. 

You can also display the guide menu simply by pressing the 

GUIDE

button.

4

To

Then

Watch a programme

Select a programme by 

in the EPG list

pressing the 

/

/

œ

/

button.

Press the 

ENTER/OK 

(

) button.

If the next program is selected, it is scheduled with the clock icon 
displayed. If the 

ENTER/OK 

(

) button is pressed again, the scheduling 

is canceled with the clock icon gone. 
For details about scheduling programmes, refer to the next page.

View programme 

Select a programme of your choice

information

by pressing the 

/

/

œ

/

√ 

button.

Press the 

INFO 

(

) button when

the programme of your choice is
highlighted.

Toggle between the 

Now &

Press the red button repeatedly.

Next Guide

or 

Full Guide

Display the 

Favourites

Press the green button repeatedly.

and the 

All Channels

list

Scrolls backwards quickly 

Press the yellow button repeatedly.

(2 hours). 

Scrolls forward quickly 

Press the blue button repeatedly.

(2 hours). 

Exit the guide

Press the Exit button.

Information such as the channel number, programme title and 
running time, status bar, and brief summary of the highlighted 
programme will be displayed in the top right corner of the screen. 
If there is a lengthy summary, “…” will be displayed. 
Press the 

INFO 

(

) button for the full summary text. 

Six channels are displayed. To scroll between channels, move to a 
channel using the 

or 

button. To display page by page, use the 

P

or

button.

BN68-00889H-01Eng  3/23/06  10:23 AM  Page 26

Summary of Contents for PS-42E71HD

Page 1: ...s manual thoroughly and retain it for future reference Register your product at www samsung com global register This device is a Class B digital apparatus ON SCREEN MENUS Picture In Picture PIP Energy Saving TELETEXT Option SRS TruSurroundXT Digital Natural Image engine Digital Terrestrial Receiver ...

Page 2: ...els on the screen These pixels will have no impact on the performance of the product Avoid operating the TV at temperatures below 5 C 41 F A still image displayed too long may cause permanent damage to the PDP Panel Watching the PDP TV in 4 3 format for a long period of time may leave traces of borders displayed on the left right and centre of the screen caused by the difference of light emission ...

Page 3: ...NALOG TV Storing Channels Automatically 10 Storing Channels Manually 11 Adding Locking Channels 11 Sorting the Stored Channels 12 Assigning Names to Channels 12 Fine Tuning Channel Reception 13 LNA Low Noise Amplifier 13 PICTURE CONTROL Changing the Picture Standard 13 Customizing the Picture Settings 14 Selecting the Picture Size 14 Digital NR 15 DNIe Demo 15 Viewing the Picture in Picture PIP 15...

Page 4: ...heduled List 27 Setting the Default Guide 28 Viewing All Channels and Favourite Channels 28 Setting the Preferred Languages 29 Choosing Your Language 29 Adjusting the Translucency Level 30 Setting up the Parental Lock 30 Using the Preferred Features 31 Checking the Product Information 31 Checking the Signal Information 32 Upgrading the Software Option 32 Viewing Common Interface 33 Selecting the C...

Page 5: ...ct colour and shape may vary depending on the model Control Panel depending on the model Front or Side Panel Œ SOURCE Displays a menu of all of the available input sources TV Ext 1 Ext 2 AV S Video Component PC HDMI DTV MENU Press to see the on screen menu of your TV s features ˇ Press to decrease or increase the volume In the on screen menu use the buttons as you use the œ and buttons on the remo...

Page 6: ...inputs on your TV allow you to receive left and right audio from your DVI device Not compatible with PC When connecting this product via HDMI or DVI to a Set Top Box DVD Player or Games Console etc make sure that it has been set to a compatible video output mode as shown in the table below Failure to observe this may result in picture distortion image breakup or no picture Do not attempt to connec...

Page 7: ...cts a target device to be controlled by the Samsung remote control TV DVD STB CABLE VCR ı ı Available source selection Previous channel DTV menu display Automatic Power off VCR DVD Function Rewind Stop Play Pause Fast Forward Next channel Previous channel Exit the on screen menu Control the cursor in the menu Use to see information on the current broadcast Fastext topic selection Picture size sele...

Page 8: ...R button on the remote control to switch the television on The programme that you were watching last is re selected automatically If you have not yet stored any channels no clear picture appears Refer to Storing Channels Automatically on page 10 or Storing Channels Manually on page 11 If the television is initially powered on several basic customer settings proceed automatically Refer to Plug Play...

Page 9: ... will begin memorizing all of the available channels Press the ENTER OK button to set the clock 7 Press the œ or button to select the hour or minute Set these by pressing the or button You can enter the Hour Minute by using the numeric buttons on the remote control 8 Press the ENTER OK button to confirm your setting The DTV channel scan menu appears and the DTV channel is automatically updated If ...

Page 10: ...le STB HD STB Satellite STB AV Receiver DVD Receiver Game Camcorder DVD Combo DHR DVD HDD Recorder or PC 6 Press the EXIT button to exit Editing Device Names Source List Move Enter Return TV Ext 1 Ext 2 AV S Video Component PC HDMI DTV TV Edit Name Move Enter Return Ext 1 Ext 2 AV S Video Component PC HDMI TV VCR DVD D VHS Cable STB Storing Channels Automatically You can scan for the frequency ran...

Page 11: ...ired Search When you do not know the channel numbers Press the or button to start the search The tuner scans the frequency range until the first channel or the channel that you selected is received on the screen Store When you store the channel and associated programme number Set to OK by pressing the ENTER OK button Channel mode P Programme mode When completing tuning the broadcasting stations in...

Page 12: ... channel to be assigned to a new name then press the ENTER OK button 5 Press the or button to select a letter A Z a number 0 9 or a symbol Move on to the previous or next letter by pressing the œ or button then press the ENTER OK button 6 Repeat steps 4 to 5 for each channel to be assigned to a new name 7 Press the EXIT button to exit Assigning Names to Channels Name Move Adjust Return Prog Ch Nam...

Page 13: ...Depending on areas factory mode of LNA will be set up as On or Off LNA Low Noise Amplifier This function is very useful in the situation that the TV is used in weak signal LNA amplifies the TV signal in the weak signal area a low noise preamplifier boosts the incoming signal Channel Move Enter Return Country Belgium Auto Store Manual Store Channel Manager Sort Name Fine Tune LNA Off TV You can sel...

Page 14: ...he menu 2 Press the or button to select Picture then press the ENTER OK button 3 Press the or button to select Size then press the ENTER OK button 4 Select the required option by pressing the or button then press the ENTER OK button Available options Auto Wide 16 9 Wide 4 3 Zoom 4 3 Auto Wide Expanding and pulling up the picture from 4 3 to 16 9 ratio 16 9 Sets the picture to 16 9 wide mode Wide 4...

Page 15: ...ynamic Size Auto Wide Digital NR On DNIe Demo Off PIP TV You can display a sub picture within the main picture In this way you can watch TV program or monitor the video input from any connected devices PIP On Off You can activate or deactivate the PIP function You can select these options simply by pressing the PIP button on the remote control Source TV Ext 1 Ext 2 AV S Video You can select a sour...

Page 16: ...speakers It is fully compatible with all multichannel formats You can select these options simply by pressing the SRS button on the remote control TruSurround XT SRS and Symbol are trademarks of SRS Labs Inc TruSurround XT technology is incorporated under license from SRS Labs Inc Auto Volume On Off Each broadcasting station has its own signal conditions and so it is not easy to adjust the volume ...

Page 17: ... staying on by pressing the or button You can select these options simply by pressing the SLEEP button on the remote control If the sleep timer is not yet set Off is displayed If it is already set the remaining time before which the television switches to standby mode is displayed On Timer Off Timer You can set the On Off timers so that the television will switch on or off automatically at the tim...

Page 18: ...ss of the surrounding illumination High Enters maximum power saving mode regardless of the surrounding illumination Language Blue Screen Melody Energy Saving Setup Move Enter Return Plug Play Language English Time Game Mode Off Blue Screen Off Melody Off PC More TV 1 Press the MENU button to display the menu 2 Press the or button to select Setup then press the ENTER OK button 3 Press the or button...

Page 19: ...displayed a still image on the screen for a long time To remove after images on the screen use either All White or Signal Pattern function Although both of the two functions remove after images on the screen Signal Pattern is more effective The after image removal function has to be executed for a long time approximately 1 hour to effectively remove after images on the screen If after image is not...

Page 20: ...ENTER OK button Available options Image Lock Position Auto Adjustment Image Reset 5 When you are satisfied with your setting press the ENTER OK button 6 Press the EXIT button to exit Image Lock Coarse Fine The purpose of picture quality adjustment is to remove or reduce picture noise If the noise is not removed by Fine tuning alone then adjust the frequency as best as possible coarse and Fine tune...

Page 21: ...und the on screen menu system and adjust the various settings available refer to the following illustration Available in DTV mode Preset to the DTV mode by using the TV DTV button on your remote control Press the D MENU button on your remote control Guide Now Next Guide Full Guide Scheduled List Default Guide Preference Preferred Subtitle Language Preferred Audio Language OSD Language Translucency...

Page 22: ...Store Manual Store Edit Favourite Channels Channel Manager Manual Store Adjust Move Return 1 Press the D MENU button Result The DTV menu is displayed 2 Press the or button to select Channel Result The Channel menu is displayed 3 Press the ENTER OK button 4 Press the or button to select Manual Store Press the ENTER OK button Result The Manual Store is displayed 5 Press the œ or button to select Cha...

Page 23: ... favourites list To undo press the ENTER OK button again Select All Select all channels currently displayed Select None Deselect all selected channels Preview Displays a currently selected channel s The Favourite Channels settings have been completed 8 Press the D MENU button to return to the previous menu or press the EXIT button to return to normal viewing Edit Favourite Channels Return no chann...

Page 24: ... to be deleted from the favourite channels list by pressing the or button 2 Press the blue button Result The selected channel and number will be deleted To add a deleted channel back in to the favourite channel manager see Add on page 23 3 Press the D MENU button to return to the previous menu or press the EXIT button to return to normal viewing Edit Favourite Channels Move Return 2 BBC TWO 7 BBC ...

Page 25: ... channel number and name are displayed if the channel is one of the all channels and a icon if the channel is one of the favourite channels 8 Press the blue or CH MGR button to exit from the channel manager You can display a list of all channels or your favourite channels All Channels 14 20 14 33 Contains video with AFD O coded frame is 16 9 1 AFDO 16 9 AFDO 16 9 No Block SD Stereo Subtitle Englis...

Page 26: ...y in the EPG list pressing the œ button Press the ENTER OK button If the next program is selected it is scheduled with the clock icon displayed If the ENTER OK button is pressed again the scheduling is canceled with the clock icon gone For details about scheduling programmes refer to the next page View programme Select a programme of your choice information by pressing the œ button Press the INFO ...

Page 27: ...to the scheduled list When watching analog TV the reserved DTV channel cannot be changed The channel is only changed automatically to the reserved channel when you are watching DTV The more simple and easy way for scheduling programmes refer to the step 4 on page 26 Scheduling programme only functions with the television already turned on and not from standby mode For details about switching the t...

Page 28: ...lect a programme of your choice by pressing the œ button 6 Press the INFO button to display information about the highlighted programme Result The available programme information is displayed 7 When the favourite channel manager has not been set up The favourites list is empty Would you like to choose your favourites now message is displayed Select Yes Result The Edit Favourite Channels menu is di...

Page 29: ...previous menu or press the EXIT button to return to normal viewing Preference Move Enter Return Preferred Subtitle Language English Preferred Audio Language English OSD Language English Translucency Level Medium Parental Lock Preference Move Enter Return Preferred Subtitle Language English Preferred Audio Language English OSD Language English Translucency Level Medium Parental Lock Preference Move...

Page 30: ...ental Lock Press the ENTER OK button Result The Enter PIN is displayed 5 Enter your current 4 digit PIN code by using the numeric buttons 0 9 Result The Parental Lock menu are displayed with the Parental Rating selected The default PIN code for a new TV set is 0000 If you enter an invalid PIN code the Invalid PIN code Please try again message is displayed 6 Press the ENTER OK button 7 Press the or...

Page 31: ...chnology and is being applied to various fields including VOD Video On Demand ITV Interactive TV EC Electronic Commerce tele education tele conferencing digital libraries and network games You can select these options simply by pressing the SUBTITLE button on the remote control Feature Move Enter Return Subtitle Off Subtitle Language Audio Language Digital Text Enable Feature Move Enter Return Sub...

Page 32: ...next restart or channel change some 90 minutes later when the upgrade dialog appears again Don t Upgrade If you select Don t Upgrade the iDTV does not perform the upgrade and the software upgrade banner is not displayed again The upgrade is still stored internally to subsequently upgrade to the new version then the following sequence of steps are performed 1 Press the D MENU button Result The DTV ...

Page 33: ... Up TV Selecting the CI Common Interface Menu 1 Press the D MENU button Result The DTV menu is displayed 2 Press the or button to select System Result The System menu is displayed 3 Press the ENTER OK button 4 Press the or button to select Common Interface Press the ENTER OK button Result The technical information for signal status is displayed 5 Press the or button to select CI Menu Press the ENT...

Page 34: ...llow and blue in turn 6 Press the D MENU button to return to the previous menu or press the EXIT button to return to normal viewing The default PIN of a new TV set is 0 0 0 0 When PIN is changed in Parental Lock the PIN for resetting automatically changes System Move Enter Return Product Information Signal Information Software Upgrade Common Interface Reset Reset Enter PIN Return Enter New PIN Res...

Page 35: ... again Ø Ø page up Used to display the next teletext page mode Press to select the teletext mode LIST FLOF If you press it in the LIST mode it switches into the List save mode In the List save mode you can save teletext page into list using the store button page down Used to display the previous teletext page index Used to display the index contents page at any time while you are viewing teletext ...

Page 36: ...ct a technician for installing the wall bracket Samsung Electronics is not responsible for any damages to the product or harm to customers when the installation is done by the customer This product is for installing on cement walls The product may not stay in place when installed on plaster or wood The package contents and parts supplied for the wall mount are subject to change without prior notic...

Page 37: ... the Wall Mount Bracket 3 Tighten the screws of the plastic hanger shown in picture 2 to the back side of the PDP 4 Remove the Safety Pins Fasten the 4 plastic latches assembled at step on the back side of the PDP using the guide holes of the wall mount push and hook down to secure the PDP on the wall mount as illustrated Secure the PDP by inserting the Safety Pins not to fall from the wall mount ...

Page 38: ...Power button On Off on the front panel or press the POWER button on the remote control Check the picture contrast and brightness settings Check the volume Check if Internal Mute is set to ON Normal picture but no sound Check the volume Check whether the volume MUTE button on the remote control has been pressed No picture or black and white picture Adjust the colour settings Check that the broadcas...

Page 39: ...r human health from uncontrolled waste disposal please separate this from other types of wastes and recycle it responsibly to promote the sustainable reuse of material resources Household users should contact either the retailer where they purchased this product or their local government office for details of where and how they can take this item for environmentally safe recycling Business users s...

Page 40: ... 08 25 08 65 65 0 15 Min 01805 121213 0 12 Min 06 40 985 985 199 153 153 02 261 03 710 0900 20 200 88 0 10 Min 231 627 22 0 801 801 881 80 8 200 128 8 800 200 0400 0850 123 989 902 10 11 30 08 585 367 87 0870 242 0303 8 800 502 0000 Web Site www samsung com be www samsung com cz www samsung com dk www samsung com fi www samsung com fr www samsung de www samsung com hu www samsung com it www samsun...

Reviews: