background image

English - 72

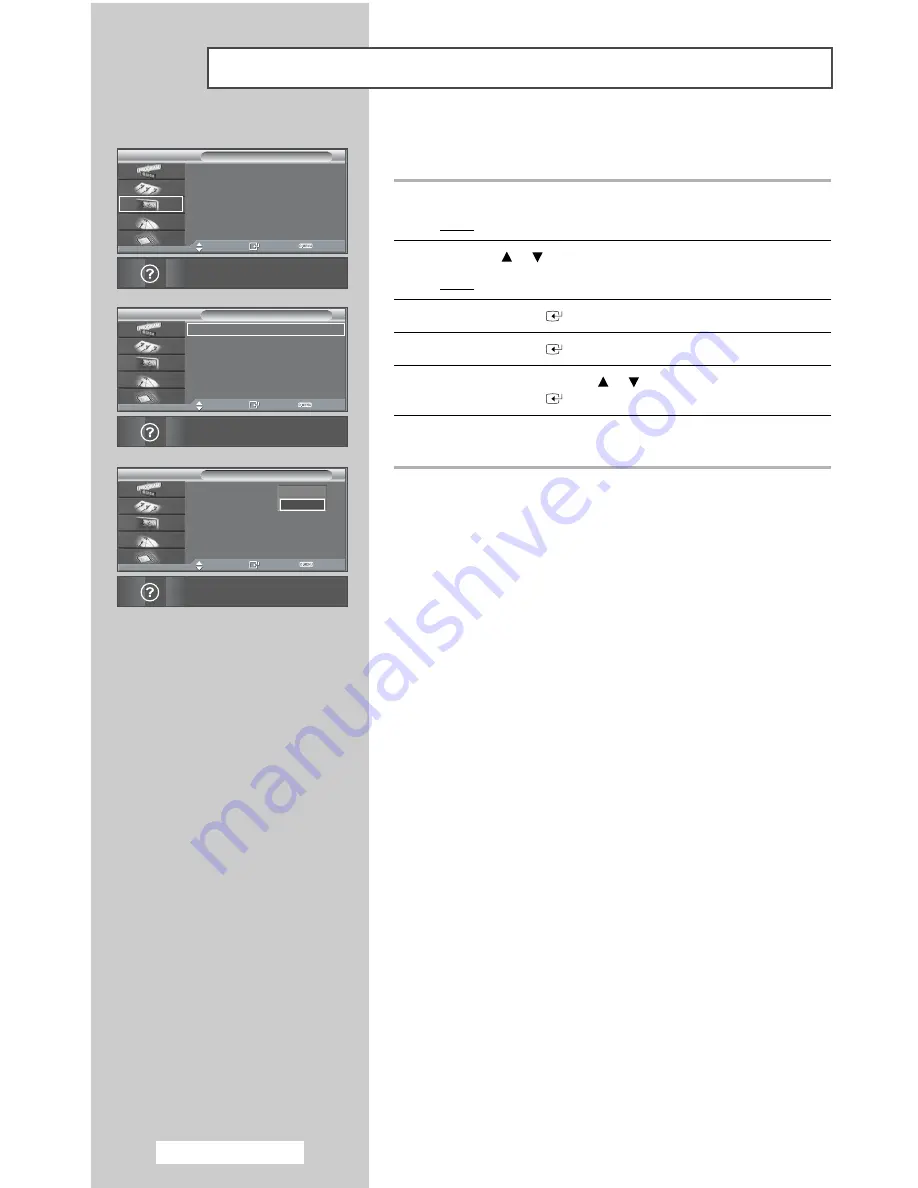
You can activate or deactivate the subtitle.

1

Press the 

D.MENU

button.

Result:

The DTV menu is displayed.

2

Press the 

or 

button to select 

Feature.

Result:

The options available in the 

Feature

group are displayed.

3

Press the 

ENTER

button. 

4

Press the 

ENTER

button.

5

Select 

On

by pressing the 

or 

button.

Press the 

ENTER

button.

6

Press the 

D.MENU 

button to return to the previous menu or press

the 

EXIT

button to return to normal viewing.

Setting the Subtitle

Subtitle

: Off

Š

Subtltle Language

Audio Language

: English

Š

Audio Format

: MPEG

Š

Feature

Move

Enter

Exit

Press ENTER to view the feature options.

Subtitle

: Off

Subtltle Language

: English

Audio Language

: English

Audio Format

: MPEG

Feature

Move

Enter

Return

Press ENTER to turn Subtitles on or off.

Off

On

Subtitle

: Off

Š

Subtltle Language

Audio Language

: English

Š

Audio Format

: MPEG

Š

Feature

Move

Enter

Return

Press ENTER to turn Subtitles on or off.

Summary of Contents for PS-42D7HD

Page 1: ...ual thoroughly and retain it for future reference ON SCREEN MENUS Picture In Picture PIP Colour Weakness Enhancement Mode My Colour Control TELETEXT Option SRS TruSurroundXT Digital Natural Image engine Register your product at www samsung com global register This device is a Class B digital apparatus ...

Page 2: ...sting of 1 230 000 SD level to 3 150 000 HD level pixels which require sophisticated technology to produce However there may be few bright or dark pixels on the screen These pixels will have no impact on the performance of the product Avoid operating the TV at temperatures below 5 C 41 F A still image displayed too long may cause permanent damage to the PDP Panel Watching the PDP TV in 4 3 format ...

Page 3: ...errite Core for Antenna Cable and Power Cord PS50D7HX Ferrite Cores Antenna Cable The ferrite cores are used to attenuate undesired signals When you connect the Antenna Cable make sure to coil the Antenna Cable round the ferrite core Ferrite Cores Power Cord The ferrite cores are used to attenuate undesired signals When you connect the Power Cord make sure to coil the Power Cord round the ferrite ...

Page 4: ...YOUR DISPLAY Displaying Information 28 Changing the Picture Standard 28 Customizing the Picture Settings 29 Setting the Picture PC Mode 30 Selecting the Picture Size 32 Viewing the DNIe Demonstration 33 Freezing the Current Picture 33 Setting the My Colour Control Easy Control 34 Setting the My Colour Control Detail Control 35 Setting the Blue Screen 36 Using the Colour Weakness Enhancement Featur...

Page 5: ...ion 76 Checking the Signal Information 77 Upgrading the Software Option 78 Resetting 79 USING THE TELETEXT FEATURE Teletext Feature 80 Displaying the Teletext Information 81 Selecting Display Options 82 Selecting a Teletext Page 83 ADDITIONAL INFORMATION AND CONNECTIONS Connecting to the External Devices 84 Connecting to the RCA Input 85 Connecting to the S Video Input 85 Connecting to the Compone...

Page 6: ...nels e ENTER button Confirm your choice Store or Enter f POWER button Press to turn the TV on and off Power Indicator Power Off Blue Power On Off g Remote Control Sensor Aim the remote control towards this spot on the TV You can use the CH buttons to switch on the TV when it is in standby mode depending on the model The VOL and CH buttons have the same function as the œ buttons on the remote contr...

Page 7: ...cable will be necessary to make this connection When using the optional HDMI DVI adapter the DVI analog audio inputs on your TV allow you to receive left and right audio from your DVI device Not compatible with PC b DVI AUDIO IN L R DVI audio input c AV OUT VIDEO AUDIO L R Outputs for external devices d AV IN VIDEO AUDIO L R Video and audio inputs for external devices such as a camcorder or VCR e ...

Page 8: ...UT THE BATTERIES AND PRESS THE RESET BUTTON FOR ABOUT 2 3 SECONDS RE INSERT THE BATTERIES AND TRY USING THE REMOTE CONTROL AGAIN TruSurround XT MODE SELECTION MAKE THE REMOTE CONTROL WORK FOR STB VCR CABLE OR DVD VOLUME INCREASE VOLUME DECREASE TEMPORARY SOUND SWITCH OFF VCR DVD FUNCTIONS REWIND REW STOP PLAY PAUSE FAST FORWARD FF REMOTE CONTROL SETUP ONE OR TWO DIGIT CHANNEL SELECTION DTV MENU DI...

Page 9: ... EXIT DISPLAY MODE TELETEXT SUB PAGE FASTEXT TELETEXT NEXT PAGE TELETEXT PREVIOUS PAGE TELETEXT STORE TELETEXT INDEX TELETEXT DISPLAY MIX BOTH TELETEXT INFORMATION AND THE NORMAL BROADCAST TELETEXT PAGE HOLD Teletext Function Refer to page 80 83 for details EXIT TELETEXT DEPENDING ON THE MODEL ...

Page 10: ...m in a cool dry place if you won t be using the remote control for a long time The remote control can be used up to about 23 feet from the TV Assuming typical TV usage the batteries last for about one year If the remote control doesn t work Check the following 1 Are the plus and minus ends of the batteries reversed 2 Are the batteries drained 3 Is there a power cut or is the power cord unplugged 4...

Page 11: ...n the direction of the arrow When done mount the wall bracket on the wall 2 Before drilling into the wall check if the length between the two locking holes at the back of the product is correct If the length is too short or long loosen all or some of the 4 screws on the wall bracket to adjust the length 3 Check the installation diagram and mark the drill points on the wall Use the 5 0 mm bit to dr...

Page 12: ...the 4 product holders into the corresponding bracket holes Then place the product so that it is firmly fixed to the bracket Make sure to reinsert and tighten the safety pin to securely hold the product to the bracket Wall Bracket Angle Adjustment Adjust the bracket angle to 2 o before installing it on the wall The shape of the product may vary depending on the model The assemblies of the plastic h...

Page 13: ...n channels correctly a signal must be received by the set from one of the following sources An outdoor aerial A cable television network A satellite network 1 In these cases connect the aerial or network input cable to the ANT IN jack on the rear of the television 2 If you are using an indoor aerial you may need to turn it when tuning your television until you obtain a picture that is both sharp a...

Page 14: ...he power button on the front of the television or POWER button on the remote control to switch the television on Result The programme that you were watching last is re selected automatically If your television isn t turned on when the POWER button is pressed press the TV button to select TV mode If you have not yet stored any channels no clear picture appears Refer to Storing Channels Automaticall...

Page 15: ...nels the second digit must be pushed immediately after the first Failure to do this will result in a single digit channel being displayed Used to increase the volume Used to decrease the volume Used to switch the sound off temporarily To turn the sound back on press this button again or press the or button Press the PRE CH button The TV will switch to the last channel viewed To quickly switch betw...

Page 16: ...ton Press the ENTER button Result The menu to select channels is displayed 6 To start channel store press the ENTER button Result The search will end automatically Channels are sorted and stored in the order which reflects their position in the frequency range with lowest first and highest last When this has finished the menu to set the time will be displayed To stop the search before it has finis...

Page 17: ...ew South Wales ACT Victoria Queensland South Australia Western Australia Tasmania Northern Territory 10 Press the D MENU button to return to the previous menu or press the EXIT button to return to normal viewing Plug Play Feature continued English 17 Plug Play Plug Play Move Select Skip Selects the time zone where you locate New South Wales ACT Victoria Queensland South Australia Western Australia...

Page 18: ...y cannot be selected 1 Press the MENU button Result The main menu is displayed 2 Press the or button to select Setup Result The Setup menu is displayed 3 Press the ENTER button 4 Press the ENTER button again to select Plug Play Result The message to Start Plug Play is displayed 5 For further details on settings refer to the previous page Plug Play Feature continued Choosing Your Language Plug Play...

Page 19: ... The programme originally selected is then displayed To stop the search before it has finished press the MENU or the ENTER button 9 When the channels have been stored you can Sort them in the order required Sorting the Stored Channels on page 23 Clear a channel Skipping Unwanted Channels on page 22 Fine tune channel reception if necessary Fine Tuning Channel Reception on page 27 Assign a name to t...

Page 20: ... or button Press the ENTER button Result The following options are available depending on the model AUTO PAL SECAM NTSC4 43 NTSC3 58 7 Press the or button to select Sound System Press the ENTER button 8 Select the required sound standard by pressing the or button Press the ENTER button Result The following options are available BG DK I M Storing ChannelsManually Area Asia W Europe Auto Store Manua...

Page 21: ...rrect number Press the ENTER button 13 To store the channel and associated programme number select Store by pressing the or button Set to OK by pressing the ENTER button 14 Repeat steps 9 to 13 for each channel to be stored 15 Press the MENU button to return to the previous menu or press the EXIT button to return to normal viewing Channel mode P Programme mode When completing tuning the broadcasti...

Page 22: ...hannel to be deleted or added 7 Press the or button to select Add Delete Press the ENTER button Result The state of the current channel is displayed 8 Press the or button to select the channel that you wish to add or delete Result If the channel that you wish to edit is not in memory the Add is selected and displayed Otherwise if the channel that you wish to edit is in memory the Delete is selecte...

Page 23: ...ton 6 Select the number of the programme to which the channel is to be moved by pressing the or button Press the ENTER button Result The channel is moved to its new position and all other channels are shifted accordingly 7 Repeat steps 5 to 6 until you have moved all the channels to the required programme numbers 8 Press the MENU button to return to the previous menu or press the EXIT button to re...

Page 24: ...me Press the ENTER button Result Arrow indications are displayed around the name box 6 Press the or button to select a letter A Z a number 0 9 or a symbol Move on to the previous or next letter by pressing the œ or button 7 Press the ENTER button 8 Repeat steps 5 to 7 for each channel to be assigned to a new name 9 Press the MENU button to return to the previous menu or press the EXIT button to re...

Page 25: ...of programme to which the channel is to be locked by pressing the or button Press the ENTER button 8 Press the or button to select Lock Select Locked by pressing the ENTER button Result The selected channel is locked and marked with the symbol 9 Press the MENU button to return to the previous menu or press the EXIT button to return to normal viewing A Blue screen is displayed when the Child Lock i...

Page 26: ... the or button to select LNA Press the ENTER button 5 Select Off or On by pressing the or button Press the ENTER button 6 When it has finished press the EXIT button to return to normal viewing If the picture is noisy with the LNA set to On select Off LNA setting is to be made for each channel Using the LNA Low Noise Amplifier Feature Area Asia W Europe Auto Store Manual Store Add Delete Sort Name ...

Page 27: ...e fine tuning setting in the TV s memory press the ENTER button Result The programme number changes to Red and is marked with a 7 To reset the fine tuning to 0 select Reset by pressing the or button then press the ENTER button 8 Press the MENU button to return to the previous menu or press the EXIT button to return to normal viewing If you are unable to fine tune a channel check that the Colour Sy...

Page 28: ...utton to return to normal viewing You can also set these options simply by pressing the P MODE Picture Mode button on the remote control Changing the Picture Standard You can view the channel information and setting status you have selected by pressing the INFO button on the remote control The information displayed varies according to the selected source P 1 Mono Picture Dynamic Sound Custom SRS T...

Page 29: ... Press the MENU button to return to Mode menu Press the or button to select Colour Tone Press the ENTER button 11 Select the required option by pressing the or button Result The following options are available Cool2 Cool1 Normal Warm1 Warm2 12 Press the ENTER button 13 To return the factory defaults select Reset by pressing the or button Press the ENTER button Result The previously adjusted settin...

Page 30: ... until you reach the optimal setting Press the or button to select other option s 7 Press the ENTER button 8 Press the MENU button Result The PC menu is displayed again 9 Press the or button to select Position Press the ENTER button 10 Adjust the position by pressing the œ or button 11 Press the ENTER button Setting the Picture PC Mode Preset to the PC mode by pressing the SOURCE button 50 Coarse ...

Page 31: ...shed and the TV will automatically return to the previous picture 13 To return the factory defaults select Image Reset by pressing the or button Press the ENTER button Result The previously adjusted settings will be reset to the factory defaults Image Lock Position Auto adjustment Image Reset PC TV Image Lock Position Auto adjustment Image Reset PC TV Image Reset has completed Return Move Enter Re...

Page 32: ...ntrol If you change the picture size when PIP is On PIP will automatically be turned Off Depending on the input source the SIZE options may vary Positioning and Sizing the screen using Zoom Resizing the screen using the Zoom enables the positioning and sizing of the screen to up down direction using the or button as well as the screen size Move the screen up down using the or button after selectin...

Page 33: ...n doesn t work when source is in PC mode The DNle Demo is designed to show the difference between the regular and DNIe pictures By default the product displays the picture with DNle applied DNIeTM Digital Natural Image engine This feature brings you more detailed image with 3D noise reduction detail enhancement contrast enhancement and white enhancement New image compensation Algorithm gives brigh...

Page 34: ...ld greens Pink Emphasizing warm skin colours Standard Standard picture Custom Changing the settings in the Detail Control menu will automatically set to Custom see next page 6 Select the required option by pressing the œ or button Result The original picture before adjustment is shown on the left side while the selected mode is shown on the right side 7 Press the ENTER button Depending on the inpu...

Page 35: ... refresh the adjusted screen Press the or button to select other option s 8 Press the MENU button Result The Detail Control menu is displayed again 9 To return the factory defaults select Reset by pressing the or button Press the ENTER button Result The previously adjusted colours will be reset to the factory defaults 10 Press the MENU button to return to the previous menu or press the EXIT button...

Page 36: ...ton to select Blue Screen Press the ENTER button 5 Select Off or On by pressing the or button Press the ENTER button Blue Screen is displayed while there is no signal from the external device in the external mode regardless of the Blue Screen Setting This function doesn t work when source is in DTV mode Setting the Blue Screen English 36 Plug Play Language English Time Child Lock Blue Screen Off M...

Page 37: ...e ENTER button again Press the or button to select On Press the ENTER button 6 Select the required option Red Green or Blue by pressing the or button Press the ENTER button Result The horizontal bar is displayed Press the œ or button until you reach the optimal setting Press the or button to select other option s 7 Press the ENTER button Plug Play Language English Time Child Lock Blue Screen Off M...

Page 38: ...ollowing options are available Auto Saving Automatically adjusts to the surrounding illumination Standard Operates in standard mode regardless of the surrounding illumination Super Saving Enters maximum power saving mode regardless of the surrounding illumination 6 Press the ENTER button This feature is not available when the input source is in PC or HDMI mode Mode Dynamic Size 16 9 Digital NR On ...

Page 39: ... ENTER button 6 Press the or button to select Source Press the ENTER button Result The following options are available AV S Video 7 Select a source of the sub picture by pressing the or button Press the ENTER button 8 Press the or button to select Swap Press the ENTER button Result The main picture and sub picture are interchanged You cannot use the swap function for PC HDMI or COMP 9 Press the or...

Page 40: ...e channel that you want to view through sub picture by pressing the or button This function doesn t work in TV mode or DTV mode When the Source is set to TV you can select the channel of the sub picture If the sub picture receives no signal and the main picture is output from a Component PC or HDMI signal the sub picture will be blue If the main picture is output from a Video signal the sub pictur...

Page 41: ...ctivate or deactivate the PIP function directly X This PIP combination is not available O This PIP combination is available Table of PIP Settings TV DTV AV S Video Component PC HDMI TV X X O O O O O DTV X X X X X X X AV O X X O O O O S Video O X O X O O O Component X X X X X X X PC X X X X X X X HDMI X X X X X X X Sub Main ...

Page 42: ... button to select Picture Result The Picture menu is displayed 3 Press the ENTER button 4 Press the or button to select Digital NR Press the ENTER button 5 Select Off or On by pressing the or button Press the ENTER button Mode Dynamic Size 16 9 Digital NR On DNIe Demo Off My Colour Control Energy Saving Standard PIP Picture TV Move Enter Return Mode Dynamic Size 16 9 Digital NR On DNIe Demo Off My...

Page 43: ...l Shift menu is selected 6 Press the ENTER button Select On by pressing the or button for making the screen move per regular hour and preventing the residual image Press the ENTER button Pixel Shift Using this function you can minutely move pixels on the PDP in horizontal or vertical direction to minimize after image on the screen 7 Select the required option Horizontal Dot Vertical Line or Time b...

Page 44: ...is function helps remove after images on the screen by moving all the pixels on the PDP according to a pattern Use this function when there are remaining after images or symbols on the screen especially when you displayed a still image on the screen for a long time 6 Press the ENTER button to cancel the currently selected function To remove after images on the screen use either All White or Signal...

Page 45: ... required option by pressing the or button Result The following options are available Standard Music Movie Speech Custom 6 Press the ENTER button You can select these options by simply pressing the S MODE Sound Mode button on the remote control English 45 Changing the Sound Standard Custom Mode Custom Equalizer SRS TSXT Off Auto Volume Off Internal Mute Off Sound TV Move Enter Return Mode Standard...

Page 46: ... volume every time the channel is changed This feature lets you automatically adjust the volume of the desired channel by lowering the sound output when the modulation signal is high or by raising the sound output when the modulation signal is low 1 Press the MENU button Result The main menu is displayed 2 Press the or button to select Sound Result The Sound menu is displayed 3 Press the ENTER but...

Page 47: ...lt The Sound menu is displayed 3 Press the ENTER button 4 Press the or button to select SRS TSXT Press the ENTER button 5 Select the required option by pressing the or button Result The following options are available 6 Press the ENTER button You can select these options simply by pressing the SRS button on the remote control TruSurround XT SRS and Symbol are trademarks of SRS Labs Inc TruSurround...

Page 48: ...MENU button Result The main menu is displayed 2 Press the or button to select Setup Result The Setup menu is displayed 3 Press the ENTER button 4 Press the or button to select Melody Press the ENTER button 5 Select Off or On by pressing the or button Press the ENTER button Mode Custom Equalizer SRS TSXT Off Auto Volume Off Internal Mute Off Sound TV Move Enter Return Mode Custom Equalizer SRS TSXT...

Page 49: ...and automatic switching occurs switch to Mono When receiving mono sound in AV mode connect to the AUDIO L input connector on the panel front or side depending on the model If mono sound only comes out of the left speaker press the DUAL button Type of broadcast Regular broadcast Standard audio Regular NICAM Mono NICAM stereo NICAM DUAL I II Regular broadcast Standard audio Bilingual or DUAL I II St...

Page 50: ... or button to select Time Press the ENTER button Result The Clock Set is selected 5 Press the ENTER button again 6 Press the œ or button to select Hour Minute or am pm Set these by pressing the or button You can also set these by pressing the numeric buttons directly 7 Press the ENTER button In the event of a power interruption or the set being turned off at the supply the settings for the Clock w...

Page 51: ...ff 30 60 90 120 150 or 180 for staying on by pressing the or button Press the ENTER button You can select these options simply by pressing the SLEEP button on the remote control If the sleep timer is not yet set Off is displayed If the sleep timer is already set the remaining time before which the television switches to standby mode is displayed Plug Play Language English Time Child Lock Blue Scre...

Page 52: ...mer Press the ENTER button Result The On Timer menu is displayed 6 Select Hour Minute am pm Programme or Volume by pressing the œ or button Set these by pressing the or button You can also set these by pressing the numeric buttons directly 7 Press the œ or button to select Activation 8 To activate On Timer with the setting entered select Yes by pressing the or button 9 Press the ENTER button Resul...

Page 53: ...ess the ENTER button Auto Power Off When you set the timer On the television will eventually turn off if no controls are operated for 3 hours after the TV was turned on by timer This function is only available in timer On mode and prevents overheating or leakages which may occur if a TV is on for too long when you are on vacation for example If no signal is received for 15 minutes the TV will be a...

Page 54: ... Press the MENU button Result The main menu is displayed 7 Press the ENTER button to select Input Result The Input menu is displayed again 8 Press the or button to select Edit Name Press the ENTER button 9 Press the or button to select external source to be edited Press the ENTER button Result The available device names are listed VCR DVD D VHS CABLE STB HD STB Satellite STB AV Receiver DVD Receiv...

Page 55: ...ss the DVD STB CABLE or VCR button Result The edited device and audio status are displayed on top left of the set 3 Press the DVD STB CABLE or VCR button until the required input source is selected If you change the external source while viewing pictures might take a short period of time to be switched DTV mode can be selected by the TV DTV button Viewing Pictures from External Sources English 55 ...

Page 56: ...reen menu system and adjust the various settings available refer to the following illustration Available in the Digital TV mode Now Next Guide Full Guide Scheduled List Default Guide Full Guide Guide Move Enter Exit Press ENTER to display the Electronic Programme Guide Options Translucency level Medium Parental Lock Preference Move Enter Exit Press ENTER to change your preferences Subtitle On Subt...

Page 57: ...ore it has finished press the ENTER button with STOP selected 5 Press the D MENU button to return to the previous menu or press the EXIT button to return to normal viewing If the signal status is poor the No Service found Check the aerial connection message is displayed Auto Store Manual Store Edit Favourite Channels Channel Manager Channel Move Enter Exit Press ENTER to change the channel setting...

Page 58: ...he previous menu or press the EXIT button to return to normal viewing You can input by pressing the number buttons on the remote control You can not change only Frequency and when changing a channel the Frequency will be automatically changed Auto Store Manual Store Edit Favourite Channels Channel Manager Channel Move Enter Exit Press ENTER to change the channel settings Auto Store Manual Store Ed...

Page 59: ...channel and the channel will be added to the favourite channel list To undo press the ENTER button again Select All Select all channels currently displayed Select None Deselect all selected channels Preview Displays a currently selected channel s The Favorite Channels settings have been completed 8 Press the D MENU button to return to the previous menu or press the EXIT button to return to normal ...

Page 60: ...ed button To remove all channels press the green button Editing Your Favourite Channels continued English 60 800 RaiDue 801 RaiTre 802 RaiUno Edit Favourite Channels Press ENTER to add the channel to the favourites list Select All Select None Preview Move Select Return Auto Store Manual Store Edit Favourite Channels Channel Manager Channel Move Enter Return Press ENTER to edit your favourite chann...

Page 61: ...layed on the screen Delete 1 In the Edit Favourite Channels menu select the channel to be deleted from the favourite channels list by pressing the or button 2 Press the blue button Result The selected channel and number will be deleted To add a deleted channel back in to the favourite channel list see Add on page 60 Editing Your Favourite Channels continued 800 RaiDue 801 RaiTre 802 RaiUno Edit Fa...

Page 62: ...e to the channel of your choice by pressing the or button 4 To tune to the selected channel press the ENTER button while the cursor is on the selected channel The channel number name and an icon are displayed in the top left corner while changing the channel The channel number and name are displayed if the channel is one of the all channels and a icon if the channel is one of the favourite channel...

Page 63: ... information about the current programme may be displayed 1 While viewing a programme press the INFO button Result The programme information is displayed 2 To exit from banner information press the INFO button 14 30 Sat 1 Sep Exit INFO 70 7 HD Digital AllChannels NO Information A ...

Page 64: ... ordered hour segments Two hours of programme information is displayed which may be scrolled forwards or backwards in time 1 Press the D MENU button Result The options available in the Guide group are displayed 2 Press the ENTER button 3 Select the your required guide Now Next Guide or Full Guide by pressing the or button 4 Press the ENTER button Result The selected guide menu is displayed You can...

Page 65: ...ion HD SD Sound Modes Subtitle or Teletext Languages of Subtitle or Teletext and brief summary of the highlighted programme are included on the detailed information will be appeared if the summary is long Six channels are displayed To scroll between channels move to a channel using the or button To display page by page use the P or P button Then Press the red button Press the red button again to t...

Page 66: ...he D MENU button to return to the previous menu or press the EXIT button to return to normal viewing The Scheduled list may be displayed in the EPG menu Save Save the adjusted schedule Cancel Cancel the adjusted schedule Add Programme Add a new schedule Edit Re adjust the selected schedule Delete Delete the selected schedule You can also set hour and minute by pressing the number buttons on the re...

Page 67: ...e preset default channel list in the EPG menu will be displayed 6 Press the D MENU button to return to the previous menu or press the EXIT button to return to normal viewing You can select these options by simply pressing the GUIDE button on the remote control Setting the Default Guide Now Next Guide Full Guide Scheduled List Default Guide Full Guide Guide Move Enter Return Press ENTER to choose t...

Page 68: ...hlighted programme Result Available programme information is displayed 8 When the favourite channel list has not been set up The favourites list is empty Would you like to choose your favourites now message is displayed Select Yes Result The Favourite Channels menu is displayed If you select No all channels will remain unchanged To edit the favourite channels refer to page 59 61 for more details 9...

Page 69: ...ilable are displayed 5 Select the required option by pressing the or button and press the ENTER button to change the setting 6 Press the D MENU button to return to the previous menu or press the EXIT button to return to normal viewing Translucency Level Medium Parental Lock Preference Move Enter Exit Press ENTER to change your preferences Translucency Level Medium Parental Lock Preference Move Ent...

Page 70: ...he Invalid PIN code Please try again message is displayed 6 Press the ENTER button 7 Press the or button to select the age rating you want to lock out Press the ENTER button 8 If you want to change the PIN code select Change PIN by pressing the or button Press the ENTER button Result The Enter New PIN is displayed 9 Enter your new PIN code by using the numeric buttons 0 9 Result The Confirm New PI...

Page 71: ... the previous menu or press the EXIT button to return to normal viewing If you forget the PIN code press the remote control buttons in the following sequence which resets the PIN to 0 0 0 0 POWER Off MUTE 8 2 4 POWER On Change PIN Enter PIN Return Enter the new PIN code again to confirm 0 9 Confirm New PIN Change PIN Enter PIN Return Enter the new PIN code again to confirm 0 9 Confirm New PIN You ...

Page 72: ... MENU button to return to the previous menu or press the EXIT button to return to normal viewing Setting the Subtitle Subtitle Off Subtltle Language Audio Language English Audio Format MPEG Feature Move Enter Exit Press ENTER to view the feature options Subtitle Off Subtltle Language English Audio Language English Audio Format MPEG Feature Move Enter Return Press ENTER to turn Subtitles on or off ...

Page 73: ...ish is the default in cases where the selected language is unavailable in the broadcast 6 Press the D MENU button to return to the previous menu or press the EXIT button to return to normal viewing While viewing a programme the subtitle can be selected While viewing a programme audio languages can be selected Selecting the Preferred Language Subtitle or Audio Subtitle On Subtltle Language English ...

Page 74: ...ed 5 Select the required option by pressing the or button and press the ENTER button to change the setting 6 Press the D MENU button to return to the previous menu or press the EXIT button to return to normal viewing Selecting the Audio Format Subtitle On Subtltle Language English Audio Language English Audio Format MPEG Feature Move Enter Exit Press ENTER to view the feature options Subtitle On S...

Page 75: ...e Software Upgrade Reset System Move Enter Return Press ENTER to show the product information Product Information Signal Information Time Zone Software Upgrade Reset System Move Enter Return Press ENTER to select your time zone Time Zone Adjust Select Return Select the time zone where you locate New South Wales ACT Victoria Queensland South Australia Western Australia Tasmania Northern Territory T...

Page 76: ...lt The Product Information menu is selected Product Name Software Version 5 Press the D MENU button to return to the previous menu or press the EXIT button to return to normal viewing Product Information Signal Information Time Zone Software Upgrade Reset System Move Enter Return Press ENTER to show the product information Product Name JAGUAR Software version T JAGUDAUO Product Information Return ...

Page 77: ...return to normal viewing If the signal status is poor the No signal message is displayed Checking the Signal Information Product Information Signal Information Time Zone Software Upgrade Reset System Move Enter Return Press ENTER to display the signal information on the current channel Product Information Signal Information Time Zone Software Upgrade Reset System Move Enter Exit Press ENTER to vie...

Page 78: ...he or button to select Software Upgrade and press the ENTER button Result The software upgrade information is displayed 4 To switch to an alternative version press the red button Press the blue button to reset activate the upgrade and restart 5 Press the D MENU button to return to the previous menu or press the EXIT button to return to normal viewing Upgrading the Software Option Product Informati...

Page 79: ...pressing the coloured buttons red green yellow and blue in turn 5 Press the D MENU button to return to the previous menu or press the EXIT button to return to normal viewing Resetting Reset Enter PIN Return Use the NUMBER buttons to enter your PIN code 0 9 Enter PIN System Return Press RED GREEN YELLOW and BLUE in sequence to confirm the reset process WARNING All channel settings and user preferen...

Page 80: ...teletext pages are organized according to six categories Part Contents A Selected page number B Broadcasting channel identity C Current page number or search indications D Date and time E Text F Status information FASTEXT information Teletext information is often divided between several pages displayed in sequence which can be accessed by Entering the page number Selecting a title in a list Select...

Page 81: ...2 Press the TEXT MIX button to activate the teletext mode Result The contents page is displayed It can be redisplayed at any time by pressing the index button 3 Press the TEXT MIX button again Result The screen will be split into two This Double Teletext feature lets you view the actual broadcast and teletext information separately on the screen 4 If you wish to display the actual broadcast and te...

Page 82: ...uiz games for example The normal screen reveal again A secondary page sub page The broadcast when searching for a page cancel The next page page up The previous page page down Double size letters in the size Upper half of the screen Once Lower half of the screen Twice Normal screen Three times To return to the normal display after using the reveal or size feature press the EXIT button ...

Page 83: ...casting company the different topics covered on a Teletext page are colour coded and can be selected by pressing the coloured buttons on the remote control Press the coloured button corresponding to the topic that you wish to select the available topics are given in the status line Result The page is displayed with other coloured information that can be selected in the same way 3 To display the pr...

Page 84: ...n be fitted with Three RCA connectors VIDEO AUDIO L R If you have a second VCR and wish to copy cassette tapes connect the source VCR to AV IN and the target VCR to AV OUT so that you can redirect the signal from AV IN to AV OUT When you wish to record a programme connect the receiver to AV IN and the VCR to AV OUT so that you can redirect the signal from AV IN to AV OUT Please be sure to match th...

Page 85: ...eo output such as a camcorder or VCR Rear of the TV Camcorder VCR To play pictures and sound both the S VIDEO and AUDIO L R connectors must be used and Whenever you connect an audio or video system to your television ensure that all elements are switched off Refer to the documentation supplied with your equipment for detailed connection instructions and associated safety precautions Please be sure...

Page 86: ...ur PC Personal Computer and Rear of the TV The COMPONENT IN connectors are used for equipment with a DVD output 480i 480p 576i 576p 1080i The COMPONENT IN connectors are used for DTV receiver 480i 480p 576i 576p 1080i DVD Rear of the TV DTV receiver Please be sure to match the color coded input terminals and cable jacks English 86 ...

Page 87: ...nnecting to the HDMI DVI Compatible The HDMI DVI IN connector is used for equipment with a DVI out DTV Set Top Box Rear of the TV The HDMI DVI IN connector is used for equipment with an HDMI out DTV Set Top Box Rear of the TV HDMI DVI cable and ...

Page 88: ...video cable properly if desired external input AV IN or Component cannot be selected Play the DVD after activating the DVD Home Theater System Use the volume control of the Home Theater System while watching the PDP using the DVD Home Theater where the PDP TV does not produce the audio DVD Home Theater Rear of the TV AV Receiver Amplifier Use the AV OUT ports of the PDP for Home Theater System Con...

Page 89: ...l be displayed 4 Click on the Monitor tab then set the Screen refresh rate with reference to the Display Modes Table Set the Vertical Frequency and Horizontal Frequency individually if you can do so instead of setting the Screen refresh rate 5 Click on OK to close the window then Click on OK button to the Display Properties window Automatic re booting may commence at this moment 6 Shutdown the PC ...

Page 90: ...the screen when the PC power is turned off or if the PC is disconnected If so press the SOURCE button to enter the Video mode Also make sure that the PC is connected When connecting a notebook PC to the television make sure that the PC screen is displayed through only the television Otherwise random signals might appear When horizontal synchronous signals seem irregular in PC mode check PC power s...

Page 91: ...he SET button 4 Enter 3 digits of the VCR Cable box or DVD code listed on the next page for your VCR Cable box or DVD Example To enter code 6 press 0 0 and 6 To enter code 76 press 0 7 and 6 5 Press the POWER button Your VCR Cable box or DVD should turn on If it turns on your remote control is now set correctly If it does not turn on repeat the steps above but try one of the other codes listed for...

Page 92: ...English 92 Programming the Remote Control for Other Components continued VCR Remote Control Codes Cable Box CATV Remote Control Codes DVD Remote Control Codes ...

Page 93: ...pliance that is affecting the television then move it further away Plug your television into a different mains socket Check the direction location and connections of your aerial This interference often occurs due to the use of an indoor aerial Replace the remote control batteries Clean the upper edge of the remote control transmission window Check the battery terminals On your computer check Power...

Page 94: ...This page is intentionally left blank ...

Page 95: ...If you have any comments or questions regarding a Samsung products contact the SAMSUNG customer care centre 1300 362 603 612 9763 5750 www samsung com au BN68 01018A 00 ...

Reviews: