background image

Français - 8

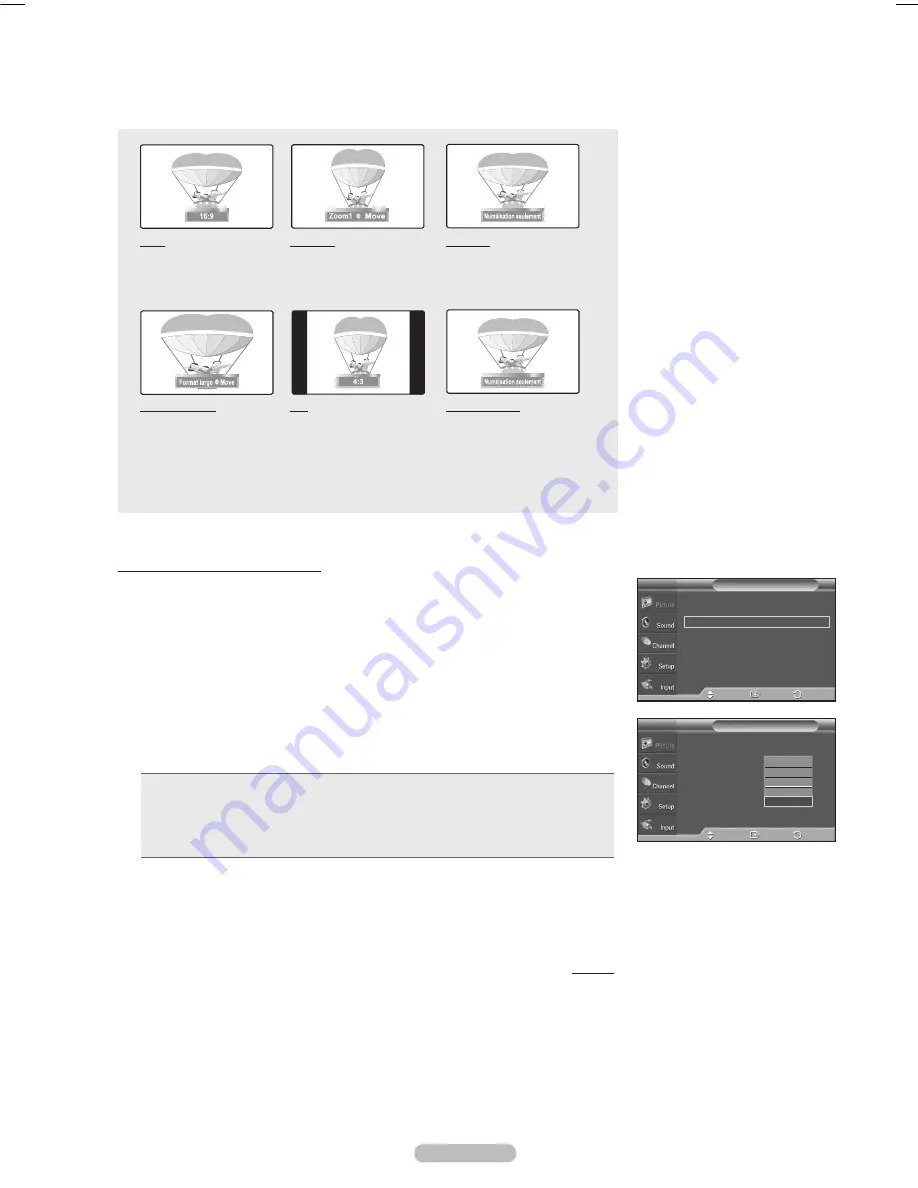
Format large

Augmente le facteur de 

forme de l’image pour 

qu’elle remplisse l’écran 

en entier.

Zoom 

Format de l’écran lorsque 

l’écran Zoom1 est 

agrandi verticalement.

4:

Règle l’image au format 

normal 4:3.

Zoom 1

Format de l’écran lorsque 

l’écran large est agrandi 

verticalement.

Numér. seul.

Cette fonction permet 

d’afficher l’image complète 

non tronquée pour une 

entrée de signaux HDMI 

(720p/1080i), Component 

(1080i) ou DTV (1080i).

16:

Règle l’image au mode 

écran large 16:9.

Réduction numérique des bruits

Si le signal de diffusion capté par le téléviseur est faible, il est possible d’activer la 

fonction de réduction numérique des bruits pour aider à éliminer les parasites et les 

images rémanentes qui apparaissent à l’écran.

Suivre les instructions 

d’activation des options d’image

 1 et 2. 

(Voir la page 26)


 Appuyer sur la touche ▲ ou ▼ pour sélectionner 

Réduc. bruit num.

, suivie de 

la touche 

ENTER

.


Appuyer sur la touche ▲ ou ▼ pour sélectionner 

Désactivé

Bas

Moyen

Élevé

 ou 

Auto

Appuyer sur la touche 

ENTER

• 

Désactivé

 : Désactive la fonction de réduction du bruit à l’écran.

• 

Bas

 : Règle le bruit à l’écran au niveau bas.

• 

Moyen

 : Règle le bruit à l’écran au niveau moyen.

• 

Élevé

 : Règle le bruit à l’écran au niveau élevé.

• 

Automatique

 : Détecte et diminue automatiquement le bruit à l’écran.

  Appuyer sur la touche 

ExIT

 pour quitter.


Suite...

Options d’image

T  V

Nuance coul. 

: Normal

Format 

: 16:9

Réduct. bruit num.  : Auto

DNle 

: Off

Nv nr HDMI 

: No

rmal

Mode Film 

: Off

Mode bleu seu. 

: Off

 Plus

Intro.

Dépl.

Retour

Off

Basse

Moyen

Haute

Auto

Options d’image

T  V

Nuance coul. 

: Normal 

Format 

: 16:9 

Réduct. bruit num.  : Auto 

DNle 

: Off 

Nv nr HDMI 

: Normal 

Mode Film 

: Off 

Mode bleu seu. 

: Off 

 Plus

Intro.

Dépl.

Retour

Pyrope CF _BN68-01399B-01.indd   28

2008-05-30   오전 9:15:55

Summary of Contents for PN42A450

Page 1: ...e Si vous avez des suggestions ou des questions concernant les produits Samsung veuillez contacter le Service Consommateurs Samsung Country Customer Care Center Web Site Address CANADA 1 800 SAMSUNG 7267864 www samsung com ca Samsung Electronics Canada Inc Customer Service 55 Standish Court Mississauga Ontario L5R 4B2 Canada Samsung Electronique Canada Inc Service à la Clientèle 55 Standish Court ...

Page 2: ...172 3 or ISO IEC 13818 3 used or sold in combination with this product unit The license only covers the use of this product unit to encode and or decode audio files conforming to the ISO IEC 11172 3 or ISO IEC 13818 3 No rights are granted under this license for product features or functions that do not conform to the ISO IEC 11172 3 or ISO IEC 13818 3 Other countries The product unit accompanying...

Page 3: ...as temperature or humidity This is normal and not a defect of the unit Cell Defects The PDP uses a panel consisting of 1 230 000 SD level to 3 150 000 HD level pixels which require sophisticated technology to produce However there may be a few bright or dark pixels on the screen These pixels will have no impact on the performance of the product Avoid operating the TV at temperatures below 5 C 41 F...

Page 4: ... Track Digital 35 Choosing a Multi Channel Sound MTS Track Analog 36 Automatic Volume Control 36 Setting the TV Speakers On Off 37 Connecting Headphones Sold separately 37 Channel Control Selecting the Antenna 38 Clearing Scrambled Channels Digital 38 Adding and Erasing Channels 39 Viewing the Channel Lists 40 Setting Your Favorite Channels 40 Setting the Default Channel List Mode 41 Labeling Chan...

Page 5: ...ote Control BN59 00687A AAA Batteries 4301 000103 Power Cord 3903 000144 Owner s Instructions Quick Setup Guide Ferrite Core for Headphone 3301 001456 Cover Bottom Screws 2ea Refer to page 73 Warranty Card Safety Guide Manual Not available in all locations Cloth Clean Ferrite Core for Power Cord 3301 001305 The following parts are sold separately and are available at most electronics stores If you...

Page 6: ...l 2 MENU Press to see an on screen menu of your TV s features 3 VOL Press to increase or decrease the volume In the on screen menu use the VOL buttons as you would use the and buttons on the remote control 4 CH Press to change channels In the on screen menu use the CH buttons as you would use the and buttons on the remote control 5 Power Indicator Blinks and turns off when the power is on and ligh...

Page 7: ...og audio inputs on your TV allow you to receive left and right audio from your DVI device 7 ANT IN Uses a 75Ω Coaxial connector for an Air Cable Network 8 SERVICE For service only 9 3D SYNC OUT Connect to 3D IR Emitter 0 COMPONENT IN 1 2 AV IN 1 Connects Component video audio The COMPONENT IN 1 jack is also used as the AV IN 1 jack Connect the video cable to the COMPONENT IN 1 Y VIDEO jack and the...

Page 8: ...S Use these buttons in the Channel list SRS Selects SRS TruSurround XT mode E MODE Press to select the preset display and sound modes for sports cinema and games Use these buttons in the DMA and Anynet modes This remote can be used to control recording on Samsung recorders with the Anynet feature SOURCE Press to display all of the available video sources PRE CH Tunes to the previous channel CH Pre...

Page 9: ... antennas to the TV This procedure requires an optional combiner adaptor available at most electronics shops 1 Connect both antenna leads to the combiner 2 Plug the combiner into the ANT IN terminal on the bottom of the back panel Installing Batteries in the Remote Control 1 Lift the cover at the back of the remote control upward as shown in the figure 2 Install two AAA size batteries Make sure to...

Page 10: ...T IN terminal on your cable box This terminal might be labeled ANT IN VHF IN or simply IN 2 Connect this cable to a two way splitter 3 Connect an Antenna cable between an OUTPUT terminal on the splitter and the IN terminal on the cable box 4 Connect an Antenna cable between the ANT OUT terminal on the cable box and the B IN terminal on the RF A B switch 5 Connect another cable between the other OU...

Page 11: ... Top Box match the color of the connection terminal to the cable Connecting a DVD Player or Cable Box Satellite receiver Set Top Box via DVI This connection can only be made if there is a DVI Output jack on the external device 1 Connect a HDMI DVI Cable or DVI HDMI Adapter between the HDMI IN 2 jack on the TV and the DVI jack on the DVD Player or Cable Box Satellite receiver Set Top Box 2 Connect ...

Page 12: ... 2 Y PB PR jacks on the TV and the COMPONENT Y PB PR jacks on the DVD Player or Cable Box Satellite receiver Set Top Box 2 Connect Audio Cables between the COMPONENT IN 1 or 2 R AUDIO L jacks on the TV and the AUDIO OUT jacks on the DVD Player or Cable Box Satellite receiver Set Top Box Component video separates the video into Y Luminance brightness PB Blue and PR Red for enhanced video quality Be...

Page 13: ...nal on the back of the VCR 3 Connect an Antenna Cable between the ANT OUT terminal on the VCR and the ANT IN terminal on the TV 4 Connect a Video Cable between the VIDEO OUT jack on the VCR and the AV IN 1 Y VIDEO or AV IN 2 VIDEO jack on the TV 5 Connect Audio Cables between the AUDIO OUT jacks on the VCR and the AV IN 1 or AV IN 2 R AUDIO L jacks on the TV S Video Connection Your Samsung TV can ...

Page 14: ...erent back panel configuration When the receiver home theater is set to On you can hear sound output from the TV s Optical jack When the TV is displaying a DTV air signal the TV will send out 5 1 channel sound to the Home theater receiver When the source is a digital component such as a DVD and is connected to the TV via HDMI only 2 channel sound will be heard from the Home Theater receiver Digita...

Page 15: ...n your computer 2 Connect a 3 5mm Stereo 2RCA cable between the DVI IN HDMI 2 R AUDIO L jack on the TV and the Audio Out jack of the sound card on your computer Each PC has a different back panel configuration When connecting a PC match the color of the connection terminal to the cable When using an HDMI DVI cable connection you must use the HDMI IN 2 terminal PC TV Rear Panel PC Audio Cable Not s...

Page 16: ...e Use Standard Press the Volume button While the volume OSD is displayed press and hold the MENU button for 5 seconds The Screen Saver is activated if there is no remote control key input for longer than 1 minute while Plug Play is running 4 Press the or button to memorize the channels of the selected connection Press the ENTER button to select Start Air Air antenna signal Cable Cable antenna sign...

Page 17: ...ER button Press the or button to select On or Off then press the ENTER button The Select the time zone in which you live menu is automatically displayed 10 Press the or button to highlight the time zone for your local area and to move the highlight to the appropriate time zone on the map of the United States Press the ENTER button If clock is not automatically set see page 48 to set the clock 11 T...

Page 18: ...hannels when you press the second number For quick channel change press the number buttons then press the ENTER button Using the Button The button is used to select stations that broadcast a digital signal 1 For example for Channel 7 1 press 7 then then 1 HD indicates the TV is receiving a Digital High Definition signal SD indicates the TV is receiving a Standard Definition signal For quick channe...

Page 19: ...s the ENTER buttons to display change or use the selected items For a more detailed description of each function refer to the corresponding page Anynet HDMI CEC see page 65 Picture Mode see page 23 Sound Mode see page 34 Sleep Timer see page 49 Add to Favorite see page 40 Switch to Cable see page 20 Viewing the Display The display identifies the current channel and the status of certain audio vide...

Page 20: ...evision can begin memorizing the available channels you must specify the type of signal source that is connected to the TV i e an Air or a Cable system 1 Press the MENU button to display the menu Press the or button to select Channel then press the ENTER button 2 Press the ENTER button to select Antenna Press the or button to select Air or Cable then press the ENTER button Press the EXIT button to...

Page 21: ...particular area At this point the signal source has been selected 5 The TV begins memorizing all available stations After all the available channels are stored the TV starts to remove scrambled channels see page 38 The Auto program menu then reappears If you want to stop Auto Programming press the ENTER button The Stop Auto Program message will be displayed Select Yes by pressing the or button Pre...

Page 22: ...ess the or button to select Edit Name then press the ENTER button 2 Press the or button to select AV1 AV2 S Video Component1 Component2 PC HDMI1 HDMI2 or HDMI3 input jack then press the ENTER button 3 Press the or button to select VCR DVD Cable STB Satellite STB PVR STB AV Receiver Game Camcorder PC TV IPTV Blu Ray HD DVD or Digital Media Adapter input source then press the ENTER button Press the ...

Page 23: ...n to decrease or increase the value of a particular item Press the ENTER button Press the EXIT button to exit When you make changes to Cell Light Contrast Brightness Sharpness Color or Tint G R the OSD will be adjusted accordingly When in PC mode Tint G R Sharpness and Color are not available Each adjusted setting will be stored separately according to its input mode Cell Light Sets the pixel brig...

Page 24: ...ntrast so that the optimal contrast is provided 6 Press the or button to select Dynamic Contrast then press the ENTER button 7 Press the or button to select Off Low Medium or High Press the ENTER button Off Turns off the dynamic contrast adjustment function Low Sets the dynamic contrast to low Medium Sets the dynamic contrast to medium High Sets the dynamic contrast to high Activating Gamma You ca...

Page 25: ...ect Color then press the ENTER button Color is available when Color Space is set to Custom 14 Press the or button to select Red Green Blue Yellow Cyan or Magenta Press the ENTER button 15 Press the or button to select Red Green or Blue to change it Press the ENTER button 16 Press the or button to decrease or increase the value of a particular item Press the ENTER button In Color you can adjust the...

Page 26: ...tinued Flesh Tone You can emphasize the pink flesh tone in the picture 20 Press the or button to select Flesh Tone then press the ENTER button 21 Press the or button to decrease or increase the value Press the ENTER button Changing the adjustment value will refresh the adjusted screen Activating Edge Enhancement You can emphasize object boundaries in the picture 22 Press the or button to select Ed...

Page 27: ...lecting Zoom1 Zoom2 or Wide Fit Press the or button to select Position then press the ENTER button Press the or button to move the picture up and down Reset Press the or button to select Reset then press the ENTER button You can initialize the setting After selecting Just Scan in HDMI 1080i 1080p or Component 1080i 1080p mode Press the or button to select H Position or V Position then press the EN...

Page 28: ...ow the Activating Picture Options instructions numbers 1 and 2 Refer to page 26 2 Press the or button to select Digital NR then press the ENTER button 3 Press the or button to select Off Low Medium High or Auto Press the ENTER button Off Turns the screen noise reduction function off Low Reduces screen noise at a low level Medium Reduces screen noise at a medium level High Reduces screen noise at a...

Page 29: ...h or external devices Press the EXIT button to exit Setting the Film Mode The TV can be set to automatically sense and process film signals from all sources and adjust the picture for optimum quality 1 Follow the Activating Picture Options instructions numbers 1 and 2 Refer to page 26 2 Press the or button to select Film Mode then press the ENTER button 3 Press the or button to select Off or Auto ...

Page 30: ...ere are remaining after images or symbols on the screen especially when you displayed a still image on the screen for a long time Scrolling This function removes after images on the screen by moving all the pixels on the PDP according to a pattern Use this function when there are remaining after images or symbols on the screen especially when you displayed a still image on the screen for a long ti...

Page 31: ...picture in minutes 1 Follow the Activating Picture Options instructions numbers 1 and 2 Refer to page 26 2 Press the or button to select Screen Burn Protection then press the ENTER button 3 Press the ENTER button to select Pixel Shift then press the ENTER button Pressing the or button will alternate between On and Off You will also see the items Horizontal Dot Vertical Line and Time Pixel Shift Us...

Page 32: ...e Picture Mode When D Effect is on only the Contrast Brightness D Effect and Reset picture menus are activated To use the 3D Effect function a graphics card supporting 3D or 3D software is required The 3D glasses and the Emitter must be manufacturer by the same company If you play a game or watch TV while wearing the 3D glasses for long periods of time you may experience eyestrain or a headache 3D...

Page 33: ...t to match your graphic cards or 3D Software See the descriptions for Steps 1 to 4 above 5 Press the or button to select Format then press the ENTER button 6 Press the or button to select Checkerboard Horizontal or Vertical then press the ENTER button Checkerboard If the output format of your graphic card or 3D software is Checkerboard select this input format Horizontal If the output format of yo...

Page 34: ...r button to select a particular frequency to adjust Press the or button to increase or decrease the level of the particular frequency then press the ENTER button Press the EXIT button to exit L R Sound Balance Adjustment To adjust the sound balance of the L R speakers Bandwidth Adjustment 100Hz 300Hz 1kHz 2kHz 3kHz 10kHz To adjust the level of different bandwidth frequencies If you make any change...

Page 35: ...lect Sound then press the ENTER button 2 Press the or button to select Multi Track Options then press the ENTER button 3 Press the ENTER button to select Preferred Language Press the or button to choose the language English Spanish French you want then press the ENTER button Press the EXIT button to exit You can only select the language from among the actual languages being broadcast Preferred Lan...

Page 36: ...on the remote control to select Mono Stereo or SAP Choosing a Multi Channel Sound MTS Track Analog Depending on the particular program being broadcast you can listen to Mono Stereo or SAP 1 Press the MENU button to display the menu Press the or button to select Sound then press the ENTER button 2 Press the or button to select Auto Volume then press the ENTER button 3 Press the or button to select ...

Page 37: ...er Output Speaker Output Speaker Output Sound Output Sound Output Sound Output TV Speaker Off Mute Mute Mute Sound Output Sound Output Sound Output Video No Signal Mute Mute Mute Mute Mute Mute Connecting Headphones Sold separately You can connect a set of headphones to your set if you wish to watch a TV program without disturbing other people in the room When you insert the headphone s plug into ...

Page 38: ...n Press the or button to select Clear Scrambled Channel then press the ENTER button It searches scrambled channels which are to be removed from the list To stop searching scrambled channels Press the ENTER button to select Stop Press the button to select Yes then press the ENTER button 2 When the scrambled channel searching is completed press the ENTER button Press the EXIT button to exit This fun...

Page 39: ...same manner Red button Press repeatedly to select All Added or Favorite Green button Press to add all channels deleted Yellow button Press to delete all channels memorized Antenna Air Auto Program Clear Scrambled Channel Channel List Name Fine Tune Signal Strength Channel T V Enter Move Return All Added Favorite Default List Mode All Channel List T V Enter Move Return Channel List Added Enter DTV ...

Page 40: ... channels add channels or favorite channels use the red button on the remote control Red button Press repeatedly to select All Added or Favorite Green button Press to add all channels deleted Yellow button Press to delete all channels memorized Antenna Air Auto Program Clear Scrambled Channel Channel List Name Fine Tune Signal Strength Channel T V Enter Move Return All Added Favorite Default List ...

Page 41: ...te control Added Shows Added channels when you press CH LIST button on the remote control Favorite Shows Favorite channels when you press CH LIST button on the remote control Press the EXIT button to exit Press the CH LIST button on the remote control to bring up the Channel Lists Easy Setting 1 Press the TOOLS button on the remote control 2 Press the or button to select Add to Favorite or Delete ...

Page 42: ...ng Analog Channels Use fine tuning to manually adjust a particular channel for optimal reception 1 Press the MENU button to display the menu Press the or button to select Channel then press the ENTER button 2 Press the or button to select Fine Tune then press the ENTER button 3 Press the or button to adjust the fine tuning 4 To store the fine tuning setting in the TV s memory press the ENTER butto...

Page 43: ...ss the MENU button to display the menu Press the or button to select Channel then press the ENTER button 2 Press the or button to select Signal Strength then press the ENTER button If the signal strength meter indicates that the signal is weak physically adjust your antenna to increase the signal strength Continue to adjust the antenna until you find the best position with the strongest signal Pre...

Page 44: ...therwise just click OK and exit the dialog box Display Modes If the signal from the system equals the standard signal mode the screen is adjusted automatically If the signal from the system doesn t equal the standard signal mode adjust the mode by referring to your videocard user guide otherwise there may be no video For the display modes listed below the screen image has been optimized during man...

Page 45: ... from the PC The function also automatically fine tunes the settings and adjusts the frequency values and positions How to Auto Adjust 1 Press the MENU button to display the menu Press the or button to select Picture then press the ENTER button 2 Press the or button to select Auto Adjustment then press the ENTER button The message Auto Adjustment in progress Please wait appears on the screen and t...

Page 46: ...then press the ENTER button Press the or button to select Screen then press the ENTER button 2 Press the or button to select Image Reset then press the ENTER button The message Image Reset is completed appears on the screen Press the EXIT button to exit The previously adjusted settings will be reset to the factory defaults 2 Press the ENTER button to select Image Lock 3 Press the or button to sele...

Page 47: ...ve to Month Day Year Hour Minute or am pm Set the date and time you want by pressing the or button then press the ENTER button Press the EXIT button to exit The current time will appear every time you press the INFO button You can set the Month Day Year Hour and Minute directly by pressing the number buttons on the remote control Continued Clock Mode Manual Clock Set Time Zone DST Off Clock T V En...

Page 48: ...and signal the auto time may not be set correctly If this occurs set the time manually Antenna or Cable must be connected in order to set the time automatically Setting the On Off Timer Use this feature to set the TV to turn on or off at a desired time You must set the clock first 1 Press the MENU button to display the menu Press the or button to select Setup then press the ENTER button Press the ...

Page 49: ...ng which may occur if a TV is on for too long time Setting the Sleep Timer The sleep timer automatically shuts off the TV after a preset time 30 60 90 120 150 and 180 minutes 1 Press the MENU button to display the menu Press the or button to select Setup then press the ENTER button Press the or button to select Time then press the ENTER button 2 Press the or button to select Sleep Timer then press...

Page 50: ...isplay the menu Press the or button to select Setup then press the ENTER button 2 Press the or button to select Caption then press the ENTER button 3 Press the ENTER button to select Caption Press the or button to select On then press the ENTER button Continued Plug Play Language English Time V Chip Caption External Settings Entertainment Off More Setup T V Enter Move Return Plug Play Language Eng...

Page 51: ... the font you want The default is Default Foreground Color This option consists of Default White Black Red Green Blue Yellow Magenta and Cyan You can change the color of the letter The default is Default Background Color This option consists of Default White Black Red Green Blue Yellow Magenta and Cyan You can change the background color of the caption The default is Default Foreground Opacity Thi...

Page 52: ...Non Synchronous Use Captions This channel carries data that is intended to augment information carried in the program CC3 Secondary Synchronous Caption Service Alternate program related caption data typically second language captions CC4 Special Non Synchronous Use Captions Similar to CC2 Text1 First Text Service This may be various non program related data Text2 Second Text Service Additional dat...

Page 53: ...on to select Melody Press the or button to select Off Low Medium or High then press the ENTER button Adjusting the TV On Off Melody Sound The TV power on off melody sound volume can be adjusted Off Turns off the melody function Low Sets the melody volume to low Medium Sets the melody volume to medium High Sets the melody volume to high Press the EXIT button to exit The Melody does not play When no...

Page 54: ...es the Entertainment function off Sports Provides the optimal picture and sound quality for sports Cinema Provides the optimal picture and sound quality for movie watching You can experience a richer picture and enhanced sound Game Provides the optimal picture and sound quality for games This mode accelerates the playing speed when using an external game console connected to the TV Press the EXIT ...

Page 55: ...SB is properly recognized the message Upgrade version xxxx to version xxxx The system would be reset after upgrade is displayed Press the or button to select Yes then press the ENTER button The upgrade starts Please be careful to not disconnect the power or remove the USB drive while upgrades are being applied The TV will shut off and turn on automatically after completing the firmware upgrade Ple...

Page 56: ... of a new TV set is 0 0 0 0 3 The V Chip screen will appear Press the or button to select Change PIN then press the ENTER button The Change PIN screen will appear Choose any 4 digits for your PIN and enter them Re enter the same 4 digits When the message PIN is changed successfully is displayed your PIN has been memorized Press the EXIT button to exit If you forget the PIN press the remote control...

Page 57: ...f two methods The TV guidelines or the MPAA rating 1 Press the MENU button to display the menu Press the or button to select Setup then press the ENTER button 2 Press the or button to select V Chip then press the ENTER button The message Enter PIN will appear Enter your 4 digit PIN number 3 The V Chip screen will appear Press the or button to select TV Parental Guidelines then press the ENTER butt...

Page 58: ...Y TV Y7 TV G TV PG TV 14 and TV MA have additional options See the next step to change any of the following sub ratings ALL Lock all TV ratings FV Fantasy violence D Sexually suggestive dialog The V Chip will automatically block certain categories that are more restrictive For example if you block TV Y category then TV Y7 will automatically be blocked Similarly if you block the TV G category then ...

Page 59: ...d The symbol is indicated While is selected press the ENTER button to block or unblock the category Press the EXIT button to exit Allow All Press to unlock all TV ratings Block All Press to lock all TV ratings G General audience no restriction PG Parental guidance suggested PG 13 Parents strongly cautioned R Restricted Children under 17 should be accompanied by an adult NC 17 No children under age...

Page 60: ...mming intended for children under age 8 C8 Programming generally considered acceptable for children 8 years and over to watch on their own G General programming suitable for all audiences PG Parental guidance 14 Programming contains themes or content which may not be suitable for viewers under the age of 14 18 Adult programming The V Chip will automatically block any category that is more restrict...

Page 61: ... Press to lock all TV ratings G General 8 ans Not recommended for young children 13 ans Programming may not be suitable for children under the age of 13 16 ans Programming is not suitable for children under the age of 16 18 ans Programming restricted to adults The V Chip will automatically block any category that is more restrictive For example if you block 8 ans category then 13 ans 16 ans and 18...

Page 62: ... button to activate the restriction selected The symbol is indicated Press the EXIT button to exit Allow All Press to unlock all TV ratings Block All Press to lock all TV ratings Parental restriction levels differ depending on the broadcasting station The default menu name and downloadable US rating changes depending on the downloaded information Even if you set the on screen display to your desir...

Page 63: ...he MENU button Press the or button to select Setup then press the ENTER button 3 Press the or button to select V Chip then press the ENTER button 4 Enter your PIN then press the ENTER button and press the or button to temporarily disable the V Chip Lock If you forget the PIN press the remote control buttons in the following sequence which resets the pin to 0 0 0 0 Power Off MUTE 8 2 4 Power On Cha...

Page 64: ...ect the Optical cable between Digital Audio Out Optical on your TV and Digital Audio Input on the Home Theater Connect only one Home Theater When following the connection above the Optical jack only outputs 2 channel audio You will only hear sound from the Home Theater s Front Left and Right speakers and the subwoofer If you want to hear 5 1 channel audio connect the DIGITAL AUDIO OUT OPTICAL jack...

Page 65: ...e or button to select Yes then press the ENTER button The Auto turn off function is enabled If you select No the Auto turn off function is canceled Press the EXIT button to exit The Select Device setting of the TV remote control is to be set to TV to use the Anynet function If you set Auto Turn Off to Yes connected external devices are also turned off when the TV is turned off However if the devic...

Page 66: ...ton After switching to the device while playing a file Backward search Forward search Stop Play Pause Device with built in Tuner After switching to the device when you are watching a TV program CH button Audio Device When Receiver is activated VOL button MUTE button The Anynet function only works when the remote control is set to TV The REC button works only while in the recordable state You canno...

Page 67: ...n in the Anynet setup menu Check whether the TV remote control is in TV mode Check whether it is Anynet exclusive remote control Anynet doesn t work in certain situations Searching channels Plug Play etc When connecting or removing the HDMI cable please make sure to search devices again or turn your TV off and on again Check if the Anynet Function of Anynet device is set on I want to start Anynet ...

Page 68: ... purchase these additionally 2 Remove the screws from the center back of the TV put the screws into the clamps and then fasten the screws onto the TV again Screws may not be supplied with the product In this case please purchase the screws of the following specifications 3 Connect the clamps fixed onto the TV and the clamps fixed onto the wall with a strong string and then tie the string tightly I...

Page 69: ...l The visual quality is of an SD Standard Definition grade Screen is black and power indicator light blinks steadily On your computer check the Power and Signal Cable The TV is using its power management system Move the computer s mouse or press any key on the keyboard On your equipment check STB DVD etc Power and Signal Cable The TV is using its power management system Press the Source button on ...

Page 70: ...yed on the TV screen the Adjustment screen appears Press the INFO button to reset Press the or button to select Yes then press the ENTER button The position is initialized to the default setting 3 Press the Blue button Press the and buttons to select a save mode from either Position 1 Position 2 or Position 3 in order to save the current position To not save the current position press the RETURN b...

Page 71: ...onsult a specialized installation company This installation manual is to be used when attaching the wall mount to a wall When attaching to other building materials please contact your nearest dealer The auto wall mount will not work when Anynet is operating Preparing before installing Wall Mount on the wall Once the wall mount is installed the position of your TV can be easily adjusted 1 Install W...

Page 72: ...han the standard dimension as they may cause damage to the inside of the TV set For wall mounts that do not comply with the VESA standard screw specifications the length of the screws may differ depending on their specifications Do not use screws that do not comply with the VESA standard screw specifications Do not use fasten the screws too strongly this may damage the product or cause the product...

Page 73: ...solution 1024 x 768 60 Hz 1360 x 768 60 Hz Sound Output 10 10 W 10 10 W Dimension W x H x D Body With stand 41 5 X 26 3 X 3 7 inches 1055 0 X 667 4 X 93 2 mm 41 5 X 28 5 X 12 4 inches 1055 0 X 724 9 X 315 9 mm 48 4 X 29 8 X 3 8 inches 1230 2 X 755 7 X 95 0 mm 48 4 X 32 0 X 12 4 inches 1230 2 X 812 7 X 315 9 mm Weight Body With stand 59 3 lbs 26 9 Kg 67 2 lbs 30 5 Kg 75 4 lbs 34 2 Kg 81 6 lbs 37 0 ...

Page 74: ... 2 W SIDE VIEW REAR VIEW NOTE All drawings not necessarily to scale Some dimensions are subject to change without prior notice Refer to dimensions on each unit prior to performing any carpentry Not responsible for typographical or printed errors 2008 Samsung Electronics America Inc ...

Page 75: ... 2 W SIDE VIEW REAR VIEW NOTE All drawings not necessarily to scale Some dimensions are subject to change without prior notice Refer to dimensions on each unit prior to performing any carpentry Not responsible for typographical or printed errors 2008 Samsung Electronics America Inc ...

Page 76: ...This page is intentionally left blank ...

Page 77: ......

Page 78: ...oir acheté ce produit Samsung Pour obtenir un service complet veuillez enregistrer votre produit à www samsung com global register Modèle N de série Imaginez les possibilités Écran à plasma guide de l utilisateur ...

Page 79: ...C 11172 3 ou ISO IEC 13818 3 utilisé ou vendu de pair avec ce produit La licence ne couvre que l utilisation de cet appareil à des fins d encodage et ou de décodage de fichiers audio conformément à la norme ISO IEC 11172 3 ou ISO IEC 13818 3 Aucun droit n est accordé en vertu de cette licence en ce qui a trait aux caractéristiques ou fonctions du produit qui ne sont pas conformes à la norme ISO IE...

Page 80: ...normal et n est pas le signe d une défectuosité Défauts de cellules L écran à plasma comporte de 1 230 000 définition standard à 3 150 000 haute définition pixels dont la création nécessite une technologie hautement perfectionnée Toutefois il peut y avoir quelques pixels lumineux ou sombres à l écran Ces pixels n ont aucune incidence sur le rendement du produit Éviter de faire fonctionner le télév...

Page 81: ...lticanaux numérique 35 Sélection d une piste de son multicanaux analogique 36 Contrôle automatique du volume 36 Activation et désactivation des haut parleurs du téléviseur 37 Branchement du casque d écoute vendu séparément 37 Réglage des canaux Sélection de l antenne 38 Suppression des canaux brouillés canaux numériques 38 Ajout et suppression de canaux 39 Visualisation des listes de canaux 40 Sél...

Page 82: ...00103 Cordon d alimentation 3903 000144 Guide de l utilisateur Guide de configuration rapide Tore de ferrite pour câble de prise Casque d écoute 3301 001456 Couvre base Vis 2ea Consulter la page 73 Carte de garantie Guide de sécurité N est pas disponible dans toutes les agences Linge de nettoyage Tore de ferrite pour câble de prise AV latérale S VIDÉO 3301 001305 Les pièces suivantes sont vendues ...

Page 83: ...ue la touche ENTER de la télécommande 2 MENU Afficher à l écran le menu des fonctions du téléviseur 3 VOL Augmenter ou diminuer le volume Dans le menu à l écran utiliser les touches VOL de la même manière que les touches et de la télécommande 4 CH Changer de canal Dans le menu à l écran utiliser les touches CH de la même manière que les touches et de la télécommande 5 Témoin d alimentation Clignot...

Page 84: ...es sorties gauche et droite de l appareil DVI Non compatible avec un ordinateur 7 ANT IN Connecteur coaxial de 75 Ω pour l antenne et le réseau câblé 8 SERVICE Connecteur pour entretien seulement 9 3D SYNC OUT Pour raccorder l émetteur IR 3D 0 ENTRÉE COMPOSANT COMPONENT IN 1 2 AV IN 1 Permet de brancher les composants vidéo et audio La prise d entrée COMPONENT IN 1 sert également de prise d entrée...

Page 85: ...es films ou jouer à des jeux en trois dimensions à l aide de lunettes 3D E MODE Appuyer pour sélectionner l affichage préréglé et les modes sonores pour les sports le cinéma et les jeux Utiliser ces touches pour les modes DMA et Anynet Cette télécommande peut servir à commander l enregistrement des enregistreurs DVD Samsung avec la fonction Anynet SOURCE Appuyer sur cette touche pour afficher tout...

Page 86: ...nt de raccorder les antennes au téléviseur Pour cette opération un multiplexeur adaptateur en option en vente dans la plupart des boutiques d électronique est nécessaire 1 Raccorder les conducteurs des deux antennes au combinateur 2 Brancher le multiplexeur dans la prise ANT IN située au bas du panneau arrière Insertion des piles dans la télécommande 1 Soulever le couvercle à l arrière de la téléc...

Page 87: ...ectronique 1 Repérer et débrancher le câble raccordé à l entrée d antenne ANT IN de le câblosélecteur Cette prise peut porter l inscription ANT IN VHF IN ou simplement IN 2 Relier ce câble à un répartiteur à deux voies 3 Raccorder un câble d antenne entre une sortie OUTPUT du répartiteur et l entrée IN du câblosélecteur 4 Raccorder un câble d antenne entre la sortie d antenne ANT OUT du câblosélec...

Page 88: ... de raccordement doivent correspondre Branchement d un lecteur DVD câblosélecteur ou récepteur décodeur à l aide d un câble DVI Ce branchement n est possible que si l appareil externe est pourvu d une prise de sortie DVI 1 Brancher un câble de raccordement HDMI DVI ou un adaptateur DVI HDMI entre la prise d entrée HDMI IN 2 du téléviseur et la prise DVI du lecteur DVD câblosélecteur ou récepteur d...

Page 89: ... les prises d entrée COMPONENT IN 1 ou 2 Y PB PR du téléviseur et les prises COMPONENT Y PB PR du lecteur DVD ou du câblosélecteur ou récepteur décodeur 2 Brancher les câbles audio entre la prise d entrée COMPONENT IN 1 ou 2 R AUDIO L du téléviseur et les prises de sortie AUDIO OUT du lecteur DVD ou du câblosélecteur ou récepteur décodeur Le composant vidéo sépare le vidéo en Y luminance luminosit...

Page 90: ...tenne la borne ANT OUT du magnétoscope et la borne ANT IN du téléviseur 4 Relier au moyen d un câble vidéo la prise de sortie vidéo du magnétoscope et la prise AV IN 1 Y VIDEO ou AV IN 2 VIDÉO du téléviseur 5 Raccorder les câbles audio entre les sorties AUDIO OUT du magnétoscope et les entrées AV IN 1 ou AV IN 2 R AUDIO L du téléviseur Branchement S Vidéo Le téléviseur Samsung peut être branché à ...

Page 91: ...t réglé sur On vous pouvez entendre du son provenant de la prise optique du téléviseur Lorsque le téléviseur émet des signaux numériques antenne il transmet le son en 5 1 canaux au récepteur du cinéma maison Lorsque la source est un composant numérique comme un lecteur DVD et que ce dernier est branché au téléviseur à l aide d un câble HDMI seul un son deux canaux sera émis par le récepteur du cin...

Page 92: ...rvu d une fiche stéréo de 3 5 mm et de deux fiches RCA entre la prise d entrée DVI IN HDMI 1 R AUDIO L du téléviseur et la prise de sortie audio de la carte son de l ordinateur La configuration du panneau arrière de chaque ordinateur est différente Lors du branchement d un ordinateur les couleurs du câble et de la borne de branchement doivent correspondre Il faut brancher un câble HDMI DVI dans la...

Page 93: ...par inadvertance maintenir enfoncée la touche Volume puis appuyer sur la touche MENU du téléviseur pendant cinq secondes Lorsque la fonction Prêt à l emploi est activée l écran de veille se met en marche si aucune touche de la télécommande n a été actionnée depuis plus d une minute 4 Appuyer sur la touche ou pour mémoriser les canaux du branchement sélectionné Appuyer sur ENTER pour choisir Démarr...

Page 94: ...TER Appuyer sur la touche ou pour sélectionner Activé ou Désactivé suivie de la touche ENTER Choisir le fuseau horaire de la région le menu s affiche automatiquement 10 Appuyer sur la touche ou pour mettre le fuseau horaire en surbrillance et pour mettre le fuseau horaire approprié en surbrillance sur la carte des États Unis Appuyer sur la touche ENTER Si l horloge ne se règle pas automatiquement ...

Page 95: ... Pour changer rapidement de canal appuyer sur les touches numériques suivies de la touche ENTER Utilisation de la touche La touche sert à choisir les stations émettrices de signaux numériques 1 Par exemple pour choisir le canal 7 1 appuyer sur 7 puis sur et sur 1 Le code HD indique que le téléviseur est en mode réception réglé sur un signal DHD haute définition numérique Le code SD indique que le ...

Page 96: ... la touche suivie de ENTER pour afficher modifier ou utiliser les éléments sélectionnés Pour plus de détails sur chaque fonction se reporter à la page correspondante Anynet HDMI CEC consulter la page 65 Mode image consulter la page 23 Mode sonore consulter la page 34 Mise en veille consulter la page 49 Ajouter aux favoris consulter la page 40 Switch to Cable consulter la page 20 Affichage des para...

Page 97: ...diffusion Pour que le téléviseur puisse mémoriser les canaux disponibles il faut préciser la source de signal à laquelle il est raccordé air ou câble 1 Appuyer sur la touche MENU pour afficher le menu Appuyer sur la touche ou pour sélectionner Chaîne suivie de la touche ENTER 2 Appuyer sur ENTER pour choisir Antenne Appuyer sur la touche ou pour sélectionner Air ou Câble suivie de la touche ENTER ...

Page 98: ...rticulier communiquer avec le câblodistributeur La sélection de la source de signal est maintenant terminée 5 Le téléviseur commence alors à mémoriser tous les canaux disponibles Une fois tous les canaux mémorisés le téléviseur commence à éliminer les canaux brouillés voir la page 38 Puis le menu Prog auto s affiche Si vous voulez arrêter la programmation automatique appuyez sur ENTER le message A...

Page 99: ...la touche ENTER Appuyer sur la touche ou pour sélectionner Entrer le nom suivie de la touche ENTER 2 Appuyer sur la touche ou pour sélectionner la prise d entrée AV1 AV2 S Video Component1 Component2 PC HDMI1 HDMI2 ou HDMI3 suivie de la touche ENTER 3 Appuyer sur la touche ou pour sélectionner la source d entrée Magnétoscope DVD Câble STB Satellite STB PVR STB Récepteur A V Jeu Caméscope PC TV IPT...

Page 100: ...ur augmenter ou réduire la valeur d un élément particulier Appuyer sur la touche ENTER Appuyer sur la touche EXIT pour quitter le menu Lorsque des modifications sont apportées au Contraste à la Luminosité à la Précision à la Couleur ou à la Teinte la couleur affichée à l écran est modifiée en conséquence En mode PC Teinte V R Netteté et Couleur ne sont pas accessibles Chaque paramètre configuré es...

Page 101: ... l écran afin d obtenir un contraste optimal 6 Appuyer sur la touche ou pour sélectionner Contraste dynam puis appuyer sur la touche ENTER 7 Appuyer sur la touche ou pour sélectionner Désactivé Basse Moyen ou Haute Appuyer sur la touche ENTER Désactivé Désactive la fonction de réglage du contraste dynamique Basse Règle le contraste dynamique au niveau bas Moyen Règle le contraste dynamique au nive...

Page 102: ...hissement de l écran Les réglages peuvent être modifiés et mémorisés pour chaque appareil externe branché à une entrée du téléviseur Activation de l équilibrage du blanc Il est possible de régler la température de la couleur pour obtenir une image de couleurs plus naturelles 17 Appuyer sur la touche ou pour sélectionner Équilibrage des blancs suivie de la touche ENTER 18 Sélectionner l option dési...

Page 103: ... Il est possible d accentuer le rose de l image 20 Appuyer sur la touche ou pour choisir Rose puis sur la touche ENTER 21 Appuyer sur la touche ou pour augmenter ou réduire la valeur Appuyer sur la touche ENTER Une modification de la valeur des réglages entraîne un rafraîchissement de l écran Amélioration des bords Il est possible d accentuer le contour des objets de l image 22 Appuyer sur la touc...

Page 104: ...de deux heures Après avoir sélectionné Zoom1 Zoom2 ou Format large Appuyer sur la touche ou pour sélectionner Position suivie de la touche ENTER Utiliser la touche ou pour déplacer l image vers le bas et le haut Rétablir Appuyer sur la touche ou pour sélectionner Rétablir suivie de la touche ENTER Le paramètre peut être initialisé Après avoir sélectionné Numér seul en mode HDMI 1080i 1080p ou Comp...

Page 105: ...cran 1 Suivre les instructions d activation des options d image 1 et 2 Voir la page 26 2 Appuyer sur la touche ou pour sélectionner Réduc bruit num suivie de la touche ENTER 3 Appuyer sur la touche ou pour sélectionner Désactivé Bas Moyen Élevé ou Auto Appuyer sur la touche ENTER Désactivé Désactive la fonction de réduction du bruit à l écran Bas Règle le bruit à l écran au niveau bas Moyen Règle ...

Page 106: ...eils externes Appuyer sur la touche EXIT pour quitter Réglage du mode Film Il est possible de régler le téléviseur afin qu il détecte et traite automatiquement les signaux de film provenant de toutes les sources et règle l image pour obtenir une définition optimale 1 Suivre les instructions d acttivation des options d image 1 et 2 Voir page 26 2 Appuyer sur la touche ou pour sélectionner le mode F...

Page 107: ...cette fonction lorsque l écran présente des symboles ou des images rémanentes tout particulièrement lorsqu une image fixe est affichée pendant une période prolongée Défilement Cette fonction permet de supprimer les images rémanentes en déplaçant tous les points à l écran au plasma sur un parcours prédéfini Utiliser cette fonction lorsque l écran présente des symboles ou des images rémanentes tout ...

Page 108: ...t de programmer en minutes le délai entre les défilements d images 1 Suivre les instructions d acttivation des options d image 1 et 2 Voir page 26 2 Appuyer sur la touche ou pour sélectionner Protection grillage écran suivie de la touche ENTER 3 Appuyer sur la touche ENTER pour choisir Déplac Point suivie de la touche ENTER Appuyer sur la touche ou pour permuter entre On et Off S affichent égaleme...

Page 109: ... À la mise sous tension ou hors tension le mode passe au mode par défaut Off et le Format est sauvegardé Le mode Effet D s active ou se désactive indépendamment du Mode d image Lorsque le mode Effet D est activé seuls les menus Contraste Luminosité Effet D et Rétablir l image sont activés Si le mode Effet 3D est annulé le niveau de noir HDMI repasse à la valeur précédente Les lunettes 3D et l émet...

Page 110: ...al ou Vertical puis sur ENTER Damier Si le format de sortie de votre carte graphique ou logiciel 3D est Damier sélectionnez ce format d entrée Horizontal Si le format de sortie de votre carte graphique ou logiciel 3D est Entrelacé horizontalement sélectionnez ce format d entrée Vertical Si le format de sortie de votre carte graphique ou logiciel 3D est Entrelacé verticalement sélectionnez ce forma...

Page 111: ...ouche ENTER 3 Appuyer sur ou pour choisir une fréquence particulière à ajuster Appuyer sur la touche ou pour augmenter ou réduire le niveau de la fréquence particulière suivie de la touche ENTER Appuyer sur la touche EXIT pour quitter le menu Réglage de l équilibrage du son G D Pour régler l équilibrage du son des haut parleurs G D Réglage des fréquences 100Hz 300Hz 1KHz 3KHz 10KHz Pour régler le ...

Page 112: ...la touche MENU pour afficher le menu Appuyer sur la touche ou pour sélectionner Son suivie de la touche ENTER 2 Appuyer sur la touche ou pour sélectionner Options multi pistes suivie de la touche ENTER 3 Appuyer sur ENTER pour choisir Langue privilégiée Appuyer sur la touche ou pour sélectionner la langue désirée Anglais Espagnol ou Français suivie de la touche ENTER Appuyer sur la touche EXIT pou...

Page 113: ...ommande pour sélectionner Mono Stéréo ou SAP Sélection d une piste de son multicanaux analogique Selon l émission diffusée il est possible de procéder à une écoute en Mono Stéréo ou SAP 1 Appuyer sur la touche MENU pour afficher le menu Appuyer sur la touche ou pour sélectionner Son suivie de la touche ENTER 2 Appuyer sur la touche ou pour sélectionner Volume auto suivie de la touche ENTER 3 Appuy...

Page 114: ...rs Sortie haut parleurs Sortie haut parleurs Sortie du son Sortie du son Sortie du son Haut parleur TV Désactivée Sourdine Sourdine Sourdine Sortie du son Sortie du son Sortie du son Aucun signal vidéo Sourdine Sourdine Sourdine Sourdine Sourdine Sourdine Branchement du casque d écoute vendu séparément Pour regarder la télévision sans déranger les personnes se trouvant dans la même pièce il est po...

Page 115: ...ur la touche ou pour sélectionner Supprimer les canaux brouillés suivie de la touche ENTER Cette fonction détecte les canaux brouillés à supprimer de la liste Pour arrêter la fonction de recherche des canaux brouillés Appuyer sur la touche ENTER pour sélectionner Arrêt Appuyer sur la touche ou pour sélectionner Oui suivie de la touche ENTER 2 Lorsque la recherche de canaux brouillés est terminée a...

Page 116: ... de la même façon Touche rouge P MODE Appuyer plusieurs fois sur cette touche pour sélectionner Tout Ajouté ou Favorite Touche verte S MODE Appuyer pour ajouter tous les canaux supprimés Touche jaune STILL Appuyer pour supprimer tous les canaux en mémoire Antenne Air Prog Auto Effacer les canaux brouillés Liste des canaux Nom Syn Précise Puissance signal Chaîne T V Intro Dépl Retour Tout Ajouté Fa...

Page 117: ...uer entre tous les canaux les canaux ajoutés ou entre les canaux favoris appuyer sur la touche rouge P MODE de la télécommande Touche rouge P MODE Appuyer plusieurs fois sur cette touche pour sélectionner Tout Ajouté ou Favorite Touche vert Appuyer pour ajouter tous les canaux supprimés Touche jaune STILL Appuyer pour supprimer tous les canaux en mémoire Antenne Air Prog Auto Effacer les canaux br...

Page 118: ...de la télécommande Ajouté Affiche tous les canaux ajoutés lorsqu on appuie sur la touche CH LIST de la télécommande Favorite Affiche les canaux favoris lorsqu on appuie sur la touche CH LIST de la télécommande Appuyer sur la touche EXIT pour quitter Appuyer sur la touche CH LIST de la télécommande pour afficher les listes de canaux Configuration facile 1 Appuyer sur la touche TOOLS de la télécomma...

Page 119: ...es canaux analogiques La fonction de syntonisation précise permet d optimiser manuellement la réception d un canal 1 Appuyer sur la touche MENU pour afficher le menu Appuyer sur la touche ou pour sélectionner Chaîne suivie de la touche ENTER 2 Appuyer sur la touche ou pour sélectionner Syn Précise suivie de la touche ENTER 3 Appuyer sur ou pour ajuster la syntonisation précise 4 Pour mémoriser les...

Page 120: ...ériques accessibles 1 Appuyer sur la touche MENU pour afficher le menu Appuyer sur la touche ou pour sélectionner Chaîne suivie de la touche ENTER 2 Appuyer sur la touche ou pour sélectionner Puissance signal suivie de la touche ENTER Si le capteur d intensité du signal indique que le signal capté est faible ajuster l antenne pour améliorer sa puissance de réception Poursuivre l ajustement de l an...

Page 121: ...propriée est 60 ou 60 Hz Sinon cliquer sur OK et quitter la boîte de dialogue Modes d affichage Si le signal en provenance du système équivaut au mode de signal standard l affichage s ajuste automatiquement Si le signal n équivaut pas au mode de signal standard consulter le manuel d utilisation de la carte vidéo pour régler le mode Sinon il est possible qu il n y ait pas d affichage vidéo L image ...

Page 122: ...ordinateur En outre cette fonction syntonise automatiquement les réglages et ajuste les valeurs et les positions de la fréquence Réglages automatiques 1 Appuyer sur la touche MENU pour afficher le menu Appuyer sur la touche ou pour sélectionner Configuration suivie de la touche ENTER 2 Appuyer sur la touche ou pour sélectionner Réglage auto suivie de la touche ENTER Le message Réglage Auto en cour...

Page 123: ...iguration suivie de la touche ENTER Appuyer sur la touche ou pour sélectionner Écran suivie de la touche ENTER 2 Appuyer sur la touche ou pour sélectionner Rétablir l image suivie de la touche ENTER Le message Rétablissement de l image terminé s affiche Appuyer sur la touche EXIT pour quitter le menu Les réglages définis précédemment seront rétablis selon les valeurs par défaut prédéfinies en usin...

Page 124: ... la touche ou pour passer à Mois Jour Année Heure Minute ou am pm Régler la date et l heure en appuyant sur la touche ou suivie de la touche ENTER Appuyer sur la touche EXIT pour quitter le menu L heure s affiche chaque fois que la touche INFO est enfoncée Il est possible de régler directement le Mois le appuyant l Année les Heure et les Minute en appuyant sur les touches numériques de la télécomm...

Page 125: ...ge automatique de l horloge ne fonctionne pas correctement Dans un tel cas régler l horloge manuellement L antenne ou le câble doit être branché pour que le réglage automatique de l horloge s effectue Réglage de la minuterie activée désactivée Cette fonction permet d allumer ou d éteindre le téléviseur à l heure voulue Tout d abord il faut régler l horloge 1 Appuyer sur la touche MENU pour affiche...

Page 126: ...e et évite toute fuite ou surchauffe lorsque le téléviseur est sous tension pendant une période prolongée pendant les vacances par exemple Réglage de la minuterie de mise en veille Cette minuterie éteint automatiquement le téléviseur après le délai choisi 30 60 90 120 150 et 180 minutes 1 Appuyer sur la touche MENU pour afficher le menu Appuyer sur la touche ou pour sélectionner Configuration suiv...

Page 127: ...e menu Appuyer sur la touche ou pour sélectionner Configuration suivie de la touche ENTER 2 Appuyer sur la touche ou pour sélectionner Sous titrage suivie de la touche ENTER 3 Appuyer sur ENTER pour choisir Sous titrage Appuyer sur la touche ou pour sélectionner On suivie de la touche ENTER Suite Prêt à l emploi Langue Français Heure V Chip Sous titres Réglages externes Divertiss Off Plus Configur...

Page 128: ...oisir le style de police La sélection par défaut est Par défaut Couleur avant plan Cette option permet de choisir entre Par défaut Blanc Noir Rouge Vert Bleu Jaune Magenta et Cyan Il est possible de modifier la couleur du lettrage La sélection par défaut est Par défaut Couleur arrière plan Cette option permet de choisir entre Par défaut Blanc Noir Rouge Vert Bleu Jaune Magenta et Cyan Il est possi...

Page 129: ... ont pour fonction d accroître l information transmise par le programme CC3 Service de sous titrage secondaire synchronisé Programme alternatifde données de sous titrage généralement dans une seconde langue CC4 Sous titrage non synchronisés particulier Option semblable à CC2 Text 1 Premier service de texte Il peut comprendre diverses données qui ne se rapportent pas au programme Text 2 Deuxième se...

Page 130: ...e ENTER 3 Appuyer sur la touche ENTER pour sélectionner Mélodie Appuyer sur la touche ou pour sélectionner Off Basse Moyen ou Haute suivie de la touche ENTER Réglage de la mélodie de marche arrêt du téléviseur La mélodie jouée par le téléviseur à l allumage et à l arrêt est configurable Off Désactive la fonction Mélodie Bas Règle le volume Mélodie au niveau bas Moye Règle le volume Mélodie au nive...

Page 131: ...ts Cinéma ou Jeu suivie de la touche ENTER Off Désactive la fonction Entertainment Sports Offre une image et une qualité sonore optimales pour les sports Cinéma Offre une image et une qualité sonore optimales pour le visionnement de films L image et le son sont enrichis Jeux Offre une image et une qualité sonore optimales pour les jeux Ce mode accélère la vitesse de jeu d une console externe branc...

Page 132: ...tement détecté le message suivant s affiche remplacer la version xxxx par la version xxxx L appareil se réinitialise après la mise à jour Appuyez sur la touche ou pour choisir OK puis sur ENTER La mise à jour est lancée Veiller à ne pas débrancher l alimentation et à ne pas retirer la clé USB pendant l application des mises à jour Le téléviseur s éteint et se remet en marche automatiquement une fo...

Page 133: ...er le NIP à 4 chiffres Le NIP par défaut d un nouveau téléviseur est 0 0 0 0 3 L écran V Chip s affiche Appuyer sur la touche ou pour sélectionner Changer NIP suivie de la touche ENTER L écran Changer NIP s affiche Choisir et saisir quatre chiffres pour le NIP Entrer de nouveau le code à 4 chiffres Le message NIP modifié avec succès est affiché Le NIP a été enregistré Appuyer sur la touche EXIT po...

Page 134: ...x façons à l aide du contrôle parental du téléviseur ou à l aide des classifications de la MPAA 1 Appuyer sur la touche MENU pour afficher le menu Appuyer sur la touche ou pour sélectionner Configuration suivie de la touche ENTER 2 Appuyer sur la touche ou pour sélectionner V Chip suivie de la touche ENTER Le message Entrer NIP s affiche Entrer le NIP à 4 chiffres 3 L écran V Chip s affiche Appuye...

Page 135: ...s Les classifications TV Y7 TV Y7 TV G TV SP TV 14 et TV A comportent des options supplémentaires Voir l étape suivante pour changer les sous classifications ci dessous TOUT Bloquer toutes les classifications L Langage pour adultes FV Fantastique violence S Situations à connotation sexuelle D Dialogues à connotation sexuelle V Violence La fonction V Chip permet de bloquer automatiquement certaines...

Page 136: ...yer sur la touche ENTER pour bloquer ou débloquer la classification Appuyer sur la touche EXIT pour quitter le menu Perm tout Appuyer sur cette touche pour débloquer toutes les classifications Bloq tout Appuyer sur cette touche pour bloquer toutes les classifications G Public de tous âges aucune restriction PG Surveillance parentale recommandée PG 13 Supervision des parents fortement recommandée R...

Page 137: ...cette touche pour bloquer toutes les classifications C Émissions destinées aux enfants de moins de 8 ans C8 Émissions convenant généralement aux enfants de 8 ans et plus sans surveillance G Émissions grand public convenant à tous les auditoires PG Surveillance parentale 14 Émissions dont la teneur peut ne pas convenir en tout ou en partie aux auditeurs de moins de 14 ans 18 Émissions pour adultes ...

Page 138: ...ral 8 ans Émissions non recommandées pour les jeunes enfants 13 ans Émissions pouvant ne pas convenir aux enfants de moins de 13 ans 16 ans Émissions ne convenant pas aux enfants de moins de 16 ans 18 ans Émissions réservées aux adultes La fonction V Chip bloque automatiquement toute classification plus restrictive Par exemple si la classification 8 ans est bloquée les classifications 13 ans 16 an...

Page 139: ... sur la touche ENTER pour activer la restriction sélectionnée Le symbole s affiche Appuyer sur la touche EXIT pour quitter le menu Perm tout Appuyer sur cette touche pour débloquer toutes les classifications Bloq tout Appuyer sur cette touche pour bloquer toutes les classifications Les niveaux de contrôle parentale varient selon la station émettrice Le nom de menu par défaut et les modifications d...

Page 140: ...la touche MENU Appuyer sur la touche ou pour sélectionner Configuration suivie de la touche ENTER 3 Appuyer sur la touche ou pour sélectionner V Chip suivie de la touche ENTER 4 Entrer le NIP et appuyer sur la touche ENTER suivie la touche ou pour désactiver temporairement la fonction Blocage V Chip Si le NIP est oublié appuyer sur les touches de la télécommande dans l ordre suivant pour rétablir ...

Page 141: ...et fonctionne lorsque l appareil audiovisuel qui le prend en charge est à l état de veille ou en marche Anynet prend en charge un maximum de 12 appareils audiovisuels Notez que vous pouvez brancher jusqu à trois appareils du même type Branchement d appareils Anynet Le système Anynet peut être utilisé uniquement avec les appareils audiovisuels Samsung équipés de la fonction Anynet Pour vous assurer...

Page 142: ...marche suivie de la touche ENTER La fonction Arrêt automatique est activée Si arrêt est sélectionné la fonction Arrêt automatique est désactivée Appuyer sur la touche EXIT pour quitter le menu Le paramètre d appareil sélectionné de la télécommande du téléviseur doit être réglé à TV pour pouvoir utiliser la fonction Anynet Si l Arrêt automatique est activé les appareils externes branchés sont égale...

Page 143: ...ers l arrière Recherche vers l avant Arrêt Lecture Pause Appareil avec syntoniseur intégré Après la permutation vers l appareil pendant l écoute d une émission télévisée CH Touche Appareil audio Lorsque le récepteur est activé Touches VOL Touche MUTE La fonction Anynet n est accessible que lorsque la télécommande est réglée à TV La touche REC ne fonctionne qu à l état d écoute de la télévision Il ...

Page 144: ...nynet HDMI CEC est activé dans le menu Configuration d Anynet Vérifier si la télécommande est en mode TV Vérifier s il s agit de la télécommande exclusive Anynet Anynet ne fonctionne pas dans certaines conditions recherche de canaux Prêt à l emploi etc Au moment du branchement ou du débranchement du câble HDMI s assurer d effectuer une nouvelle recherche des appareils ou de redémarrer le téléviseu...

Page 145: ...is il faut les acheter 2 Retirer les vis à l arrière du téléviseur au centre passer les vis dans les pièces de retenue puis reposer les vis sur le téléviseur Il se peut que le produit soit dépourvu de vis Le cas échéant il faut acheter les types de vis suivants 3 Relier les pièces de retenue du téléviseur à celles du mur à l aide d une corde solide puis bien nouer cette dernière Installer le télév...

Page 146: ...visuelle est de calibre SD définition standard L écran est noir et le témoin d alimentation clignote Sur l ordinateur Sur l ordinateur vérifier l alimentation et le câble de signal Le téléviseur est en mode d économie d énergie Déplacer la souris de l ordinateur ou appuyer sur une touche du clavier Sur le matériel vérifier le mode STB DVD etc l alimentation et le câble de signal Le téléviseur est ...

Page 147: ...ran de réglage s affiche alors Appuyez sur la touche INFO pour réinitialiser Appuyez sur la touche ou pour sélectionner Oui puis sur ENTER La position est initialisée au réglage par défaut 3 Appuyez sur la touche bleue Appuyez sur les touches et pour sélectionner un mode de sauvegarde à partir des Position1 Position2 ou Position3 afin de sauvegarder la position en cours Pour ne pas sauvegarder la ...

Page 148: ...en installation Ce dispositif doit être utilisé pour poser le support mural sur un mur Pour le fixer à d autres matériaux veuillez communiquer avec votre détaillant Le support mural automatique ne fonctionne pas lorsque la fonction Anynet est activée Preparación para instalar el montaje mural Once the wall mount is installed the position of your TV can be easily adjusted 1 Fixer le support mural e...

Page 149: ...endommager l intérieur du téléviseur En ce qui a trait aux supports muraux qui ne sont pas conformes aux spécifications de vis standard VESA la longueur des vis peut différer selon leurs spécifications N utilisez pas de vis non conformes aux spécifications de vis standard VESA Ne serrez pas trop les vis cela pourrait endommager le produit ou en provoquer la chute et causer des blessures Samsung dé...

Page 150: ... po 50 po Résolution PC 1024 x 768 60 Hz 1360 x 768 60 Hz Son Sortie 10 10 W 10 10 W Dimension L x H x P Corps Avec support 41 5 X 26 3 X 3 7 pouces 1055 0 X 667 4 X 93 2 mm 41 5 X 28 5 X 12 4 pouces 1055 0 X 724 9 X 315 9 mm 48 4 X 29 8 X 3 8 pouces 1230 2 X 755 7 X 95 0 mm 48 4 X 32 0 X 12 4 pouces 1230 2 X 812 7 X 315 9 mm Poids Corps Avec support 59 3 lbs 26 9 Kg 67 2 lbs 30 5 Kg 75 4 lbs 34 2...

Page 151: ...ous les dessins ne sont pas nécessairement des représentations à l échelle Certaines dimensions peuvent avoir été changées sans avis Mesurez les dimensions de chaque unité avant de procéder à des travaux de menuiserie Nous n assumons aucune responsabilité pour les erreurs typographiques ou d impression 2008 Samsung Electronics America Inc ...

Page 152: ...ous les dessins ne sont pas nécessairement des représentations à l échelle Certaines dimensions peuvent avoir été changées sans avis Mesurez les dimensions de chaque unité avant de procéder à des travaux de menuiserie Nous n assumons aucune responsabilité pour les erreurs typographiques ou d impression 2008 Samsung Electronics America Inc ...

Page 153: ...Cette page est laissée intentionnellement en blanc ...

Page 154: ......

Reviews: