background image

English - 11

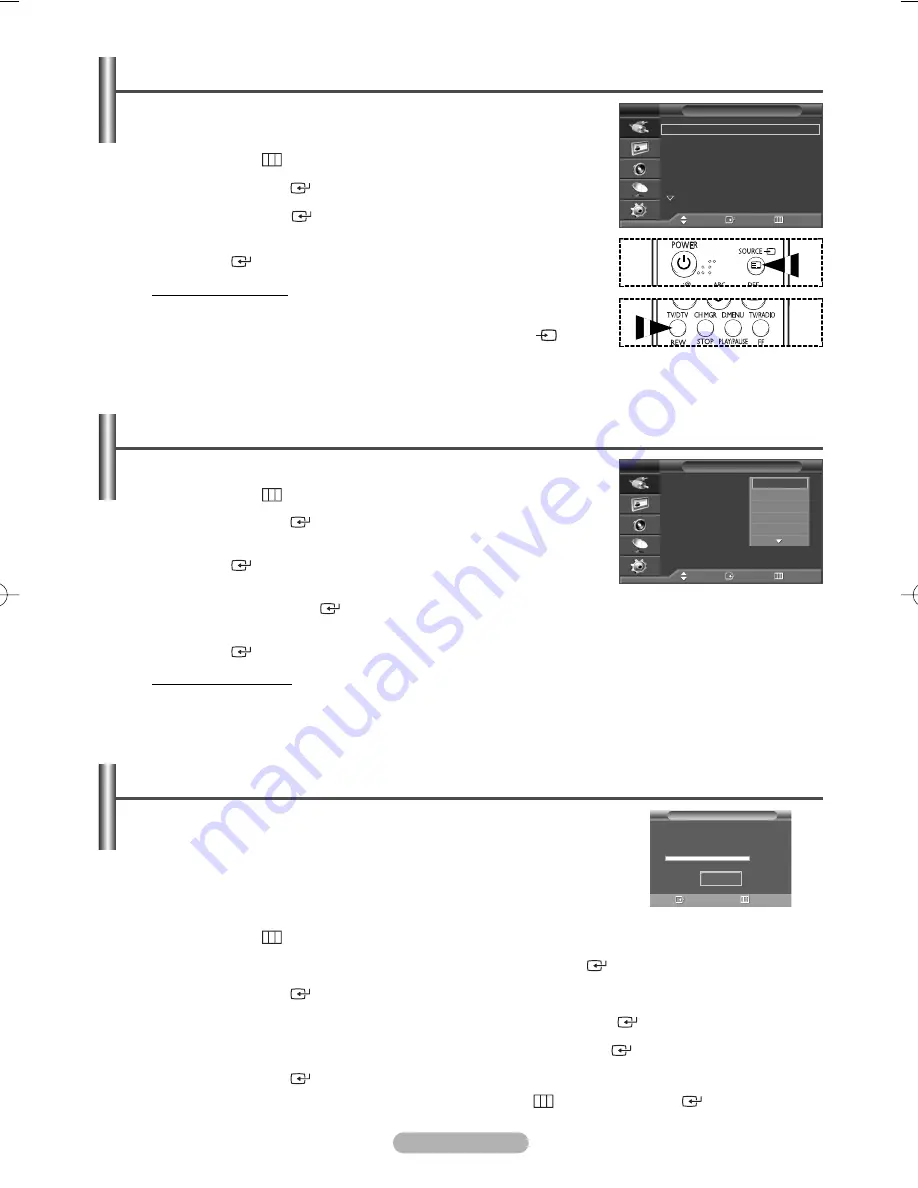
1

Press the 

MENU 

(

) button to display the menu.

2

Press the 

ENTER/OK 

(

) button to select 

Source List

.

3

Press the 

ENTER/OK 

(

) button again.

4

Press the 

or 

button to select the signal source, then press the 

ENTER/OK 

(

) button.

Available signal source: 

TV

Ext.1

Ext.2

AV

S-Video

Component

,

PC

HDMI1

HDMI2

DTV

You can select these options simply by pressing the 

SOURCE 

(

) button

on the remote control.

To watch television programme again, press the 

TV/DTV

button and 

select the channel number required.

Viewing an External Signal Sources

You can switch between viewing signals from connected equipment, such as a
VCR, DVD, Set-Top Box, and the TV source (air or cable).

You can give a name to the external source.

1

Press the 

MENU 

(

) button to display the menu.

2

Press the 

ENTER/OK 

(

) button.

3

Press the 

or 

button to select 

Edit Name

, then press the 

ENTER/OK 

(

) button.

4

Press the 

or 

button to select the external source to be edited, 

then press the 

ENTER/OK 

(

) button.

5

Select the required device by pressing 

or 

, then press the 

ENTER/OK 

(

) button.

Available device names: 

VCR

DVD

D-VHS

Cable STB

HD STB

,

Satellite STB

AV Receiver

DVD Receiver

Game

Camcorder

,

DVD Combo

DHR (DVD HDD Recorder)

, or 

PC

.

6

Press the 

EXIT

button to exit.

Editing Device Names

Source List

Move

Enter

Return

TV

Ext.1

:

----

Ext.2

:

----

AV

:

----

S-Video

:

----

Component

:

----

PC

:

----

More

TV

Edit Name

Move

Enter

Return

Ext.1

:

-----

Ext.2

:

-----

AV

:

-----

S-Video

:

-----

Component

:

----

PC

:

----

HDMI1

:

----

HDMI2

:

----

TV

- - - -

VCR
DVD

D-VHS

Cable STB

Storing Channels Automatically

You can scan for the frequency ranges available to you (availability depends on
your country). Automatically allocated programme numbers may not correspond
to actual or desired programme numbers. However you can sort numbers 
manually and clear any channels you do not wish to watch.

1

Press the 

MENU 

(

) button to display the menu.

2

Press the 

or 

button to select 

Channel

, then press the 

ENTER/OK 

(

) button.

3

Press the 

ENTER/OK 

(

) button again. The available countries are listed.

4

Select your country by pressing the 

or 

button, then press the 

ENTER/OK 

(

) button.

5

Press the 

or 

button to select 

Auto Store

, then press the 

ENTER/OK 

(

) button.

6

Press the 

ENTER/OK 

(

) button again to start the search. The search will end automatically. 

➢ 

To stop the search before it has finished, press the 

MENU 

(

) or the 

ENTER/OK 

(

) button.

Enter

Return

Auto Store

P 1      C --         40 MHz

0 %

Start

Not available in DTV or external input mode.

y

t

of

eed

BN68-00889W-01Eng(Spa)  9/20/06  3:15 PM  Page 11

Summary of Contents for Plasma Display Panel Television

Page 1: ...e unit please read this manual thoroughly and retain it for future reference Register your product at www samsung com global register ON SCREEN MENUS Picture In Picture PIP Energy Saving TELETEXT Option SRS TruSurroundXT Digital Natural Image engine Digital Terrestrial Receiver ...

Page 2: ...ermanent damage to the PDP Panel Watching the PDP TV in 4 3 format for a long period of time may leave traces of borders displayed on the left right and centre of the screen caused by the difference of light emission on the screen Playing a DVD or a game console may cause similar effect to the screen Damages caused by the above effect are not covered by the Warranty Afterimage on the Screen Displa...

Page 3: ...Manually 12 Adding Locking Channels 13 Sorting the Stored Channels 14 Assigning Names to Channels 14 Fine Tuning Channel Reception 15 LNA Low Noise Amplifier 15 PICTURE CONTROL Changing the Picture Standard 15 Customizing the Picture Settings 16 Selecting the Picture Size 16 Digital NR 17 SMD 17 DNIe Demo 17 Viewing the Picture in Picture PIP 17 SOUND CONTROL Sound Features 18 FUNCTION DESCRIPTION...

Page 4: ...o Scanning 27 1 3 Manual Scanning 27 1 4 Reset to Factory Defaults 27 2 Channel Organising 28 2 1 Delete Frequency 28 2 2 Delete Channel 28 2 3 Delete All Channels 28 2 4 Move Edit Channel 28 3 Parental Lock 29 3 1 Set Channel Lock 29 3 2 Change PIN Code 29 4 System Setup 30 4 1 Language Selection 30 4 2 OSD Setting 30 4 3 Time Setting 30 4 4 System Information 30 4 5 Software Upgrade 30 Installin...

Page 5: ...s to see the on screen menu of your TV s features ˇ Press to decrease or increase the volume In the on screen menu use the buttons as you use the œ and buttons on the remote control C P Press to change channels In the on screen menu use the C P buttons as you use the and buttons on the remote control ˆ ENTER Press to confirm a selection Ø Power Press to turn the TV on and off Power Indicator Power...

Page 6: ... Video S Video or Video and audio inputs for external devices such as a Camcorder or VCR Headphones jack You can connect a set of headphones to your television if you wish to watch a television programme without disturbing the other people in the room Prolonged use of headphones at a high volume may damage your hearing Œ continued ...

Page 7: ... EXT 2 Inputs or outputs for external devices such as VCR DVD video game device or video disc players HDMI 1 DVI IN Connect to the HDMI jack of a device with HDMI output These inputs can also be used as a DVI connection with separate analog audio inputs An optional HDMI DVI cable will be necessary to make this connection When using the optional HDMI DVI adapter the DVI analog audio inputs on your ...

Page 8: ...ı ı Available source selection Previous channel DTV menu display Toggle between the TV and Radio channel VCR DVD Function Rewind Stop Play Pause Fast Forward Next channel Previous channel Exit from the on screen menu Control the cursor in the menu Use to see information on the current broadcast Fastext topic selection Digital subtitle display Picture freeze Not available Select the soundtrack vide...

Page 9: ...button on the remote control to switch the television on The programme that you were watching last is re selected automatically If you have not yet stored any channels no clear picture appears Refer to Storing Channels Automatically on page 11 or Storing Channels Manually on page 12 If the television is initially powered on several basic customer settings proceed automatically Refer to Plug Play F...

Page 10: ...cally The TV will begin memorizing all of the available channels Press the ENTER OK button to set the clock 7 Press the œ or button to select the hour or minute Set these by pressing the or button You can enter the Hour Minute by using the numeric buttons on the remote control 8 Press the ENTER OK button to confirm your setting The DTV channel scan menu appears and the DTV channel is automatically...

Page 11: ...Cable STB HD STB Satellite STB AV Receiver DVD Receiver Game Camcorder DVD Combo DHR DVD HDD Recorder or PC 6 Press the EXIT button to exit Editing Device Names Source List Move Enter Return TV Ext 1 Ext 2 AV S Video Component PC More TV Edit Name Move Enter Return Ext 1 Ext 2 AV S Video Component PC HDMI1 HDMI2 TV VCR DVD D VHS Cable STB Storing Channels Automatically You can scan for the frequen...

Page 12: ...ur standard Sound System BG DK I L Press the or button to select the required sound standard Channel When you know the number of the channel to be stored Press the or button to select C Air channel or S Cable channel Press the button then press the or button to select the required number You can also select the channel number directly by pressing the numeric buttons 0 9 If there is abnormal sound ...

Page 13: ...you to prevent unauthorized users such as children from watching unsuitable programmes by muting out video and audio 4 Press the or button to select Child Lock then press the ENTER OK button 5 Select On by pressing the or buttons then press the ENTER OK button 6 Press the or buttons to select the Channel Manager then press the ENTER OK button 7 Move to the field by pressing the œ buttons select a ...

Page 14: ... 0 C 1 C 4 2 C 74 3 C 75 4 S 1 TV A Not available in DTV or external input mode This operation allows you to change the programme numbers of stored channels This operation may be necessary after using auto store 1 Press the MENU button to display the menu 2 Press the or button to select Channel then press the ENTER OK button 3 Press the or button to select Sort then press the ENTER OK button 4 Sel...

Page 15: ...R OK button 5 Press the EXIT button to exit Depending on areas factory mode of LNA will be set up as On or Off LNA Low Noise Amplifier This function is very useful in the situation that the TV is used in weak signal LNA amplifies the TV signal in the weak signal area a low noise preamplifier boosts the incoming signal Channel Move Enter Return Country Belgium Auto Store Manual Store Channel Manage...

Page 16: ...irements 1 Press the MENU button to display the menu 2 Press the or button to select Picture then press the ENTER OK button 3 Press the or button to select Size then press the ENTER OK button 4 Select the required option by pressing the or button then press the ENTER OK button Available options Auto Wide 16 9 Wide 4 3 Zoom 4 3 Auto Wide Expanding and pulling up the picture from 4 3 to 16 9 ratio 1...

Page 17: ...e in PC mode Digital NR SMD DNIe Demo Picture Move Enter Return Mode Dynamic Size Auto Wide Digital NR On SMD On DNIe Demo Off PIP TV You can display a sub picture within the main picture In this way you can watch TV program or monitor the video input from any connected devices PIP On Off You can activate or deactivate the PIP function You can select these options simply by pressing the PIP button...

Page 18: ...ision speakers It is fully compatible with all multichannel formats TruSurround XT SRS and Symbol are trademarks of SRS Labs Inc TruSurround XT technology is incorporated under license from SRS Labs Inc Auto Volume On Off Each broadcasting station has its own signal conditions and so it is not easy to adjust the volume every time the channel is changed This feature lets you automatically adjust th...

Page 19: ...0 90 120 150 or 180 for staying on by pressing the or button If the sleep timer is not yet set Off is displayed If it is already set the remaining time before which the television switches to standby mode is displayed On Timer Off Timer You can set the On Off timers so that the television will switch on or off automatically at the time you select You must set the clock first On Timer Select Hour M...

Page 20: ...ss of the surrounding illumination High Enters maximum power saving mode regardless of the surrounding illumination Language Blue Screen Melody Energy Saving Setup Move Enter Return Plug Play Language English Time Game Mode Off Blue Screen Off Melody Off PC More TV 1 Press the MENU button to display the menu 2 Press the or button to select Setup then press the ENTER OK button 3 Press the or button...

Page 21: ...ng time Signal Pattern This function helps remove after images on the screen by moving all the pixels on the PDP according to a pattern Use this function when there are remaining after images or symbols on the screen especially when you displayed a still image on the screen for a long time To remove after images on the screen use either All White or Signal Pattern function Although both of the two...

Page 22: ...the window then Click on OK button to the Display Properties window Automatic re booting may commence at this moment Setting upYour PC Software Based on Windows XP Both screen position and size will vary depending on the type of PC monitor and its resolution The table below shows all of the display modes that are supported Input Mode PC The interlace mode is not supported The television might oper...

Page 23: ...ligned on the center of screen 1 Press the or button to select Coarse or Fine then press the ENTER OK button 2 Press the œ or button to adjust the screen quality vertical stripes may appear or the picture may be blurry Press the ENTER OK button Position Adjust the PC s screen positioning if it does not fit the TV screen 1 Adjust the position by pressing the œ button 2 Press the ENTER OK button Aut...

Page 24: ...m Information Software Upgrade The sub items of the CI Menu may vary depending on the CAM model In the Digital TV mode do not turn the power off before the screen is completely loaded Installation Channel Organising Parental Lock System Setup Select Country Auto Scanning Manual Scanning Reset to Factory Defaults Installation Select Country Installation Channel Organising Parental Lock System Setup...

Page 25: ...e level Press the buttons to adjust the volume level Press the MUTE button to turn to silence mode Press the MUTE button again or buttons in order to cancel the mute function 3 Select Soundtrack Press the ALT button to see the soundtrack list Press the or and ENTER OK buttons to select one 4 Select Videotrack Press the ALT button twice to see the videotrack list Press the or and ENTER OK buttons t...

Page 26: ...t the channel by pressing the or buttons and press the ENTER OK button to watch this channel Operating the DTV Menu Main Menu After installing your antenna system and TV with appropriate connectors Plug in the AC main power and switch on the TV Press the D MENU button to bring up the main menu The following on screen display will appear The sub menu topics will be displayed For the sub menus Insta...

Page 27: ... want to find The followings are defined as a default but optionally you can choose it Signal Status bar shows you if it is valid Input the frequency of the channel you want to find Select the bandwidth You can select the value of 6 MHz 7 MHz or 8 MHz Select the Guard Interval Mode You can select the value of AUTO 1 32 1 16 1 8 or 1 4 Select the FFT Fast Fourier Transform Mode One of the values AU...

Page 28: ... Press the D MENU button and then press the ENTER OK button to save the set data The message Please Wait is displayed continued Installation Channel Organising Parental Lock System Setup Delete Frequency Delete Channel Delete All Channels Move Edit Channel Channel Organising Delete Frequency Installation Channel Organising Parental Lock System Setup Delete Frequency Delete Channel Delete All Chann...

Page 29: ...lly To cancel the lock Press the RED button again in order to cancel the lock 3 2 Change PIN Code To change the PIN Code select the second option Change PIN Code This will take you to the following menu In this option you need to enter the current PIN Code at the first cursor and at the second cursor enter the desired PIN Code To confirm you need to enter the new PIN Code again Please remember the...

Page 30: ...time in Time Zone The local time will be changed according to your location GMT is referred to the standard time of Greenwich 4 4 System Information If you have to contact your service provider or a service center they might ask for information available from this menu Place the cursor on this sub menu and press the ENTER OK button The following will be the on screen display 4 5 Software Upgrade Y...

Page 31: ...in the direction of the arrow until it fits 3 Insert the CAM with the CI card installed into the common interface slot Insert the CAM in the direction of the arrow right up to the end so that it is parallel with the slot 4 Check if you can see a picture on a scrambled signal channel You can install the CAM anytime whether the TV is ON or OFF ...

Page 32: ...hen searching for a page Ò Ò TV DTV exit Exit from the teletext display You can change teletext pages by pressing the numeric buttons on the remote control Most television stations provide written information services via teletext The index page of the teletext service gives you information on how to use the service In addition you can select various options to suit your requirements by using the ...

Page 33: ...cian for installing the wall bracket Samsung Electronics is not responsible for any damages to the product or harm to customers when the installation is done by the customer This product is for installing on cement walls The product may not stay in place when installed on plaster or wood The package contents and parts supplied for the wall mount are subject to change without prior notice Mounting ...

Page 34: ...nd right side after hanging the SET on the wall mount bracket 3 Please avoid catching your fingers while installing and adjusting the angle 4 Please tightly secure the wall mount bracket to the wall to avoid injury from a falling SET How to Install the Wall Mount Bracket 3 Tighten the screws of the plastic hanger shown in picture 2 to the back side of the PDP 4 Remove the Safety Pins Fasten the 4 ...

Page 35: ...es as illustrated in figure Viewing the PDP after connecting the external devices Remove the Safety Pins to adjust the angle to 0 and then secure the Safety Pins again For safety be sure to secure the PDP using the safety pins If the safety pins are not used the PDP may fall causing serious injury How to Adjust Mounting Angle Please secure the mounting bracket on the wall surface after setting its...

Page 36: ... VCR Cable DVD or Set Top Box Pressing the corresponding button on the remote control allows you to switch between these modes and control whichever piece of equipment you choose The remote control might not be compatible with all DVD Players VCRs Cable boxes and Set Top Boxes Setting Up the Remote to Operate Your Cable Box 1 Turn off your cable box 2 Press the CABLE button on your TV s remote con...

Page 37: ...mote Control Modes DVD When your remote control is in DVD mode the volume buttons still control your TV s volume Setting Up the Remote to Operate Your Set Top Box 1 Turn off your STB 2 Press the STB button on your TV s remote control 3 Press the SET button on your TV s remote control 4 Using the number buttons on your remote control enter three digits of the STB code listed on page 39 of this manu...

Page 38: ...81 082 083 021 056 059 007 008 018 021 026 037 062 006 036 073 074 075 076 021 006 021 024 025 034 005 019 041 075 Brand MITSUBISHI MONTGOMERY WARD MTC MULTITECH NEC OPTIMUS PANASONIC PENTAX PENTEX RESEARCH PHILCO PHILIPS PIONEER PORTLAND PROSCAN QUARTZ QUASAR RADIOSHACK REALISTIC RCA SANSUI SANYO SCOTT SEARS SHARP SHIMTOM SIGNATURE SONY SYLVANIA SYMPHONIC TANDY TASHIKA TATUNG TEAC TECHNICS TEKNIK...

Page 39: ...veSTBHDDCOMBOPremium Code 010 011 012 013 014 SET TOP BOX Code 023 043 018 034 019 035 015016017019022045060061062065066067 068 074 069 070 069 018 024 032 027 025 069 070 071 069 069 065 046 047 048 063 064 069 056 022 015 017 020 020 059 063 069 070 Brand ALPHASTAR ANAM CHANNEL MASTER CROSSDIGITAL CHAPARRAL DIRECT TV DAEWOO DISHNETWORKSYSTEM DISHPRO DRAKE DX ANTENNA ECHOSTAR EXPRESSVU GOI GE GEN...

Page 40: ... MATHES CYBER HOME CLARION CIRRUS CINEVISION DAEWOO DENON FARENHEIT FISHER GPX GO VIDEO GE GREENHILL HITACHI HITEKER HOYO HARMAN KARDON IRT INTEGRA JBL JVC JATON KENWOOD KISS KONKA KLH LG Goldstar LOEWE LASONIC MOBILE AUTHORITY MEMOREX MALATA MAGNAVOX MINTEK MONYKA Brand NORCENT NEXT BASE NEC NANTAUS NESA OPTOMEDIA ELECTRONICS OPTIVIEW ONKYO PHILCO PRINCETON PROSCAN PANASONIC PHILIPS ROTEL RIO RCA...

Page 41: ...rrect Sound and picture interference Try to identify the electrical appliance that is affecting the television then move it further away Plug the television into a different mains socket Blurred or snowy picture distorted sound Check the direction location and connections of your aerial This interference often occurs due to the use of an indoor aerial Remote control malfunctions Replace the remote...

Page 42: ...r human health from uncontrolled waste disposal please separate this from other types of wastes and recycle it responsibly to promote the sustainable reuse of material resources Household users should contact either the retailer where they purchased this product or their local government office for details of where and how they can take this item for environmentally safe recycling Business users s...

Reviews: