background image

49

48

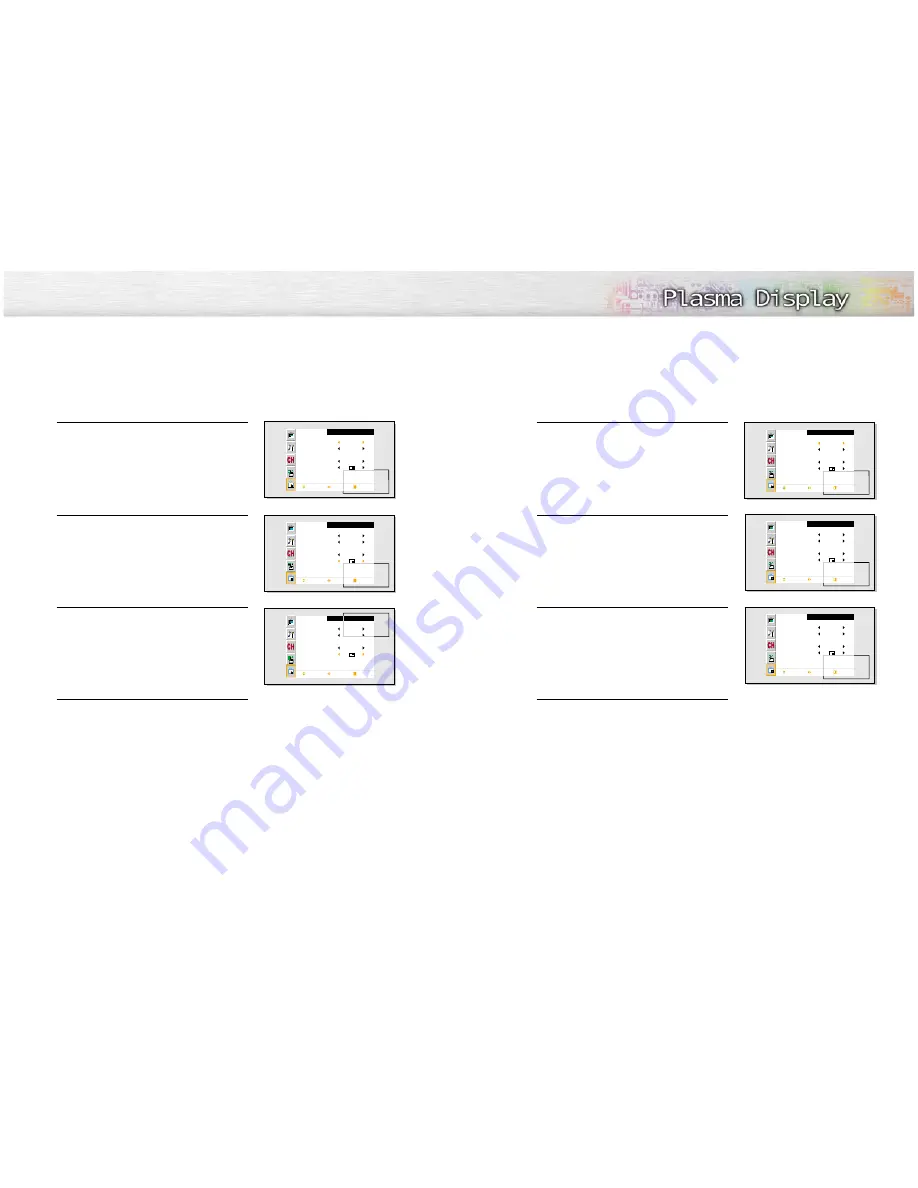
Changing the PIP Channel

Press the MENU button. Press the UP or DOWN
button to select “PIP”, then press the ENTER button. 

Press the UP or DOWN button to select “Ant/CATV”.
Press the LEFT or RIGHT button to select “Ant”, 

“STD”, “HRD” or “IRC”.

Press the UP or DOWN button to select “Channel”.
Press the LEFT or RIGHT button to change the 

channel that appears in the PIP window.

Press the MENU button to exit.

PIP

Select

Source

Swap

Size

Locate

Ant/CATV

Channel

Move               Select              Menu

 On

 TV

Large

Ant

Ant   5

PIP

Select

Source

Swap

Size

Locate

Ant/CATV

Channel

Move               Select              Menu

 On

 TV

Large

STD

STD   5

PIP

Select

Source

Swap

Size

Locate

Ant/CATV

Channel

Move               Select              Menu

 On

 TV

Large

STD

STD   9

Changing the Location of the PIP Image

Press the MENU button. Press the UP or DOWN
button to select “PIP”, then press the ENTER button. 

Press the UP or DOWN button to select “Locate”.

Press the LEFT or RIGHT button to move the PIP
screen where you want.  

Press the MENU button to exit.

PIP

Select

Source

Swap

Size

Locate

Ant/CATV

Channel

Move               Select              Menu

 On

 TV

Large

Ant

Ant   5

PIP

Select

Source

Swap

Size

Locate

Ant/CATV

Channel

Move               Select              Menu

 On

 TV

Large

Ant

Ant   5

PIP

Select

Source

Swap

Size

Locate

Ant/CATV

Channel

Move               Select              Menu

 On

 TV

Large


Ant

Ant   5

Quick way to change the PIP channel: Just press the “CH

or

“CH

” button under the cover of the remote control.

Summary of Contents for PL-42P3S

Page 1: ...Samsung Electronics Mexico S A de C V Saturno No 44 Col Nueva Industrial Vallejo Gustavo A Madero C P 07700 Mexico TEL 52 5 747 5100 EXPORTER Samsung Electronics co Ltd 416 Mae tan 3dong Pal dal Gu Suwon City Kyungki Do Korea BN68 00426A 00 ...

Page 2: ...te ventilation and that you ve followed the manufacturer s instructions for mounting Operate your PDP only from the type of power source indicated on the marking label If you are not sure of the type of power supplied to your home consult your appliance dealer or local power com pany Use only a grounded or polarized outlet For your safety this PDP is equipped with a polarized alter nating current ...

Page 3: ...S 003 Cet appareil numéique de la classe B est conforme à la norme NMB 003 du Canada 5 Protect the power cord Power supply cords should be routed so that they won t be walked on or pinched by objects placed on or against them Pay particular attention to cords at plugs convenience recepta cles and the point where they exit from the unit Unplug the PDP from the wall outlet and disconnect the antenna...

Page 4: ... on them should primarily be in the wide screen 16 9 ratio format or expanded to fill the screen if your model offers this feature and con stantly moving Displaying stationary graphics and images on screen such as the dark side bars on non expanded standard format television video and programming should be limited to no more than 5 of the total television viewing per week Additionally viewing othe...

Page 5: ...P L A S M A D I S P L A Y P A N E L General Information Your New Plasma Display Panel 10 Remote Control Buttons 12 Wall Installation Instructions 14 ...

Page 6: ...eaker jack Power Input jack Connect the supplied power cord Remote Control Signal Receiver Aim the remote control towards this spot on the PDP Power Indicator Power Off LED Red Power On Timer On LED Green Power On Timer Off LED Off Checking Accessories Speakers optional SOURCE button Press to display all of the available video sources ie Video S Video Component1 Component2 PC MENU button Displays ...

Page 7: ...o mute the PDP sound ØVOL Volume buttons Use it to adjust volume SLEEP button Press to select a preset time interval for automatic shutoff MENU button Displays the main on screen menu ENTER button Confirms a selection PIP button Activates picture in picture ÔSTILL button Press to pause the current screen LED Display When you press a button appears along with selected mode TV VCR CATV DVD or STB an...

Page 8: ...and prevent problems avoid the following places Do not install next to smoke and fire detectors Do not install in an area subjected to vibration Do not install in an area subjected to high voltage Do not install near or around any heating apparatus 3 Use only recommended parts and components 14 Screws 4 EA Insulation holders 4 EA Installation Notes Parts Wall attachment panel is sold separately Ch...

Page 9: ... wall attachment panel brackets are tightened Otherwise the PDP panel may fall down and you might be hurt How to Adjust Mounting Angle Notice Notice Please secure the mounting bracket on the wall surface after setting its angle at 0 Factory default The wall mount bracket is delivered separately Please tighten the captive screw in the direction of the arrow after assembling the bracket 1 Secure the...

Page 10: ...I S P L A Y P A N E L Connections Connecting VHF and UHF Antennas 20 Connecting Cable TV 21 Connecting Speakers 23 Connecting a VCR 24 Connecting a Camcorder 25 Connecting a DVD Player 26 Connecting a DTV Receiver 27 ...

Page 11: ...minal on the PDP Use the Antenna Cable an accessory included in the product package Cable without a Cable Box 1 Plug the incoming cable into the VHF UHF terminal on the PDP Use the Antenna Cable an accessory included in the product package Cable with a Cable Box that Descrambles All Channels 1 Find the cable connected to the ANTENNA OUT terminal on your cable box This terminal might be labeled ANT...

Page 12: ...tch and four coaxial cables which you can buy from your Samsung dealer or any electronics store 1 Find and disconnect the cable that is con nected to the ANTENNA IN terminal of your cable box This terminal might be labeled ANT IN VHF IN or simply IN Connect this cable to a two way splitter 2 Connect a coaxial cable between an OUT PUT terminal of the splitter and the IN termi nal of the cable box 3...

Page 13: ...h one of these ferrite cores to the cable near the connector When you connect the audio cable PC DVI S Video Video Component1 Component2 to the connectors bind the ferrite core around the cable to secure it Ferrite Cores Connecting a VCR Audio Cable Video Cable Power Plug Connect a Video Audio cable between the AUDIO L R VIDEO jacks on the PDP and the VIDEO AUDIO OUTPUT jacks on the camcorder View...

Page 14: ...s How to Connect 1 2 PDP DVD Player Watching DTV Video Cable Audio Cable DVI Cable or Power Plug Connect the cable or antenna to the antenna input jack on the DTV Connect a Video cable between the Y Pb Pr COMPONENT 1 2 or DVI jack on the PDP and the Y PB PR VIDEO OUTPUT JACKS on the DTV receiver Connect an Audio cable between the COMPONENT 1 2 L R AUDIO or DVI jacks on the PDP and the AUDIO OUTPUT...

Page 15: ...P L A S M A D I S P L A Y P A N E L Operation Turning the PDP On and Off 30 Memorizing the Channels 32 Setting Up Your Remote Control 37 ...

Page 16: ... With the power on press the MENU button on the remote control The main menu appears on the screen The Picture menu is selected 2 Press the UP DOWN buttons to move items in the menu Press the LEFT RIGHT buttons to display change or use the selected items Press the ENTER button to enter items in the menu On screen menus disappear from the screen automatically after about thirty seconds or you can p...

Page 17: ... HRC and IRC identify various types of cable TV systems Contact your local cable company to identify the type of cable system that exists in your particular area At this point the signal source has been selected Proceed to Storing Channels in Memory next page Channel Ant CATV Auto Program Fine Tune LNA Ch Scan Move Select Menu Ant Off 0 Channel Ant CATV Auto Program Fine Tune LNA Ch Scan Move Sele...

Page 18: ... Manual Method 1 Use the number buttons to directly select the channel that will be added or erased Ex Channel 4 2 Press the ADD DEL button Repeatedly pressing this button will alternate between Added and Erased Note You can view any channel including an erased channel by using the number buttons on the remote control Ant 4 Ant 4 Added Channel Ant CATV Auto Program Fine Tune LNA Ch Scan Move Selec...

Page 19: ...ntrol is in VCR mode the VCR control buttons Stop REW Play Pause FF still operate your VCR When your remote control is in CATV or DVD mode the VCR control buttons Stop REW Play Pause FF still operate your VCR Changing Channels Using the Channel Buttons Press the CH or CH buttons to change channels When you press the CH or CH buttons the PDP changes channels in sequence You will see all the channel...

Page 20: ...zing the Picture 40 Using Automatic Picture Settings 41 Selecting the Color Tone 42 DNIe Digital Natural Image engine 43 Viewing the Picture in Picture 44 Changing the Screen Size 50 Freezing the Picture 51 Remote Control Codes VCR Codes Cable Box Codes DVD Codes ...

Page 21: ...e Select Menu Dynamic Custom On 40 1 Press the MENU button then press the ENTER button 2 Press the UP or DOWN button to select Adjust then press the ENTER button You will also see the items Contrast Brightness Sharpness Color and Tint 3 Press the UP or DOWN button to select the item you wish to change 4 Press the LEFT or RIGHT button to change the value of the item 5 Press the MENU button to exit ...

Page 22: ... s New Technology brings you more detailed images with contrast and white enhancement and 3D noise reduction 1 Press the MENU button then press the ENTER button 2 Press the UP or DOWN button to select DNIe then press the LEFT or RIGHT button to select On Off or Demo On Switches on the DNIe mode Demo The screen before applying DNIe appears on the right and the screen after applying DNIe appears on ...

Page 23: ... 5 PIP Select Source Swap Size Locate Ant CATV Channel Move Select Menu On TV Large Ant Ant 5 PIP Select Source Swap Size Locate Move Select Menu On Video Large Viewing the Picture in Picture Selecting the PIP Screen 1 Press the MENU button Press the UP or DOWN button to select PIP then press the ENTER button 2 Press the LEFT or RIGHT button to select On The PIP image will appear in the corner of ...

Page 24: ...Menu On TV Small Ant Ant 5 Swapping the Contents of the PIP Image and Main Image 1 Press the MENU button Press the UP or DOWN button to select PIP then press the ENTER button 2 Press the UP or DOWN button to select Swap then press the ENTER button The image in the PIP window will appear on the main screen and vice versa 3 Press the MENU button to exit PIP Select Source Swap Size Locate Ant CATV Ch...

Page 25: ...arge STD STD 5 PIP Select Source Swap Size Locate Ant CATV Channel Move Select Menu On TV Large STD STD 9 Changing the Location of the PIP Image 1 Press the MENU button Press the UP or DOWN button to select PIP then press the ENTER button 2 Press the UP or DOWN button to select Locate 3 Press the LEFT or RIGHT button to move the PIP screen where you want 4 Press the MENU button to exit PIP Select ...

Page 26: ...ama mode can t be selected In Component 480p 720p 1080i modes you can move the picture on screen by pressing the Up or Down button All screen modes Changing the screen size to Normal Zoom1 or Zoom2 during PIP mode will cause the PIP window to disappear When you press the ASPECT button on the remote control the PDP s screen mode should appear in sequence The screen displays in this order Wide Panor...

Page 27: ...D I S P L A Y P A N E L Sound Control Customizing the Sound 54 Using Automatic Sound Settings 55 Choosing a Multi Channel Sound MTS Soundtrack 56 Using the Auto Volume 57 Using Dolby Virtual 58 Using a Subwoofer 59 ...

Page 28: ...tton Press the UP or DOWN button to select Sound then press the ENTER button 2 Press the UP or DOWN button to select Adjust then press the ENTER button You will also see the items Bass Treble and Balance 3 Press the UP or DOWN button to select the item you wish to change 4 Press the LEFT or RIGHT button to change the value of the item 5 Press the MENU button to exit Sound Mode Adjust MTS Auto Volu...

Page 29: ...n to select MTS 3 Press the LEFT or RIGHT button to select Mono Stereo or SAP 4 Press the MENU button to exit Sound Mode Adjust MTS Auto Volume Dolby Virtual Woofer Move Select Menu Custom Mono Off Off Sound Mode Adjust MTS Auto Volume Dolby Virtual Woofer Move Select Menu Standard Mono Off Off Sound Mode Adjust MTS Auto Volume Dolby Virtual Woofer Move Select Menu Standard Stereo Off Off Choose S...

Page 30: ...ofer Move Enter Menu Standard Mono Off Off Woofer Woofer Volume Cutoff Freq Move Select Menu On 50 120Hz Woofer Woofer Volume Cutoff Freq Move Adjust Menu On 50 120Hz 65 Volume Woofer Woofer Volume Cutoff Freq Move Adjust Menu On 50 130Hz 58 Using Dolby Virtual This feature allows the PDP s optional L R speakers to provide a Home Theater like Dolby effect The center and surround sounds are mixed i...

Page 31: ...P L A S M A D I S P L A Y P A N E L Channel Control Fine Tuning Channels 62 LNA Low Noise Amplifier 63 ...

Page 32: ...l Air CATV Auto Program Fine Tune LNA Ch Scan Add Erase Adjust Menu Air Off 3 Channel Air CATV Auto Program Fine Tune LNA Ch Scan Add Erase Adjust Menu Air Off 3 LNA Low Noise Amplifier If the TV is operating in a weak signal area sometimes the LNA function can improve the reception a low noise preamplifier boosts the incoming signal 1 Press the MENU button Press the UP or DOWN button to select Ch...

Page 33: ... S P L A Y P A N E L Connecting a PC and Operation Connecting to a PC 66 Adjusting the PC Screen 70 Changing the Position of the Image 71 Changing the Size of the Image 72 Information 73 Picture Quality Adjustment 74 ...

Page 34: ...o pages 70 and 76 Connecting a PC to the PDP Audio Cable PC Cable DVI Cable Power Plug 1 2 Pin Configuration D Sub Cable DVI D Cable Digital Only Connector 15Pin Signal Cable based on protruded pin Setting up Your PDP Plug and Play Our adoption of the new VESA Plug and Play solution eliminates complicated and time consuming setup It allows you to install your monitor in a Plug and Play compatible ...

Page 35: ...lution The table below shows all of the display modes that are supported The interlace mode is not supported The PDP operates abnormally if a non standard video format is selected Notes When this PDP is used as a PC display 32 bit color is supported Depending on the manufacturer your PC display screen might appear different and depending on your particular version of Windows Check your PC instruct...

Page 36: ... to exit Picture Mode Adjust Color Tone Color Adjust DNIe Move Select Menu Custom Custom On Picture Mode Adjust Color Tone Color Adjust DNIe Move Select Menu Custom Custom On Picture Mode Adjust Color Tone Color Adjust DNIe Move Enter Menu Custom Custom On Adjust Red Green Blue Move Adjust Menu 50 50 50 82 Red Changing the Position of the Image After connecting the PDP to your PC adjust the positi...

Page 37: ...ve Select Menu Wide PC Position Adjust Scaling Information Auto Adjust Move Select Menu Normal Information Preset Press the TV VIDEO button then press the UP or DOWN button to select PC Press the ENTER button to select PC mode 1 Press the MENU button Press the UP or DOWN button to select PC then press the ENTER button 2 Press the UP or DOWN button to select Informa tion then press the ENTER button...

Page 38: ... Adjust Move Enter Menu Wide PC Position Adjust Scaling Information Auto Adjust Move Enter Menu Wide Adjust Corase Fine Move Adjust Menu 50 7 53 Coarse 74 Picture Quality Adjustment Picture Automatic Adjustment Preset Press the TV VIDEO button then press the UP or DOWN button to select PC Press the ENTER button to select PC mode 1 Press the MENU button Press the UP or DOWN button to select PC then...

Page 39: ... the UP or DOWN button to select PC then press the ENTER button 2 Press the UP or DOWN button to select Adjust then press the ENTER button 3 Press the UP or DOWN button to select Fine Remove picture noise on the screen by pressing the LEFT or RIGHT button If Fine is not set properly noise will appear on the screen 4 Press the MENU button to exit PC Position Adjust Scaling Information Auto Adjust M...

Page 40: ...ss the MENU button Press the UP or DOWN button to select Function then press the ENTER button 2 Press the UP or DOWN button to select Time then press the ENTER button 3 Press the LEFT or RIGHT button to select hour then press the UP or DOWN button to select the correct hour 4 Press the LEFT or RIGHT button to select minute then press the UP or DOWN button to select the correct minute 5 Press the M...

Page 41: ...the LEFT or RIGHT button to select hour then press the UP or DOWN button to select the correct hour 5 Press the LEFT or RIGHT button to select minute then press the UP or DOWN button to select the correct minute Function Language Time Caption NR Auto Power Off V Chip Film Mode Move Select Menu English Off Off Off Function Language Time Caption NR Auto Power Off V Chip Film Mode Move Enter Menu Eng...

Page 42: ...on to select Time then press the ENTER button 3 Press the UP or DOWN button to select On Time Volume Press the LEFT or RIGHT button to adjust volume level 4 Press the UP or DOWN button to select On Time Channel Press the LEFT or RIGHT button to select the channel Function Language Time Caption NR Auto Power Off V Chip Film Mode Move Select Menu English Off Off Off Function Language Time Caption NR...

Page 43: ...glish Off Off Off Function Language Time Caption NR Auto Power Off V Chip Film Mode Move Enter Menu English Off Off Off Caption Caption Mode Channel Field Move Select Menu On Caption 2 1 Caption Caption Mode Channel Field Move Select Menu On Text 2 1 1 Press the MENU button Press the UP or DOWN button to select Function then press the ENTER button 2 Press the LEFT or RIGHT button to select the app...

Page 44: ...tton Press the UP or DOWN button to select Function then press the ENTER button 2 Press the UP or DOWN button to select NR 3 Press the LEFT or RIGHT button to select On 4 Press the MENU button to exit Function Language Time Caption NR Auto Power Off V Chip Film Mode Move Select Menu English Off Off Off Function Language Time Caption NR Auto Power Off V Chip Film Mode Move Select Menu English Off O...

Page 45: ...te control buttons in the following sequence which resets the pin to 0 0 0 0 Power Off Mute 8 2 4 Power On Function Language Time Caption NR Auto Power Off V Chip Film Mode Move Select Menu English Off Off Off Function Language Time Caption NR Auto Power Off V Chip Film Mode Move Enter Menu English Off On Off V Chip Enter Pin Enter Pin V Chip V Chip Lock TV GuideLines MPAA Rating Change Pin No Mov...

Page 46: ...ntasy violence D Sexually Sugessive Dialog L Adult Language S Sexual situation V Violence Note 2 The V Chip will automatically block certain categories that are more restrictive For example if you block TV Y category then TV Y7 will automatically be blocked Similarly if you block the TV G category then all the categories in the young adult group will be blocked TV G TV PG TV 14 and TV MA The sub r...

Page 47: ...en R NC 17 and X will automatically be blocked also How to Reset the TV after the V Chip Blocks a Channel Emergency Escape If the TV is tuned to a restricted channel the V Chip will block it The screen will go blank and the following message will appear Excessive rating To resume normal viewing tune to a different channel using the number buttons Under certain conditions depending on the rating of...

Page 48: ...s the RIGHT or LEFT button to select On or Off On Automatically senses and processes film signals from all sources and adjusts the picture for optimum quality Off Switches off the Film mode 3 Press the MENU button to exit Note Film mode is supported in Video S Video Component 480i Function Language Time Caption NR Auto Power Off V Chip Film Mode Move Select Menu English Off Off Off Function Langua...

Page 49: ... care your PDP will give you many years of service Please follow these guidelines to get the maximum performance from your PDP Identifying Problems Do not put the PDP near extremely hot cold humid or dusty places Do not put the PDP near appliances that create magnetic fields Keep the ventilation openings clear Do not place the PDP on a rough and slanted surface such as cloth or paper Liquids Do no...

Page 50: ... DVI VIDEO S VIDEO COMPONENT 1 COMPONENT 2 PC RGB DVI 10W 10W 8 Ω Subwoofer 500mv RMS at 1KHz Model Dimensions Display Remote Control Weight Display Remote Control Voltage Power Consumption Number of Pixels Screen Size ANTENNA input VIDEO input AUDIO input AUDIO output Exterior design and product specifications are subject to change without prior notice to improve the performance of this product T...

Reviews: