background image

English  35

Maint

enanc

e

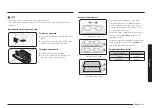
Burner grates and components

Turn off all surface burners and make sure they have all cooled down.

1

2

3

LL

C

C

R

R

1. 

Remove the center burner grate(C) 
following both sides grates.(L/R)

2. 

Remove the burner caps from the burner 
heads.

3. 

Remove the burner heads from the 
valve manifolds to reveal the starter 
electrodes.

4. 

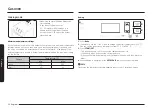
Clean all removable grates and burner 
components in warm, soapy water. Do 
not use steel-wool pads or abrasive 
cleaners.

5. 

Rinse and dry grates and burner 
components thoroughly.

8

7

6

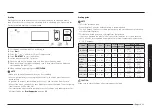
6. 

Return the burner heads to their 
positions on top of the manifold valves. 
Make sure a starter electrode is inserted 
through the hole in each burner head.

NOTE

See the next page for detailed burner 
component re-assembly instructions.

7. 

Return the burner caps to their positions 
on top of the burner heads. To ensure 
proper and safe operation, make sure the 
burner caps lie flat on top of the burner 
heads.

8. 

Reinstall the burner grates in their 
respective positions.

9. 

Turn on each burner and check if it 
operates properly. After verifying that a 
burner operates normally, turn it off.

CAUTION

• 

The starter electrodes are not removable. Do not attempt to remove them by 
force.

• 

To avoid chipping, do not bang grates and caps against each other or against 
hard surfaces, such as cast iron cookware.

• 

The burner head can be blocked by food or dust. Clean the head if it appears 
blocked. If you clean the head with water, assemble it only after it is completely 
dry. If the head is wet, it might prevent the burners from igniting.

• 

To avoid falling down the grates, make sure to remove both sides grates first.

• 

Do not attempt to remove center oval burner cap from the head.

NOTE

• 

After cleaning, confirm that the burner port openings aren't plugged.

• 

Shake out any excess water and then let burner heads and caps dry thoroughly. 
Placing the center burner upside down will allow the water to drain out more 
easily.

• 

Do not wash any burner components in a dish washer.

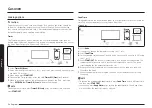
Burner reinstall guide

Round burner head

1. 

Orient the burner head so that the 
opening for the electrode lines up with 
the electrode.

2. 

Install the burner head so that the 
electrode passes through the opening for 
the electrode. Make sure the burner head 
lies flat on the stove top.

Summary of Contents for NX60A6111SB

Page 1: ...GasFree StandingRange User manual NX60 61 S...

Page 2: ...lts WARNING Never Operate the Top Surface Cooking Section of this Appliance Unattended Failure to follow this warning statement could result in fire explosion or burn hazard that could cause property...

Page 3: ...e range tipping over and causing injury if you or a child stand sit or lean on an open door Never completely remove the leveling legs If you remove the leveling legs the range will not be secured by t...

Page 4: ...ed and operated so there is at least 8 inches 20 cm between the radiator and your body This device and its antenna s must not be co located or operated in conjunction with any other antenna or transmi...

Page 5: ...y instructions This unit has been tested and found to comply with the limits for a class B digital device pursuant to Part 18 of the FCC rules These limits are designed to provide reasonable protectio...

Page 6: ...torage drawer safety 13 Overview 14 Layout 14 What s included 14 Control panel 15 Before you start 15 Clock 15 Oven vent cooling vent 15 Cooktop 16 Ignition 17 Cookware 18 Griddle 19 Gas oven 20 Using...

Page 7: ...plumber or gas fitter qualified or licensed by the State of Massachusetts When using ball type gas shut off valves you must use the T handle type Multiple flexible gas lines must not be connected in s...

Page 8: ...s laundry an oven cover lighted candles lighted cigarettes dishes chemicals metal objects etc on the appliance Items such as a cloth may get caught in the door This may result in electric shock fire p...

Page 9: ...e power outlet Do not modify the power plug power cord or power outlet in any way Do not put a fuse in a neutral or ground circuit Use a dedicated 120 V 60 Hz 20 amp AC electrical circuit with a time...

Page 10: ...facturer s instructions and all codes and requirements of the authority having jurisdiction The qualified agency performing this work assumes the gas conversion responsibility Installation of this ran...

Page 11: ...cause carbon monoxide poisoning Aluminum foil linings may also trap heat causing a fire hazard Do not leave burners unattended on medium or high heat settings Before igniting the burners make sure all...

Page 12: ...the scalded area in cool or lukewarm water for at least 10 minutes 2 Do not apply any creams oils or lotions 3 Cover with a clean dry cloth Place pots in the center of the grate Do not place a pot lar...

Page 13: ...level on each side Do not damage move or clean the door gasket Do not spray water on the oven glass while the oven is on or just after you have turned it off Do not use aluminium foil or foil liners a...

Page 14: ...pcs 05 Removable oven door 06 Storage drawer 07 Broil oven burner 08 Oven light 09 Oven rack system 10 Bake oven burner What s included Surface burner grates 2 and griddle 1 Surface burners and caps 5...

Page 15: ...panel to prevent accidents 12 OFF CLEAR Cancel the current operation but not the timer 13 START SET Start a function or set the time Before you start You should know about the following features and...

Page 16: ...each knob and show which burner the knob controls Each burner is designed for specific cooking purposes See the table below Position Purpose Food type Characteristics Right Front RF 17 000 BTU Power h...

Page 17: ...gas to the range and call a qualified service technician NEVER use an open flame to locate a leak Ignition CAUTION 2 1 Make sure all surface burners are properly installed To light a burner 1 Push in...

Page 18: ...ainers You may get severe burns if you touch the surfaces near the vent while the oven is operating Make sure you hold the handle of a wok or a small one handled pot while cooking Cookware Requirement...

Page 19: ...hen placing or removing the griddle NOTE You may need to adjust heat settings for the griddle over time The griddle may discolor over time as it becomes seasoned with use Do not let rust remain on the...

Page 20: ...es Small roasts 2 Turkey Large roasts Hams 1 CAUTION Do not cover an oven rack with aluminum foil This will hamper heat circulation resulting in poor baking Do not place aluminum foil on the oven bott...

Page 21: ...of the rack and remove it from the rack guide Rack and Pan placement or 4 3 Single Oven Rack 5 3 Multiple Oven Rack 5 3 Multiple Oven Rack Centering the baking pans in the oven as much as possible wi...

Page 22: ...he form of a long beep if the entered temperature or time is below the minimum or above the maximum setting for the feature Feature Temperature F Min Max Bake 175 500 Broil LO HI Baking 2 3 4 1 1 Pres...

Page 23: ...the food The air escaping from the oven will be very hot For information about broiler temperatures rack settings and cooking times for different foods see Broiling guide on page 23 Broiling guide NOT...

Page 24: ...f 3sec to delete the message NOTE To change the set time press Timer Off 3sec enter a different time and then press START SET Cook Time Timed cooking sets the oven to cook foods at a set temperature f...

Page 25: ...tarting time using the or 7 Press START SET 8 The oven starts cooking at the set time and turns off automatically when it completes cooking NOTE To change the starting time press Delay Start and enter...

Page 26: ...anchor the plastic wrap underneath the container so that the oven does not blow it off the dough To avoid lowering the temperature and extending proofing time do not open the oven door NOTE Use rack...

Page 27: ...power failure the oven will not resume operation automatically SAb will appear in the control panel but the oven will not turn back on Food can be safely removed from the oven but you should not turn...

Page 28: ...imes and temperatures If it appears that the oven is too hot or too cool you can recalibrate the oven temperature Before recalibrating test a recipe by using a temperature setting that is higher or lo...

Page 29: ...5 1 1 Press and hold for 3 seconds 2 Press or to set the number to 3 3 Press START SET to enter to Energy saving 4 Press or to select Off Hr or On 12Hr 5 Press START SET to save the change Sound Mute...

Page 30: ...r the on off status of each cooktop burner Oven Remote Control Set or adjust oven settings remotely My Cooking Turn the oven off remotely Once cooking starts change the set cooking time and temperatur...

Page 31: ...Turn off the range oven light Oven Timer Cook Time Set the timer on the range oven to 1 hour Amazon Alexa Google Assistant Samsung smart home appliances are supported by SmartThings skill in Alexa act...

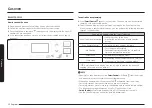
Page 32: ...y kind These can scratch or damage the surface Stainless steel surface 1 Remove any spills spots and grease stains using a soft wet cloth 2 Apply an approved stainless steel cleanser to a cloth or pap...

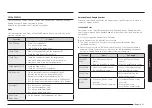
Page 33: ...Do not remove the inner gasket of the oven door for cleaning Don t hand Don t hand clean the clean the oven door oven door gasket gasket You may You may hand clean hand clean the door the door Use soa...

Page 34: ...ectrical systems creating a risk of electrical shock or high levels of carbon monoxide due to corrosion of the gas valves or ports Keep oven vent ducts unobstructed Clean vents frequently to avoid gre...

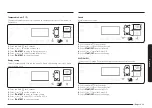
Page 35: ...f it operates properly After verifying that a burner operates normally turn it off CAUTION The starter electrodes are not removable Do not attempt to remove them by force To avoid chipping do not bang...

Page 36: ...ake sure the burner head lies flat on the stove top Burner cap Match the burner caps to the burners by size and then reinstall the caps on the burner heads CAUTION Make sure each cap is reinstalled on...

Page 37: ...o prevent electric shock make sure the oven is turned off and cool before replacing the oven light NOTE Remove the racks if they prevent you from accessing the oven light Removing and reinstalling the...

Page 38: ...n Indentation 3 Open the door fully If the door will not open fully the indentations are not inserted correctly in the bottom edges of each slot 4 Push the hinge locks up against the front frame of th...

Page 39: ...ob has been left in the Lite position After the burner lights turn the control knob to a desired setting If the burner still clicks contact a service technician The burners do not burn evenly Surface...

Page 40: ...n will not turn on The oven is not completely plugged into the electrical outlet Make sure the electrical plug is fully inserted into a live properly grounded outlet A fuse in your home may be blown o...

Page 41: ...23 Greasy buildup on oven surfaces Regular cleaning is necessary when broiling frequently Problem Cause Action Cooking is finished but the cooling fan is still running The fan automatically runs for...

Page 42: ...ng of excessive spillovers and food buildup before you start a self cleaning cycle Multiple self cleaning cycles may be necessary to completely clean the oven Problem Cause Action There is steam or sm...

Page 43: ...eds to be reset Your digital control has been damaged Replace the fuse or reset the circuit breaker Problem Cause Action Food does not bake or roast properly in the oven The wrong cooking mode was sel...

Page 44: ...manship for the limited warranty period starting on the date of delivery to the original consumer purchaser of One 1 Year Parts and Labor This limited warranty is valid only on products purchased and...

Page 45: ...d product Replacement parts and products are warranted for the remaining portion of the original product s warranty or ninety 90 days whichever is longer All replaced parts and products are the proper...

Page 46: ...e during the one 1 year warranty period at no charge subject to availability within the contiguousCanada In home service is not available in all areas To receive in home service product must be unobst...

Page 47: ...ror free operation of the product EXCEPT AS SET FORTH HEREIN THERE ARE NO WARRANTIES OR CONDITIONS ON THIS PRODUCT EITHER EXPRESS OR IMPLIED AND SAMSUNG DISCLAIMS ALL WARRANTIES AND CONDITIONS INCLUDI...

Page 48: ...ed to this product Registration Please register your product online at www samsung com register Questions For questions about features operation performance parts accessories or service call 1 800 SAM...

Page 49: ...Memo...

Page 50: ...RY CALL OR VISIT US ONLINE AT U S A Consumer Electronics 1 800 SAMSUNG 726 7864 www samsung com us support CANADA 1 800 SAMSUNG 726 7864 www samsung com ca support English www samsung com ca_fr suppor...

Reviews: