background image

Operating the oven _

38

OPERA

TING THE O

VEN

Crispy Pizza

This pizza function is designed to give pizzas crisp, browned bottoms while keeping the topping moist.

1

.  Press the 

Pizza

 pad.

2

.  Press the 

START/SET

 pad to begin pizza cooking.

Use only 1 rack and place the rack in position 2 or 3 for the best 

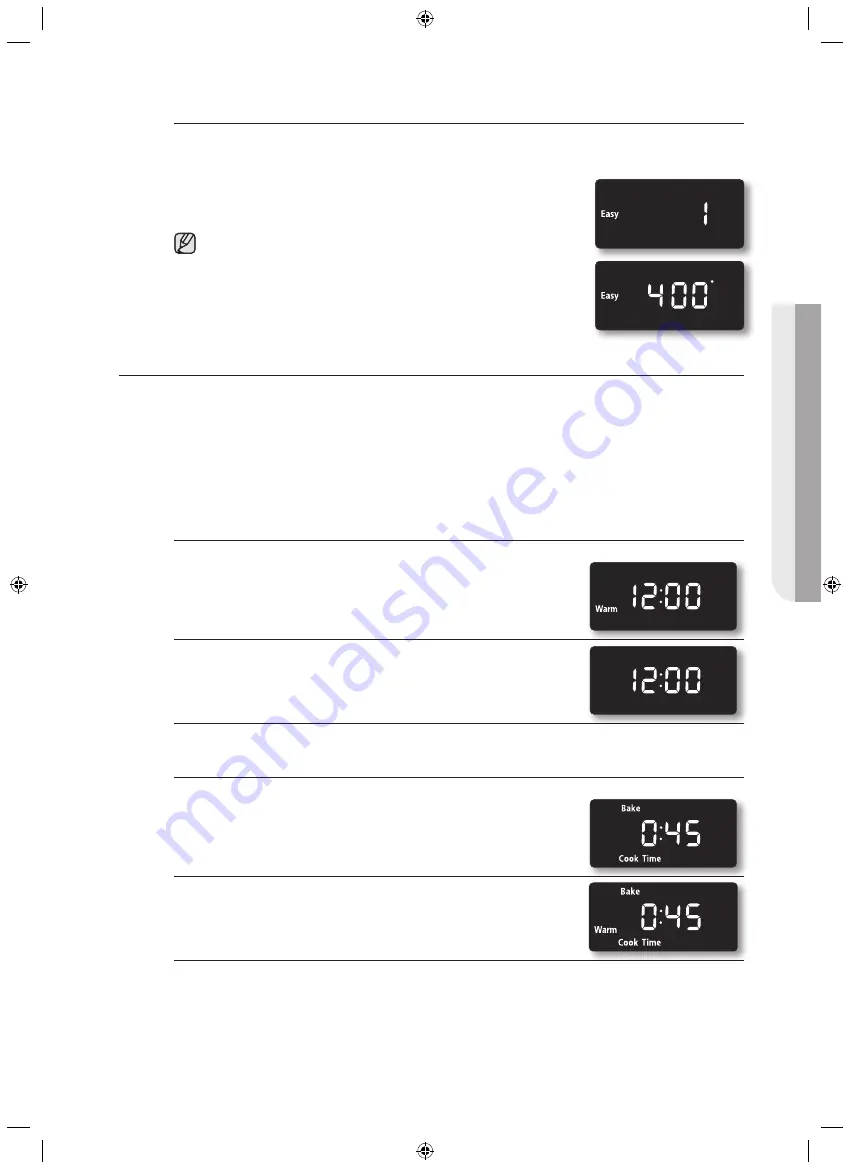
results when using the pizza feature. The default temperature is 

400°F. You may adjust the oven temperature to fit your needs. 

Follow the package instructions for preheating and baking times. 

The pizza setting is not timed. Be sure to monitor the time to 

finish cooking the pizza.

uSinG the keeP WArM function

The keep warm feature maintains an oven temperature of 170°F and will keep cooked food warm 

for serving up to 3 hours after cooking has finished.

After 3 hours, the feature will shut the oven off  automatically. The feature may be used without 

any other cooking operations or may be set to activate after a timed or delay timed cooking 

operation.

You should not use this feature to reheat cold foods.

How to use the keep warm feature

1

.  Press the 

KEEP WARM

 pad.

2

.  Press the 

START/SET

 pad.

3

.  Press the 

CLEAR/OFF

 pad at any time to turn the feature off.

How to set the oven to activate the keep warm mode after a timed 

cooking

1

.  Set up the oven for 

TIMED COOKING. 

(Refer to the section on the timed cooking feature on page 32.)

2

.   Press the 

KEEP WARM

 pad before pressing the 

START/SET


pad to begin the cooking.

3

.  Press the 

CLEAR/OFF

 pad at any time to turn the feature off.

NE595R0ABSR_AC_DG68-00425A-05_EN.indd   38

2015-02-27   �� 4:37:06

Summary of Contents for NE59J342

Page 1: ...imagine the possibilities Thank you for purchasing this Samsung product Electric Range user manual ENGLISH NE595R0 NE59J342 NE595R0ABSR_AC_DG68 00425A 05_EN indd 1 2015 02 27 4 36 54 ...

Page 2: ...s Read and follow all instructions before using your oven to prevent the risk of fire electric shock personal injury or damage when using the range This guide does not cover all possible conditions that may occur Always contact your service agent or manufacturer about problems that you do not understand What you need to know about safety instructions Warnings and Important Safety Instructions in t...

Page 3: ...BEEN PROPERLY INSTALLED AND VERIFY THAT THE ANTI TIP DEVICE IS PROPERLY ENGAGED Refer to the installation manual for instructions a If the anti tip device is not installed a child or adult can tip the range and be killed b Verify the anti tip device has been properly installed and engaged at rear right or rear left of the range bottom c If you move the range and then move it back into place ensure...

Page 4: ...ing crevices around the oven door Be sure your appliance is properly installed and grounded by a qualified technician User servicing Do not repair or replace any part of the appliance unless specifically recommended in the manual All other servicing should be referred to a qualified technician Always disconnect the power to the appliance before servicing by removing the fuse or switching off the c...

Page 5: ...eam jet cleaners If the power cord is damaged it must be replaced by the manufacturer its service agent or similarly qualified persons in order to avoid a hazard The appliance is not intended for use by persons including children with reduced physical sensory or mental capabilities or lack of experience and knowledge unless they have been given supervision or instruction concerning use of the appl...

Page 6: ...th the utensil the handle of a utensil should be positioned so that it is turned inward and does not extend over adjacent surface units Glazed cooking utensils Only certain types of glass glass ceramic ceramic earthenware or other glazed cookware are suitable for range top service without breaking due to sudden changes in temperature Cookware handles should be turned outward and not extend over ad...

Page 7: ...ING If the surface is cracked switch off and unplug the appliance to avoid the possibility of electrical shock Do not use your Induction Cooktop until the glass surface has been replaced WARNING WARNING Ensure that the appliance is switched off before replacing the lamp to avoid the possibility of electric shock The range should not be placed on a base The oven must be switched off before removing...

Page 8: ...nite Use care when opening the door Let hot air or steam escape before you remove food from or replace food into the oven Protective liners Do not use aluminum foil to line the oven bottoms except as suggested in the manual Improper installation of these liners may result in a risk of electric shock or fire Keep oven vent ducts unobstructed The oven vent is located above the right rear surface uni...

Page 9: ...onnect the power supply Have it serviced by a qualified technician Excess spillage must be removed before cleaning and shall specify which utensils can be left in the oven during cleaning VENTILATING HOOD Clean ventilating hoods frequently Do not let grease accumulate on the hood or filter When flaming foods under the hood turn the fan on GLASS CERAMIC COOKING SURFACES DO NOT TOUCH SURFACE UNITS O...

Page 10: ...or any damage such as dents on the interior or exterior of the oven broken door latches cracks in the door or a door that is not lined up correctly If there is any damage do not operate the oven and notify your dealer immediately Plug the power cord into a properly grounded outlet with the proper configuration Your oven should be the only item connected to this circuit Keep all packaging materials...

Page 11: ... or fire In the event of a gas leak such as propane gas LP gas etc ventilate the area immediately Do not touch the power cord Do not touch the appliance A spark may result in an explosion or fire Take care not to contact the oven door heating elements or any of the other hot parts with your body while cooking or just after cooking Failing to do so may result in burns If materials inside the oven s...

Page 12: ...shock burns or injury Do not touch the inside of the appliance immediately after cooking The inside of the appliance will be hot Failing to do so may result in burns Do not use or place flammable sprays or objects near the oven Flammable items or sprays can cause fires or an explosion Do not insert fingers foreign substances or metal objects such as pins or needles into inlets outlets or holes If ...

Page 13: ...electric shock Dishes and containers can become hot Handle with care Hot foods and steam can cause burns Carefully remove container coverings directing the steam away your hands and face Remove lids from baby food jars before heating After heating baby food stir well to distribute the heat evenly Always test the temperature by tasting before feeding the baby The glass jar or the surface of the foo...

Page 14: ...r the edge of the oven door If you open the door the food or object may fall and this may result in burns or injury Do not abruptly cool the door the inside of the appliance or a dish by pouring water over it during or just after cooking This may result in damage to the appliance The steam or water spray may result in burns or injury Do not operate while empty except for self cleaning Do not defro...

Page 15: ...OUTLETS The 120V appliance outlets located on the control console may be used to run portable appliances placed on countertops beside the range The outlets operate independently and are not affected by range control settings Circuit Breakers Appliance Outlet Do not place portable appliances on the cooktop Damage to the portable appliance could result if the cooktop is hot Appliance outlet circuit ...

Page 16: ... 28 Convection baking 30 Convection roasting 32 Timed cooking 33 Delay timed cooking 34 Broiling 36 Using the custom cook feature 37 Using the easy cook feature 38 Using the keep warm function 39 Extra features 41 Turning the oven light on and off 42 Setting the Sabbath Feature maintaining your appliance 44 44 Self cleaning 46 Steam cleaning 47 Care and cleaning of the oven 49 Care and cleaning of...

Page 17: ...witch Oven light Self steam clean latch Gasket Oven control panel See page 23 for more information Surface control knobs See page 18 for more information What s included with your range Wire racks If you need an accessory marked with a you can buy it from the Samsung Contact Center 1 800 726 7864 NE595R0ABSR_AC_DG68 00425A 05_EN indd 16 2015 02 27 4 36 56 ...

Page 18: ...not touch the surface units until they have cooled down The surface may be still be hot and burns may occur if the glass surface is touched before it has cooled down sufficiently Immediately clean spills on the cooking area to prevent a tough cleaning chore later If cabinet storage is provided directly above the cooking surface make sure that the items are infrequently used and can be safely store...

Page 19: ...it is turned off Glows until the unit is cooled to approximately 150 F Cooking areas The cooking areas on your range are identified by permanent circles on the glass cooking surface For the most efficient cooking fit the pan size to the element size Pans should not extend more than to 1 beyond the cooking area When a control is turned on a glow can be seen through the glass cooking surface The ele...

Page 20: ...urface unit has 2 cooking sizes to select from so you can match the size of the unit to the size of the cookware you are using 1 Push the knob in 2 Turn in either direction to the setting you want To use the small surface unit turn the control knob to the small burner A settings To use the large surface unit turn the control knob to the large burner B settings CAUTION The area between the high and...

Page 21: ...d or aluminum foil to maintain food quality Always start with hot food Eating uncooked or cold food placed on the warming center could result in illness 1 Turn the warming center on Press the WARMING CENTER ON OFF pad 2 Select the power setting you want Pressing the WARMING CENTER LEVEL pad once will set it to the level 1 setting Press the pad twice for the level 2 setting 3 times for level 3 3 Tu...

Page 22: ...heat is transferred from the surface element to the pan bottom ALUMINUM Excellent heat conductor Some types of food will cause the aluminum to darken Anodized aluminum cookware resists staining pitting If aluminum pans are slid across the ceramic cooktop they may leave metal marks that resemble scratches Remove these marks as soon as the cooktop cools down COPPER Excellent heat conductor but disco...

Page 23: ...reventing marks and scratches Do not use glass cookware It may scratch the cooktop Do not place a trivet or wok ring between the cooktop and the pan These items can mark or scratch the cooktop Make sure the cooktop and the pan bottom are clean Do not slide metal pans across the cooktop Preventing stains Do not use a soiled dish cloth or sponge to clean the cooktop surface A film will remain which ...

Page 24: ...ature 6 DELAY START Use along with Bake Conv Bake Conv Roast Cooking Time and Self Clean pads to set the oven to start and stop automatically at a time you set 7 COOKING TIME Press and then use the number pad to set the amount of time you want your food to cook The oven will shut off when the cooking time has run out 8 CLOCK Press to set the time of day 9 OVEN LIGHT Press to turn the oven light on...

Page 25: ...e current time in hours and minutes on the number pad eg 1 3 0 for 1 30 this step is skipped in the 24 hour display mode 3 Exit the setup Press the START SET or CLOCK pad How to change between a 12 hour and 24 hour display 1 Start the setup Press CLOCK and 0 on the number pad at the same time for 3 seconds The display will show the present mode eg 12 hour 2 Select the display mode you want Press 0...

Page 26: ...n timer The kitchen timer serves as an extra timer that will beep when the set time has elapsed It does not start or stop cooking functions You can use the kitchen timer with any of the other oven functions How to set the timer 1 Turn the timer on Press the KITCHEN TIMER ON OFF pad 3 Enter the amount of time you want Enter the amount of time you want using the number pad eg 1 5 The timer can be se...

Page 27: ...four cake layers at the same time place the oven racks in positions 2 and 5 Place the pans or cookware as shown in Fig 1 and Fig 2 5 2 4 Fig 1 Fig 2 Before using the racks The oven has two racks Each rack has stops that need to be placed correctly on the supports These stops will keep the rack from coming completely out REMOVING THE RACKS REPLACING THE RACKS 1 Pull the rack straight out until it s...

Page 28: ...to cancel baking or if you have finished press the CLEAR OFF pad Place food in the oven after preheating if the recipe calls for it Preheating is very important for good results when baking cakes cookies pastry and breads After the oven has reached the desired temperature a long beep will sound 6 times How to adjust the thermostat while cooking 1 Start the setup Press the BAKE pad The display will...

Page 29: ...an with a dark finish will allow faster cooking times When using convection baking with a single rack place the oven rack in position 4 If cooking on multiple racks place the oven racks in positions 2 and 5 or positions 3 5 and 6 When baking a cake using the bake mode will produce better results How to set the oven for convection baking 1 Start the convection baking mode Press the CONV BAKE pad Th...

Page 30: ...00 45 55 2 crust frozen fruit 9 3 350 68 78 Cookies Sugar 4 325 350 12 17 Chocolate Chip 4 325 350 14 18 Brownies 4 325 29 36 Breads Yeast bread loaf 9x5 3 350 18 22 Yeast rolls 4 350 375 13 18 Quick Bread loaf 8x4 3 325 350 45 55 Biscuits 4 350 375 9 14 Muffins 4 400 15 19 Pizza Frozen 4 375 425 23 26 Fresh 4 400 425 12 15 Actual times depend on the mixes or recipes baked NE595R0ABSR_AC_DG68 0042...

Page 31: ...ONV ROAST pad The default temperature is 350 F 2 Enter the temperature you want eg 400 F using the number pad 3 Press the START SET pad to begin convection roasting Conv Roast and the adjusted oven temperature eg 400 F will appear in the display for 2 seconds The temperature display will start to change once the oven temperature reaches 150 F A beep will sound 6 times when the oven reaches the adj...

Page 32: ...50 15 25 170 Shoulder 3 6 350 20 30 160 Poultry Chicken whole 3 4 375 17 23 180 Turkey unstuffed 12 15 325 12 16 180 Turkey unstuffed 16 20 325 11 15 180 Turkey unstuffed 21 25 325 8 12 180 Turkey Breast 3 8 325 20 25 170 Cornish Hen 1 1 350 45 75 total time 180 Lamb Half Leg 3 4 325 25 30 30 35 160 medium 170 well Whole Leg 6 8 325 25 30 30 35 160 medium 170 well Roasting times are approximate an...

Page 33: ...display will start to change once the oven temperature reaches 150 F The oven will continue to cook until the set amount of time has elapsed then turn off automatically unless the keep warm feature was set Refer to the section on the keep warm feature on page 38 6 You can cancel a timed cooking at any time by pressing the CLEAR OFF pad Place food in the oven after preheating if the recipe calls fo...

Page 34: ... number pad to enter the temperature you want eg 375 F 4 Press the COOKING TIME pad 5 Enter the cooking time you want eg 45 min using the number pad You can set the cooking time for any amount of time from 1 minute to 9 hours and 99 minutes 6 Press the DELAY START pad 7 Enter the time you want the oven to turn on eg 4 30 using the number pad 8 Press the START SET pad At the set time a short beep w...

Page 35: ...ater or flour on the fire Flour can explode and water can cause a grease fire to spread and cause personal injury How to set the oven for broiling 1 Select the broil setting you want Press the BROIL pad once for HI or twice for LO Use LO to cook foods such as poultry or thick cuts of meat thoroughly without over browning them 2 Start the broiling function Press the START SET pad Broil on one side ...

Page 36: ...up 2 to 2 lbs split lengthwise 4 23 28 13 18 Broil skin side down first 2 Breasts 5 13 18 5 10 Lobster Tails 2 4 10 to 12 oz each 4 14 18 Do not turn over Cut through back of shell Spread open Brush with melted butter before broiling and halfway through broiling time Fish Fillets to thick 6 5 9 3 4 Handle and turn very carefully Brush with lemon butter before and during cooking if desired Ham Slic...

Page 37: ...rature you want eg 375 F 3 You can store a recipe setting in one of three Custom Cook positions Press the CUSTOM COOK pad the number of times that corresponds to the position in which you want to store the setting eg for Custom Cook position 2 press the CUSTOM COOK pad twice You can store recipe settings at position 1 2 or 3 4 Press the START SET pad How to recall a setting 1 Press the CUSTOM COOK...

Page 38: ... maintains a warm environment useful for rising yeast leavened products 1 To enter the Proof mode press the Proof pad 2 To start the proofing function press the START SET pad The proofing feature automatically provides the optimum temperature for the proof process and therefore does not have a temperature adjustment 3 Press the CLEAR OFF pad at any time to turn off the proofing feature If you pres...

Page 39: ...0 F and will keep cooked food warm for serving up to 3 hours after cooking has finished After 3 hours the feature will shut the oven off automatically The feature may be used without any other cooking operations or may be set to activate after a timed or delay timed cooking operation You should not use this feature to reheat cold foods How to use the keep warm feature 1 Press the KEEP WARM pad 2 P...

Page 40: ...ressing 0 on the number pad changes the mode between 12 Hr and Hr 3 Press the START SET pad Fahrenheit or Celsius temperature selection The oven control can be programmed to display temperatures in Fahrenheit or Centigrade The oven has been preset at the factory to display in Fahrenheit How to change the display from Fahrenheit to Centigrade or from Centigrade to Fahrenheit 1 Press BROIL and the 0...

Page 41: ...3 Press the START SET pad Thermostat adjustment The temperature in the oven has been preset at the factory When first using the oven be sure to follow recipe times and temperatures If you think the oven is too hot or too cool the temperature in the oven can be adjusted Before adjusting test a recipe by using a temperature setting that is higher or lower than the recommended temperature The baking ...

Page 42: ...activated accidentally How to activate the control lockout feature 1 Press the HOLD 3 SEC pad for 3 seconds The display will show Loc and a Lock icon continuously as well as the current time All functions must be cancelled before the control lockout is activated This function is available when the oven temperature is under 400 F How to unlock the controls 1 Press the HOLD 3 SEC pad for 3 seconds L...

Page 43: ...ve the oven light will remain on until the Sabbath feature is turned off If the oven light needs to be off be sure to turn the oven light off before activating the Sabbath feature How to use the Sabbath feature 1 Press the BAKE pad The default temperature is 350 F 2 Enter the temperature you want eg 375 F by using the number pad 3 Press the START SET pad The temperature display will start to chang...

Page 44: ... failure or interruption the oven will shut off When power is returned the oven will not turn back on automatically SAb will be displayed in the oven control display but the oven will not operate The food may be safely removed from the oven while it is still in the Sabbath mode however the oven cannot be turned back on until after the Sabbath Holidays After the Sabbath observance turn OFF the Sabb...

Page 45: ...r the self cleaning cycle is complete Stand to the side of the oven when opening the door to allow hot air or steam to escape The oven may still be VERY HOT Before a self cleaning cycle Fig 1 We recommend venting your kitchen with an open window or using a ventilation fan or hood during the self cleaning cycle Remove the wire rack broil pan broil pan insert all cookware and any aluminum foil from ...

Page 46: ...d 2 Press the DELAY START pad 3 Using the CLOCK and number pads enter the time you want the clean cycle to start 4 Press the START SET pad The display will show Delay Self clean and the Lock icon The motor driven door lock will engage automatically 5 The Self Cleaning cycle will turn on automatically at the set time How to turn off the self cleaning feature You may find it necessary to stop or int...

Page 47: ...in the display Because these functions produce the best results when started while the oven is cool we recommend that you wait until the oven has cooled down and Hot disappears from the display After a steam cleaning cycle Take care when opening the door before a steam cleaning procedure has ended The water on the bottom is hot Open the oven door and remove the remaining water with a sponge Do not...

Page 48: ...r For more difficult residue and built up grease apply a liquid detergent directly onto the area and leave for 30 to 60 minutes Wipe with a damp cloth and dry Do not use abrasive cleaners on any of these surfaces They can scratch Cleaning stainless steel surfaces 1 Shake the bottle of Stainless Steel Appliance Cleaner or polish well 2 Place a small amount of stainless steel appliance cleaner or po...

Page 49: ...gasket You may hand clean the oven door Use soap water to thoroughly clean the top sides and front of the oven door Rinse well You may use a glass cleaner on the outside glass of the oven door DO NOT immerse the door in water DO NOT spray or allow water or the glass cleaner to enter the door vents DO NOT use oven cleaners cleaning powders or any harsh abrasive cleaning materials on the outside of ...

Page 50: ... on residue 1 Allow the cooktop to cool 2 Spread a few drops of ceramic cooktop cleaner on the entire burned residue area 3 Using the cleaning pad for ceramic cooktops rub the residue area applying pressure as needed 4 If any residue remains repeat the steps listed above as needed 5 For additional protection after all residue has been removed polish the entire surface with ceramic cooktop cleaner ...

Page 51: ...gary spillovers such as jellies fudge candy syrups or melted plastics can cause pitting of the surface of your cooktop This is not covered under the warranty You should clean the spill while it is still hot Take special care when removing hot substances Refer to the following section When using a scraper be sure it is new and the razor blade is still sharp Do not use a dull or nicked blade Cleanin...

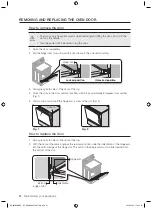
Page 52: ...both sides of the door at the top 4 Close the door to the door removal position which is approximately 5 degrees from vertical Fig 1 5 Lift door up and out until the hinge arm is clear of the slot Fig 2 about 5 Fig 1 Fig 2 How to replace the door 1 Firmly grasp both sides of the door at the top 2 With the door at the same angle as the removal position slide the indentation of the hinge arm into th...

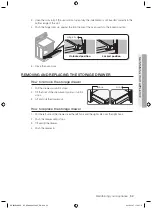
Page 53: ... position 5 Close the oven door Removing and replacing the storage drawer How to remove the storage drawer 1 Pull the drawer out until it stops 2 Tilt the front of the drawer and pull out it until it stops 3 Lift and pull the drawer out How to replace the storage drawer 1 Put the left side of the drawer over the left hook and the right side over the right hook 2 Push the drawer until it stops 3 Ti...

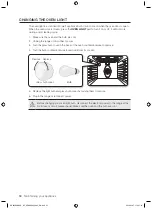
Page 54: ...disconnect power 3 Turn the glass bulb cover in the back of the oven counterclockwise to remove 4 Turn the bulb counterclockwise to remove it from its socket Remove Glass bulb cover Bulb Replace 5 Replace the light bulb and glass bulb cover by turning them clockwise 6 Plug in the range or reconnect power CAUTION Before changing your oven light bulb disconnect the electrical power to the range at t...

Page 55: ...ler to make the appliance accessible Carpet is interfering with movement of the range Provide sufficient space so the range can be lifted over the carpet The oven control beeps and displays an F error code You have a function error code CODE CAUSE SE Shorted key E 27 Oven sensor opened E 28 Oven sensor shorted E 08 Oven heating error E 0A Oven heating over E 0E Door locking error Press the CLEAR O...

Page 56: ...se and circuit breakers Incomplete service wiring Call for service Power outage Check to see if the house lights will turn on If required call your local electric company for service The oven light will not turn on The light bulb is loose or defective Tighten or replace the bulb The switch operating light is broken Call for service Oven smokes excessively during broiling The control has not been s...

Page 57: ...ooktop on page 54 Areas of discoloration with metallic sheen Mineral deposits from water and food have been left on the surface of the cooktop Remove using a ceramic glass cooktop cleaning cream Use cookware with clean dry bottoms The oven will not self clean The oven temperature is too high to set a self clean operation Allow the range to cool and reset the controls The oven controls have been se...

Page 58: ...en racks are difficult to slide The shiny silver colored racks were cleaned in a self cleaning cycle Apply a small amount of vegetable oil to a paper towel and wipe the edges of the oven racks with the paper towel Display goes blank A fuse in your home may be blown or the circuit breaker tripped Replace the fuse or reset the circuit breaker Display flashes There was a power failure Reset the clock...

Page 59: ... maintenance and environmental instructions that are covered and prescribed in the instruction book product removal and reinstallation problems caused by pest infestations and overheating or overcooking by user This limited warranty shall not cover cases of incorrect electric current voltage or supply light bulbs house fuses house wiring cost of a service call for instructions or fixing installati...

Page 60: ... maintenance QUESTIONS OR COMMENTS COUNTRY CALL OR VISIT US ONLINE AT CANADA 1 800 SAMSUNG 726 7864 www samsung com ca support English www samsung com ca_fr support French U S A Consumer Electronics 1 800 SAMSUNG 726 7864 www samsung com us support U S A Mobile Phones 1 800 SAMSUNG 726 7864 www samsung com us support NE595R0ABSR_AC_DG68 00425A 05_EN indd 59 2015 02 27 4 37 22 ...

Page 61: ...possibilités Nous vous remercions d avoir choisi ce produit Samsung Manuel d utilisation de la cuisinière électrique FRANÇAIS CANADIEN NE595R0 NE59J342 NE595R0ABSR_AC_DG68 00425A 05_CFR indd 1 2015 02 27 4 39 58 ...

Page 62: ...gnes de sécurité importantes Lisez et suivez toutes les consignes avant d utiliser votre four afin d éviter tout risque d incendie d électrocution de blessure ou de dommage lors de l utilisation de la cuisinière Le présent guide ne couvre pas toutes les situations susceptibles de se produire Contactez toujours votre réparateur ou le fabricant en cas de fonctionnement anormal de l appareil Ce que v...

Page 63: ... ET VÉRIFIEZ QUE CE DERNIER EST BIEN FIXÉ Reportez vous au manuel d installation pour plus d instructions a Si le dispositif anti basculement n est pas installé un enfant ou un adulte peut faire basculer la cuisinière et être tué b Vérifiez que le dispositif anti basculement ait été correctement installé et fixé sur l arrière droit ou arrière gauche du dessous de la cuisinière c Si vous déplacez l...

Page 64: ...les surfaces situées à proximité de cette ouverture les rainures situées autour de la porte du four Assurez vous que votre appareil est correctement installé et mis à la terre par un technicien qualifié Dépannage utilisateur Ne réparez ni ne remplacez jamais les pièces de l appareil vous même sauf si le présent manuel vous y autorise Toute autre réparation devra être effectuée par un technicien qu...

Page 65: ...l à l aide d un nettoyeur haute pression eau ou vapeur Si le cordon d alimentation de l appareil est endommagé il devra être remplacé par le fabricant son réparateur agréé ou par toute personne qualifiée afin d éviter tout danger Cet appareil n est pas conçu pour être utilisé par des personnes y compris les enfants inexpérimentées ou dont les capacités physiques sensorielles ou mentales sont rédui...

Page 66: ... d inflammation de matières inflammables et de projections dû à un contact accidentel avec l ustensile dirigez le manche de l ustensile vers l intérieur et non au dessus des foyers adjacents Ustensiles de cuisson en faïence Afin d éviter tout risque de fêlure lié aux brusques changements de températures utilisez uniquement des ustensiles en verre en vitrocéramique en céramique en terre cuite ou en...

Page 67: ...tout risque d électrocution N utilisez pas la table de cuisson à induction tant que la surface vitrée n a pas été remplacée AVERTISSEMENT AVERTISSEMENT afin d éviter tout risque d électrocution veillez à ce que l appareil soit hors tension avant de procéder au remplacement de l ampoule La cuisinière ne doit pas être placée sur un socle Veillez à ce que le four soit éteint avant de retirer le dosse...

Page 68: ...apper avant de retirer les aliments du four ou de les remettre Couches protectrices N utilisez pas de papier d aluminium pour recouvrir la sole du four sauf si les instructions le suggèrent Une installation inappropriée de ces couches protectrices est susceptible de provoquer une décharge électrique ou un incendie N obstruez pas les conduits de ventilation du four L orifice de ventilation est situ...

Page 69: ... prise d alimentation Faites le réparer par un technicien qualifié Nettoyez les projections les plus importantes avant le nettoyage et vérifiez quels ustensiles peuvent être laissés dans le four durant cette opération HOTTE D ASPIRATION Nettoyez fréquemment la hotte d aspiration Ne laissez pas la graisse s accumuler sur la hotte ou le filtre Si les aliments situés sur la cuisinière s enflamment ac...

Page 70: ...ts d emballage et vérifiez que le four n est pas endommagé traces de choc à l intérieur ou à l extérieur loquets cassés fissures au niveau de la porte ou porte mal alignée En cas de dommages n utilisez pas le four et contactez immédiatement votre revendeur Branchez le cordon d alimentation sur une prise adaptée correctement reliée à la terre Ne branchez aucun autre appareil électrique sur ce même ...

Page 71: ...ce de dépannage le plus proche Le non respect de cette consigne peut entraîner un risque d électrocution ou d incendie En cas de fuite de gaz propane GPL etc aérez immédiatement la pièce Ne touchez pas non plus l appareil Ne touchez pas non plus l appareil La moindre étincelle risquerait de provoquer une explosion ou un incendie Prenez garde à ne pas toucher la porte du four les éléments chauffant...

Page 72: ...uste après son fonctionnement les éléments sont encore brûlants Le non respect de cette consigne risque d entraîner des brûlures N utilisez et n entreposez pas d aérosols ou d objets inflammables à proximité du four Les matériaux inflammables et les aérosols peuvent créer un incendie ou une explosion N insérez pas vos doigts de substances étrangères ou d objets métalliques tels que des épingles ou...

Page 73: ... Les plats et récipients peuvent devenir extrêmement chauds Manipulez les avec précaution Les plats chauds et la vapeur peuvent provoquer des brûlures Retirez le couvercle des récipients avec précaution en veillant à éloigner ces derniers de votre visage et de vos mains afin d éviter que le dégagement de vapeur ne vous brûle Retirez les couvercles des petits pots pour bébé avant de les faire chauf...

Page 74: ...te lorsque celle ci est ouverte Vous risqueriez de vous brûler ou de vous blesser si les objets chutaient Ne créez pas de choc thermique brutal au niveau de la porte de l intérieur de l appareil ou du plat ex en versant de l eau dessus pendant ou juste après la cuisson Cela risque d endommager l appareil La vapeur ou les projections d eau pourraient entraîner des brûlures ou des blessures Ne faite...

Page 75: ...fficacité PRISES DE L APPAREIL Les prises 120 V situées sur le tableau de commande de l appareil servent à alimenter des appareils portables placés sur un plan de travail à côté de la cuisinière Ces prises fonctionnent de manière indépendante et ne sont pas affectées par les réglages de la cuisinière Disjoncteurs Prise de l appareil Ne placez aucun appareil portable sur la table de cuisson Vos app...

Page 76: ...n 30 Rôtissage par convection 32 Cuisson minutée 33 Cuisson minutée différée 34 Cuisson au gril 36 Utilisation de la fonction cuisson personnalisée 37 Utilisation de la fonction cuisson facile 38 Utilisation de la fonction de maintien au chaud 39 Fonctions complémentaires 41 Activation et désactivation de l éclairage du four 42 Réglage de la fonction Shabbat entretien de votre appareil 44 44 Auto ...

Page 77: ...upres du Centre d assistance Samsung 1 800 726 7864 Porte du four Ventilateur de convection Hauteur Surface vitrée Commutateur d éclairage automatique du four Éclairage du four Loquet de nettoyage automatique vapeur Joint Tableau de commande du four Reportez vous à la page 16 pour plus d informations Boutons de commande de la table Reportez vous à la page 18 pour plus d informations NE595R0ABSR_AC...

Page 78: ...aient refroidi Le foyer peut encore être chaud et vous risquez de vous brûler si vous touchez la surface vitrée avant qu elle n ait suffisamment refroidi Nettoyez immédiatement les éclaboussures de la table de cuisson afin d éviter qu elles ne s incrustent et soient difficiles à nettoyer Si un placard de rangement est installé directement au dessus de la table de cuisson assurez vous que les éléme...

Page 79: ... surface descende à environ 150 F Zones de cuisson Les zones de cuisson de votre cuisinière sont matérialisées par des cercles permanents sur la table de cuisson vitrée Pour une cuisson plus efficace utilisez des récipients de même taille que les foyers Les récipients ne doivent pas dépasser de plus de à 1 la zone de cuisson Lorsqu un bouton est activé une lueur est visible à travers la table de c...

Page 80: ...double est doté de deux tailles de cuisson de manière à adapter la taille de l élément à celle du récipient utilisé 1 Enfoncez le bouton 2 Tournez dans l une ou l autre direction selon le réglage souhaité Pour utiliser le petit élément tournez le bouton de commande sur le réglage correspondant au petit foyer A Pour utiliser le grand élément tournez le bouton de commande sur le réglage correspondan...

Page 81: ...t Les aliments doivent être déjà chauds La consommation d aliments crus ou froids placés sur la zone chauffe plat risque de vous rendre malade 1 Allumez la zone chauffe plat Appuyez sur la touche WARMING CENTER ON OFF ACTIVATION DESACTIVATION DE LA ZONE CHAUFFE PLAT 2 Sélectionnez la puissance de votre choix Appuyer une fois sur la touche WARMING CENTER LEVEL NIVEAU DE LA ZONE CHAUFFE PLAT permet ...

Page 82: ... et rapidement au fond de la casserole ALUMINIUM Excellent conducteur thermique Certains types d aliments font noircir l aluminium Les ustensiles en aluminium anodisé résistent aux taches et aux piqûres Si vous faites glisser des casseroles en aluminium sur la table de cuisson en céramique des traces métalliques semblables à des rayures peuvent apparaître Retirez ces traces dès le refroidissement ...

Page 83: ...anneau wok entre la table de cuisson et la casserole Ces accessoires sont susceptibles de marquer ou de rayer la table de cuisson Assurez vous que la table de cuisson et le fond de la casserole sont propres Ne faites pas glisser de casseroles en métal sur la table de cuisson Prévention des taches N utilisez pas de torchon ou d éponge sale pour nettoyer la table de cuisson Un film subsisterait prov...

Page 84: ...e pour régler le départ et l arrêt automatiques du four à une heure définie 7 COOKING TIME TEMPS DE CUISSON appuyez sur cette touche puis utilisez le pavé numérique et définissez le temps de cuisson des aliments Le four s éteint une fois le temps de cuisson écoulé 8 CLOCK HORLOGE appuyez sur cette touche pour régler l heure 9 OVEN LIGHT ÉCLAIRAGE DU FOUR permet d allumer ou d éteindre l éclairage ...

Page 85: ...de du pavé numérique ex 1 3 0 pour 1h 30 Cette étape n apparaît pas en mode d affichage 24 heures 3 Quittez l installation Appuyez sur la touche START SET DÉPART RÉGLAGE ou CLOCK HORLOGE Comment passer du format 12 heures au format 24 heures 1 Démarrez le réglage Appuyez simultanément sur la touche CLOCK HORLOGE et la touche numérique 0 pendant 3 secondes Le format actuel s affiche ex 12 heures 2 ...

Page 86: ...lle ne permet pas de démarrer ou d arrêter les fonctions de cuisson Vous pouvez utiliser la minuterie avec toutes les autres fonctions du four Comment régler la minuterie 1 Activez la minuterie Appuyez sur la touche KITCHEN TIMER ON OFF ACTIVATION DÉSACTIVATION DE LA MINUTERIE 2 Saisissez la durée souhaitée Saisissez la durée de votre choix à l aide du pavé numérique ex 1 5 Sélectionnez une durée ...

Page 87: ...ur aux positions 2 et 5 Positionnez les casseroles ou les ustensiles de cuisine comme indiqué sur la Fig 1 et la Fig 2 5 2 4 Fig 1 Fig 2 Avant d utiliser les grilles Le four est équipé de deux grilles Chacune comporte une butée qui doit être correctement installée sur son support Les butées empêchent la grille de sortir complètement de son logement RETRAIT DES GRILLES RÉINSERTION DES GRILLES 1 Tir...

Page 88: ...nnuler la cuisson ou si vous avez terminé appuyez sur la touche CLEAR OFF EFFACER ARRÊT Si la recette l indique enfournez la nourriture une fois le four préchauffé Le préchauffage assure de bons résultats pour la cuisson de gâteaux biscuits pâte et petits pains Une fois la température souhaitée atteinte le four émet six longs signaux sonores Comment régler le thermostat en cours de cuisson 1 Démar...

Page 89: ...t foncé réduit le temps de cuisson Lorsque vous cuisez des aliments par convection sur une seule grille positionnez la grille sur la hauteur 4 Si vous utilisez plusieurs grilles positionnez les aux niveaux 2 et 5 ou aux niveaux 3 5 et 6 Lorsque vous cuisez des gâteaux le mode Bake Cuisson traditionnelle offre de meilleurs résultats Comment régler le four pour la cuisson par convection 1 Lancez le ...

Page 90: ...0 45 55 X 2 croûtes fruits surgelés 9 3 350 68 78 Cookies Sucre 4 325 350 12 17 Pépites de chocolat 4 325 350 14 18 Brownies 4 325 29 36 Pains Pain à la levure pain de 9 x 5 3 350 18 22 Petits pains à la levure 4 350 375 13 18 Pain rapide pain de 8 x 4 3 325 350 45 55 Biscuits 4 350 375 9 14 Muffins 4 400 15 19 Pizza Surgelée 4 375 425 23 26 Fraîche 4 400 425 12 15 Les temps de cuisson réels dépen...

Page 91: ...ONVECTION La température par défaut est 350 F 2 Saisissez la température de votre choix ex 400 F à l aide des pavés numériques 3 Appuyez sur le bouton START SET DÉPART RÉGLAGE pour lancer le rôtissage par convection L indication Conv Roast Rôtissage par convection ainsi que la température du four réglée ex 400 F s affichent pendant 2 secondes La température affichée change dès que le four atteint ...

Page 92: ...170 Epaule 3 6 350 20 30 160 Volaille Poulet entier 3 4 375 17 23 180 Dinde non farcie 12 15 325 12 16 180 Dinde non farcie 16 20 325 11 15 180 Dinde non farcie 21 25 325 8 12 180 Blanc de dinde 3 8 325 20 25 170 Poulet de Cornouailles 1 1 350 45 à 75 temps total 180 Agneau Demi gigot 3 4 325 25 30 30 35 160 à point 170 rose Gigot entier 6 8 325 25 30 30 35 160 à point 170 rose Les temps de rôtiss...

Page 93: ...a température affichée change dès que le four atteint 150 F Le four continue de chauffer jusqu à ce que la durée réglée s écoule puis s éteint automatiquement sauf si la fonction de maintien au chaud a été réglée reportez vous au chapitre relatif à la fonction de maintien au chaud page 38 6 Vous pouvez annuler la cuisson minutée à tout moment en appuyant sur la touche CLEAR OFF EFFACER ARRÊT Si la...

Page 94: ...aut est de 350 F 3 À l aide du pavé numérique saisissez la température de votre choix ex 375 F 4 Appuyez sur la touche COOKING TIME TEMPS DE CUISSON 5 Saisissez le temps de cuisson de votre choix ex 45 min à l aide du pavé numérique Pour régler le temps de cuisson sélectionnez une durée comprise entre 1 minute et 9 heures 99 minutes 6 Appuyez sur la touche DELAY START DÉPART DIFFÉRÉ 7 Saisissez l ...

Page 95: ... aggraver l incendie Comment régler le four pour la cuisson au gril 1 Sélectionnez le réglage de votre choix pour le gril Appuyez sur la touche BROIL GRIL une fois pour sélectionner HI ÉLEVÉ ou deux fois pour sélectionner LO FAIBLE Sélectionnez LO FAIBLE pour cuire des aliments tels que de la volaille ou des morceaux épais de viandes sans risquer de trop les brunir 2 Démarrez la fonction Gril Appu...

Page 96: ... 13 18 Grillez d abord le côté peau vers le bas 2 blancs 5 13 18 5 10 Queues de langouste 2 4 10 à 12 oz chacune 4 14 18 Ne retournez pas Coupez dans le dos de la carapace Ouvrez en écartant Badigeonnez de beurre fondu avant de griller et à mi cuisson Filets de poisson à d épaisseur 6 5 9 3 4 Manipulez et retournez avec précaution Selon vos goûts vous pouvez badigeonner de beurre citronné avant et...

Page 97: ... votre choix ex 375 F 3 Appuyez sur la touche CUSTOM COOK CUISSON PERSONNALISÉE le nombre de fois correspondant à la position sous laquelle vous souhaitez mémoriser la recette préréglée Par exemple pour la recette préréglée 2 appuyez sur la touche CUSTOM COOK CUISSON PERSONNALISÉE deux fois Les recettes préréglées peuvent être mémorisées sous la position 1 2 ou 3 4 Appuyez sur la touche START SET ...

Page 98: ...e La fonction Levée sert à maintenir un niveau de chaleur permettant le gonflement des produits nécessitant une fermentation à la levure 1 Sélectionnez le mode Proof Levée Appuyez sur la touche Proof Levée 2 Démarrez la fonction Levée Appuyez sur la touche START SET DÉPART RÉGLAGE La fonction de levée fournit automatiquement la température optimale pour le processus de levée Par conséquent aucun r...

Page 99: ...cuits au chaud jusqu à 3 heures après leur cuisson en vue de les servir Au bout de 3 heures le four s éteint automatiquement Cette fonction peut être utilisée indépendamment de toute autre cuisson et moyennant un réglage peut s activer directement après la cuisson minutée ou différée N utilisez pas cette fonction pour faire réchauffer des aliments froids Comment utiliser la fonction de maintien au...

Page 100: ...ÉSACTIVATION ou ON ACTIVATION Appuyer sur la touche 0 du pavé numérique permet de passer du mode 12 Hr au mode Hr 3 Appuyez sur la touche START SET DÉPART RÉGLAGE Sélection de la température en Fahrenheit ou Celsius Le four peut être programmé pour afficher la température en degrés Fahrenheit ou Celsius Par défaut le four est réglé pour que la température s affiche en degrés Fahrenheit Comment pas...

Page 101: ...a touche 0 du pavé numérique permet de passer de l un à l autre 3 Appuyez sur la touche START SET DÉPART RÉGLAGE Réglage du thermostat Les températures sont réglées par défaut Lorsque vous utilisez votre four pour la première fois veillez à respecter les temps et températures de cuisson Si vous pensez que la température est trop élevée ou trop basse vous pouvez la régler une nouvelle fois Avant de...

Page 102: ... Comment activer la fonction de verrouillage des commandes 1 Appuyez sur la touche HOLD 3 SEC VERROUILLAGE 3 S pendant 3 secondes Le message Loc une icône en forme de verrou ainsi que l heure actuelle s affichent à l écran Toutes les fonctions doivent être annulées avant l activation du verrouillage des commandes Cette fonction est disponible lorsque la température du four est inférieure à 400 F C...

Page 103: ...Si vous souhaitez éteindre l éclairage veillez à désactiver l éclairage du four avant d activer la fonction Shabbat Comment utiliser la fonction Shabbat 1 Appuyez sur le bouton BAKE CUISSON TRADITIONNELLE La température par défaut est 350 F 2 Saisissez la température de votre choix ex 375 F à l aide du pavé numérique 3 Appuyez sur la touche START SET DÉPART RÉGLAGE La température affichée change d...

Page 104: ...cas de coupure de courant ou d interruption le four s éteint Lors de la remise sous tension le four ne se rallume pas automatiquement SAb Shabbat s affiche à l écran de commande du four mais le four ne fonctionne pas Vous pouvez retirer les aliments du four tout en restant en mode Shabbat cependant le four ne peut pas se rallumer après le Shabbat Vacances Lorsque le Shabbat est terminé désactivez ...

Page 105: ...e fois le cycle d auto nettoyage terminé Pour permettre à l air chaud ou à la vapeur de s échapper maintenez vous sur le côté du four lorsque vous ouvrez la porte Le four peut encore être TRÈS CHAUD Avant le cycle d auto nettoyage Fig 1 Durant le cycle d auto nettoyage nous vous conseillons d aérer votre cuisine en ouvrant une fenêtre ou en activant un ventilateur ou une hotte Retirez la grille mé...

Page 106: ... DÉPART DIFFÉRÉ 3 A l aide du bouton CLOCK HORLOGE et des boutons numériques saisissez l heure de départ du cycle d auto nettoyage 4 Appuyez sur le bouton START SET DÉPART RÉGLAGE Les icônes de départ différé d auto nettoyage et de verrouillage s affichent à l écran 5 Le cycle d auto nettoyage démarre automatiquement à l heure définie Comment désactiver la fonction d auto nettoyage Vous pourrez ar...

Page 107: ... Chaud s affiche Pour assurer des résultats optimaux il est préférable de démarrer cette fonction à four froid C est pourquoi nous vous conseillons d attendre que le four ait refroidi et que l indication Hot Chaud disparaisse de l affichage Après un cycle de nettoyage vapeur Soyez vigilant si vous ouvrez la porte avant que le nettoyage vapeur soit terminé L eau située dans la sole du four est très...

Page 108: ...es peintes et ornements décoratifs Pour le nettoyage sommaire utilisez un torchon imbibé d eau chaude savonneuse Pour ôter les résidus incrustés et la graisse accumulée versez un nettoyant liquide directement sur la zone et laissez agir 30 à 60 minutes Frottez à l aide d un torchon humide puis essuyez N appliquez jamais de détergent sur ces surfaces car ils risquent de les rayer Nettoyage des surf...

Page 109: ...ent Utilisez du savon et de l eau pour un nettoyage minutieux des parties supérieure latérale et frontale de la porte du four Rincez abondamment Utilisez un produit vitre pour nettoyer la vitre extérieure de la porte du four N IMMERGEZ PAS la porte dans de l eau NE VAPORISEZ PAS ou ne faites pas pénétrer de l eau ou du produit vitre à l intérieur des orifices de ventilation de la porte N UTILISEZ ...

Page 110: ...ux recommandés Élimination des résidus brûlés 1 Laissez refroidir la table de cuisson 2 Étalez quelques gouttes de nettoyant pour surface de cuisson en céramique sur l ensemble de la surface couverte de résidus brûlés 3 En utilisant le tampon de nettoyage conçu pour les surfaces de cuisson en céramique frottez la zone couverte de résidus en appuyant si nécessaire 4 Si des résidus subsistent répéte...

Page 111: ... confitures le caramel le sucre les sirops ou les plastiques fondus peuvent faire apparaître des piqûres sur la surface de votre table de cuisson Ces dommages ne sont pas couverts par la garantie Il est conseillé de nettoyer la projection tant qu elle est encore chaude Soyez particulièrement vigilant lorsque vous retirez des substances chaudes Reportez vous au chapitre suivant Lorsque vous utilise...

Page 112: ...ar le haut 4 Fermez la porte jusqu à la position de retrait de la porte à environ 5 degrés de la position verticale Fig 1 5 Soulevez et retirez la porte jusqu à ce que le bras de la charnière soit enlevé de son logement Fig 2 environ 5 Fig 1 Fig 2 Comment remettre la porte en place 1 Saisissez fermement les deux côtés de la porte par le haut 2 En maintenant la porte dans le même angle que lors de ...

Page 113: ... porte du four Retrait et remise en place du tiroir de rangement Comment retirer le tiroir de rangement 1 Tirez le tiroir vers vous jusqu à ce qu il arrive en butée 2 Inclinez l avant du tiroir et tirez le vers vous jusqu à ce qu il arrive en butée 3 Soulevez et tirez le tiroir vers vous Comment remettre le tiroir de rangement en place 1 Placez le côté gauche du tiroir sur le crochet gauche et le ...

Page 114: ... 3 Tournez le cache en verre situé à l arrière du four dans le sens inverse des aiguilles d une montre pour le retirer 4 Tournez l ampoule dans le sens inverse des aiguilles d une montre pour la retirer de sa douille Retrait Cache en verre Ampoule Remise en place 5 Replacez l ampoule et son cache en verre en les tournant dans le sens des aiguilles d une montre 6 Branchez la cuisinière ou mettez la...

Page 115: ...inière Contactez un maçon ou un installateur pour rendre la cuisinière accessible La moquette interfère avec les mouvements de la cuisinière Ménagez un espace suffisant pour que la cuisinière puisse être soulevée de la moquette La commande du four émet un signal sonore et affiche un code d erreur F Il s agit d un code d erreur de fonction CODE CAUSE SE Touche court circuitée E 27 Capteur du four c...

Page 116: ...e s allume pas La cuisinière n est pas correctement branchée sur la prise murale un fusible de votre habitation est peut être grillé ou le disjoncteur a peut être lâché Assurez vous que le cordon d alimentation est branché sur une prise en état de marche et correctement mise à la terre Vérifiez le fusible et le disjoncteur Câblage incomplet Contactez le service technique Coupure de courant Vérifie...

Page 117: ...d rugueux ont été en contact avec la table de cuisson ou bien des particules importantes comme du gros sel ou du sable se sont trouvées entre les récipients et la table de cuisson Afin d éviter les rayures respectez les procédures de nettoyage recommandées Assurez vous que les fonds des récipients sont propres avant de les utiliser Utilisez également des récipients à fond lisse Vous avez fait glis...

Page 118: ...ce phénomène programmez un cycle d auto nettoyage d une durée minimale de 3 heures Reportez vous au chapitre relatif à l auto nettoyage page 49 Odeur forte Il est normal de constater une odeur provenant de l isolation de la cavité du four lors des premières utilisations de votre four Cette odeur est provisoire Bruit au niveau du ventilateur Un ventilateur de convection peut se déclencher ou s arrê...

Page 119: ... réglage effectué par l acquéreur et non respect des instructions de fonctionnement d entretien et de respect de l environnement couvertes ou prescrites dans le présent carnet d entretien tout démontage ou toute réinstallation de l appareil tout problème résultant d une prolifération d insectes nuisibles d une surchauffe ou d un plat trop cuit par l utilisateur La présente garantie limitée ne peut...

Page 120: ...ux de nettoyage ou d entretien reguliers DES QUESTIONS OU DES COMMENTAIRES PAYS TÉLÉPHONE OU SUR INTERNET CANADA 1 800 SAMSUNG 726 7864 www samsung com ca support English www samsung com ca_fr support French U S A Consumer Electronics 1 800 SAMSUNG 726 7864 www samsung com us support U S A Mobile Phones 1 800 SAMSUNG 726 7864 www samsung com us support NE595R0ABSR_AC_DG68 00425A 05_CFR indd 59 201...

Reviews: