background image

40 


4.2 Windows-based Secure   

Erase 


NOTE:

 The steps outlined in this section will work only with a secondary 

drive.    If you wish to perform a Secure Erase on your primary drive (the 
drive containing your OS), please refer to Section 4.3. 
 
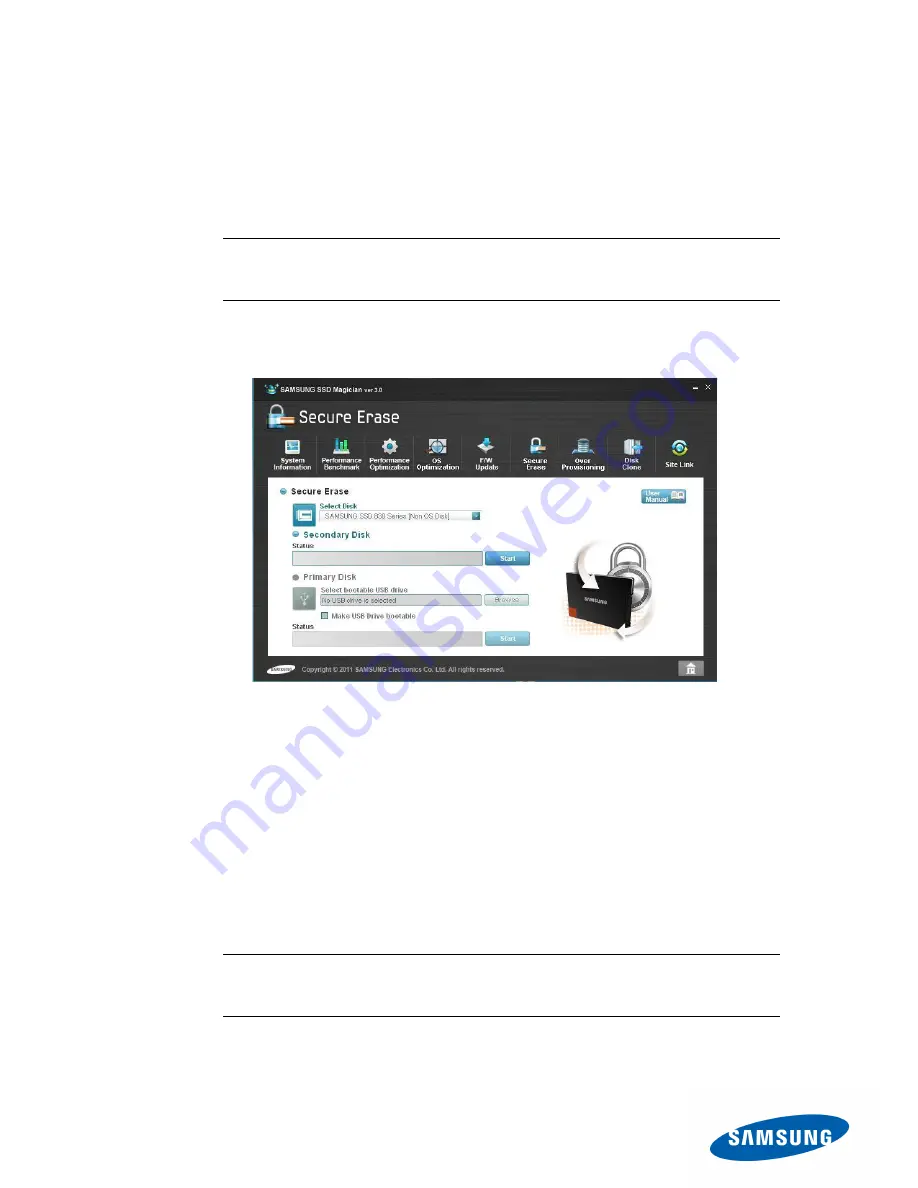
To erase a Samsung SSD that is acting as a secondary drive: 
1.  Select  the  SSD  from  the  list  of  available  drives.  Erasable  drives  will 

have a “[Non OS Disk]” label next to them. 


2. 

Click “Start.” 

 
Some  PCs  automatically 

“lock” attached drives.    If you receive an error 

message that tells you that the selected disk cannot be erased because it 
is in a “locked” state, follow the instructions below to power OFF/ON your 
SSD: 
1.  Open your computer case to gain physical access to the SSD.     
2.  Disconnect the cables attached to the SSD. 
3.  After waiting a few moments, reconnect the cables to the SSD. 
 
The  steps  above  effectively  “unlock”  the  drive  and  you  should  now  be 
able to click the 

[Start]

 button and successfully perform a Secure Erase 

on your secondary SSD. 
 

NOTE:

 If you are not comfortable disconnecting the cables to your SSD, 

you  may  skip  to  Section  4.3  and  follow  the  steps  for  the  DOS-based 
Secure Erase Utility instead. 


Summary of Contents for MZ-7PC064D

Page 1: ...Rev 3 0 Samsung SSD Magician User Manual ...

Page 2: ...without notice The information furnished by Samsung Electronics in this material is believed to be accurate and reliable at the time of publishing but Samsung Electronics makes no warranty whether express or implied with respect to anything found herein Trademarks and Service Marks The Samsung Logo is the trademark of Samsung Electronics Adobe is a trademark and Adobe Acrobat is a registered trade...

Page 3: ...er Provisioning 18 Disk Clone 19 Site Link 20 CHAPTER 3 21 3 1 FIRMWARE UPDATE BASICS 22 Introduction 22 Cautions 22 System Requirements 23 3 2 WINDOWS BASED FIRMWARE UPDATE 24 Updating Firmware with the Windows Based Firmware Utility 24 3 3 DOS BASED FIRMWARE UPDATE UTILITY BASICS 27 Creating a Boot Disk for the Firmware Update 27 3 4 UPDATING THE FIRMWARE WITH THE DOS UTILITY 33 Using the DOS Fi...

Page 4: ...1 4 4 USING THE SECURE ERASE UTILITY 44 Starting DOS SSD Application 44 CHAPTER 5 47 5 1 LIMITATIONS 48 General Limitations 48 Firmware Update Utility Limitations 48 Secure Erase Utility Limitations 48 APPENDIX 50 6 1 APPENDIX 51 Troubleshooting 51 Firmware Update Utility 51 Secure Erase Utility 52 GLOSSARY 54 7 1 GLOSSARY 55 ...

Page 5: ...5 Chapter 1 Preparation ...

Page 6: ...ions 1 Samsung SSD Magician software is only for Samsung SSD 470 Series and SSD 830 Series products and is not recommended for use with other products 2 Samsung Electronics is not liable for any data loss or other damages that may occur while using the software 3 Samsung is not able to provide any data restoration service in the event of data loss System Requirements Hardware Requirements Samsung ...

Page 7: ...oftware Requirements Windows XP with SP3 or above 32bit or 64bit Internet Explorer 7 or above Windows 7 Standard AHCI drivers or AHCI drivers from your PC s chipset manufacturer Acrobat Reader 8 0 or above ...

Page 8: ...8 Chapter 2 Using SSD Magician ...

Page 9: ...g SSD Magician software at www samsung com ssd Please note where you save the file as you will need it to continue the installation 2 Run the self extracting setup file to start the installation 3 Select the language that you prefer to use 4 Accept the software license agreement to start the installation 5 Confirm the installation path and click Next Click the Finish button to complete the install...

Page 10: ...e SSD Magician Software by clicking the SAMSUNG SSD MAGICIAN icon created on the desktop or the shortcut on the Quick Launch toolbar At the main screen select a feature to use You may also find the Samsung SSD Magician Software in the All Programs folder of the Windows Start Menu ...

Page 11: ...ur PC and the disk s connected to it System Summary displays information about the OS and the main hardware components Disk Summary displays information about the disk itself such as model name serial number manufacturer firmware version disk capacity and S M A R T information ...

Page 12: ... test too frequently may shorten SSD lifespan Samsung suggests that the Performance Benchmark test be run no more than once a day For previous Performance Optimization and Benchmark results click the icon Select any two entries from the list in performance test history and click the Compare button to view their comparison results To schedule the Performance Optimization and Benchmark functions to ...

Page 13: ... is constantly writing and deleting data of various sizes leaving data strewn haphazardly throughout the SSD Garbage Collection remedies this by combing through the Swiss cheese of data left behind collecting any data and carefully placing it together TRIM helps to make Garbage Collection more efficient by preparing invalid data for deletion When the OS deletes data the data does not actually go a...

Page 14: ...is turned on for the PC This setting is available in the BIOS For previous Performance Optimization and Benchmark results click the icon Select any two entries from the list in performance test history and click the Compare button to view their comparison results To schedule the Performance Optimization and Benchmark functions to run at a later time click the icon to set up the schedule ...

Page 15: ...Ds The OS Optimization menu provides options to optimize the OS for working with an SSD to improve system performance and maximize SSD lifetime This feature will check system settings to determine how they will affect the SSD and recommend which features to enable or disable ...

Page 16: ...e Firmware Update menu is used to update the SSD to the latest firmware provided by Samsung Firmware updates may include improvements in SSD performance compatibility user environment etc Refer to Chapter 3 for more details ...

Page 17: ...ve and is connected using either SATA or eSATA This can take place while Windows is running because it will not affect the OS files The other procedure is a Secure Erase of the boot drive which contains the Windows OS This must be completed with a DOS bootable USB Drive To see full instructions on how to use the Secure Erase feature refer to Chapter 4 Caution It is strongly recommended that you BA...

Page 18: ...ime allowing the SSD Controller to prepare free blocks for the OS to use in the future Because the SSD performs best when writing to free blocks the result is a better user experience through reduced wait time Samsung recommends allocating 7 10 of the total volume of your SSD for Over Provisioning space Over Provisioning space is displayed as unallocated space or an unallocated partition in the Wi...

Page 19: ...host please refer to your model number to determine your eligibility If you purchased any of the 470 Series SSD models below and 830 Series SSDs you can install Norton Ghost from the CD that came in your box or by downloading it from Samsung s website at www samsung com ssd Qualifying 470 Series SSDs Basic Model Upgrade Kit Note 64GB MZ 5PA064B MZ 5PA064C Paper box package 128GB MZ 5PA128B MZ 5PA1...

Page 20: ...o multi language versions of the Norton Ghost software in both ISO format and as simple setup files You can also find more information about Symantec online support and your local call centers Check this section to get user manuals and other support ...

Page 21: ...21 Chapter 3 Firmware Update ...

Page 22: ...ung com global business semiconductor If you have a computer with a Samsung SSD pre installed please contact the manufacturer of your computer 2 To prevent any potential data corruption or partial or total data loss during the firmware update it is highly recommended that users back up save a copy of all data stored on the Samsung SSD to another storage device before executing the Firmware Utility...

Page 23: ...application Be sure to check if the following requirements are satisfied before installing and using this product Hardware Requirements Samsung SSD 470 Series MZ 5PA064 MZ 5PA128 MZ 5PA256 Models or Samsung SSD 830 Series all models USB Flash Disk Minimum 10 MB capacity for those using the DOS based utility only Software Requirements The Samsung SSD Magician software must be installed on your comp...

Page 24: ...pdate the firmware using the Windows based firmware utility follow these steps 1 Click on FW update and choose Yes if you agree to the warning 2 Click on the FW Download button to download and save a copy of the latest firmware Please note where you save this file as you will need it in the steps that follow 3 Select the Windows solution radial button under the Firmware update solution header and ...

Page 25: ...e firmware update image that you saved to your computer The folder will contain DSRD enc and MAX enc files and will be found in the folder you specified during the download process In the example below the update was saved to a folder titled FW ...

Page 26: ...26 5 Click Start and choose YES from the popup window 6 The firmware update process will begin Choose OK when the confirmation message is displayed ...

Page 27: ...sung SSD Magician software to minimize user interaction when downloading and updating the firmware Samsung may provide new firmware in order to improve SSD performance compatibility or user experience A firmware update is recommended whenever the latest firmware version is released Creating a Boot Disk for the Firmware Update 1 If you have not already done so install the Samsung SSD Magician softw...

Page 28: ...otable USB drive radial button under the Firmware update solution header B Insert the USB flash drive into a USB port on your computer Please wait a few moments for the computer to recognize the device C Select the Browse button by the Select USB Bootable Disk heading D Choose the USB flash drive that you attached to your computer ...

Page 29: ...y selecting the folder that contains the latest firmware data files DSRD enc and MAX enc files The file will be found in the folder you specified during the download process In the example below the download was saved to a folder titled FW ...

Page 30: ...ct the check box Make USB Disk Bootable in order to make the USB disk DOS bootable 7 When the Firmware Update message box is displayed please read the contents If you agree check the box and click Yes to proceed ...

Page 31: ...31 8 Click the Start button and wait for the process to complete ...

Page 32: ...e startup disk creation is completed the message USB disk solution created successfully Restart the PC and boot from USB to initiate the Firmware Update procedure will be displayed Click OK to complete the process ...

Page 33: ... refer to the steps above if you are unsure of how to prepare a USB Drive for this process 1 Configure the USB Flash Drive as a primary booting device in the BIOS NOTE If you are not sure how to set up your computer BIOS please check the user manual of your computer system or motherboard 2 Restart the computer in DOS mode with the USB Boot Drive NOTE Turn your computer OFF and boot from the USB di...

Page 34: ...ity will launch automatically 4 Press Y if you read and accept the disclaimer and warning 5 This utility will automatically scan for connected SSDs and display a list of detected disks Press Y to confirm the firmware update process ...

Page 35: ...35 ...

Page 36: ...are version will be displayed 7 After a few seconds the software will either automatically close or may register the next SSD if one is present NOTE If the firmware is already updated on the SSD then the user will be notified with the following message ...

Page 37: ...37 Chapter 4 Secure Erase ...

Page 38: ...SSD Magician software to minimize user interaction during erasure Secure Erase is an unrecoverable operation that permanently deletes all data on a Samsung SSD Cautions 1 The DOS based Samsung Secure Erase Utility supports the Samsung SSD 470 Series and the SSD 830 Series only If you use another model of Samsung SSD please check www samsung com global business semiconductor If you have a computer ...

Page 39: ...the data on their SSD or restore the original out of the box performance of their SSD Therefore it is up to the user whether or not to execute the Secure Erase feature System Requirements This section will provide you with details about the installation of the DOS SSD Application with Secure Erase Utility SSD Secure Erase UTIL Check that you have the following required items before installing and ...

Page 40: ...ou receive an error message that tells you that the selected disk cannot be erased because it is in a locked state follow the instructions below to power OFF ON your SSD 1 Open your computer case to gain physical access to the SSD 2 Disconnect the cables attached to the SSD 3 After waiting a few moments reconnect the cables to the SSD The steps above effectively unlock the drive and you should now...

Page 41: ...e steps below 1 If you haven t already done so install the Samsung SSD Magician application on your Windows PC 2 Start the SSD Magician application The Samsung SSD Magician Software should be installed in the All Programs section of the Start Menu 3 Click the Secure Erase button in the menu for the Samsung SSD Magician application ...

Page 42: ...ize the device 6 From the Select Disk dropdown list Select your SSD 7 Select the Browse button next to the Select USB Bootable Disk heading and select the USB drive you connected to your computer 8 Select the checkbox Make USB Disk Bootable in order to make the USB disk DOS bootable 9 A Secure Erase message is displayed Please read the contents of the message box that appears If you agree check th...

Page 43: ... Start button will be disabled and USB boot disk creation will start 11 Once the bootable disk creation process is complete the message USB disk solution created successfully Restart the PC and boot from USB to initiate the Secure Erase feature is displayed Click OK ...

Page 44: ...n process as instructed in the section beginning on page 35 Starting DOS SSD Application Warning The Secure Erase Utility will execute only in IDE ATA or AHCI mode Please check your BIOS settings Follow the steps below 1 Configure the USB Flash Drive as a primary booting device in the BIOS NOTE If you are not sure how to set up your computer BIOS please check the user manual of your computer syste...

Page 45: ...always initiate the USB disk at startup 3 The DOS SSD application is launched automatically 4 After reading the disclaimer Press Y to accept and continue 5 The application scans for any connected SSDs A list of detected disks is displayed for a few seconds 6 Choose the disk you would like to Secure Erase and press Enter ...

Page 46: ... Erasing is displayed Please do not disturb the system during the erase process 9 Upon Successful Completion of Secure Erase the confirmation message Secure Erase is successful displays 10 After few seconds the application will either close or move on to the next SSD if another SSD drive exists ...

Page 47: ...47 Chapter 5 Limitations ...

Page 48: ...n is abnormally terminated during Performance Optimization or Performance Benchmarking the data on the SSD may be lost or the SSD itself may suffer physical damage Firmware Update Utility Limitations 1 If your SSD s is are configured in RAID mode the Firmware Update Utility cannot detect the SSD s Please disable RAID mode in the BIOS and update the firmware on each drive individually After updatin...

Page 49: ...RAID mode in the BIOS 2 The Secure Erase feature may not be supported in AHCI mode with some AMD chipsets In this case please change AHCI mode to IDE mode in the BIOS and then run Secure Erase After Secure Erase is complete you can reconfigure AHCI mode in the BIOS ...

Page 50: ...50 Appendix Troubleshooting ...

Page 51: ...ty does not start automatically after restarting the computer you may be presented with a DOS screen Because the Boot Priority has been set to use the USB drive first the USB disk is detected as drive C The executable files and data files for the firmware update are stored in the SAMSUNG folder directory Perform the following steps Please do NOT include the quotation marks A Type cd samsung and pr...

Page 52: ...d the number of disks connected to the system Q 2 Why doesn t the Secure Erase Utility automatically launch when I boot from a USB disk into DOS A2 There are a number of reasons why this could happen but the problem is easily remedied by following the steps below 1 If the Secure Erase Utility does not automatically start after restarting the computer you may be presented with a DOS screen Because ...

Page 53: ...sked to power the drive OFF ON If the power OFF ON process is displayed press Y to confirm NOTE To Power OFF ON the SSD you must open the computer case to gain physical access to the drive Disconnect its power cable wait a few seconds and reconnect the power cable ...

Page 54: ...54 Glossary ...

Page 55: ...DE which stands for Integrated Drive Electronics Boot Disk Within the context of this manual the boot disk is a USB Flash Drive that allows the computer to restart in DOS mode In this case it also includes the Samsung SSD Secure Erase Utility or the Samsung SSD Firmware Update Utility BIOS BIOS is an abbreviation of Basic Input Output System BIOS software is built into every PC and is the first pr...

Page 56: ...riting and deleting data of various sizes leaving data strewn haphazardly throughout the SSD Garbage Collection remedies this by combing through the Swiss cheese of data left behind collecting any valid data and carefully placing it together IDE or ATA PATA IDE or Integrated Drive Electronics is an interface standard for connecting internal storage devices HDD CD ROM etc to PCs It is based on the ...

Page 57: ...r and its storage devices and mass storage devices HDDs ODDs SSDs etc It supports fast data transfers and provides functionality such as Hot Plugging and NCQ SSD Solid State Drives or SSDs are innovative data storage devices that deliver high performance reliability and quality by using NAND Flash memory instead of the magnetic disks used in traditional Hard Disk Drives HDDs SSD Power Off On To po...

Page 58: ...or booting a computer In order to boot with a USB drive the PC BIOS must support the USB drive booting function If supported by the BIOS the USB drive should be formatted as a bootable disk and copied with the basic system files kernel necessary for DOS booting Instructions for creating a USB Booting Disk are available in this User Manual Wear leveling Wear leveling is a technique by which the SSD...

Page 59: ...msung com ssd All brand and product names are trademarks of their respective companies Design and contents of this manual are subject to change without notice 2011 Samsung Electronics Co Ltd All rights reserved ...

Reviews: