background image

S

AFETY

3

S

AFETY

Important Safety Instructions,

continued

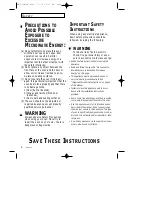
• Do not operate this appliance if it has a damaged

cord or plug, if it is not working properly, or if it
has been damaged.

• This appliance should be serviced only by quali-

fied service personnel. Contact the nearest autho-
rized service facility for examination, repair, or
adjustment.

• Do not cover or block any of the openings on this

appliance.

• Do not store this appliance outdoors. Do not use

near water – for example, near a kitchen sink, in a
wet basement, or near a swimming pool, etc. 

• Keep the inside of the oven clean. Food particles

or spattered oils stuck to the oven walls or floor
can cause paint damage and reduce the efficien-
cy of the oven.

• Do not immerse cord or plug in water.

• Keep cord away from heated surfaces.

• Do not let cord hang over edge of table or

counter.

• When cleaning door and oven surfaces, use only

mild, nonabrasive soaps or detergents applied
with a sponge or soft cloth.

• To reduce the risk of fire in the oven:

a. Do not overcook food. Watch appliance care

fully if paper, plastic, or other combustible 
materials are inside.

b. Remove wire twist-ties from plastic cooking bags 

before placing bags in oven.

c. If materials inside the oven ignite, keep the 

oven door closed, turn the oven off, disconnect 
the power cord, or shut off the power at the 
fuse or circuit breaker panel.

d. Do not use the oven compartment for storage 

purposes. Do not leave paper products, cooking
utensils, or food in the oven when not in use.

• Do not try to preheat oven or operate while empty.

• Do not cook without the glass tray in place on the

oven floor. Food will not cook properly without the
tray.

• Do not defrost frozen beverages in narrow-necked

bottles. The containers can break.

• Dishes and containers can become hot. Handle

with care.

• Carefully remove container coverings, directing

steam away from hands and face.

• Remove lids from bay food before heating. After

heating baby food, stir well and test temperature
by tasting before serving.

• A short power-supply cord is provided to reduce

the risk of becoming entangled in or tripping over
a longer cord. Longer cord sets or extension
cords are available and may be used 
with caution.  

• Do not operate any other heating or cooking appli-

ance beneath this appliance.

• Do not mount unit over or near any portion of a

heating or cooking appliance.

• Do not mount over a sink.

• Do not store anything directly on top of the appli-

ance when it is in operation.

S

AVE

T

HESE

I

NSTRUCTIONS

MW7692W/MW7693G  1/17/00 6:13 AM  Page 3

Summary of Contents for MW7692W

Page 1: ...para bebe Vegetales frescos Desayuno congelado Cena congelada Receta personalizada 1 Plato de comida 2 Guisado 3 Sopa salsa Sonido MW7692W MW7693G IMPORTANT IN ORDER TO PREVENT BAD OPERATING ANDAVOID DAMAGES TO THE PRODUCT PLEASE READ THIS MANUALCAREFULLY BEFORE CONNECTINGAND TURNNING ON THEAPPARATUS PLEASEALSO KEEPTHIS MANUALFOR FUTURE REFERENCES Code No DE68 00801A MW7692W MW7693G 1 17 00 6 13 A...

Page 2: ...ANT SAFETY INSTRUCTIONS WARNING Some items like whole eggs and food in sealed containers may explode if heated in this oven Use this appliance only for its intended use as described in the manual Do not use corrosive chemicals or vapors in this appliance This type of oven is specifically designed to heat cook or dry food It is not designed for industrial or labo ratory use As with any appliance cl...

Page 3: ...fore placing bags in oven c If materials inside the oven ignite keep the oven door closed turn the oven off disconnect the power cord or shut off the power at the fuse or circuit breaker panel d Do not use the oven compartment for storage purposes Do not leave paper products cooking utensils or food in the oven when not in use Do not try to preheat oven or operate while empty Do not cook without t...

Page 4: ...nded Use of Extension Cords A short power supply cord is provided to reduce the risk of becoming entangled in or tripping over a longer cord Longer cord sets or extension cords are available and may be used if care is exercised in their use If a long cord or extension cord is used 1 The marked electrical rating of the cord set or extension cord should be at least as great as the electrical rating ...

Page 5: ...eceta Personalizada Button 11 Auto Descongelado Defrosting Automatically 12 Setting Cooking Times Nivel de Potencia Power Levels 12 One stage Cooking 12 Multi stage Cooking 13 Using the Mas Menos Button 13 Adjusting the Volume 14 Using the Cronómetro 14 Setting the Child Protection Lock 15 Demonstration Mode 15 Cooking Instructions 16 Cooking Utensils 16 Testing Utensils 16 Cooking Techniques 17 G...

Page 6: ..._______________ Setting Up Your Microwave Oven 1 Place the oven on a flat sturdy surface and plug the cord into a grounded outlet Once plugged in the display on your oven will show Make sure there is adequate ventilation for your oven by leaving at least four inches of space behind above and to the side of the oven 2 Open the oven door by pressing the but ton below the control panel 3 Wipe the ins...

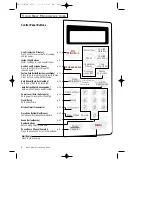
Page 7: ...11 Press twice to program your favorite recipe Press once to cook with that recipe Auto Reheat Auto Recalentado p 10 Sets type of dish to be reheated Number Buttons Sets cooking times or amounts Sound Button Sonido p 14 More Less Button Mas Menos p 13 Increases or decreases cooking time Kitchen Timer Cronómetro p 14 Start Inicio Press to start cooking Auto Defrost Auto Descongelado p 12 Sets weigh...

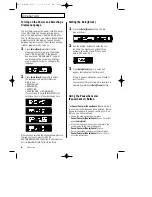
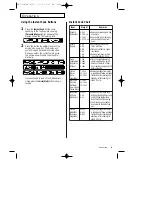
Page 8: ... PAUSE CANCEL button to end this proce dure or press RELOJ CLOCK to set the clock Setting the Reloj Clock 1 Press the Reloj Clock button The dis play will show 2 Use the number buttons to enter the cur rent time You must press at least three numbers to set the clock If the current time is 5 00 enter 5 0 0 3 Press Reloj Clock again A colon will appear indicating that the time is set If there is a p...

Page 9: ...es with fork 3 EA Place on turntable in spoke 4 EA like fashion 5 EA Remove from oven wrap in 6 EA foil and let stand 3 5 min Fresh 1 cup Place the vegetables into a Vegetables 2 cups casserole and add a small Vegetales 3 cups amount of water 2 4 Tbsp frescos 4 cups Cover during cooking and stir before standing Frozen 7 10 oz Remove package from outer Dinner 10 12 oz wrapping and follow package Ce...

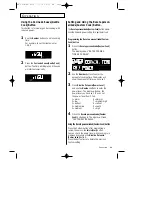
Page 10: ...p to four servings for casseroles and soup Only one serving is available for a plate of food The display shows the dish and quantity you have chosen then PRESS START MICRO HELP Plate of food One Serving Casserole One Serving Soup Sauce One Serving 2 Use the number buttons to increase the serving size For example for three servings press the 3 button Refer to the Auto Reheat Chart below for the ser...

Page 11: ... POWER 2 Use the Number buttons to enter the amount of cooking time The display will show the amount of time you have set 3 Press Nivel de Potencia Power Level and use the Number buttons to enter the power level The display will show the power level you have set You can set the power level from 0 to 9 1 warm 6 simmer 2 low 7 medium high 3 defrost 8 reheat 4 medium low 9 sauté 5 medium 0 high 4 Pre...

Page 12: ...s the Inicio Start button to begin cooking If you want to change the power level press Pausa Cancelar Pause Cancel before you press Inicio Start and re enter all of the instructions OPERATION 12 OPERATION Auto Descongelado Defrosting Automatically To thaw frozen food set the weight of the food and the microwave automatically sets the defrosting time power level and standing time 1 Press the Auto D...

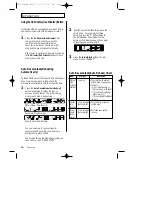
Page 13: ...R ENTER NEXT STAGE COOKING TIME 4 Press Inicio Start to begin cooking or repeat steps 2 and 3 to set a power level for a third stage of cooking When fin ished press Inicio Start MICRO HELP Using the Mas Menos More Less Button The Mas Menos More Less button allows you to adjust pre set cooking times It only works with Auto Recalentado Auto Reheat and the Instant Cook buttons Use the Mas Menos More ...

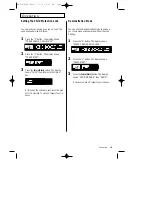
Page 14: ...IGH 2 Press 0 to turn the volume off 1 for low volume 2 for medium volume or 3 for high volume The display will show the volume you have chosen then shows PRESS INI CIO START 3 Press Inicio Start The display returns to the time of day Using the Cronómetro Kitchen Timer 1 Use the Number buttons to set the length of time you want the timer to run 2 Press the Cronómetro Kitchen Timer button 3 The dis...

Page 15: ...s to the time of day At this point the microwave oven cannot be used until it is unlocked To unlock it repeat steps 1 3 above Demonstration Mode You can use the Demonstration Mode to see how your microwave oven operates without the oven heating 1 Press the 0 button The display shows PRESS 1 DEMO 2 CHILD LOCK 2 Press the 1 button The display shows PRESS START 3 Press the Inicio Start button The dis...

Page 16: ... damage your oven so be careful Ceramic porcelain and stoneware Use these if they are labeled Microwave Safe If they are not labeled test them to make sure they can be used safely Never use dishes with metallic trim Plastic Use only if labeled Microwave Safe Other plastics can melt Straw wicker and wood Use only for short term heating as they can be flammable Not Recommended Glass jars and bottles...

Page 17: ... liquids such as soup or hot choco late should be shaken or stirred when cooking is complete Let liquids stand a moment before serv ing When heating baby food stir well and test the temperature before serving Adding Moisture Microwave energy is attracted to water molecules Food that is uneven in moisture content should be covered or allowed to stand so that the heat dis perses evenly Add a small a...

Page 18: ...ions towards the outside of the dish Cover with wax paper Turn over when the cooking time is half up Cook until juices run clear and meat near the bone is no longer pink Let stand 5 10 min GUIDE for Cooking Poultry in Your Microwave Place poultry on a microwave safe roasting rack in a microwave safe dish Cover poultry with wax paper to prevent spattering Use aluminum foil to shield bone tips thin ...

Page 19: ...erved immediately GUIDE for Cooking Eggs in Your Microwave Never cook eggs in the shell and never warm hard cooked eggs in the shell they can explode Always pierce whole eggs to keep them from bursting Cook eggs just until set they become tough if overcooked GUIDE for Cooking Vegetables in Your Microwave GUIDE for Cooking Seafood in Your Microwave Cook fish until it flakes easily with a fork Place...

Page 20: ...0 lbs After each stage remove any pieces of food that are nearly defrosted Let stand covered with foil for 5 10 minutes Whole Chicken 2 5 6 0 lbs Remove giblets before freezing poultry Start defrosting with the breast side down After the first stage turn the chicken over and shield any warm portions with narrow strips of aluminum foil After the second stage again shield any warm portions with narr...

Page 21: ... Let stand for 10 minutes Remove bay leaf before serving Makes 6 servings Broccoli and Cheese Casserole 1 4 cup butter or margarine 1 4 cup chopped onion 1 1 2 Tbs flour 1 2 tsp salt 1 4 tsp dry mustard 1 8 tsp pepper 1 1 2 cups milk 1 4 cup chopped red pepper 8 oz 2 cups cheddar cheese shredded 1 pkg 9 10 oz frozen chopped broccoli thawed 4 cups cooked spiral shaped pasta 8 oz dry 1 In a 2 quart ...

Page 22: ...stir once 4 Stir in sugar salt flour celery seed and pepper Cook at High until mixture boils 30 40 sec Stir in vinegar and 1 2 cup water Cook at High until liquid boils and thickens slightly 1 2 min stir once Add bacon to dressing Pour dressing over potatoes Stir well Makes 6 servings Black Bean Soup 1 cup chopped onion 1 clove garlic minced 2 cans 15 oz each black beans drained 1 can 14 16 oz ste...

Page 23: ...ring and oven floor Make sure the turntable and roller ring are positioned correctly Using your microwave causes TV or radio interference This is similar to the interference caused by other small appliances such as hair dryers Move your microwave further away from other appliances like your TV or radio Care and Cleaning Follow these instructions to clean and care for your oven Keep the inside of t...

Page 24: ...Power Output Outside Dimensions Oven Cavity Dimensions Net Gross Weight MW7692W MW7693G 1 4cuft 10 power levels including defrost 99 minutes 99 seconds 120 VAC 60 Hz 1100 Watts 217 8 W X 125 16 H X 179 32 D 143 4 W X 927 32 H X 167 16 D 40 8 46 3 lbs MW7692W MW7693G 1 17 00 6 13 AM Page 24 ...

Page 25: ... and turn food over Press INICIO START to resume defrosting cycle 1 Press AUTO RECALENTADO AUTO REHEAT repeatedly to select type of dish to reheat 2 To increase serving size press the corresponding number button 3 Press INICIO START to begin reheating cycle 1 Use number buttons to set cooking time 2 To set power level at other than HIGH press NIVEL DE POTENCIA POWER LEVEL and use the number button...

Reviews: