background image

10

.1   

<Installing accessories>

10

 Installing accessories

Your printer is a full-featured laser printer that has been optimized to 
meet most of your printing needs. Recognizing that each user may have 
different requirements, however, Samsung makes several accessories 
available to enhance the printer’s capabilities.

This chapter includes:

Precautions when installing accessories

Installing a memory DIMM

Installing a wireless network interface card

Precautions when installing accessories

Disconnect the power cord: 

Never remove the control board cover while the power is being supplied.

To avoid the possibility of an electrical shock, always disconnect the 
power cord when installing or removing ANY internal or external 
accessories.

Discharge static electricity: 

The control board and internal accessories (network interface card and 
memory DIMM) are sensitive to static electricity. Before installing or 
removing an internal accessories, discharge static electricity from your 
body by touching something metal, such as the metal back plate on any 
device plugged into a grounded power source. If you walk round before 
finishing installation, discharge any static electricity once again.

Installing a memory DIMM

Your printer has a dual in-line memory module (DIMM) slot. Use this 
DIMM slot to install additional memory.

The ML-3050 has 32 MB of memory which can be expanded to 288 MB. 
The ML-3051N and ML-3051ND have 64 MB of memory which can be 
expanded to 320 MB. 

For order information for optional memory DIMMs, see page 7.1.

1

Turn the printer power off and unplug all cables from the printer.

2

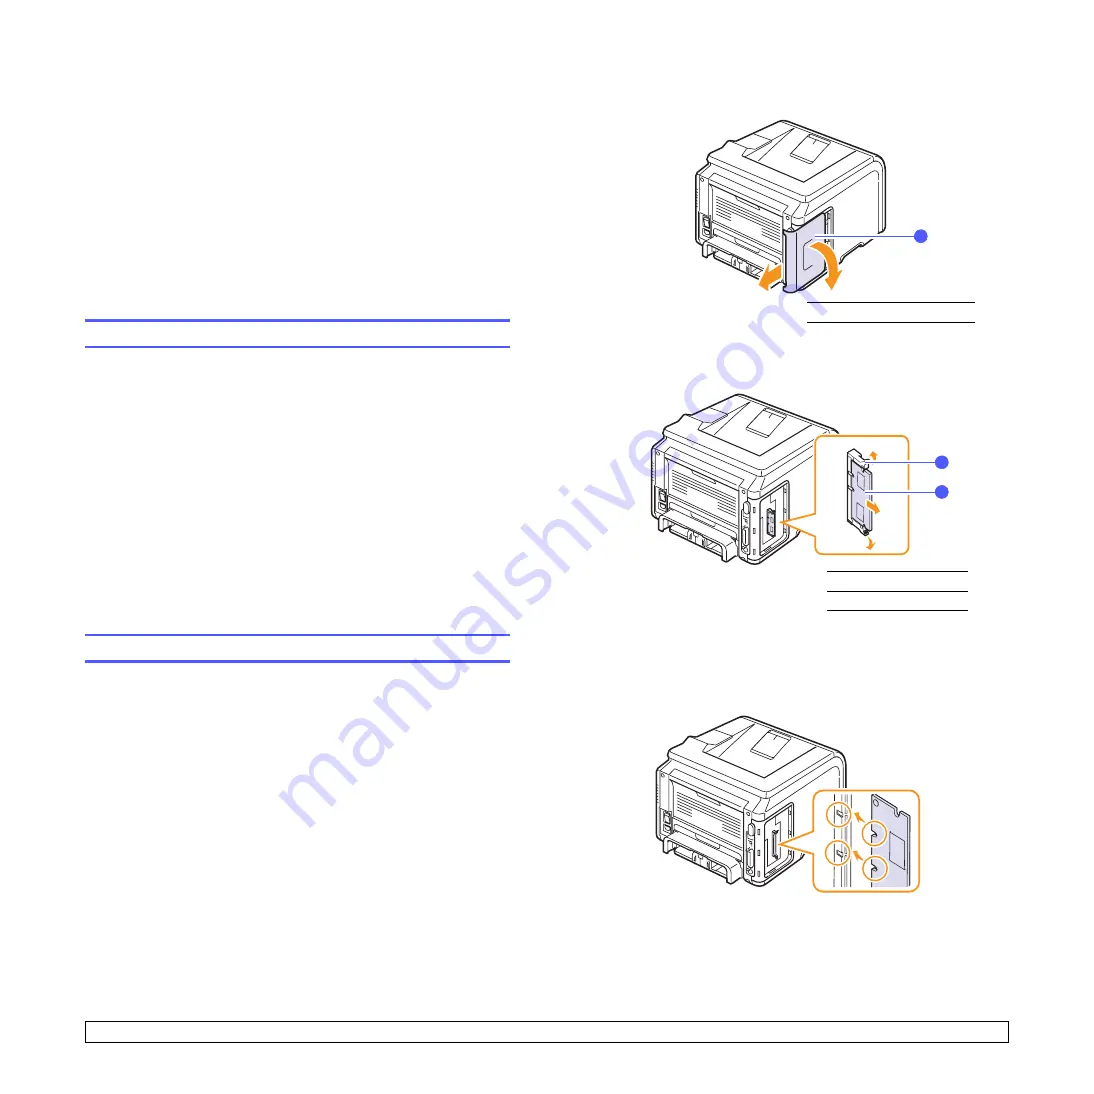
Grasp the control board cover and slide toward you to open it.

3

Completely open the latch on each side of the DIMM slot. Remove 
the preinstalled memory DIMM.

4

Take out a new memory DIMM from the plastic bag.

5

Holding the memory DIMM by the edges, align the notches on the 
memory DIMM with the grooves on the memory DIMM slot.

1

control board cover

1

1

latch

2

memory DIMM

1

2

Summary of Contents for ML-3050 Series

Page 1: ...td Centronics is a trademark of Centronics Data Computer Corporation IBM and IBM PC are trademarks of International Business Machines Corporation PCL and PCL 6 are trademarks of Hewlett Packard company Microsoft Windows Windows 9x Windows Me Windows 2000 Windows NT 4 0 Windows XP and Windows 2003 are registered trademarks of Microsoft Corporation PostScript 3 is a trademark of Adobe System Inc UFS...

Page 2: ... features 3 2 System requirements 3 2 4 Network setup Introduction 4 1 Supported operating systems 4 1 Configuring TCP IP 4 1 Configuring EtherTalk 4 2 Configuring IPX frame types 4 2 Setting Ethernet speed 4 3 Restoring the network configuration 4 3 Printing a network configuration page 4 3 5 Loading print media Selecting print media 5 1 Loading paper 5 4 Selecting an output location 5 8 6 Basic ...

Page 3: ...ED 9 6 Understanding display messages 9 7 Solving general printing problems 9 9 Solving print quality problems 9 11 Common Windows problems 9 13 Common PostScript problems 9 14 Common Linux problems 9 14 Common Macintosh problems 9 16 10 Installing accessories Precautions when installing accessories 10 1 Installing a memory DIMM 10 1 Installing a wireless network interface card 10 2 11 Specificati...

Page 4: ...er consumption when it is not in active use When the printer does not receive data for an extended period of time power consumption is automatically lowered The energy star emblem does not represent EPA endorsement of any product or service Recycling Please recycle or dispose of the packaging material for this product in an environmentally responsible manner Radio Frequency Emissions FCC regulatio...

Page 5: ...ll void the authorization to use it Contact manufacturer for service FCC Statement for Wireless LAN use While installing and operating this transmitter and antenna combination the radio frequency exposure limit of 1mW cm2 may be exceeded at distances close to the antenna installed Therefore the user must maintain a minimum distance of 20cm from the antenna at all times This device can not be coloc...

Page 6: ...he power output of the wireless device or devices that may be embedded in your printer is well below the RF exposure limits as known at this time Because the wireless devices which may be embedded into your printer emit less energy than is allowed in radio frequency safety standards and recommendations manufacturer believes these devices are safe for use Regardless of the power levels care should ...

Page 7: ...rivers approved for the country in which the device will be used See the manufacturer System Restoration Kit or contact manufacturer Technical Support for additional information WARNING Do not disassemble the printer Doing so may give you an electric shock If you continuously print many pages the surface of the output tray may become hot Be careful not to touch the surface especially for children ...

Page 8: ...aped together to form a poster See the Software Section 9 8 Save time and money This printer allows you to use Toner Save mode to save toner See page 2 7 You can print on both sides of the paper to save paper double sided printing if you use the ML 3051ND You can print multiple pages on a single sheet of paper to save paper 2 Up printing See the Software Section You can use preprinted forms and le...

Page 9: ...100 Base TX O I I Wireless LAN IEEE 802 11 b g Wireless LAN O O O PostScript Emulation NA I I Duplex printinga a Printing on both sides of paper NA NA I Printer overview Front view 1 output tray 7 multi purpose tray 2 control panel 8 front cover 3 handle 9 output support 4 paper level indicator 10 multi purpose tray paper width guides 5 optional tray 2 11 multi purpose tray extension 6 tray 1 The ...

Page 10: ... an operation at any time 4 Status Shows the status of your printer See page 9 6 1 Menu Enters Menu mode and scrolls through the available menus 2 Scroll buttons Scroll through the options available in the selected menu and increase or decrease values 3 OK Confirms the selection on the display 4 Back Sends you back to the upper menu level 5 Toner Save Allows you to save on toner by using less tone...

Page 11: ...ork utilities CD provides you with information on setting up and connecting your printer to a network Printer Driver Help Provides you with help information on printer driver properties and instructions for setting up the properties for printing To access a printer driver help screen click Help from the printer properties dialog box Samsung website If you have Internet access you can get help supp...

Page 12: ... buttons to access the desired setting option or the required value 5 Press OK to save your selection An asterisk appears next to the selection on the display indicating that it is now the default 6 Press Stop to return to Standby mode After 60 seconds of inactivity no key being pressed the printer automatically returns to Standby mode Note Print settings made from the printer driver on a connecte...

Page 13: ... margin from 0 0 to 164 mm Values Portrait Landscape Portrait Landscape Values 0 0 Duplex To print on both sides of paper choose the binding edge as follows Long Edge Flip on the long edge Prints pages to read like a book Short Edge Flip on the short edge Prints pages to read by flipping over like a note pad Select Off to print on one side of the paper Note This menu item is available only with th...

Page 14: ... Monarch Env DL Env C5 Env C6 Env US Folio Custom Paper Letter for USA A4 for Europe and Asia Values Plain Paper Bond Paper Transparency Envelope Labels Post Card CardStock Preprinted Recycled Color Paper Cotton Paper Thick Paper Thin Paper Values Tray 1 Tray 2 MP Tray Manual Tray Auto Values Off On Graphic menu Use the Graphic menu to change settings affecting the quality of the printed character...

Page 15: ...l I Portuguese B Portugues Deutsch Italiano Values 5 Min 10 Min 15 Min 30 Min 45 Min Values Off On Values Off On Values Low High Emulation menu Use the Emulation menu to configure printer language emulation the default setting Auto CR This item allows you to append the required carriage return to each line feed Refer to the following samples Job Timeout You can set the length of time the printer w...

Page 16: ... paper size and printing orientation Values PCL1 PCL54 Values ROMAN8 PCCYRIL PC8 Values 4 00 999 75 0 25 unit 12 Values Regular Dark Values 0 44 99 99 0 01 unit 10 Values 5 128 60 Letter 64 A4 PostScript This menu provides you with the Print PS Error menu item the default setting EPSON This menu sets the EPSON emulation configuration the default setting Item Explanation Print PS Error You can sele...

Page 17: ...ws you to select the ethernet speed Values DHCP BOOTP Static Values Off On Values Auto 802 2 802 3 Ethernet II SNAP off Values Auto 10M Half 10M Full 100M Half 100M Full Printing a demo page Print a demo page to make sure that the printer is operating correctly ML 3050 ML 3051N Press and hold Demo for about 2 seconds ML 3051N ML 3051ND 1 Press Menu and then OK when Information appears 2 Press the ...

Page 18: ... to enable this mode Using the control panel button Press Toner Save on the control panel The printer must be in Standby mode the Status LED lights green and Ready is shown on the display if you use the ML 3051N or ML 3051ND If the button backlight is on the mode is enabled and the printer uses less toner to print a page If the button backlight is off the mode is disabled and the printer prints in...

Page 19: ... automatically installed when you install the printer driver User s Guide in PDF Linux Printer driver Use this driver to run your printer from a Linux computer and print documents Smart Panel This program allows you to monitor the printer s status and alerts you when an error occurs during printing PostScript printer driver CD Windows Postscript Printer Description PPD file Use the PostScript driv...

Page 20: ...rinting O O O O Different source for first page O X O O Watermark O X X X Overlay O X X X System requirements Before you begin ensure that your system meets the following requirements Windows Note For Windows NT 4 0 2000 XP 2003 users who have an administrator right can install the software Item Requirements Recommended Operating system Windows 95 98 Me NT 4 0 2000 XP 2003 CPU Windows 95 98 Me NT ...

Page 21: ...irements Operating system Red Hat 8 0 9 0 Fedora Core 1 3 Mandrake 9 0 10 2 SuSE 8 2 9 2 Processor Pentium IV 1 GHz or higher RAM 256 MB or higher Free disk page 1 GB or higher Software Linux Kernel 2 4 or higher Glibc 2 2 or higher CUPS SANE Item Requirements Operating system Macintosh 10 3 ML 3050 8 6 9 2 and 10 1 10 4 ML 3051N or ML 3051ND RAM 128 MB Free disk space 200 MB Connection USB interf...

Page 22: ...elect a network interface and manually configure the addresses for use with the TCP IP protocol For further details refer to the user s guide on the network utilities CD that came with your printer Via the control panel You can set up the following basic network parameters through the printer s control panel Configure TCP IP Configure IPX frame types for NetWare Configure EtherTalk Supported opera...

Page 23: ...e following step 1 Press Menu until Network appears on the bottom line of the display and press OK 2 Press the Scroll buttons until EtherTalk appears and press OK 3 Press the Scroll buttons until On appears and press OK 4 Press Stop to return to Standby mode Configuring IPX frame types To use IPX SPX protocol networks for example Novell NetWare the format of the network communication frames must b...

Page 24: ...guration to its default settings 1 Press Menu until Network appears on the bottom line of the display and press OK 2 Press the Scroll buttons until Clear Setting appears and press OK 3 Press OK when Yes appears to restore the network configuration 4 Power the printer off and back on Printing a network configuration page The network configuration page shows how the network interface card on your pr...

Page 25: ...hould be appropriate for your project Size You can use any size media that fits easily within the paper adjusters of the paper tray Weight Your printer supports print media weights as follows 16 to 24 lb 60 to 90 g m2 bond for the tray 1 and optional tray 2 16 to 43 lb 60 to 163 g m2 bond for the multi purpose tray 20 to 24 lb 75 to 90 g m2 for the duplex printing ML 3051ND only Brightness Some pr...

Page 26: ... inches A6 105 x 148 5 mm 4 13 x 5 85 inches Envelope Envelope B5 176 x 250 mm 6 93 x 9 84 inches 75 to 90 g m2 20 to 24 lb 5 sheets of 75 g m2 20 lb in the multi purpose tray Envelope Monarch 98 4 x 190 5 mm 3 88 x 7 5 inches Envelope COM 10 105 x 241 mm 4 12 x 9 5 inches Envelope DL 110 x 220 mm 4 33 x 8 66 inches Envelope C5 162 x 229 mm 6 38 x 9 02 inches Envelope C6 114 x 162 mm 4 49 x 6 38 i...

Page 27: ...heet at a time through the multi purpose tray to avoid paper jams To prevent print media such as transparencies and label sheets from sticking together remove them as they print out Guidelines for special print media Media type Guidelines Envelopes Successful printing on envelopes depends upon the quality of the envelopes When selecting envelopes consider the following factors Weight The weight of...

Page 28: ...ot run a sheet of labels through the printer more than once The adhesive backing is designed for only a single pass through the printer Do not use labels that are separating from the backing sheet or are wrinkled bubbled or otherwise damaged Card stock or custom sized materials Do not print on media smaller than 76 mm 3 inches wide or 127 mm 5 inches long In the software application set margins at...

Page 29: ... the multi purpose tray You can load previously printed paper The printed side should be facing up with an uncurled edge at the front If you experience problems with paper feed turn the paper around Note that the print quality is not guaranteed Changing the size of the paper in the tray 1 To load longer sizes of paper such as Legal sized paper you need to adjust the paper guides to extend the pape...

Page 30: ...a type you are using keep the following loading guidelines Envelopes Flap side down and with the stamp area on the top left side Transparencies Print side up and the top with the adhesive strip entering the printer first Labels Print side up and top short edge entering the printer first Preprinted paper Design side up with the top edge toward the printer Card stock Print side up and the short edge...

Page 31: ...elect Manual Feed in the Source option from the Paper tab when you change print settings to print a document See the Software Section Manually loading paper can be helpful when you want to check the print quality after each page is printed This loading procedure is almost the same as the procedure for loading in the multi purpose tray except you load paper sheet by sheet in the tray send print dat...

Page 32: ...er is printing Printing to the output tray Face down The output tray collects paper face down in the order in which the sheets were printed The tray should be used for most print jobs 1 1 rear cover 2 output tray 2 Printing to the rear cover Face up Using the rear cover paper comes out of the printer face up Printing from the multi purpose tray to the rear cover provides a straight paper path Usin...

Page 33: ...n a print queue or print spooler such as the printer group in Windows delete the job as follows 1 Click the Windows Start button 2 For Windows 98SE NT 4 0 2000 Me select Settings and then Printers For Windows XP 2003 select Printers and Faxes 3 Double click the Samsung ML 305x Series PCL6 or Samsung ML 305x Series PS icon 4 From the Document menu select Cancel Printing Windows 95 98 Me or Cancel W...

Page 34: ...and types of print materials SCX S5530A Memory DIMM Extends your printer s memory capacity ML 00MA 16 MB ML 00MB 32 MB ML 00MC 64 MB ML 00MD 128 MB ML MEM140 256 MB IEEE 802 11 b g Wireless LAN carda Allows you to connect your printer to a wireless network and share it with other people over the network ML NWA10L How to purchase To order Samsung authorized supplies or accessories contact your loca...

Page 35: ... This buildup can cause print quality problems such as toner specks or smearing Your printer has a cleaning mode that can correct and prevent these types of problems Cleaning the outside of the printer Clean the cabinet of the printer with a soft lint free cloth You can dampen the cloth slightly with water but be careful not to let any water drip onto or into the printer Caution Cleaning the cabin...

Page 36: ... Your printer automatically picks up a sheet of paper from the tray and prints out a cleaning sheet with dust or toner particles on it Maintaining the toner cartridge Toner cartridge storage To get the most from the toner cartidge keep the following guidelines in mind Do not remove the toner cartidge from its package until ready for use Do not refill the toner cartidge The printer warranty does no...

Page 37: ...ll still occur even after you have redistributed the toner 1 Open the front cover 2 Pull the toner cartidge out Cautions Avoid reaching too far into the printer The fusing area may be hot To prevent damage to the toner cartridge do not expose it to light for more than a few minutes Cover it with a piece of paper if necessary Do not touch the green surface underside of the toner cartridge Use the h...

Page 38: ... water sets toner into fabric To prevent damage to the toner cartridge do not expose it to light for more than a few minutes Cover it with a piece of paper if necessary Do not touch the green surface underside of the toner cartridge Use the handle on the cartridge to avoid touching this area 5 Hold the toner cartridge by the handle and slowly insert the cartridge into the opening in the printer 6 ...

Page 39: ...he paper If the paper tears ensure that all fragments of paper are removed otherwise a jam will occur again When a paper jam occurs the Status LED lights red Open and close the front cover The jammed paper automatically exit the printer If the paper does not exit check the display on the control panel The message indicating the corresponding location of the paper jam appears Refer to the table bel...

Page 40: ...t snaps into place Printing automatically resumes In the optional tray 2 1 Pull the optional tray 2 open 2 Remove the jammed paper from the printer If the paper does not move when you pull or if you do not see the paper in this area stop and go to step 3 3 Pull the tray 1 half 4 Pull the paper straight up and out 5 Insert the trays back into the printer Printing automatically resumes In the multi ...

Page 41: ...n the paper exit area 1 Open and close the front cover The jammed paper is automatically ejected from the printer 2 Gently pull the paper out of the output tray If you do not see the jammed paper or if there is any resistance when you pull stop and go to the next step 3 Open the rear cover 4 If you see the jammed paper push the pressure lever on each side up and remove the paper Return the pressur...

Page 42: ...d paper out If the jammed paper does not move when you pull push the pressure lever on each side up to loose the paper and then remove it 9 Return the lever door stopper and guide to their original position 10 Close the rear cover Printing automatically resumes In the duplex unit area ML 3051ND only If the duplex unit is not inserted correctly paper jam may occur Make sure that the duplex unit is ...

Page 43: ...ectly Do not overload the tray Ensure that the paper level is below the paper capacity mark on the inside wall of the tray Do not remove paper from the tray while your printer is printing Flex fan and straighten paper before loading Do not use creased damp or highly curled paper Do not mix paper types in a tray Use only recommended print media See page 5 1 Ensure that the recommended print side of...

Page 44: ...interrupted during printing see page 9 9 If completing the checklist does not resolve the printer problem check the following troubleshooting sections Understanding display messages on page 9 7 Solving general printing problems on page 9 9 Common Windows problems on page 9 13 Common Macintosh problems on page 9 16 Common PostScript problems on page 9 14 Common Linux problems on page 9 14 Understan...

Page 45: ...s does not match the paper you are loading Load the correct paper in the tray Load Manual Press Cont Key The multi purpose tray is empty in manual feed mode Load a sheet of print material and press Stop if you use the ML 3050 or OK if you use the ML 3051N or ML 3051ND You need to press Stop or OK each page to be printed Low Heat Error Cycle Power There is a problem in the fuser unit Unplug the pow...

Page 46: ...ss conflicts with other cards on the network Contact your network administrator and choose an address within your subnet which will not conflict with any other cards Message Meaning Suggested solutions Ready Replace Cart The life of some parts on the toner cartidge ends Regardless of the remaining toner this is warning message showing that the toner cartidge replacement is needed as the parts life...

Page 47: ... the default printer Select Samsung ML 305x Series PCL 6 orSamsung ML 305x Series PS as your default printer The printer cover is not closed Close the printer cover Paper is jammed Clear the paper jam See page 9 1 No paper is loaded Load paper See page 5 4 The toner cartidge is not installed Install the toner cartidge The printer may be in manual feed mode and out of paper Check the display messag...

Page 48: ...ts A4 sized paper at 19 ipm and letter sized paper at 21 ipm in the duplex printing mode Condition Possible cause Suggested solutions Print job is extremely slow Continued If using Windows 9x Me the Spooling Setting may be set incorrectly From the Start menu choose Settings and Printers Right click the Samsung ML 305x Series PCL 6 printer icon choose Properties click the Details tab and then choos...

Page 49: ...ms Dirt inside of the printer or improper paper loading may reduce print quality See the table below to troubleshoot problems Condition Suggested solutions Light or faded print If a vertical white streak or faded area appears on the page The toner supply is low You may be able to temporarily extend the toner cartidge life See page 8 3 If this does not improve print quality install a new toner cart...

Page 50: ... A a B b C c A a B b C c A a B b C c A a B b C c A a B b C c Background scatter Background scatter results from bits of toner distributed on the printed page The paper may be too damp Try printing with a different batch of paper Do not open packages of paper until necessary so that the paper does not absorb too much moisture If background scatter occurs on an envelope change the printing layout to...

Page 51: ...icrosoft Windows 9x Me NT 4 0 2000 XP 2003 User s Guide that came with your PC for further information on Windows error messages Horizontal stripes If horizontally aligned black streaks or smears appear The toner cartidge may be installed improperly Remove the cartridge and reinsert The toner cartidge may be defective Install a new toner cartidge See page 8 4 If the problem persists the printer ma...

Page 52: ...You need to have administrator privileges to be able to affect global settings I am using the KDE desktop but the configuration tool and LLPR won t start Maybe you do not have the GTK libraries installed These usually come with most Linux distributions but you may have to install them manually Refer to your distribution s installation manual for more details about installing additional packages I ...

Page 53: ... LLPR is running Most Unix applications will expect a command like the regular lpr command to be non interactive and thus return immediately Since LLPR is waiting for user input before passing the job on to the print spooler very often the application will wait for the process to return and thus will appear to be frozen its windows won t refresh This is normal and the application should resume fun...

Page 54: ... System you should upgrade Ghostscript on your system to at least GNU Ghostscript version 7 06 or later You can find recent Ghostscript versions at www ghostscript com Condition Suggested solutions The printer does not print a document from Acrobat Reader You should change the Print Method option to Print as Image when you print from Acrobat Reader The document has printed but the print job has no...

Page 55: ...efore installing or removing an internal accessories discharge static electricity from your body by touching something metal such as the metal back plate on any device plugged into a grounded power source If you walk round before finishing installation discharge any static electricity once again Installing a memory DIMM Your printer has a dual in line memory module DIMM slot Use this DIMM slot to ...

Page 56: ...n and select Properties 6 For Windows 95 98 Me select Device Option tab For Windows NT4 0 2000 XP 2003 select Device Settings tab 7 Select the amount of memory you installed from Printer Memory in the Installable Option section For Windows 98 select Installable Option VMOption change setting for VMOption change memory 8 Click OK Installing a wireless network interface card The ML 3051N and ML 3051...

Page 57: ...1 Press Menu until Network appears on the bottom line of the display and press OK 2 Press the Scroll buttons until Wireless appears and press OK 3 Press OK when SSID Type appears 4 Press the Scroll buttons to select the setup method you want and press OK Search List The wireless network interface card on your printer searches for wireless networks in the area and shows the results Custom You can c...

Page 58: ...encryption keys You can configure up to four keys The active key must match the key value and key position for example Key 1 configured on other wireless devices in the network 1 Press Menu until Network appears on the bottom line of the display and press OK 2 Press the Scroll buttons until Wireless appears and press OK 3 Press the Scroll buttons until Encryption appears and press OK Note If you h...

Page 59: ...20 80 RH Printer language PCL 6d PostScript 3 IBM ProPrinter EPSON SPL Memory ML 3050 32 MB 288 MB ML 3051N ML 3051ND 64 MB 320 MB 16 32 64 128 or 256 MB optional memory available Use only the Samsung approved DIMM Fonts ML 3050 1 bitmap 45 scalable ML 3051N ML 3051ND 1 bitmap 45 scalable 136 PostScript3 fonts Interface IEEE 1284 Bidirectional Parallel Standard Modes supported Compatible Nibble By...

Page 60: ...stems 4 1 TCP IP 4 1 wireless 10 3 O output location select 5 8 output tray 5 8 P paper guidelines 5 3 paper jam clear around the toner cartridge 9 3 duplex area 9 4 multi purpose tray 9 2 optional tray 2 9 2 paper exit area 9 3 tray 1 9 1 paper level indicator 5 4 paper load multi purpose tray 5 6 tray 1 optional tray 2 5 5 paper size setting 2 3 specifications 5 2 paper type setting 2 3 specific...

Page 61: ...ridge checkig remaining toner 8 2 cleaning 8 2 maintaining 8 2 redistributing 8 3 replacing 8 4 toner save mode use 2 7 W Windows problems 9 13 wireless network interface card install 10 2 wireless network setup 10 3 ...

Reviews: