background image

English  27

Cleaning and maint

aining y

our micr

ow

av

e o
ven

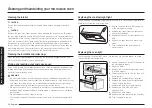
Replacing the charcoal filter

If your oven is vented to the inside, the charcoal filter should be replaced every 6 
to 12 months and more often if necessary. The charcoal filter cannot be cleaned. 
To order a new charcoal filter, contact the Parts Department at 1-800-627-4368 or 
your Samsung dealer. You can also order online at www.samsungparts.com

1. 

Unplug the oven or turn off the power 
at the main power supply.

2. 

Open the door.

3. 

Remove the vent grille mounting screws 
(3 middle screws).

4. 

Slide the vent grille to the left, then pull 
it straight out.

5. 

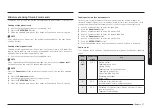
Push the hook and remove the old filter.

6. 

Slide a new charcoal filter into place. The 
filter should rest at the angle shown.

7. 

Replace the vent grille and 3 screws and 
close the door. Turn the power back on 
and set the clock.

Cleaning the grease filter

Your microwave oven has two metal reusable grease filters. The grease filters 
should be removed and cleaned at least once a month, or as required. 

WARNING

To avoid risk of personal injury or property damage, do not operate the oven hood 
without the filters in place.

1. 

To remove the filter, slide it to the left 
(or right) using the tab.

2. 

Soak the grease filter in hot water and 
a mild detergent. Rinse well and shake 
to dry. Brushing the filter lightly can 
remove embedded dirt.

WARNING

Do not use ammonia or put the grease filter 
in the microwave oven. The aluminum will 
darken.

3. 

To return the filter to its position, slide it 
into the frame slot on the left (or right), 
then push it upwards and to the right (or 
left) to lock it.

Summary of Contents for ME16K3000

Page 1: ...Microwave Oven User manual ME16K3000A ...

Page 2: ...crowave Cooking Times Power Levels 17 Eco Mode 18 Cookware guide 18 Microwave safe utensils 18 Cooking guide 20 General microwave tips 20 Cooking techniques 20 Cooking meat 21 Cooking poultry 22 Cooking seafood 22 Cooking eggs 23 Cooking vegetables 23 Recipes 23 Cleaning and maintaining your microwave oven 25 Cleaning the exterior 25 Cleaning the interior 26 Cleaning the turntable and roller rings...

Page 3: ...er residue to accumulate on the sealing surface C Do not operate the oven if it is damaged It is particularly important that the oven door close properly and that there is no damage to the 1 Door bent 2 Hinges and latches broken or loosened 3 Door seals and sealing surface D Only properly qualified service personnel should adjust or repair the oven Do not attempt to adjust or repair the oven yours...

Page 4: ... Stir liquid both before and halfway through heating it c Do not use straight sided containers with narrow necks d After heating allow the container to stand in the microwave oven for a short time before removing the container e Use extreme care when inserting a spoon or other utensil into the container STATE OF CALIFORNIA PROPOSITION 65 WARNING US ONLY WARNING This product contains chemicals know...

Page 5: ...flaming foods under the hood turn the fan on 3 Use care when cleaning the vent hood filter Corrosive cleaning agent such as lye based oven cleaner may damage the filter GROUNDING INSTRUCTIONS This appliance must be grounded In the event of an electrical short circuit grounding reduces the risk of electric shock by providing an escape wire for the electrical current This appliance is equipped with ...

Page 6: ...ug the oven by pulling the plug only Failing to do so may result in electric shock or fire When the power plug or power cord is damaged contact your nearest service center for a replacement or repair CRITICAL INSTALLATION WARNINGS The installation of this appliance must be performed by a qualified technician or service company Failing to have a qualified technician install the oven may result in e...

Page 7: ...t service center Failing to do so may result in electric shock or fire INSTALLATION CAUTIONS Position the oven so that the plug is easily accessible Failing to do so may result in electric shock or fire due to electric leakage Unplug the oven when it is not being used for long periods of time or during a thunder lightning storm Failing to do so may result in electric shock or fire CRITICAL USAGE W...

Page 8: ...fragile object such as a sink or glass object This may result in damage to the sink or glass object Do not touch the power plug with wet hands This may result in electric shock Do not turn the appliance off by unplugging the power plug while the appliance is in operation Plugging the power plug into the wall socket again may cause a spark and result in electric shock or fire Keep all packaging mat...

Page 9: ...oking or when opening the door just after cooking Take care that children do not come too close to the appliance Failing to do so may result in children burning themselves Do not place food or heavy objects over the door when opening the door The food or object may fall and this may result in burns or injury Do not abruptly cool the door the inside of the appliance or the dish by pouring water ove...

Page 10: ...y of your sales receipt as a proof of purchase if warranty service is needed MODEL NUMBER SERIAL NUMBER DATE PURCHASED PURCHASED FROM Warranty service can only be performed by a Samsung Authorized Service Center If you should require warranty service provide the above information with a copy of your sales receipt to the Samsung Authorized Service Center For service assistance and the location of t...

Page 11: ...2 See page 14 See page 16 Setting up your microwave oven 1 Open the door by pulling the handle on the right side of the door 2 Wipe the inside of the oven with a damp cloth 3 Install the pre assembled ring into the indentation at the center of the microwave oven 4 Place the glass tray securely in the center of the pre assembled roller ring ...

Page 12: ...rogress by pressing the 30 sec button for every additional 30 seconds you wish to add Vent buttons 2 Speed On Off The vent removes steam and other vapors from the cooking surface You can manually select the vent setting 1 Press the Vent 2 Speed button to set the speed level 2 Press the Vent On Off button to turn the vent on 3 Press the Vent On Off button again to turn the vent off Light Hi Lo Off ...

Page 13: ...microwave safe ceramic glass or plastic dish and add 2 4 Tbs water Cover with lid or vented plastic wrap to cook Stir before letting stand for 3 to 5 minutes Let oven cool for at least 5 minutes before using again Frozen vegetables twice Cooking Presets buttons The Cooking Presets buttons let you cook favorite foods using preset power levels and times at the touch of a button If the food is not th...

Page 14: ...o 6 oz with bone cup starch potatoes pasta rice etc cup vegetables about 3 4 oz Cooking Preset Button Amount or Type Number of Times to Press Instructions Cook Beverage Display Ac 1 once Use measuring cup or mug Do not cover Place the beverage in the oven After heating stir well Let oven cool for at least 5 minutes before using again NOTE Reheat times based on an 8 ounce cup Beverages heated with ...

Page 15: ... or vented plastic wrap If the food is not as hot as you would like after using the reheat function continue heating using additional time and power Stir the food once before serving Contents 3 4 oz meat poultry or fish up to 6 oz with bone cup starch potatoes pasta rice etc cup vegetables about 3 4 oz Pasta NOTE The right temperature of the food varies from person to person Allow food to stand 1 ...

Page 16: ...tandard amount Procedure Roast Beef Pork 2 5 6 0 lbs Start with the food placed fat side down After each stage turn the food over and shield any warm portions with narrow strips of aluminum foil Steaks Chops Fish 0 5 3 0 lbs After each stage rearrange the food If there are any warm or thawed portions of food shield them with narrow flat pieces of aluminum foil Remove any pieces of food that are ne...

Page 17: ...Sautéing onions celery and green pepper 8 80 Reheating all types of items Dinner plate pasta meat soup or sauce etc Cooking scrambled eggs Microwave Cooking Times Power Levels The power level lets you control the heating intensity from Warm 1 to High 10 Cooking at high power levels 1 Use the number buttons to enter the cooking time 2 Press the ENTER START button 3 When the cooking time is over fou...

Page 18: ... can occur if the foil is too close to the oven wall or you use too much foil Browning plate Do not preheat for more than eight minutes Ceramic porcelain and stoneware Porcelain pottery glazed earthenware and bone china are usually suitable unless decorated with a metal trim Disposable polyester cardboard Some frozen foods are packaged in these materials Power level Microwave output Use 7 70 Cooki...

Page 19: ...r Do not use recycled paper towels which may contain metal and may catch fire or cause arcing Cookware Microwave safe Comments Plastic Containers Can be used if heat resistant thermoplastic Some plastics may warp or discolor at high temperatures Do not use Melamine plastic Cling film Can be used to retain moisture Avoid wrapping the food too tightly Take care when removing the film as hot steam wi...

Page 20: ...rbed by the water fat and sugar in the food The microwaves cause the molecules in the food to move rapidly The rapid movement of these molecules creates friction and the resulting heat cooks the food General microwave tips Dense foods such as potatoes take longer to heat than lighter foods Foods with a delicate texture should be heated at a low power level to avoid becoming tough Foods with a non ...

Page 21: ...ore letting the meat stand the recommended time The following temperatures are the removal temperatures The temperature of the food will rise during standing time Food Cooking time Power level Instructions Roast beef boneless Up to 4 lbs Cooking Time 10 15 min lb for 145 F Rare 12 17 min lb for 160 F Medium 14 19 min lb for 170 F Well Done Place the roast fat side down on the roasting rack and cov...

Page 22: ...range the shrimp in a baking dish without overlapping or layering them Cover with wax paper Cook until firm and opaque stirring 2 or 3 times Let stand for 5 minutes Power Level Medium High 7 Cooking poultry Place the poultry on a microwave safe roasting rack in a microwave safe dish and cover with wax paper to prevent spattering Use aluminum foil to shield the bone tips thin pieces of meat or area...

Page 23: ...tatoes squash eggplant etc should have their skins pierced in several spots before cooking to prevent them from bursting For a more even cooking result stir or rearrange whole vegetables halfway through the cook time Generally the denser the food the longer the standing time The standing time refers to the time necessary for dense large foods and vegetables to finish cooking after they come out of...

Page 24: ...econds Stir in vinegar and cup water Cook at High until liquid boils and thickens slightly 1 2 minutes stir once Add bacon to dressing Pour dressing over potatoes Stir well Makes 6 servings Broccoli and cheese casserole cup butter or margarine cup chopped onion 1 Tbs flour tsp salt tsp dry mustard 1 8 tsp pepper 1 cups milk cup chopped red pepper 8 oz 2 cups cheddar cheese shredded 1 pkg 9 10 oz f...

Page 25: ...ys ensure that the door seals are clean and that the door closes properly Take particular care when cleaning the door seals to ensure that no particles accumulate and prevent the door from closing correctly Wash the glass door with very mild soap and water Be sure to use a soft cloth to avoid scratching If a thin film of water accumulates on the inside or outside of the oven door wipe it off with ...

Page 26: ...ven or tray To prevent the tray from breaking handle it with care and do not put it in water immediately after cooking Wash the tray carefully in warm sudsy water or in the dishwasher Clean the interior surfaces oven cavity of your microwave oven periodically to remove any splashes or stains To remove hardened food articles and remove smells place 2 cups of water add lemon juice for extra freshnes...

Page 27: ...e The filter should rest at the angle shown 7 Replace the vent grille and 3 screws and close the door Turn the power back on and set the clock Cleaning the grease filter Your microwave oven has two metal reusable grease filters The grease filters should be removed and cleaned at least once a month or as required WARNING To avoid risk of personal injury or property damage do not operate the oven ho...

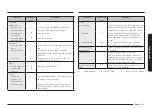
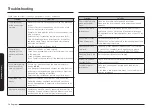
Page 28: ...s not working Make sure the plug is properly connected to a grounded outlet If the wall outlet is controlled by a wall switch make sure the wall switch is turned on Remove the plug from the outlet wait ten seconds and plug it in again Reset the circuit breaker or replace any blown fuses Plug a different appliance into the outlet If the other appliance doesn t work call a qualified electrician to r...

Page 29: ...is valid only on products purchased and used in the United States To receive warranty service the purchaser must contact SAMSUNG for problem determination and service procedures Warranty service can only be performed by a SAMSUNG authorized service center The original dated bill of sale must be presented upon request as proof of purchase to SAMSUNG or SAMSUNG s authorized service center SAMSUNG wi...

Page 30: ...state to state To obtain warranty service please contact SAMSUNG at 1 800 SAMSUNG 726 7864 or www samsung com us support In home service will be provided during the warranty labor period subject to availability within the contiguous United States In home service is not available in all areas To receive in home service the product must be unobstructed and accessible to service personnel If during i...

Page 31: ...English 31 Memo ...

Page 32: ...STIONS OR COMMENTS COUNTRY CALL OR VISIT US ONLINE AT U S A Consumer Electronics 1 800 SAMSUNG 726 7864 www samsung com us support CANADA 1 800 SAMSUNG 726 7864 www samsung com ca support English www samsung com ca_fr support French Scan the QR code or visit www samsung com spsn to view our helpful How to Videos and Live Shows Requires reader to be installed on your smartphone ...

Page 33: ...Horno de microondas Manual del usuario ME16K3000A ...

Page 34: ...Melt Ablandar derretir 16 Tiempos de cocción y niveles de potencia del microondas 17 Eco mode Modo Eco 18 Guía de recipientes y utensilios de cocina 18 Recipientes y utensilios aptos para microondas 18 Guía de cocción 20 Sugerencias generales para cocinar en microondas 20 Técnicas de cocción 20 Cocinar carne 21 Cocinar carne de ave 22 Cocinar mariscos 22 Cocinar huevos 23 Cocinar verduras 23 Recet...

Page 35: ... el horno si está dañado Es de especial importancia que la puerta del horno cierre correctamente y que no haya daños en 1 la puerta doblada 2 las bisagras y los pestillos rotos o sueltos 3 Las juntas de la puerta y la superficie de sellado D Sólo personal del servicio técnico adecuadamente calificado debe ajustar o reparar este horno No intente ajustar o reparar este horno usted mismo SÍMBOLOS Y P...

Page 36: ...rno 18 Los líquidos tales como el agua la leche el café o el té pueden recalentarse más allá del punto de ebullición sin que parezca que están hirviendo No siempre se verán las burbujas o el hervor cuando se retira el recipiente del horno de microondas ESTO PUEDE HACER QUE LOS LÍQUIDOS MUY CALIENTES SE DERRAMEN REPENTINAMENTE CUANDO SE MUEVE EL RECIPIENTE O SE COLOCA UNA CUCHARA U OTRO UTENSILIO E...

Page 37: ...el electrodoméstico 2 El cable prolongador debe ser un cable de 3 hilos de conexión a tierra y se lo debe enchufar en un tomacorriente de 3 ranuras 3 El cable más largo debe disponerse de manera tal que no quede colgando de la mesada o mesa en donde los niños pueden tirar de él o tropezarse con él accidentalmente Si utiliza un cable prolongador la luz interior puede parpadear y la velocidad del ve...

Page 38: ...ufe el horno tirando únicamente del enchufe No hacerlo puede provocar descarga eléctrica o incendio Cuando se dañe el enchufe o el cable de alimentación comuníquese con el centro de servicio técnico más cercano para solicitar un repuesto o una reparación ADVERTENCIAS FUNDAMENTALES PARA LA INSTALACIÓN La instalación de este electrodoméstico debe estar a cargo de un técnico o una compañía de servici...

Page 39: ...desenchúfelo y comuníquese con el centro de servicio técnico más cercano No hacerlo puede provocar descarga eléctrica o incendio PRECAUCIONES PARA LA INSTALACIÓN Coloque el horno de manera tal que se pueda acceder al enchufe fácilmente No hacerlo puede provocar descarga eléctrica o incendio debido a fugas eléctricas Desenchufe el horno cuando no se utilice por períodos prolongados o durante una to...

Page 40: ...blemas con el producto No coloque el electrodoméstico sobre un objeto frágil como un fregadero o un objeto de vidrio Hacerlo puede provocar daños al fregadero o al objeto de vidrio No toque el enchufe de alimentación con las manos húmedas Esto puede provocar descarga eléctrica No desenchufe la alimentación para apagar el electrodoméstico cuando éste esté en funcionamiento Volver a enchufar la alim...

Page 41: ...de alimentos o los aceites salpicados que se adhieren a las paredes o al piso pueden causar daños en la pintura y reducir la eficiencia del horno No acerque el rostro ni el cuerpo al electrodoméstico mientras está cocinando o al abrir la puerta inmediatamente después de la cocción Asegúrese de que los niños no se acerquen demasiado al electrodoméstico No hacerlo puede provocar quemaduras en los ni...

Page 42: ...ERO DE MODELO NÚMERO DE SERIE FECHA DE COMPRA ADQUIRIDO EN El servicio de garantía solo puede ser prestado por un Centro de Servicio Técnico Autorizado de Samsung Si requiere un servicio técnico de garantía proporcione la información antes detallada con una copia de su recibo al Centro de Servicio Técnico Autorizado de Samsung Para recibir asistencia del servicio técnico y averiguar la ubicación d...

Page 43: ...12 Consulte la página 14 Consulte la página 16 Instalación de su horno de microondas 1 Abra la puerta del horno tirando de la manija en el lado derecho de la puerta 2 Limpie el interior del horno con un paño húmedo 3 Instale el anillo premontado en la muesca del centro del horno de microondas 4 Coloque la charola de vidrio en el centro del anillo giratorio premontado para que quede bien sujeta ...

Page 44: ... la cocción 2 Agregue 30 segundos a un programa de cocción ya iniciado al presionar el botón 30 sec 30 seg por cada 30 segundos que desee agregar Botones de ventilación 2 velocidades y encender apagar La ventilación elimina los vapores de la superficie de cocción Puede seleccionar la configuración de ventilación manualmente 1 Presione el botón Vent 2 Speed Ventilación 2 velocidades para configurar...

Page 45: ...tes de dejar reposar por 3 a 5 minutos Deje enfriar el horno durante al menos 5 minutos antes de utilizarlo nuevamente Verduras congeladas dos veces Botón Light Hi Lo Off Luz alta baja apagada El botón Light Luz le permite seleccionar un ajuste de luz para su horno de microondas Presionar veces 1 2 3 Light luz Alto Bajo Desactivado Botones de programas de cocción Los botones Cooking Presets Progra...

Page 46: ...oz etc taza de vegetales alrededor de 3 a 4 oz Botón de programa de cocción Cantidad de veces que se debe presionar Cantidad o tipo Instrucciones Cocinar Bebidas Pantalla Ac 1 una vez Utilice una taza o jarro para medir no lo cubra Coloque la bebida en el horno Después de calentar revuelva bien Deje enfriar el horno durante al menos 5 minutos antes de utilizarlo nuevamente NOTA Los tiempos de reca...

Page 47: ...liente como quisiera después de usar la función de recalentamiento continúe calentándola con más tiempo y potencia Revuelva una vez antes de servir Contenido 3 4 oz de carne ave o pescado hasta 6 oz con hueso taza de almidón papas pasta arroz etc taza de vegetales alrededor de 3 a 4 oz Pastas NOTA La temperatura correcta para los alimentos depende de cada persona Deje reposar los alimentos de 1 a ...

Page 48: ...as instrucciones cuando descongele distintos tipos de alimentos Categoría Cantidad estándar Procedimiento Rosbif puerco 2 5 6 0 lb Comience con el alimento ubicado con el lado de la grasa hacia abajo Después de cada etapa gire el alimento y cubra cualquier parte caliente con tiras finas de papel de aluminio Steaks chuletas pescado 0 5 3 0 lb Después de cada etapa reacomode el alimento Si hay algun...

Page 49: ...entar todo tipo de alimentos plato de mesa pasta carne sopa o salsa etc Cocinar huevos revueltos Tiempos de cocción y niveles de potencia del microondas El nivel de potencia le permite controlar la intensidad de la cocción desde Tibia 1 hasta Alta 10 Cocción con altos niveles de potencia 1 Use los botones numéricos para ingresar el tiempo de cocción 2 Presione el botón ENTER START INGRESAR INICIO ...

Page 50: ...ir un arco eléctrico si el papel está demasiado cerca de la pared del horno o si utiliza demasiado Plato dorador No precalentar durante más de ocho minutos Cerámica porcelana y cerámica de gres La porcelana cerámica vajilla de barro con vidrio y la porcelana fría suelen ser aptas para hornos de microondas a menos que estén decoradas con un ribete de metal Cajas de cartón y poliéster desechables Al...

Page 51: ...s excesos de humedad Papel reciclado No utilice toallas de papel reciclado ya que pueden contener metal y producir un incendio o un arco eléctrico Utensilio de cocina Apto para microondas Comentarios Plástico Recipientes Pueden utilizarse si son de termoplástico resistente al calor Algunos plásticos pueden deformarse o perder el color expuestos a altas temperaturas No utilice plástico de melamina ...

Page 52: ...los Cuando calienta alimentos para bebés revuélvalos bien y controle la temperatura antes de servirlos Guía de cocción La energía de microondas penetra verdaderamente en los alimentos atraída y absorbida por el agua los contenidos de grasa y azúcar Las microondas provocan que las moléculas de los alimentos se muevan con rapidez El movimiento veloz de estas moléculas crea fricción y el calor result...

Page 53: ... de la grasa de la carne hacia abajo sobre una asadera para microondas en una fuente apta para microondas Utilice tiras finas de papel de aluminio para proteger cualquier punta de hueso o trozos de carne delgados Controle la temperatura en varios lugares antes de dejar reposar la carne el tiempo recomendado Las siguientes son las temperaturas a las que se deben retirar los alimentos La temperatura...

Page 54: ...ción 4 6 min lb Acomode los camarones en una fuente para horno sin superponerlos ni formar capas Cubra con papel encerado Cocine hasta que estén firmes y opacos revolviendo 2 3 veces Deje reposar durante 5 minutos Nivel de potencia Mediana alta 7 Cocinar carne de ave Coloque la carne de ave sobre una asadera para microondas en una fuente para microondas y cúbrala con papel encerado para evitar sal...

Page 55: ...a evitar que estallen Para obtener resultados de cocción más parejos revuelva o reacomode los vegetales enteros a la mitad del tiempo de cocción Por lo general cuanto más denso es el alimento mayor será el tiempo de reposo El tiempo de reposo hace referencia al tiempo necesario para que los vegetales y los alimentos densos y grandes terminen de cocinarse una vez que salen del horno Una papa al hor...

Page 56: ...aza de agua Cocine a potencia Alta hasta que el líquido hierva y se espese ligeramente 1 a 2 minutos revuelva una vez Agregue panceta al aderezo Sirva el aderezo sobre las patatas Mezcle bien Se obtienen 6 porciones Guisado de brócoli y queso taza de manteca o margarina taza de cebolla picada 1 cucharadas de harina cucharada de sal cucharada de mostaza en polvo 1 8 cucharada de pimienta 1 tazas de...

Page 57: ...pias y de que la puerta se cierre adecuadamente Tenga especial cuidado al limpiar las trabas de la puerta para asegurarse de que no se acumulen partículas que impidan que la puerta se cierre correctamente Lave la puerta de vidrio con un detergente muy suave y agua Asegúrese de utilizar un paño suave para evitar rayarla Si se acumula una delgada película de agua dentro o fuera de la puerta del horn...

Page 58: ...ara evitar que la charola se rompa sosténgala con cuidado y no la coloque debajo del agua inmediatamente después de cocinar Lave la charola con cuidado en agua jabonosa tibia o el en lavavajillas Limpie las superficies del interior cavidad del horno de su horno de microondas periódicamente para quitar cualquier salpicadura o mancha Para quitar trozos de comida endurecidos y eliminar olores coloque...

Page 59: ...que se muestra 7 Vuelva a colocar la rejilla de ventilación y los 3 tornillos y cierre la puerta Vuelva a conectar la corriente y configure el reloj Limpieza de los filtros de grasa Su horno de microondas cuenta con dos filtros de grasa metálicos reutilizables Los filtros de grasa deben retirarse y limpiarse al menos una vez por mes o cuando sea necesario ADVERTENCIA Para evitar el riesgo de lesio...

Page 60: ...o funciona Asegúrese de que el enchufe esté conectado adecuadamente a un tomacorriente con conexión a tierra Si el tomacorriente está controlado por un interruptor de pared asegúrese de que el interruptor de pared esté encendido Retire el enchufe del tomacorriente espere diez segundos y vuelva a enchufarlo Reinicie el disyuntor o reemplace cualquier fusible quemado Enchufe un electrodoméstico dist...

Page 61: ...tados Unidos Para recibir el servicio técnico de la garantía el comprador debe comunicarse con SAMSUNG con el fin de que se determine el problema y los procedimientos del servicio El servicio técnico de la garantía sólo puede ser prestado por un centro de servicio técnico autorizado de SAMSUNG Se debe presentar la factura de compra original como prueba de compra a SAMSUNG o al servicio técnico aut...

Page 62: ...tre Para recibir el servicio técnico de garantía comuníquese con SAMSUNG a 1 800 SAMSUNG 726 7864 o www samsung com us support Se brindarán servicios a domicilio durante el período de garantía de mano de obra sujeto a la disponibilidad dentro de los Estados Unidos contiguos El servicio a domicilio no está disponible en todas las zonas Para recibir servicio a domicilio el producto debe estar despej...

Page 63: ...Español 31 Nota ...
Page 64: ...PREGUNTAS O COMENTARIOS PAÍS LLAME AL O VISÍTENOS EN LÍNEA EN U S A Consumer Electronics 1 800 SAMSUNG 726 7864 www samsung com us support CANADA 1 800 SAMSUNG 726 7864 www samsung com ca support English www samsung com ca_fr support French Escanee el código QR o visite www samsung com spsn para ver nuestros útiles videos instructivos y programas en vivo Requiere un lector instalado en su teléfono...

Reviews: