background image

59

• 

Audio language and subtitles will not work for DVDs not containing
them. And depending on the disc, they may work differently.

Audio language and
subtitles do not work.

• 

The TAPE function has not been selected.

• 

The cassette has not been inserted correctly.

• 

The cassette player has not been closed.

• 

The tape is either slack or broken.

The tape does not start
playing

• 

The audio heads are dirty.

• 

The rollers or drive capstans are dirty.

• 

The tape is worn.

The volume falls off
The cassette is not erased correctly
There is excessive wow and flutter

• 

Are you using a disc that does not contain menus?

Menu screen does not appear even
when the menu function is selected.

• 

Turn off the power and hold the S.BASS button on the main unit
for longer than 5 seconds.

Using the RESET function will erase all stored settings. 
Do not use this unless necessary.

The password for rating
level has been forgotten.

• The main unit is not working. 

(Example: The power goes out or
strange noise is heard.)

• The DVD player is not

working normally.

• 

Is the antenna connected properly?

• 

If the antenna's input signal is weak, install an external FM
antenna in an area with good reception.

Can't receive radio
broadcast.

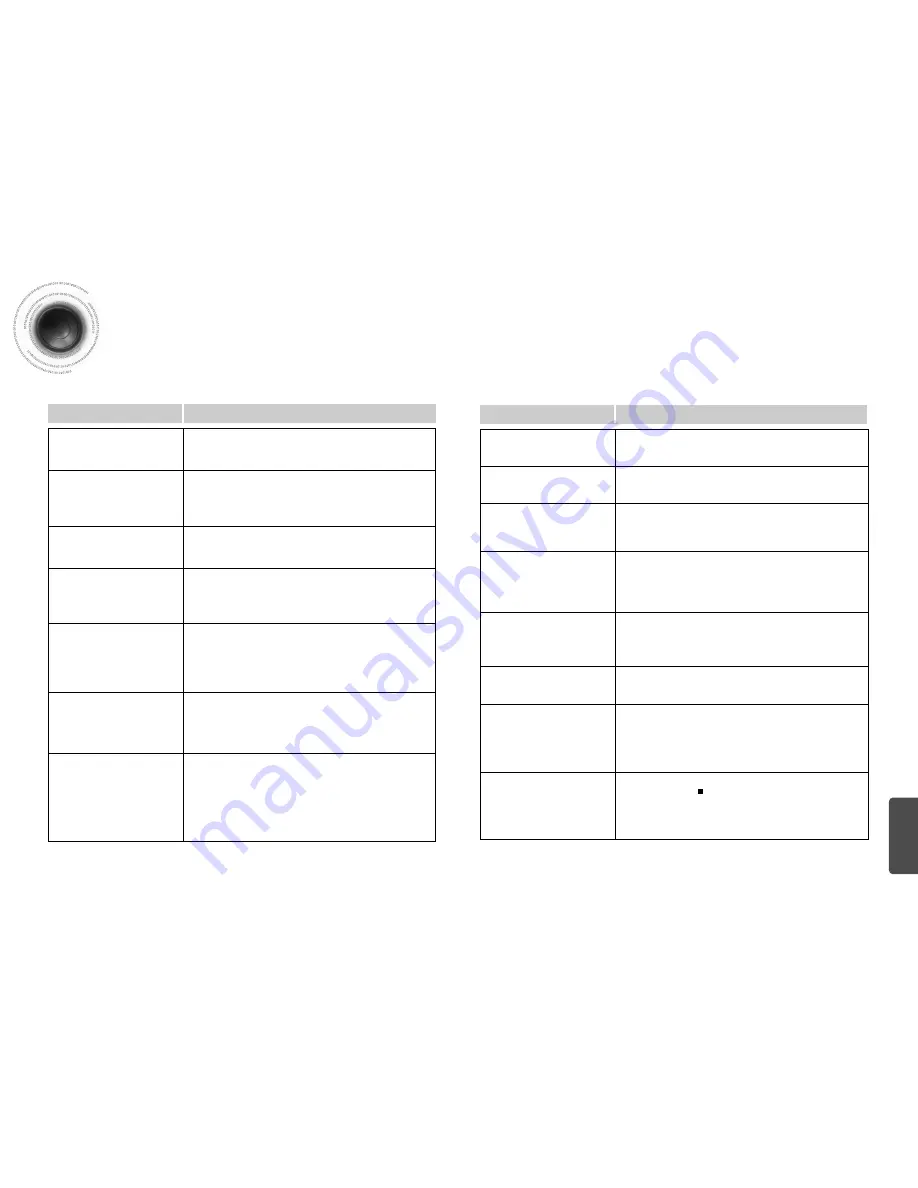
Symptom

Check/Remedy

• 

You can play 16:9 DVDs in 16:9 WIDE mode, 4:3 LETTER BOX
mode, or 4:3 PAN SCAN mode, but 4:3 DVDs can be seen in 4:3
ratio only. Refer to the DVD disc jacket and then select the
appropriate function.

Aspect ratio cannot be
changed.

60

MISCELLANEOUS

• 

While “NO DISC” message appears on the display of main unit, hold the main
unit's TUNING MODE/        button for longer than 5 seconds. “INITIAL”
appears on the display and all settings will return to the default values.

• 

Press the POWER button.

Using the RESET function will erase all stored settings. 
Do not use this unless necessary.

Before Calling for Service

Refer to the chart below when this unit does not function properly. If the problem you are experiencing is not
listed below or if the instruction below does not help, turn off the unit, disconnect the power cord, and contact
the nearest authorized dealer or Samsung Electronics Service Center.

• 

Is the power cord plugged securely into the outlet?

• 

Turn off the power and then turn it back on.

• 

Check the region number of the DVD.
DVD discs purchased from abroad may not be playable.

• 

CD-ROMs and DVD-ROMs cannot be played on this DVD
player.

• 

Make sure that the rating level is correct.

• 

Are you using a deformed disc or a disc with scratches on
the surface?

• 

Wipe the disc clean.

Disc tray does not open.

Playback does not start.

Playback does not start
immediately when the
Play/Pause button is pressed.

• 

No sound is heard during fast playback, slow playback, and step
motion playback.

• 

Are the speakers connected properly? Is the speaker setup
correctly customized?

• 

Is the disc severely damaged?

Sound is not produced.

• 

Was the DVD player suddenly moved from a cold place to a warm
one? When condensation forms inside the player, remove the disc
and let the player stand for 1 or 2 hours with the power on. (You
can use the player again after condensation disappears.)

Picture does not appear, sound
is not produced, or the disc
tray opens 2 to 5 seconds later.

Symptom

Check/Remedy

• 

Is the TV power on?

• 

Are the video cables connected properly?

• 

Is the disc dirty or damaged?

• 

A poorly manufactured disc may not be playable.

• Disc is rotating but no

picture is produced.

• Picture quality is poor and

picture is shaking.

• 

Is the remote control being operated within its operation range of
angle and distance?

• 

Are the batteries exhausted?

The remote control does
not work.

Summary of Contents for MAX-DVD9910

Page 1: ... VIDEO Instruction Manual AH68 01409E THIS APPLIANCE IS MANUFACTURED BY OPEN CLOSE DISC SKIP ZOOM SLOW REPEAT REMAIN SUB TITLE TUNER VOLUME MUT E MENU INFO RETU RN SOUND MODE ENTER AUDIO TIMER CLOCK TIMERON OFF LOGO SLIDEMODE EZ VIEW NTSC PAL CANCEL DIGEST STEP TUNER MEMORY P SCAN TUNING TAPE AUX DECK 1 2 BAND SLEEP DIMMER ...

Page 2: ...il the unit has reached room temperature before using During thunderstorms disconnect AC main plug from the wall outlet Voltage peaks due to lightning could damage the unit Do not expose the unit to direct sunlight or other heat sources This could lead to overheating and malfunction of the unit The battery used with this product contain chemicals that are harmful to the environment Do not dispose ...

Page 3: ...er Saving Function The MAX DVD9910 automatically shuts itself off after 20 minutes in the stop TV Screen Saver Function The MAX DVD9910 automatically brightens and darkens the brightness of the TV screen after 3 minutes in the stop The MAX DVD9910 automatically switches itself into the power saving mode after 20 minutes in the screen saver mode Customized TV Screen Display The MAX DVD9910 allows y...

Page 4: ...SPLAY 24 VOLUME 25 POWER SOUND 26 COMPACT DISC COMPARTMENT 27 CD Open Close 28 DISC CHANGE 29 DISC SELECTION BUTTONS 30 FUNCTION SELECTION BUTTONS DisplayWindow 1 2 3 4 5 6 7 8 9 10 1 Component Video Output Connectors Connect a TV with component vide input jacks to these jacks 2 Video Output Connector Connect the TV s video input jacks VIDEO IN to the VIDEO OUT connector 3 SW Antenna Connector Opt...

Page 5: ...they match the polarity to and to Use the correct type of batteries Batteries that look similar may differ in voltage Always replace both batteries at the same time Do not expose batteries to heat or flame Remote Control 7 Description Caution SOUND MODE button VOLUME button MENU button POWER STANDBY ON button OPEN CLOSE button TUNER button TAPE PLAY button REPEAT button MUTE button Number 0 9 butt...

Page 6: ...5 4m 11 13feet 9 Connecting the Speakers Before moving or installing the product be sure to turn off the power and disconnect the power cord Please be sure to turn off the power and unplug the power cord before moving or installing this unit Please choose one of three video connection methods Use this method if your TV has an S Video In jack R L Directions in Installing Speaker L R Right Speaker L...

Page 7: ...contains two interfaced fields thus a total of 60 fields are displayed every 1 60th of a second The interlaced scanning method is intended for capturing a still object Interlaced Scan 1 FRAME 2 FIELDS The progressive scanning method scans one full frame of video consecutively down the screen line by line An entire image is drawn at one time as opposed to the interlaced scanning process by which a ...

Page 8: ...r antenna Before attaching a 75Ω coaxial cable with a standard type connector disconnect the supplied FM antenna 1 Connect the AM loop antenna supplied to the AM and terminals 2 If reception is poor connect an outdoor single vinyl covered wire to the AM terminal Keep the AM loop antenna connected Snap the tabs on the loop into the slots of the base to assemble the AM loop antenna Spread the SW aer...

Page 9: ...s automatically If the TV is on a list of MP3s on the CD will appear on the TV screen Something like you Back for good Love of my life More than words I need you My love Uptown girl DVDRECEIVER SMARTNAVI Note To resume playback press PLAY PAUSE button again To temporarily pause playback press PLAY PAUSE during playback If pressed once PRESS PLAY is displayed and the stop position will be stored in...

Page 10: ...SO 9660 format MPEGs containing DivX can be divided into Video and Audio Video compatibility All versions of DivX later than 3 11 including the latest 5 1 are supported In addition XviD is supported For WMV V1 V2 V3 and V7 formats are possible Audio compatibility MP3s encoded at bitrates from 80kbps to 320kbps AC3s from 128kbps to 448kbps and WMAs from 56kbps to 160kbps are supported In addition f...

Page 11: ...isplay REPEAT PLAYBACK display AUDIO LANGUAGE display SUBTITLE display STEREO L R display DOLBYDIGITALdisplay ANGLE display Depending on the disc the disc information display may appear different Depending on the disc you can also select DOLBY DIGITAL or PRO LOGIC Note Fast Slow Playback Fast Playback DVD VCD CD MP3 Press and hold Each time the button is held down during playback the playback spee...

Page 12: ...ack for good Love of my life More than words I need you My love Uptown girl DVDRECEIVER SMARTNAVI Something like you Back for good Love of my life More than words I need you My love Uptown girl DVDRECEIVER SMARTNAVI Angle Function This function allows you to view the same scene in different angles DVD 2 Press Cursor button to move to ANGLE display 1Press INFO button 1 3 Each time the button is pre...

Page 13: ...he selected track DIR Repeatedly plays all tracks in the selected folder DISC Repeatedly plays the entire disc OFF Cancels Repeat Playback DVD VCD CD DVD VCD CD MP3 JPEG Repeat Playback Options Note For MP3 and JPEG discs you cannot select Repeat Play from the information display screen Note 2 Press Cursor button to move to REPEAT PLAYBACK display 1Press INFO button twice 4 Press ENTER button 3 Pr...

Page 14: ...a angle format Black bars may not disappear because some DVD discs have a built in horizontal to vertical ratio Note EZ VIEW OFF EZ VIEW SCREEN FIT OFF SELECT ZOOM POSITION 26 25 A B Repeat Playback OPEN CLOSE DISC SKIP ZOOM SLOW REPEAT REMAIN SUB TITLE TUNER VOLUME M U T E MENU INFO R E T U R N SOUND MODE AUDIO TIMER CLOCK TIMERON OFF LOGO SLIDEMODE NTSC PAL CANCEL DIGEST STEP TUNER MEMORY P SCAN...

Page 15: ...apter or track Depending on the disc you may not be able to move to the selected title or time Something like you Back for good Love of my life More than words I need you My love Uptown girl DVDRECEIVER SMARTNAVI SELECT 03 Move Select Stop Note Selecting Audio Subtitle Language Depending on the number of languages on a DVD disc a different audio language KOREAN ENGLISH JAPANESE etc is selected eac...

Page 16: ...yer Slide Mode JPEG DISC SKIP ZOOM SLOW REPEAT REMAIN SUB TITLE TUNER VOLUME M U T E MENU INFO R E T U R N SOUND MODE AUDIO TIMER CLOCK TIMERON OFF LOGO SLIDEMODE NTSC PAL CANCEL DIGEST STEP TUNER MEMORY P SCAN TUNING TAPE AUX BAND SLEEP DIMMER DECK 1 2 MONO ST 29 Place the JPEG disc on the disc tray Each time the button is pressed the slide moves backward or forward Press to skip to the next slid...

Page 17: ...TUNER MEMORY P SCAN TUNING TAPE AUX BAND SLEEP DIMMER DECK 1 2 MONO ST 31 2 When playing a VCD version 2 0 this toggles between PBC ON and OFF When you select the disc menu that is not supported by the disc the This menu is not supported message appears on the screen 1Press MENU button Press Cursor buttons to move to DISC MENU and then press ENTER button 4 Press ENTER button 3 Press Cursor buttons...

Page 18: ...STEP TUNER MEMORY P SCAN TUNING TAPE AUX BAND SLEEP DIMMER DECK 1 2 MONO ST 2 1 Press MENU button Press Cursor button to move to Setup and then press ENTER button 4 Once the setup is complete if the language was set to English OSD will be displayed in English 3 Selecting the Subtitle Language recorded on the disc Selecting the Disc Menu Language recorded on the disc Press ENTER button 5 Press Curs...

Page 19: ...io is called the aspect ratio When playing DVDs recorded in different screen size you should adjust the aspect ratio to fit your TV or monitor For a standard TV select either 4 3LB or 4 3PS option according to personal preference Select 16 9 if you have a wide screen TV Select this to view a 16 9 picture in the full screen mode on your wide screen TV You can enjoy the wide screen aspect Select thi...

Page 20: ... have selected Level 6 you cannot view DVDs with Level 7 or higher The higher the level the closer the content is to violent or adult material 3 5 Press Cursor button to move to PARENTAL and then press ENTER button Press Cursor button to select the desired rating level and then press ENTER button Enter the password and then press ENTER button Note 2 1 Press MENU button Press Cursor button to move ...

Page 21: ...r button to move to Setup and then press ENTER button Press Cursor button to move to LOGO and then press ENTER button To Change the Wallpaper 5 4 Press MENU button to exit the setup screen Press to select the desired USER and then press ENTER Select this to set the Samsung Logo image as your wallpaper Select this to set the desired image as your wallpaper Press RETURN button to return to the previ...

Page 22: ...just the DRC Press RETURN button to return to the previous level Press MENU button to exit the setup screen DISC SKIP ZOOM SLOW REPEAT REMAIN SUB TITLE TUNER VOLUME M U T E MENU INFO R E T U R N SOUND MODE AUDIO TIMER CLOCK TIMERON OFF LOGO SLIDEMODE NTSC PAL CANCEL DIGEST STEP TUNER MEMORY P SCAN TUNING TAPE AUX BAND SLEEP DIMMER DECK 1 2 MONO ST SETUP The more times the Cursor button is pressed ...

Page 23: ...to tune in to a lower or higher frequency Manual Tuning Each time the button is pressed the sound switches between STEREO and MONO In a poor reception area select MONO for a clear interference free broadcast Press MO ST button to listen in Mono Stereo This applies only when listening to an FM station To tune in to a preset station press on the remote control to select a channel Refer to Step 2 on ...

Page 24: ...One side of the selected cassette and then stops One side of the cassette The other side of the cassette and then stops Both sides of the cassette indefinitely until you press stop Before starting to record a cassette for which you wish to take note of the counter values at the beginning of each track reset the counter by pressing COUNTER RESET Each cassette deck has a separate counter CD PREVIOUS...

Page 25: ... different ways This feature enables you to synchronize the start of the recording with the start of the disc or track of your choice Press the OPEN CLOSE button to open the CD door Insert a CD and press the OPEN CLOSE button to close the CD door Press the PUSH EJECT button to open the cassette door insert a cassette and then close the cassette door Insert the cassette with the safety tabs 2 1 3 I...

Page 26: ... recording with any track on the compact disc Press the OPEN CLOSE button to open the CD door Insert a CD and press the OPEN CLOSE button to close the CD door Press the PUSH EJECT button to open the cassette door insert a cassette and then close the cassette door Insert the cassette with the safety tabs 2 1 3 Insert a blank cassette in Deck 2 Switch the system on by pressing STANDBY ON Recording w...

Page 27: ...to be selected is displayed 2 1 3 Switch the system on by pressing STANDBY ON Press TIMER CLOCK until TIMER is displayed Press the ENTER button is displayed to the top right of the time indicating that the timer has been set The system will switch on and off automatically at the required times 8 7 9 Press or button to select the source to be played when the system switches on Press ENTER to confir...

Page 28: ...function emphasizes the bass sound to produce the effect of explosion or booms Press S BASS on the front panel until the required option is selected S BASS Function Your mini compact system has a bass amplification function called SBS Super Bass Sound This function makes the sound more powerful and real P SOUND Function To obtain a Select Normal balance linear PASS Balance suitable for pop music P...

Page 29: ...ious functions available are listed in turn on the display All these functions are described in detail in this booklet For instructions on how to use them refer to the appropriate sections DEMO Function You can view the various functions available on your system To cancel this function press DEMO DIMMER again Press DEMO DIMMER button Each time the button is press the brightness changes as follows ...

Page 30: ...nsions can be played If the disc is not closed it will take longer to start playing and not all of the recorded files may be played Only CD R discs with JPEG files in ISO 9660 or Joliet format can be played JPEG file names should be 8 characters or less in length and contain no blank spaces or special characters Only a consecutively written multisession disc can be played If there is a blank segme...

Page 31: ... POWER button Using the RESET function will erase all stored settings Do not use this unless necessary Before Calling for Service Refer to the chart below when this unit does not function properly If the problem you are experiencing is not listed below or if the instruction below does not help turn off the unit disconnect the power cord and contact the nearest authorized dealer or Samsung Electron...

Page 32: ... been recorded by means of digital signals Incorporating a new video compression technology MPEG 2 and high density recording technology a DVD disc comprises two 0 6 mm thick discs bonded together An acronym for Pulse Code Modulation another name for digital audio This is recorded on a video CD version 2 0 Selected scenes or information can be chosen from the menu displayed on the TV monitor Both ...

Reviews: