ENG
10
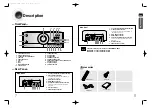
—Remote Control—
9
Description
PREP
ARA
TION
DEMO/DIMMER
POWER
CD RIPPING
RDS DISPLAY
PTY-
PTY SEARCH
PTY+
TA
CANCEL
STEP
MUTE
VOLUME
MENU
AUDIO
EXIT
SUB
TITLE
SLEEP
INFO
REPEAT
SLOW
MO/ST
P.SOUND
DSP/EQ
TIMER/CLOCK
TUNER
MEMORY
SD/HD
P.BASS
ECHO
ENTER
RETURN
TUNING
PAUSE
STOP
PLAY
DVD
TUNER
AUX
USB
ZOOM
LOGO
-
MIC VOL.
+
REMAIN
TIMER
ON/OFF
VOLUME button
MENU button
POWER button
DVD button
TUNER button
PAUSE button
CANCEL button
Number(0~9) buttons
DEMO/DIMMER button
OPEN/CLOSE button
USB button
AUX button
Cursor/Enter button
SLEEP button
TIMER ON/OFF button
DSP/EQ button
TIMER/CLOCK button
ECHO button
SLOW button, MO/ST Button
RETURN button
REPEAT button
INFO button
SUB TITLE button
MUTE button
POWER SOUND button
MIC VOL. button
CD RIPPING button
SEARCH button
EXIT button
Play button
SEARCH buttons
Stop button
TUNER MEMORY button,
SD/HD button
LOGO button
REMAIN button
VOLUME
STANDBY/ON
TUNER
DVD/CD
USB
AUX
The remote control can be used up to approximately 23
feet/7 meters in a straight line. It can also be operated at
a horizontal angle of up to 30° from the remote control
sensor.
Range of Operation of the Remote Control
Caution
Remove the battery
cover in the direction
of the arrow.
1
Insert two 1.5V AAA
batteries, paying
attention to the correct
polarities (+ and –).
2
Replace the battery
cover.
3
Follow these precautions to avoid leaking or cracking cells:
•
Place batteries in the remote control so they match the polarity:(+) to (+)and (–)to (–).
•
Use the correct type of batteries.Batteries that look similar may differ in voltage.
•
Always replace both batteries at the same time.
•
Do not expose batteries to heat or flame.
Insert Remote Batteries
POWER BASS button
STEP button
AUDIO button
TUNING button
ZOOM button
RDS selection buttons
1~38-DA66-RDS ENG 2008.5.22 2:48 PM Page 12

