background image

9

GB

Using the Deodorization Feature

Use this feature after cooking odorous food or when there is a lot of
smoke in the oven interior.

First clean the oven interior.

The deodorization time has been specified as 5 minutes. It
increases by 30 seconds whenever the +30s button is pressed.

You can also adjust deodorization time by turning the dial knob
right or left.

The maximum deodorization time is 15 minutes.

Switching the Beeper Off

You can switch the beeper off whenever you want.

Safety-Locking Your Microwave Oven

Your microwave oven is fitted with a special Child Safety programme,
which enables the oven to be “locked” so that children or anyone
unfamiliar with it cannot operate it accidentally.

The oven can be locked at any time.

Press the Deodorization(

) button after you have

finished cleaning. you will hear four beeps.

1.

Press the

and

buttons at the same time.

Result :

The following indication is displayed.

The oven will not beep each time you
press a button.

2.

To switch the beeper back on, press the

and

buttons again at the same time.
Result :

The following indication is displayed.

The oven operates with the beeper on
again.

1.

Press the

and

buttons at the same time.

Result :

The oven is locked (no functions can be
selected).

The display shows “L”.

2.

To unlock the oven, press the

and

buttons again at

the same time.
Result :

The oven can be used normally.

M1875-GB.fm Page 9 Monday, March 4, 2002 6:27 PM

Summary of Contents for M1875N-S

Page 1: ... Time 7 Using the Auto Reheat Cook Feature 7 Auto Reheat Cook Settings 7 Using the Instant Reheat Feature 8 Instant Reheat Settings 8 Using the Auto Defrost Feature 8 Auto Defrost Settings 8 Using the Deodorization Feature 9 Switching the Beeper Off 9 Safety Locking Your Microwave Oven 9 Cookware Guide 10 Cleaning Your Microwave Oven 11 Installation Wiring Instructions 11 Wiring Instructions 11 Co...

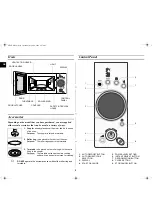
Page 2: ...urpose The roller ring supports the turntable 3 Turntable to be placed on the roller ring with the centre fitting to the coupler Purpose The turntable serves as the main cooking surface it can be easily removed for cleaning VENTILATION HOLES DOOR LATCHES DOOR TURNTABLE COUPLER ROLLER RING SAFETY INTERLOCK HOLES LIGHT DOOR HANDLE DISPLAY CONTROL PANEL 1 AUTO DEFROST BUTTON 2 AUTO REHEAT COOK SELECT...

Page 3: ...any metallic cookware in the microwave oven Metallic containers Dinnerware with gold or silver trimmings Skewers forks etc Reason Electric arcing or sparking may occur and may damage the oven 2 DO NOT heat Airtight or vacuum sealed bottles jars containers Ex Baby food jars Airtight food Ex Eggs nuts in shells tomatoes Reason The increase in pressure may cause them to explode Tip Remove lids and pi...

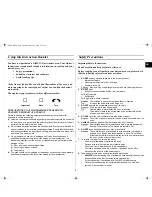
Page 4: ... will be cut off automati cally for safety You can operate normally after letting it stand for over 30 minutes IMPORTANT SAFETY INSTRUCTIONS During cooking you should look into the oven from time to time when food is being heated or cooked in disposable containers of plastic paper or other combustible materials IMPORTANT Young children should NEVER be allowed to use or play with the microwave oven...

Page 5: ...r overcooked or undercooked Was the appropriate cooking length set for the type of food Was an appropriate power level chosen Sparking and cracking occur inside the oven arcing Have you used a dish with metal trimmings Have you left a fork or other metal utensil inside the oven Is aluminium foil too close to the inside walls The oven causes interference with radios or televisions Slight interferen...

Page 6: ...imply pressing Cancel 1 Press the button Result The 850W maximum cooking power indications are displayed Select the appropriate power level by pressing the button again until the corresponding wattage is displayed Refer to the power level table 2 Set the cooking time by turning the dial knob as required 3 Press the button Result The oven light comes on and the turntable starts rotating Cooking sta...

Page 7: ...tes 3 The current time is displayed again Button Food Serving Size Standing Time Recommendations 1 Ready Meal Chilled 300 350 g 400 450 g 3 min Put on a ceramic plate and cover with microwave cling film This programme is suitable for meals consisting of 3 components e g meat with sauce vegetables and a side dishes like potatoes rice or pasta 2 Ready Meal frozen 300 350 g 400 450 g 4 min Take froze...

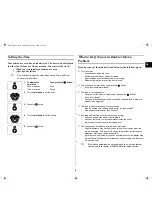
Page 8: ...ove all kinds of packaging material before defrosting Place the frozen foods on a turntable Turn the food over when the oven beeps Keep the corresponding standing time after Auto Defrosting has finished Press the Instant Reheat button which you want the required number of times Result Cooking starts after about two seconds When it has finished 1 The oven beeps four times 2 The end reminder signal ...

Page 9: ...es the oven to be locked so that children or anyone unfamiliar with it cannot operate it accidentally The oven can be locked at any time Press the Deodorization button after you have finished cleaning you will hear four beeps 1 Press the and buttons at the same time Result The following indication is displayed The oven will not beep each time you press a button 2 To switch the beeper back on press...

Page 10: ...Polystyrene cups containers Paper bags or newspaper Recycled paper or metal trims Can be used to warm food Overheating may cause the polystyrene to melt May catch fire May cause arcing Glassware Oven to table ware Fine glassware Glass jars Can be used unless decorated with a metal trim Can be used to warm foods or liquids Delicate glass may break or crack if heated suddenly Must remove the lid Sui...

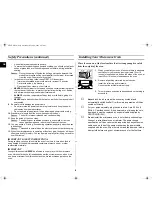
Page 11: ...a risk of shock hazard from the bared flexible cord Wiring Instructions WARNING THIS APPLIANCE MUST BE EARTHED This appliance must be earthed In the event of an electrical short circuit earthing reduces the risk of electric shock providing an escape wire for the electric current The appliance is equipped with a mains lead which includes an earth wire for connecting to the earth terminal of your ma...

Page 12: ...then frozen chilled or vacuum sealed for long life Increasingly heating times for such ready meals are being based on the Heating Categories A B C D and E On this instance simply match the heating category of your oven to the instructions on the food package and set your timer accordingly For example If the heating instructions are 3 minutes on HIGH for a D category oven then you will need to set ...

Reviews: