background image

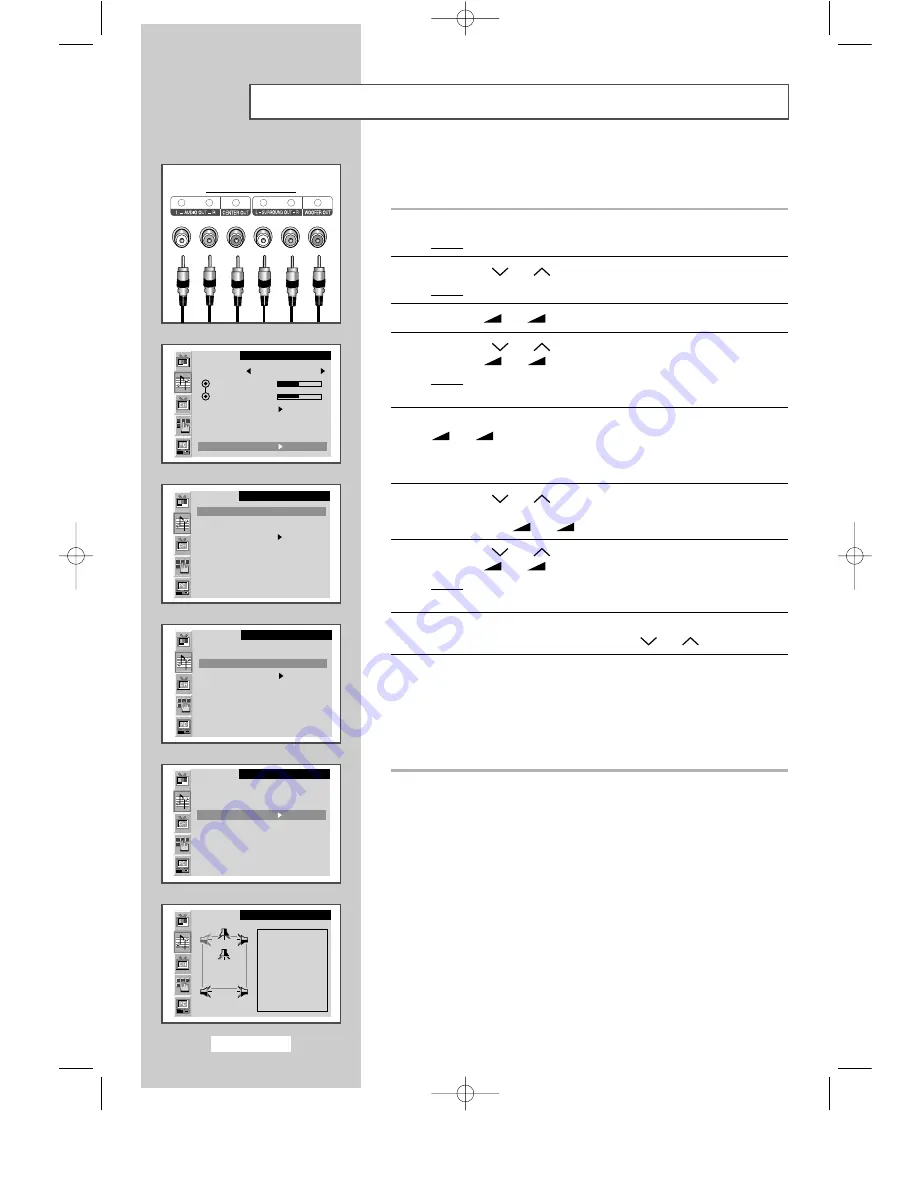
You can enjoy Digital sound when the equipment with Digital output

is connected to the television.

1

Press the MENU button.

Result:

The main menu is displayed.

2

Press the P

or P

button to select the 

Sound

.

Result:

The options available in the 

Sound

group are displayed.

3

Press the 

or 

button.

4

Press the P

or P

button to select the 

Dolby Digital

.

Press the 

or 

button.

Result:

The 

Dolby Digital

menu is displayed with the

Pro Logic

is selected.

5

Select the option (

Auto

On

or 

Off

) by pressing the

or 

button.

For further details of output depending on the each options,
refer to following page.

6

Press the P

or P

button to select the 

Dynamic range

. If you

wish to adjust the volume properly during night viewing, select the 

On

by pressing the 

or 

button.

7

Press the P

or P

button to select the 

Speaker setting

.

Press the 

or 

button.

Result:

The 

Speaker Setting

menu is displayed with the main

left speaker is selected.

8

Select the speaker (

Left

Center

Right

Right Rear

Left Rear

,

Woofer

) to be adjusted by pressing the P

or P

button.

9

Depending on the speaker, the following settings can be adjusted to
suit your personal preferences.

Test tone to simulate the volume (

On

or 

Off

)

Size (

Large

Small

or 

Off

)

Volume level (-10dB ~ 10dB)

delay time of surround channel (0 ~ 15ms) : When the 

Right

Rear

or 

Left Rear

is selected, you can adjust.

English-26

Setting the Dolby Digital

(LW40A13W)

Sound

Mode         Custom

  Bass

  Treble

Ext. audio

Audio out     Volume

Int. mute     Off

Dolby Digital

Sound

Pro Logic     :    On

Dynamic range :   Off

Speaker set

Sound

Pro Logic     :    On

Dynamic range :    On

Speaker set

Sound

Pro Logic     :    On

Dynamic range :    On

Speaker set

Sound

   Left

Test tone
     On
Size  :
     Large
Volume:
       0dB

Delay :

Rear of the TV

  apollo_en  1/10/03 10:53 AM  Page 26

Summary of Contents for LW29A13W

Page 1: ...LW40A13W Owner s Instructions Before operating the unit please read this manual thoroughly and retain it for future reference ON SCREEN MENUS PC DISPLAY PICTURE IN PICTURE PIP TELETEXT apollo_en 1 10 03 10 53 AM Page 1 ...

Page 2: ...our computer system can easily identify and configure itself for use with your set Your set automatically tells the computer system its Extended Display Identification Data EDID using Display Data Channel DDC protocols so the computer system can automatically configure itself to use your set PowerSaver This set is EPA Energy Star compliant and NUTEK compliant when used with a computer equipped wit...

Page 3: ... RAIN OR MOISTURE The main voltage is indicated on the rear of your set and the frequency is 50 or 60 Hz Safety Instructions These illustrations represent precautions concerning your set 5 10 H H 40 75 Do NOT expose your set to extreme temperature or humidity conditions Do NOT expose your set to direct sunlight Do NOT expose your set to any liquids If your set is broken do not try to repair it you...

Page 4: ...letext Functions 11 Inserting the Batteries in the Remote Control 12 Switching On and Off 12 Becoming Familiar with the Remote Control 13 Choosing Your Language 14 SETTING THE CHANNELS Storing Channels Automatically 15 Storing Channels Manually 16 Giving Channels Names 18 Skipping Unwanted Channels 19 Fine Tuning Channel Reception 19 Sorting the Stored Channels 20 USING THE VARIOUS FUNCTIONS Chang...

Page 5: ...ows 2000 or XP 35 Adjusting the Contrast and Brightness 36 Selecting the Image Size 36 Adjusting the Image Quality 37 Changing the Image Position 37 Adjusting the Colour 38 Initializing the Image Settings 39 Adjusting the PC Screen Automatically 39 USING THE TELETEXT FEATURE Teletext Feature 40 Displaying the Teletext Information 41 Selecting Display Options 41 Selecting a Teletext Page 42 RECOMME...

Page 6: ...T1 EXT2 PC Analog PC Digital MENU Opens the OSD and selects the function C P Moves the selector up or down on the OSD Increases or decreases the channel number Switches on the TV when it is in Standby mode Moves the selector left or right on the OSD Increases or decreases the level of audio volume and the values of the selected function 1 5 6 7 2 3 4 apollo_en 1 10 03 10 53 AM Page 6 ...

Page 7: ...6 Whenever you connect an audio or video system to your set ensure that all elements are switched off Refer to the documentation supplied with your equipment for detailed connection instructions and associated safety precautions Power Input apollo_en 1 10 03 10 53 AM Page 7 ...

Page 8: ...DVD If you wish to connect both the Set Top Box and VCR or DVD you should connect the Set Top Box to the VCR or DVD and connect the VCR or DVD to your set Connecting Computer Connect the DVI connector to the PC video connector Connect the stereo audio cable to PC AUDIO ST on the rear of your set and the other end to Audio Out of the sound card on your computer DVI connector Connecting Sound Output...

Page 9: ...e been made refer to pages 8 and 9 for further details 2 Switch your set on and if necessary press the VIDEO button repeatedly The input sources are displayed in the following order TV VIDEO S VIDEO Ext1 Ext2 PC Analog PC Digital To watch television programme again press the TV button Mount the brackets on the speaker and your set Connect the speaker and your set using screws Connect the speaker a...

Page 10: ... sub picture SWAP PIP freeze STILL Not available PIP location selection LOCATE PIP channel scan SCAN PIP source selection TV VIDEO Sound mode selection Previous channel Television On Off The performance of the remote control may be affected by bright light Picture freeze Not Available in PC mode Make the remote control work for TV VCR Cable DVD player Volume increase Sound menu display Picture men...

Page 11: ...ontrol Teletext Functions PIP Teletext display Mix both teletext information and the normal broadcast Teletext sub page Teletext size selection Fastext topic selection Teletext index Teletext reveal apollo_en 1 10 03 10 53 AM Page 11 ...

Page 12: ...et If you have purchased this set in the United Kingdom refer to page 45 for further instructions on plug wiring 1 Plug the mains lead into an appropriate socket Result A green Standby indicator appears on the front of your set 2 Press the POWER or channel up down P C P button Result The screen is turned on and a green Standby indicator disappears on the front of your set Your set can be placed in...

Page 13: ...elect a channel numbered ten or over Press this button and the symbol is displayed Enter the two digit channel number Used to decrease the Used to volume Display a submenu containing selections for the current menu option Search forwards manually for channels Reduce a menu option value Used to increase the Used to volume Display a submenu containing selections for the current menu option Search ba...

Page 14: ...d 2 Press the P or P button to select the Function Result The options available in the Function group are displayed 3 Press the or button 4 Press the P or P button to select the Language 5 Select a particular language by pressing the or button repeatedly 6 When you are satisfied with your choice press the MENU button to return to normal viewing Function Time PIP Language English DNIe Off apollo_en...

Page 15: ... following countries are available Belgie Deutschland Espania France Italia Nederland Schweiz Sverige UK East Europe 6 Press the P or P button to select the Search and then press the or button Result The search will end automatically Channels are sorted and stored in an order which reflects their position in the frequency range with lowest first and highest last The programme originally selected i...

Page 16: ...re displayed with the Colour system is selected 5 If necessary indicate the broadcasting standard required by pressing the or button repeatedly Result The colour standards are displayed in the following order AUTO PAL SECAM NT4 43 6 Press the P or P button to select the Sound system Indicate the sound standard required by pressing the or button repeatedly Result The sound standards are displayed i...

Page 17: ... the LNA LW40A13W Select the On by pressing the or button Result Amplifies signals when antenna reception is poor However if incoming signals are interfering with each other turn off LNA as it may malfuction 10 Press the P or P button to select the Store Select the OK by pressing the or button Result The channel and associated programme number are stored 11 Repeat Steps 7 to 9 for each channel to ...

Page 18: ...el Result The options available in the Channel group are displayed 3 Press the or button 4 Press the P or P button to select the Name Press the or button Result The current channels are displayed 5 If necessary select the channel to be assigned to a new name by pressing the P or P button 6 Press the or button 7 Press the P or P button to select a letter A Z a number 0 9 or a symbol space Move on t...

Page 19: ...l to add or erase If necessary select the Added or Erased by pressing the or button 6 Repeat Step 5 for each channel to be added or erased Fine Tuning Channel Reception If the reception is clear you do not have to fine tune the channel as this is done automatically during the search and store operation If however the signal is weak or distorted you may have to fine tune the channel manually 1 Pres...

Page 20: ...ted 5 Select the channel number that you wish to change by pressing the or button repeatedly 6 Press the P or P button to select the To Select the new number by which you wish to identify the channel by pressing the or button repeatedly 7 Press the P or P button to select the Store Select the OK to confirm the exchange of channel numbers by pressing the or button Result The selected channel is exc...

Page 21: ...ral settings which allow you to control picture quality 1 Press the MENU button Result The main menu is displayed 2 Press the P or P button to select the Picture Result The options available in the Picture group are displayed 3 Press the or button 4 Select the option Contrast Brightness Sharpness Colour or Tint NTSC only to be adjusted by pressing the P or P button Press the or button Result The h...

Page 22: ... pressing the P SIZE Picture Size button The following picture formats are available 16 9 Sets the Normal picture in 16 9 Wide mode Panorama Sets the picture in 16 9 Wide mode so that it can be shown like the Normal picture Zoom 1 Expands the 4 3 aspect ratio screen size Zoom 2 Expands the Zoom 1 screen size 4 3 Setting for normal 4 3 format Auto Wide The screen size is automatically adjusted when...

Page 23: ...ech You can also set these options simply by pressing the S STD Sound Standard button Adjusting the Sound Settings The sound settings can be adjusted to suit your personal preferences 1 Press the MENU button Result The main menu is displayed 2 Press the P or P button to select the Sound Result The options available in the Sound group are displayed 3 Press the or button 4 Select the option Bass or ...

Page 24: ...on 4 Press the P or P button to select the Dolby 5 For enjoying the Dolby sound effect select the On by pressing the or button Switching the Internal Woofers On Off LW29A13W When the internal woofers are switched off all the sound is routed to the external woofers 1 Press the MENU button Result The main menu is displayed 2 Press the P or P button to select the Sound Result The options available in...

Page 25: ...ume or Fixed by pressing the or button If you want to adjust the volume level with the volume control on the TV or external amplifier set to Volume If you set to Fixed You can adjust the volume level with the volume control on the audio amplifier And the Int mute is set to On automatically and you can not select it The following controls are not available volume bass treble and speaker setting 10 ...

Page 26: ... 7 Press the P or P button to select the Speaker setting Press the or button Result The Speaker Setting menu is displayed with the main left speaker is selected 8 Select the speaker Left Center Right Right Rear Left Rear Woofer to be adjusted by pressing the P or P button 9 Depending on the speaker the following settings can be adjusted to suit your personal preferences Test tone to simulate the v...

Page 27: ...ereo L R DTS MPEG I Stereo only MPEG II Main Left Center Main Right Right Left Surround Sub Woofer Output Input Source Mono Mono Lo Ro Lt Rt 5 1ch Dolby Digital PCM Stereo L R DTS MPEG I Stereo only MPEG II Main Left Center Main Right Right Left Surround Sub Woofer Output Input Source In case of Pro Logic Auto In case of Pro Logic On In case of Pro Logic Off The output of Sub Woofer is changed dep...

Page 28: ... weak and an automatic switching occurs then switch to the MONO When receiving a mono sound in the AV mode connect to the AUDIO L input connector on the rear panel Type of broadcast Regular broadcast Standard audio Regular NICAM Mono NICAM Stereo NICAM Dual I II Regular broadcast Standard audio Bilingual or Dual I II Stereo On screen indication MONO Normal use MONO MONO NICAM Normal STEREO MONO NI...

Page 29: ...essing the PIP ON button To deactivate the PIP press it again 6 Press the P or P button to select the TV Video Select a source of the sub picture by pressing the or button Result The sources are displayed in the following order depending on the model TV LW40A13W Video S Video EXT1 EXT2 You can also select these options simply by pressing the TV VIDEO button 7 Press the P or P button to select the ...

Page 30: ...he SWAP button 10 Press the P or P button to select the Sound sel To hear the sound of sub picture select the Sub by pressing the or button Result The options are displayed in the following order Main Sub P button Used to select the channel of sub picture SCAN button Used to scan every memorized channel in order To stop scanning press it again English 30 Function PIP On TV Video Video Size Small L...

Page 31: ...s displayed 5 Press the P or P button to select the Sleep timer Select the number of minutes after which your set switches off by pressing the or button repeatedly The preset time intervals 10 20 30 60 90 120 150 180 210 and 240 minutes You can also select simply by pressing the SLEEP button If the sleep timer is already set the screen displays the remaining time and then your set will be switched...

Page 32: ...e options available in the Function group are displayed 3 Press the or button Result The Time is selected 4 Press the or button again Result The Time Setting menu is displayed with Clock is selected 5 Press the or button to move to the hour or minute Set the hour or minute by pressing the P or P button You can view the setting status of selected source by pressing the DISPLAY button on the remote ...

Page 33: ...4 Press the or button again Result The Time Setting menu is displayed 5 Press the P or P button to select On time Set the time at which you wish the television to be switched on automatically Press the or button to move to the hour minute or on off Set these by pressing the P or P button 6 Press the P or P button to select Off time In the same above set the time at which you wish the television to...

Page 34: ... options available in the Function group are displayed 3 Press the P or P button to select the DNIe Select the required option by pressing the the or button repeatedly The following options are available Off Medium High Demo Off Switches off the DNIe mode Medium Switches on the DNIe mode High The screen is more clear than in Medium Demo The screen before applying DNIe appears on the right and the ...

Page 35: ...f not contact your computer manufacturer or Samsung Dealer 1 First click on Settings on the Windows start menu While Settings is highlighted move the cursor so that Control Panel is highlighted 3 Navigate to the Settings tab on the display dialog box The correct setting of size resolution 1280 x 768 pixels If a vertical frequency option exists on your display settings dialog box the correct value ...

Page 36: ... menu is displayed 2 Press the P or P button to select the PC Result The options available in the PC group are displayed 3 Press the or button Result The Image is selected 4 Press the or button again Result The options available in the Image group are displayed 5 Press the P or P button to select the Size Select a size of the your computer image by pressing the or button Result The sizes are displ...

Page 37: ...position to center 1 Press the MENU button Result The main menu is displayed 2 Press the P or P button to select the PC Result The options available in the PC group are displayed 3 Press the or button 4 Press the P or P button to select the Position Press the or button 5 Select the position H Position or V Position to be adjusted by pressing the P or P button Press the or button Result The horizon...

Page 38: ...available Custom Colour 1 Colour 2 Colour 3 6 If you wish adjust the colour which best corresponds to you viewing requirements select the option R Red G Green or B Blue to be adjusted by pressing the P or P button Press the or button Result The horizontal bar is displayed 7 Press the or button to reach the required setting If you change the R Red G Green or B Blue setting the Mode is selected to C...

Page 39: ...only adjusted Adjusting the PC Screen Automatically 1 Press the MENU button Result The main menu is displayed 2 Press the P or P button to select the PC Result The options available in the PC group are displayed 3 Press the or button 4 Press the P or P button to select the Auto adjustment Press the or button Result The screen quality and position are automatically adjusted and the screen returns t...

Page 40: ...ivided into numbered pages see diagram Part Contents A Selected page number B Broadcasting channel identity C Current page number or search indications D Date and time E Text F Status information FASTEXT information Teletext information is often divided between several pages displayed in sequence which can be accessed by Entering the page number Selecting a title in a list Selecting a coloured hea...

Page 41: ...Double Teletext feature lets you view the actual broadcast and teletext information separately on the screen 4 If you wish to display the actual broadcast and teletext information on a single screen press the TTX MIX button again 5 Press the TV button again to exit from the teletext display Selecting Display Options When you have displayed a Teletext page you can select various options to suit you...

Page 42: ...used by the broadcasting company the different topics covered on a Teletext page are colour coded and can be selected by pressing the coloured buttons on the remote control Press the coloured button corresponding to the topic that you wish to select the available topics are given on the status line Result The page is displayed with other colored information that can be selected in the same way 3 T...

Page 43: ...settings Check that the broadcast system selected is correct Try to identify the electrical appliance that is affecting the set and move it further away Plug your set into a different mains socket Check the direction location and connections of your aerial This interference is often due to the use of an indoor aerial Replace the remote control batteries Clean the upper edge of the remote control t...

Page 44: ...n your computer You use a software utility installed on your computer to set up this feature State Normal Operation Power Saving Function mode EPA NUTEK Horizontal Sync Active Inactive Vertical Sync Active Inactive Power Indicator Green Green Blinking 1 sec interval Power Consumption LW29A13W 150W Max Less than 8W LW40A13W 230W Max This set automatically returns to normal operation when horizontal...

Page 45: ...C4 43 Sound System B G D K I L Video Format CVBS S VHS Ext Video Input Output 1 0 Vp p 75 ohm RGB Input 0 7 Vp p 75 ohm Audio Input Output 500mVrms Colour system PAL Power Supply Input 200 240 V 50 60Hz Output DC 28V 8A Power Consumption Maximum 150W 230 W Power Saving 8W Dimension W x H x D Weight Set 759 6 x 568 5 x 195 mm 13 7 kg 1006 x 713 x 58 mm 21 5 kg Speaker L R 570 5 x 130 x 155 mm 2 4 k...

Page 46: ...de with referring to the Video card user guide because the screen might not display or only the power LED might be on For the display modes listed below the screen image has been optimized during manufacture Mode Resolution Horizontal Vertical Pixel Clock Sync Polarity Frequency kHz Frequency Hz Frequency MHz H V IBM 640 x 480 31 469 59 940 25 175 640 x 480 35 000 66 667 30 240 VESA 640 x 480 37 8...

Page 47: ...xtension lead or consult your dealer for assistance However if there is no alternative to cutting off the plug remove the fuse and then safely dispose of the plug Do NOT connect the plug to a mains socket as there is a risk of shock hazard from the bared flexible cord IMPORTANT The wires in the mains lead are coloured in accordance with the following code BLUE NEUTRAL BROWN LIVE As these colours m...

Page 48: ...English 48 Memo apollo_en 1 10 03 10 53 AM Page 48 ...

Page 49: ...English 49 Memo apollo_en 1 10 03 10 53 AM Page 49 ...

Page 50: ...ES SERVICE Do not hesitate to contact your retailer or service agent if a change in the performance of your product indicates that a faulty condition may be present ELECTRONICS apollo_en 1 10 03 10 53 AM Page 50 ...

Reviews: