background image

English-13

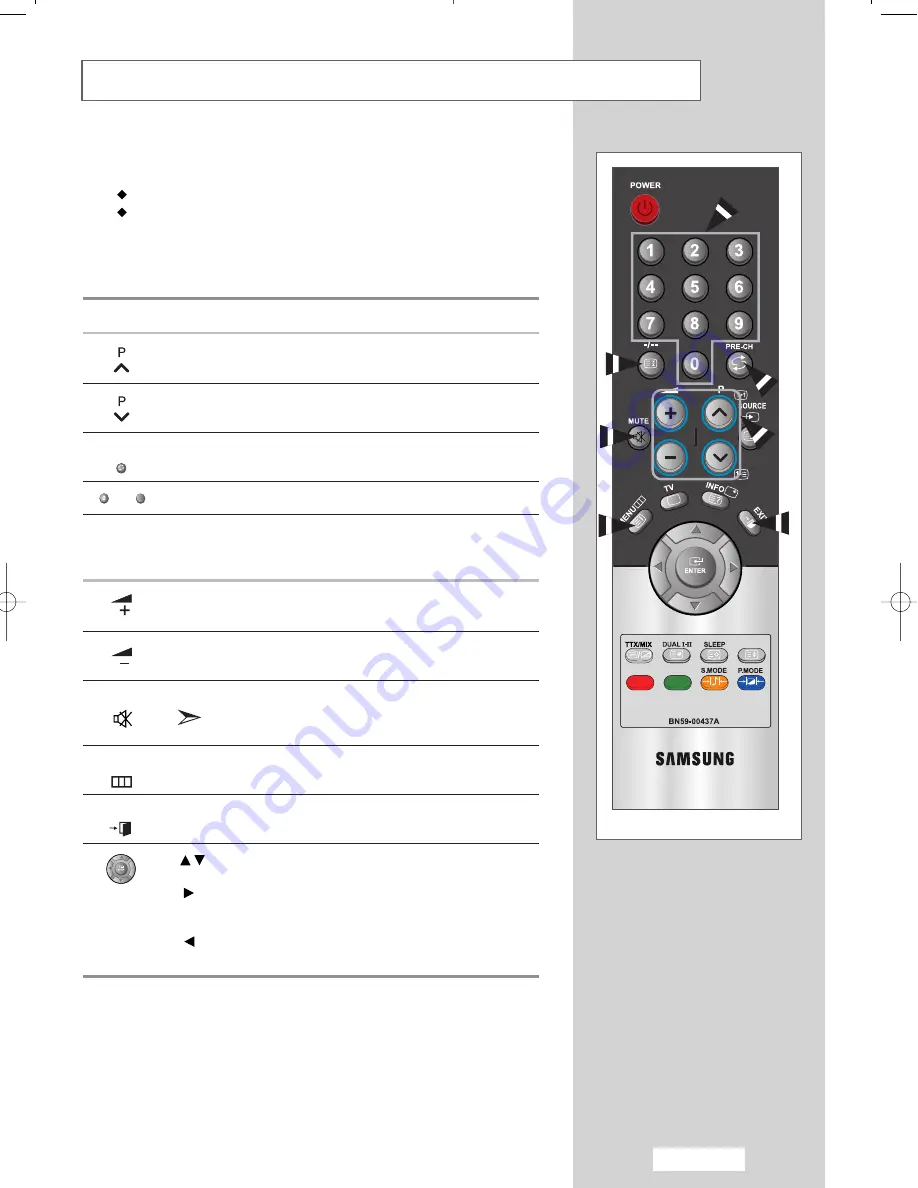
Becoming Familiar with the Remote Control

The remote control is used mainly to:

Change channels and adjust the volume
Set up your set using the on-screen menu system

The following table presents the most frequently used buttons and their
functions.

Button

Viewing Function

Menu Function

Used to display the next

-

stored channel.

Used to display the

-

previous stored channel.

PRE-CH

Used to switch repeatedly between the last two channels

displayed. (

PRE-CH

; Previous Channel)

Used to display the corresponding channels.

-/--

Used to select a channel numbered ten or over.
Press this button, and the “--” symbol is displayed.
Enter the two-digit channel number.

Used to increase the

-

volume.

Used to decrease the

-

volume.

MUTE

Used to switch the sound off temporarily.

To turn the sound back on, press this button again,

or press the 

+  

or 

-

button.

MENU

Used to display the 

Used to return to the previous

on-screen menu system.

menu or normal viewing.

EXIT

Used to exit the menu system and return directly to normal
viewing.

Used to move among the menu items.

Used to select a menu item or increase
the value of the selected item.

Used to return to the previous menu item or decrease
the value of the selected item.

9

01-BN68-00858C-00Eng.qxd  1/7/04 7:08 PM  Page 13

Summary of Contents for LW17M24C

Page 1: ...it for future reference AFTER SALES SERVICE Do not hesitate to contact your retailer or service agent if a change in the performance of your product indicates that a faulty condition may be present BN...

Page 2: ...xed for an extended period of time the amount of light transmission will also remain varied and as a result the borders may leave traces Digital Ready TV When you select the wide screen 16 9 mode to w...

Page 3: ...borders at the left right and the center of the screen remain fixed for an extended period of time the amount of light transmission will also remain varied and as a result the borders may leave traces...

Page 4: ...letext 10 Viewing the Remote Control Teletext Functions 11 Switching On and Off 12 Placing in Standby Mode 12 Becoming Familiar with the Remote Control 13 Plug Play 14 Selecting TV Mode or an Input So...

Page 5: ...f the Image 39 Changing the Image Position 40 Initializing the Image Settings 41 Adjusting the PC Screen Automatically 42 Picture Mode 43 Adjusting the Custom Picture 43 Adjusting the Screen Backgroun...

Page 6: ...D Decreases or increases the level of audio volume and the values of the selected function Moves the selector down or up on the OSD Decreases or increases the channel number POWER Turns ON OFF your se...

Page 7: ...deo system to your set ensure that all elements are switched off Refer to the documentation supplied with your equipment for detailed connection instructions and associated safety precautions Power In...

Page 8: ...ecting a Computer Connect the 15 Pin D SUB connector to the PC video connector Connect the stereo audio cable to the PC AUDIO IN STEREO jack on the rear of your set and the other end to the Audio Out...

Page 9: ...NO L AUDIO R on the rear of your set and the other ends to corresponding audio out connectors on the A V device Connecting Headphones Plug a set of headphones into the 3 5mm mini jack socket on the ri...

Page 10: ...view the different sources by selecting the appropriate input 1 Check that all the necessary connections have been made refer to pages 6 and 7 for further details 2 Press the TV button to choose TV mo...

Page 11: ...tly 1 Remove the cover on the rear of the remote control by pressing the symbol downwards and then pulling firmly to remove it 2 Install two AAA size batteries on the battery against on the remote con...

Page 12: ...roadcast Exit the OSD Control the cursor in the menu Previous channel Next channel Previous channel Picture effect selection Menu display and change confirmation Sound effect selection Numeric buttons...

Page 13: ...ctions Teletext mode selection LIST FLOF Teletext reveal P Teletext next page P Teletext previous page Teletext store Teletext hold Teletext size selection Exit from the teletext display Fastext topic...

Page 14: ...our set can be placed in Standby mode in order to reduce the power consumption The Standby mode can be useful when you wish to interrupt viewing temporarily during a meal for example 1 Press the POWER...

Page 15: ...the corresponding channels Used to select a channel numbered ten or over Press this button and the symbol is displayed Enter the two digit channel number Used to increase the volume Used to decrease...

Page 16: ...selected 4 Press the ENTER button Result The country menu is displayed Belgium Germany Spain France Italy Netherlands Switzerland Sweden United Kingdom Eastern Europe Others 5 Select your Country by p...

Page 17: ...ress the or button to select the Setup Result The options available in the Setup group are displayed 3 Press the ENTER button 4 Press the or button to select the Plug Play Press the ENTER button Resul...

Page 18: ...watch 1 Press the MENU button Result The main menu is displayed 2 Press the ENTER button to select the Input Result The options available in the Input group are displayed 3 Press the ENTER button Res...

Page 19: ...e options available in the Input group are displayed 3 Press the or button to select the Edit Name Press the ENTER button 4 Press the or button to move to the input source that you wish to edit Press...

Page 20: ...Result The main menu is displayed 2 Press the or button to select the Setup Result The options available in the Setup group are displayed 3 Press the ENTER button 4 Press the or button to select the L...

Page 21: ...n to select Auto Store Press the ENTER button Result The Start is selected 5 Press the ENTER button to search the channels The sub menu is changed from Start to Stop with channel search started Result...

Page 22: ...R button Result The options available in the Manual Store group are displayed with the Prog selected 5 Press the or button to select Colour System Press the ENTER button Select the Colour System requi...

Page 23: ...ed You can also set a channel by pressing number buttons on the remote control 9 If you do not know the channel numbers press the or button to select Search Press the ENTER button Start the Search by...

Page 24: ...options available in the Channel group are displayed 3 Press the ENTER button 4 Press the or button to select Add Delete Press the ENTER button Result The state of the current channel is displayed 5 P...

Page 25: ...ress the ENTER button 4 Press the or button to select Sort Press the ENTER button Result The current Prog Channel and Name are displayed 5 Select the channel number that you wish to change by pressing...

Page 26: ...the ENTER button Result The current Prog Channel and Name are displayed 5 If necessary select the channel to be assigned to a new Name by pressing the or button Press the ENTER button Result The selec...

Page 27: ...esult The options available in the Picture group are displayed 3 Press the ENTER button Result The Mode is selected 4 Press the ENTER button 5 Select the required picture effect by pressing the or but...

Page 28: ...button 5 Select the option Contrast Brightness Sharpness Colour or Tint NTSC only to be adjusted by pressing the or button Press the ENTER button Result The horizontal bar is displayed 6 Press the or...

Page 29: ...yed 2 Press the or button to select the Picture Result The options available in the Picture group are displayed 3 Press the ENTER button 4 Press the or button to select the Colour Tone Press the ENTER...

Page 30: ...the Sound Result The options available in the Sound group are displayed 3 Press the ENTER button Result The Mode is selected 4 Press the ENTER button 5 Select the required sound effect by pressing the...

Page 31: ...Result The main menu is displayed 2 Press the or button to select the Sound Result The options available in the Sound group are displayed 3 Press the ENTER button 4 Press the or button to select Auto...

Page 32: ...displayed 3 Press the ENTER button 4 Press the ENTER button Result The Clock is selected 5 Press the ENTER button Press the or button to set the Hour 6 Press the or button to move to Minute Press the...

Page 33: ...lt The preset Clock is selected 5 Press the or button to select the Sleep Timer Press the ENTER button 6 Select the number of minutes after which your set switches On by pressing the or button repeate...

Page 34: ...Time menu are displayed with Clock selected 5 Press the or button to select the On Timer Press the ENTER button Result The On Timer menu is displayed To Press the Move to Hour Minute Channel and Volum...

Page 35: ...The main menu is displayed 2 Press the or button to select Setup Result The options available in the Setup group are displayed 3 Press the ENTER button 4 Press the or button to select Blue Screen Pre...

Page 36: ...information is divided into numbered pages see diagram Part Contents A Selected page number B Broadcasting channel identity C Current page number or search indicators D Date and time E Text F Status...

Page 37: ...me pages may not be displayed 1 Select the channel providing the Teletext service using the or button 2 Press the TTX MIX button to activate the teletext mode Result The contents page is displayed It...

Page 38: ...ked with several secondary pages the secondary pages are displayed in sequence To freeze the display on a given page press the hold button Press the hold button again to resume Using the various displ...

Page 39: ...4 To display the subpage see the following steps Press the subpage button Result The available subpages appear Select the required subpage Subpages can be scrolled by using the or button Storing Tele...

Page 40: ...not contact your computer manufacturer or Samsung Dealer 1 First click on Control Panel on the Windows start menu 4 Navigate to the Settings tab on the display dialog box The correct size setting reso...

Page 41: ...PC menu are displayed 5 Press the ENTER button Result The Image Lock menu is selected 6 Press the or button to select Coarse or Fine Press the ENTER button Result The horizontal bar is displayed 7 Pre...

Page 42: ...he ENTER button Result The options available in the PC menu are displayed 5 Press the or button to select Position Press the ENTER button Result You can adjust the image Position 6 Press the or button...

Page 43: ...re displayed 3 Press the ENTER button 4 Press the or button to select PC Press the ENTER button Result The options available in the PC menu are displayed 5 Press the or button to select Image Reset Pr...

Page 44: ...PC Press the ENTER button Result The options available in the PC menu are displayed 5 Press the or button to select Auto adjustment Press the ENTER button Result The screen quality and position are a...

Page 45: ...tom Picture Your set has several settings which allow you to control picture quality 1 Press the MENU button Result The main menu is displayed 2 Press the or button to select the Picture Result The op...

Page 46: ...isplayed 2 Press the or button to select the Picture Result The options available in the Picture group are displayed 3 Press the ENTER button 4 Press the or button to select the Colour Tone Press the...

Page 47: ...button 4 Press the or button to select the Colour Control Press the ENTER button 5 Select the option Red Green Blue to be adjusted by pressing the or button Press the ENTER button Result The horizonta...

Page 48: ...have pressed the POWER button Check the picture contrast and brightness settings Check the volume Check the volume Check whether the MUTE button has been pressed on the remote control Adjust the colou...

Page 49: ...e Personnel In PC mode the image is not stable and may appear to vibrate In PC mode the image is not centred on the screen Check that the display resolution and frequency from your computer or video b...

Page 50: ...NTSC SECAM CVBS S VHS RGB 50 F to 104 F 10 C to 40 C 10 to 80 non condensing 4 F to 113 F 20 C to 45 C 5 to 95 non condensing RCA Jack L R 0 5Vrms 9dB 3 5 Stereo Jack 0 5Vrms 9dB 2 5W x 2 Max 10mW Out...

Page 51: ...d during manufacture Mode PC Resolution Horizontal Frequency kHz Vertical Frequency Hz Pixel Clock Frequency MHz Sync Polarity H V 720X400 640X480 640X480 800X600 800X600 1024X768 1024X768 1280X1024 1...

Page 52: ...may cause permanent damage to the mechanical part of the stand LW20M21C LW20M22C model swivels left and right If you plan to take your TV with you to a foreign country please be aware of the differen...

Page 53: ...1 Insert the locking device into the Kensington slot on the LCD TV Figure 1 and turn it in the locking direction Figure 2 2 Connect the Kensington lock cable 3 Fix the Kensington lock to a desk or a h...

Page 54: ...is to be used when attaching the wall mount to a concrete wall When attaching to other building materials please contact your nearest dealer How to assemble the Wall Mount Kit Bracket Anchors 3EA Scr...

Page 55: ...the wall 5 Push the LCD TV up and shift to the right to detach it from bracket When moving or transferring to other areas reverse No 4 procedure so as to disconnect LCD TV with ease 6 Picture 1 shows...

Page 56: ...o be used when attaching the wall mount to a concrete wall When attaching to other building materials please contact your nearest dealer How to assemble the Wall Mount Kit Bracket Anchors 4EA Screws 4...

Page 57: ...ompleting setup of LCD TV on the wall 5 Push the LCD TV up and shift to the right to detach it from bracket When moving or transferring to other areas reverse No 4 procedure so as to disconnect LCD TV...

Page 58: ...Memo...

Page 59: ...AFTER SALES SERVICE Do not hesitate to contact your retailer or service agent if a change in the performance of your product indicates that a faulty condition may be present ELECTRONICS...

Reviews: