background image

60

Setup and Reset

6

6 Setup and Reset

Configuring Sensitivity

1

Press [

] on the product.

2

Press [

] to move to 

SETUP&RESET

 and press [

] on the product.

3

Press [

] to move to 

ECO

 and press [

] on the product.

4

Press [

] to move to 

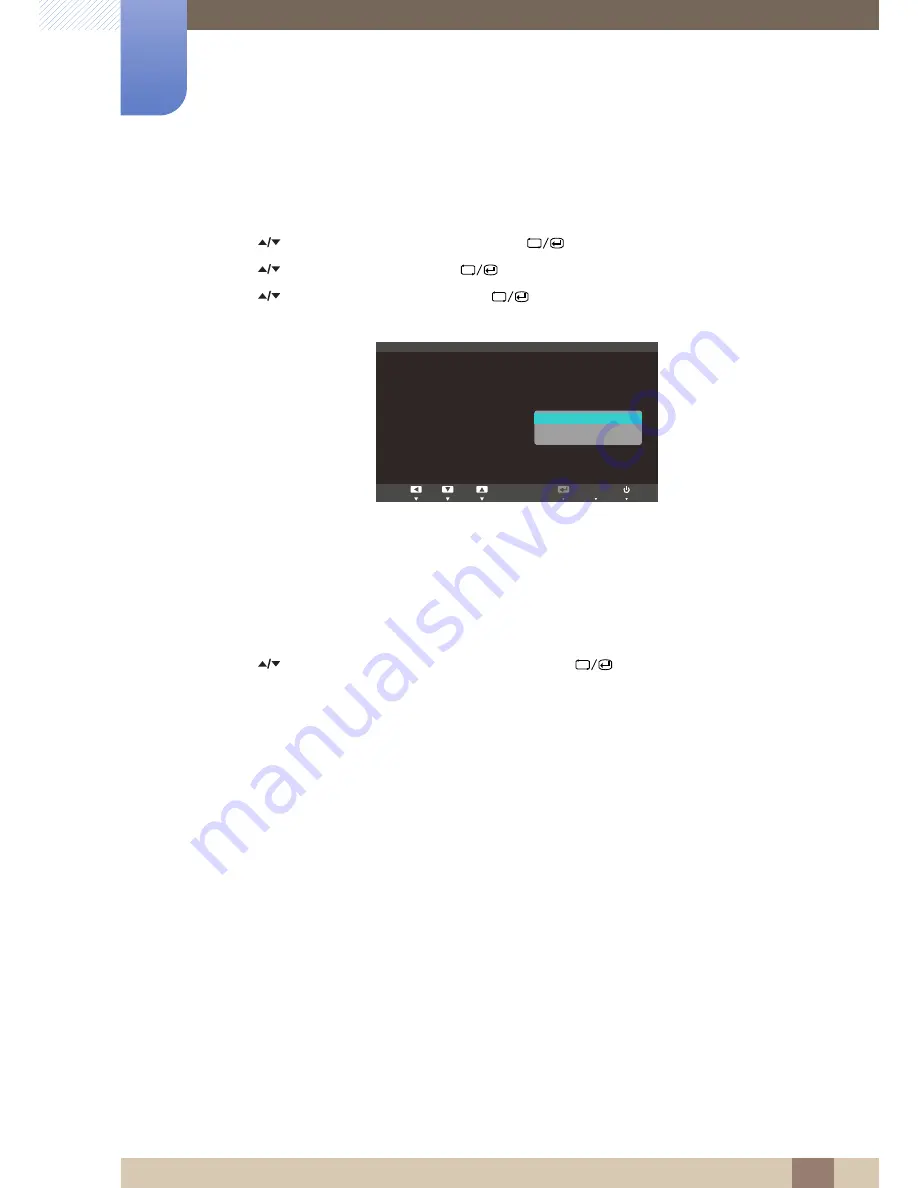
Sensitivity

 and press [

] on the product. The following screen will 

appear.

z

High

: High sensitivity that maximizes the varying level of screen brightness depending on the 

ambient light intensity.

z

Medium

: Intermediate sensitivity that sets a varying level of screen brightness between 

High

 and 

Low

 depending on the ambient light intensity.

z

Low

: Low sensitivity that minimizes the varying level of screen brightness depending on the 

ambient light intensity.

5

Press [

] to move to the option you want and press the [

].

6

The selected option will be applied.

MENU

5HWXUQ

(QWHU

0RYH

(&2

Eco Motion Sensor

೛%DFNOLJKW

(FR/LJKW6HQVRU

೛6HQVLWLYLW\

೛%ULJKWQHVV/HYHO

(FR6DYLQJ

(FR,FRQ'LVSOD\

0LQ

2II

2Q

2II

+LJK
0HGLXP
/RZ

AUTO

Summary of Contents for LS27A650DS/ZA

Page 1: ...Master S22A650D S24A650D S27A650D S24A850DW The color and the appearance may differ depending on the product and the specifications are subject to change without prior notice to improve the performanc...

Page 2: ...Standards Association Icons used in this manual Symbols for safety precautions z An administration fee may be charged if either a an engineer is called out at your request and there is no defect in th...

Page 3: ...3 Before Using the Product Before Using the Product Activities marked by this symbol are prohibited Instructions marked by this symbol must be followed...

Page 4: ...cable by the plug and do not touch the cable with wet hands Otherwise an electric shock may result 3 Wipe the monitor with a clean soft and dry cloth z Do not apply a cleaning agent that contains alc...

Page 5: ...roduct The exterior may differ depending on the product Precautions for storage High glossy models can develop white stains on the surface if an ultrasonic wave humidifier is used nearby Be sure to co...

Page 6: ...all the way in so it is not loose z An unstable connection may cause a fire Connect the power plug to a grounded power socket type 1 insulated devices only z An electric shock or injury may result Do...

Page 7: ...letely cut the power to the product Power to the product cannot be completely cut off with the power button Hold the plug when disconnecting the power cord from the power socket z An electric shock or...

Page 8: ...roduct to direct sunlight heat or a hot object such as a stove z Otherwise the product lifespan may be reduced or a fire may result Do not install the product within the reach of young children z The...

Page 9: ...z An electric shock or fire may result z Contact Samsung Customer Service Center 84page for repair Before you move the product be sure to turn off the power switch and remove all the cables connected...

Page 10: ...se the power cable may be damaged and product failure an electric shock or fire may result If a gas leakage is found do not touch the product or power plug Also ventilate the area immediately z Sparks...

Page 11: ...ng Customer Service Center 84page z Product failure an electric shock or fire may result Leaving the screen fixed on a stationary image for an extended period of time may cause afterimage burn in or d...

Page 12: ...a well ventilated area Looking at the screen too close for an extended period of time can deteriorate your eyesight Do not hold the monitor upside down or move it by holding the stand z The product m...

Page 13: ...may result Use the product in the correct posture as follows z Straighten your back z Allow a distance of 45 to 50cm between your eye and the screen and look slightly downward at the screen Keep your...

Page 14: ...lation 9 Operation 13 Correct posture to use the product PREPARATIONS 19 Checking the Contents 19 Removing the Packaging 20 Checking the Components 21 Parts 21 Frontal Buttons 23 Reverse Side 25 Insta...

Page 15: ...C as a USB HUB for the SA850 Model Only 39 Connecting a PC to the Product 39 Utilizing the Product as a USB HUB 40 Connecting the Power SCREEN SETUP 41 MAGIC 41 SAMSUNG MAGIC Bright 42 SAMSUNG MAGIC C...

Page 16: ...ng the Picture Size 55 H Position V Position 55 Configuring H Position or V Position 56 Menu H Position Menu V Position 56 Configuring Menu H Position or Menu V Position SETUP AND RESET 57 ECO 57 Eco...

Page 17: ...g Off Timer Setting 74 Reset 74 Initializing Settings Reset INFORMATION MENU AND OTHERS 75 INFORMATION 75 Displaying INFORMATION 75 Configuring Brightness in the Startup Screen TROUBLESHOOTING GUIDE 7...

Page 18: ...Table Of Contents Table Of Contents 18 88 Correct Disposal of This Product Waste Electrical Electronic Equipment 89 Terminology INDEX...

Page 19: ...hen you open the packaging with a sharp instrument 2 Remove the Styrofoam from the product 3 Check the components and remove the Styrofoam and plastic bag z The appearance of actual components may dif...

Page 20: ...r from the image shown Components Components may differ in different locations Items sold separately The following items can be purchased at your nearest retailer Quick Setup Guide Warranty Card Not a...

Page 21: ...l lock Maintain the current settings or lock the OSD control to prevent unintended changes to settings To lock the OSD control press the MENU button for five seconds To unlock the locked OSD control p...

Page 22: ...will change the input source Analog DisplayPort Digital If you power on the product or change the input source by pressing the button a message that shows the changed input source will appear at the...

Page 23: ...tions 1 1 Preparations 1 2 2 Reverse Side The color and shape of parts may differ from what is shown Specifications are subject to change without notice to improve quality SA650 SA850 DC 14V DP IN DVI...

Page 24: ...DP cable Connects to a PC via a DVI cable Connects to a PC using the D SUB cable Connects to the stereo cable Connects to an audio output device such as headphones Connect to a USB device Compatible...

Page 25: ...flat surface Next place the product with the face down on top of the cloth or cushion Insert the stand base into the stand in the direction of the arrow Do not remove the fixing pin until you are fin...

Page 26: ...pin z The monitor tilt and height can be adjusted z Hold the top center of the product and adjust the height carefully 1 3 3 Rotating the Monitor You can rotate your monitor as shown below z Be sure t...

Page 27: ...on the product with the corresponding parts on the wall mount kit or desktop stand you want to attach Place a protective cloth or cushion on a flat surface Next place the product with the face down o...

Page 28: ...kit on your own z To mount the product on a wall ensure you purchase a wall mount kit that can be installed 10cm or farther away from the wall z Be sure to use a wall mount kit that complies with the...

Page 29: ...not be available 3 To maximize the performance of the function update the graphics card driver to the latest version 4 Fourteen languages are available as installation languages 5 If the orientation...

Page 30: ...ng a source device read the user manual provided with it The number and locations of ports on source devices may differ from device to device z Do not connect the power cable until all connections are...

Page 31: ...and turn on the power switch on the PC For details refer to 2 5 Connecting the Power 3 Press to change the input source to Analog z Audio is not available if the PC and product are connected via the...

Page 32: ...to 2 5 Connecting the Power 3 Press to change the input source to Digital z Audio is not available if the PC and product are connected via the DVI port z Refer to 2 3 Connecting Headphones for the SA...

Page 33: ...ith the product z If the file provided is faulty visit the Samsung homepage http www samsung com sec and download the file 1 Insert the user manual CD provided with the product into the CD ROM drive 2...

Page 34: ...and press the 2 To hide the information message press z If the optimum resolution is not selected the message will appear up to three times for a specified time even when the product is turned off an...

Page 35: ...ion Using a PC z Adjust the resolution and refresh rate in Control Panel on your PC to obtain optimum picture quality z The picture quality of TFT LCDs may degrade if the optimum resolution is not sel...

Page 36: ...36 Connecting and Using a Source Device 2 2 Connecting and Using a Source Device Changing the Resolution on Windows Vista Go to Control Panel Personalization Display Settings and change the resolution...

Page 37: ...37 Connecting and Using a Source Device 2 2 Connecting and Using a Source Device Changing the Resolution on Windows 7 Go to Control Panel Display Screen Resolution and change the resolution...

Page 38: ...Model Only 1 Connect the stereo cable to the AUDIO IN port on the back of the product and the AUDIO OUT port on the PC If the stereo cable is connected the Volume VOL can be adjusted using the button...

Page 39: ...However the PC should support USB 3 0 for the USB 3 0 function to work fully 2 4 2 Utilizing the Product as a USB HUB Using the product as a hub connect and use various source devices with the product...

Page 40: ...le may break Be sure to securely fix the adapter in the groove Put the DC power adapter in the groove with the switch facing upward Push the adapter until you hear a click Connect the power cable to t...

Page 41: ...o move to Bright and press on the product The following screen will appear z Custom Customize the contrast and brightness as required z Standard Obtain a picture quality suitable for editing documents...

Page 42: ...he product 4 Press to move to Color and press on the product The following screen will appear z Off Disable Color z Demo Compare normal screen mode with Color mode z Full Obtain a vivid picture qualit...

Page 43: ...e z This menu is not available when Eco Light Sensor or Eco Saving is set to On 3 2 1 Configuring Brightness 1 Press on the product 2 Press to move to PICTURE and press on the product 3 Press to move...

Page 44: ...rast mode z This menu is not available when Color is in Full or Intelligent mode 3 3 1 Configuring Contrast 1 Press on the product 2 Press to move to PICTURE and press on the product 3 Press to move t...

Page 45: ...is menu is not available when Color is in Full or Intelligent mode 3 4 1 Configuring Sharpness 1 Press on the product 2 Press to move to PICTURE and press on the product 3 Press to move to Sharpness a...

Page 46: ...se 1 Press on the product 2 Press to move to PICTURE and press on the product 3 Press to move to Coarse and press on the product The following screen will appear 4 Adjust the Coarse using the button M...

Page 47: ...djusting Fine 1 Press on the product 2 Press to move to PICTURE and press on the product 3 Press to move to Fine and press on the product The following screen will appear 4 Adjust the Fine using the b...

Page 48: ...nding on the model Refer to the actual product 3 7 1 Configuring Response Time 1 Press on the product 2 Press to move to PICTURE and press on the product 3 Press to move to Response Time and press on...

Page 49: ...e 0 100 A higher value will increase the intensity of the color This menu is not available when Color is in Full or Intelligent mode 4 1 1 Configuring Red 1 Press on the product 2 Press to move to COL...

Page 50: ...This menu is not available when Color is in Full or Intelligent mode 4 2 1 Configuring Green 1 Press on the product 2 Press to move to COLOR and press on the product 3 Press to move to Green and pres...

Page 51: ...r This menu is not available when Color is in Full or Intelligent mode 4 3 1 Configuring Blue 1 Press on the product 2 Press to move to COLOR and press on the product 3 Press to move to Blue and press...

Page 52: ...owing screen will appear z Cool2 Set the color temperature to be cooler than Cool1 z Cool1 Set the color temperature to be cooler than Normal mode z Normal Display the standard color tone z Warm1 Set...

Page 53: ...1 Press on the product 2 Press to move to COLOR and press on the product 3 Press to move to Gamma and press on the product The following screen will appear 4 Press to move to the option you want and p...

Page 54: ...with an aspect ratio of 16 9 Suitable for DVD content or widescreen broadcasts SA650 z Wide Display the picture in full screen regardless of the aspect ratio of the input source SA850 z Screen Fit Di...

Page 55: ...Fit z Only available in Analog mode 5 2 1 Configuring H Position or V Position 1 Press on the product 2 Press to move to SIZE POSITION and press on the product 3 Press to move to H Position or V Posi...

Page 56: ...ress on the product 2 Press to move to SIZE POSITION and press on the product 3 Press to move to Menu H Position or Menu V Position and press The following screen will appear 4 Press to configure Menu...

Page 57: ...n off the power if the sensor has not detected any movement of an object or person for 5 minutes within the specified range of detection z 10 Min Automatically turn off the power if the sensor has not...

Page 58: ...en still turned on 5 Press to move to the option you want and press the 6 The selected option will be applied z The performance of Eco Motion Sensor is maximized to a specific user distance 1m and ang...

Page 59: ...ss on the product 2 Press to move to SETUP RESET and press on the product 3 Press to move to ECO and press on the product 4 Press to move to Eco Light Sensor and press The following screen will appear...

Page 60: ...ghtness depending on the ambient light intensity z Medium Intermediate sensitivity that sets a varying level of screen brightness between High and Low depending on the ambient light intensity z Low Lo...

Page 61: ...t The following screen will appear z Brighter Increase the current brightness of the screen z Current Maintain the current brightness of the screen z Dimmer Decrease the current brightness of the scre...

Page 62: ...press on the product 3 Press to move to ECO and press on the product 4 Press to move to Eco Saving and press on the product The following screen will appear z 75 Change the monitor power consumption t...

Page 63: ...sor will activate and switch the monitor to power saving mode z A 10 second countdown timer will start along with the above picture before the power saving mode activates showing the operation status...

Page 64: ...volve power consumption such as the brightness control function z The amount of energy savings accumulated by using the power saving functions such as Eco Motion Sensor Eco Light Sensor and Eco Saving...

Page 65: ...RESET and press on the product 3 Press to move to Menu Transparency and press on the product The following screen will appear 4 Press to move to the option you want and press the 5 The selected optio...

Page 66: ...on the product 2 Press to move to SETUP RESET and press on the product 3 Press to move to Language and press on the product The following screen will appear 4 Press to move to the language you want a...

Page 67: ...Mode 1 Press on the product 2 Press to move to SETUP RESET and press on the product 3 Press to move to PC AV Mode and press on the product The following screen will appear 4 Press to move to the optio...

Page 68: ...urce and press on the product The following screen will appear z Auto The input source is automatically recognized z Manual Manually select an input source 4 Press to move to the option you want and p...

Page 69: ...6 6 1 Configuring Display Time 1 Press on the product 2 Press to move to SETUP RESET and press on the product 3 Press to move to Display Time and press on the product The following screen will appear...

Page 70: ...Repeat Time and press on the product The following screen will appear z Acceleration 1 sec or 2 sec can be selected If No Repeat is selected a command responds only once when a button is pressed 4 Pr...

Page 71: ...SETUP RESET and press on the product 3 Press to move to Customized Key and press on the product The following screen will appear z ECO MAGIC Image Size 4 Press to move to the option you want and press...

Page 72: ...Press to move to Off Timer On Off and press on the product The following screen will appear z Off Deactivate the off timer so that the product does not power off automatically z On Activate the off t...

Page 73: ...only available when Off Timer On Off is set to On 6 10 1 Configuring Off Timer Setting 1 Press on the product 2 Press to move to SETUP RESET and press on the product 3 Press to move to Off Timer Setti...

Page 74: ...s on the product 2 Press to move to SETUP RESET and press on the product 3 Press to move to Reset and press on the product The following screen will appear 4 Press to move to the option you want and p...

Page 75: ...ightness in the Startup Screen SA650 SA850 Adjust Brightness using the or button in the startup screen where there is no on screen display menu available 1 Press or in the startup screen The following...

Page 76: ...t is working normally If the screen remains blank check the PC system video controller and cable 8 1 2 Checking the Resolution and Frequency For a mode that exceeds the supported resolution refer to 9...

Page 77: ...f required change the settings referring to Standard Signal Mode Table 82page in this manual and the INFORMATION menu on the product There are shadows or ghost images left on the screen The screen is...

Page 78: ...78 Troubleshooting Guide 8 8 Troubleshooting Guide Source device issue A beeping sound is heard when my PC is booting If a beeping sound is heard when your PC is booting have your PC serviced...

Page 79: ...onitor settings How can I change the resolution z Windows XP Go to Control Panel Appearance and Themes Display Settings and adjust the resolution z Windows ME 2000 Go to Control Panel Display Settings...

Page 80: ...onnectors D sub DVI DP D sub DVI DP USB UP port AUDIO IN Dimensions W x H x D Weight with the stand 512 0 x 364 0 x 216 0 mm 4 2 kg 568 0 x 418 0 x 224 5 mm 5 4 kg 642 5 x 466 0 x 224 5 mm 6 3 kg 558...

Page 81: ...ted to a PC with a power saving function z The displayed power consumption level can vary in different operating conditions or when settings are changed z To reduce the power consumption to 0 watts tu...

Page 82: ...itted from the PC does not belong to the standard signal modes the screen may be blank with the power LED on In such a case change the settings according to the following table by referring to the gra...

Page 83: ...imes per second allows you to view natural pictures The repeat frequency is called vertical frequency or refresh rate and is indicated in Hz VESA 1280 x 1024 63 981 60 020 108 000 VESA 1280 x 1024 79...

Page 84: ...00112112 http www samsung com COSTA RICA 0 800 507 7267 http www samsung com DOMINICA 1 800 751 2676 http www samsung com ECUADOR 1 800 10 7267 http www samsung com EL SALVADOR 800 6225 http www samsu...

Page 85: ...ARY 06 80 SAMSUNG 726 7864 http www samsung com ITALIA 800 SAMSUNG 726 7864 http www samsung com KOSOVO 381 0113216899 LUXEMBURG 261 03 710 http www samsung com MACEDONIA 023 207 777 MONTENEGRO 020 40...

Page 86: ...11 http www samsung com CIS RUSSIA 8 800 555 55 55 http www samsung com GEORGIA 8 800 555 555 ARMENIA 0 800 05 555 AZERBAIJAN 088 55 55 555 KAZAKHSTAN 8 10 800 500 55 500 GSM 7799 http www samsung com...

Page 87: ...AND 1800 29 3232 02 689 3232 http www samsung com TAIWAN 0800 329 999 http www samsung com VIETNAM 1 800 588 889 http www samsung com MIDDlE EAST IRAN 021 8255 http www samsung com http www samservice...

Page 88: ...le harm to the environment or human health from uncontrolled waste disposal please separate these items from other types of waste and recycle them responsibly to promote the sustainable reuse of mater...

Page 89: ...according to the performance of your product and enjoy improved picture quality Gamma The Gamma menu adjusts the grey scale that represents middle tones on the screen Adjusting the brightness brighten...

Page 90: ...ontal lines A vertical frequency of 60 means that an image is transmitted 60 times per second The vertical frequency is also called refresh rate and affects screen flicker Resolution Resolution is the...

Page 91: ...nnecting the Product to a PC as a USB HUB for the SA850 Model Only 39 Contrast 44 Copyright 2 Correct Disposal of This Product 88 Correct posture to use the product 13 D Display Time 69 E ECO 57 F Fin...

Page 92: ...Index Index 92 Requirements Before Contacting Samsung Customer Service Center 76 Reset 74 Response Time 48 S Safety Precautions 5 Sharpness 45 Size 54 Standard Signal Mode Table 82 T Terminology 89...

Reviews: