background image

English-5

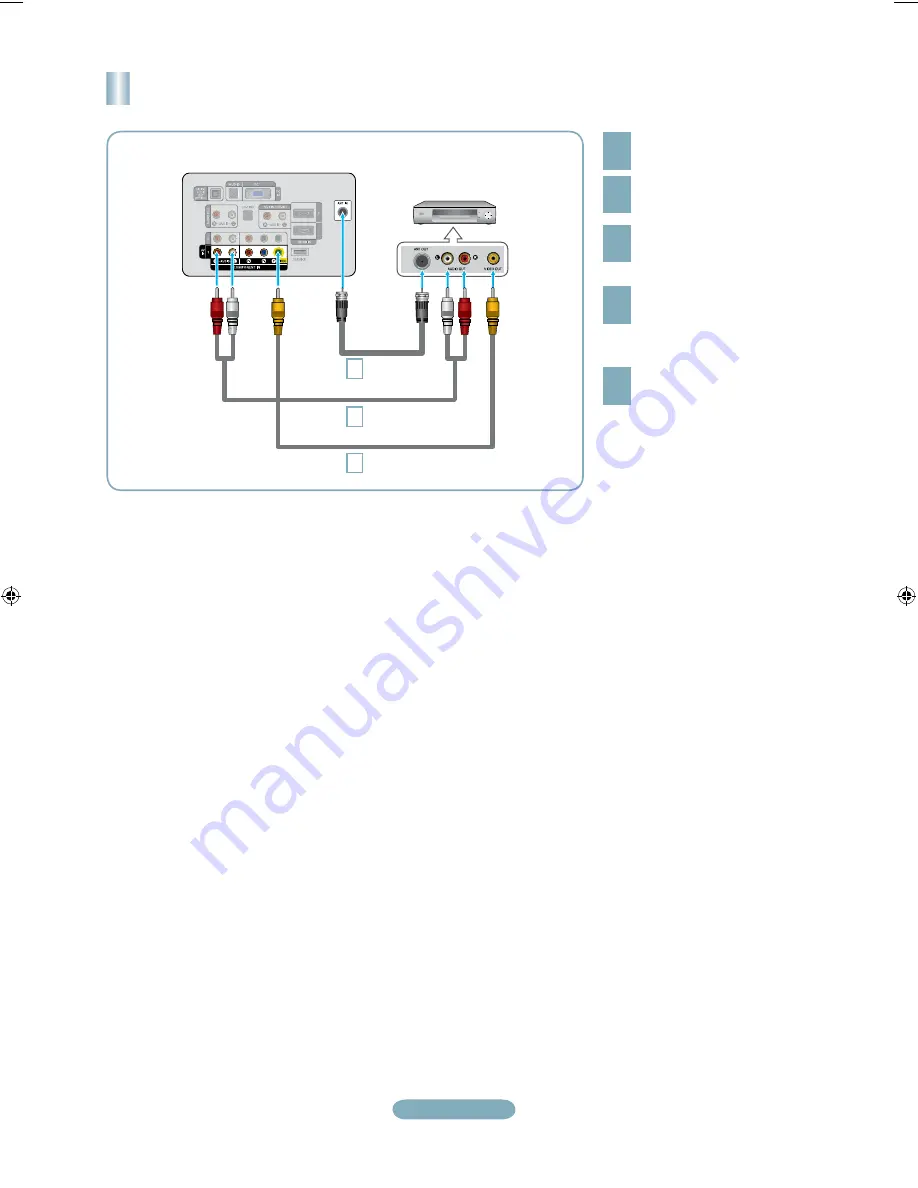
Connecting a VCR


2

4

If you have a “mono” (non-stereo) VCR, 

use a Y-connector (not supplied) to 

connect to the right and left audio input 

jacks of the TV. Alternatively, connect 

the cable to the “R” jack. If your VCR is 

stereo, you must connect two cables.

Follow the instructions in “Viewing a VCR or Camcorder Tape” to view your VCR tape.

Each VCR has a different back panel configuration.
When connecting a VCR, match the color of the connection terminal to the cable.
When connecting to AV NI, the color of the AV IN [Y/VIDEO] jack (Green) does not match the color of the video cable (Yellow).

TV Rear Panel

RF Cable

(Not supplied)

5

Audio Cable 

(Not supplied)

VCR Rear Panel

4

Video Cable  

(Not supplied)

5

Connect the cable or antenna 

to the ANT IN terminal on the 

back of the VCR.
Connect an RF Cable between 

the ANT OUT terminal on the 

VCR and the ANT IN terminal 

on the TV.

Connect a Video Cable between 

the VIDEO OUT jack on the 

VCR and the AV IN [Y/VIDEO] 

jack on the TV.

Unplug the cable or antenna 

from the back of the TV.

Connect Audio Cables between 

the AUDIO OUT jacks on the 

VCR and the AV IN [R-AUDIO-L] 

jacks on the TV.

Book 1.indb   5

2008-07-29   �� 6:39:27

Summary of Contents for LN40A500

Page 1: ...o register this product please visit www samsung com global register LN40A500T1F LN46A500T1F Rear Panel 1 AUDIO OUT 2 DIGITAL AUDIO OUT OPTICAL 3 PC IN PC AUDIO 4 HDMI IN 1 2 DVI IN HDMI2 R AUDIO L 5 ANT IN 6 POWER INPUT 7 SERVICE 8 COMPONENT IN 1 2 AV IN 9 EX LINK 0 KENSINGTON LOCK Audio Output Performance Comparison OPTICAL Digital AUDIO Analog Best Normal Video Input Performance Comparison HDMI...

Page 2: ...e used to control recording on Samsung recorders with the Anynet feature SOURCE Press to display and select the available video sources PRE CH Tunes to the previous channel CH CH Press to change channels MENU Displays the main on screen menu CC Controls the caption decoder RETURN Returns to the previous menu UP DOWN LEFT RIGHT ENTER Use to select on screen menu items and change menu values a EXIT ...

Page 3: ...tellite receiver Set Top Box DVD Player or Cable Box Satellite receiver Set Top Box Each DVD Player or Cable Box Satellite receiver Set Top Box has a different back panel configuration When connecting a DVD Player or Cable Box Satellite receiver Set Top Box match the color of the connection terminal to the cable When using an HDMI DVI cable connection you must use the HDMI IN 2 jack Each DVD Playe...

Page 4: ...deo quality Be sure to match the component video and audio connections For example if connecting a Component video cable to COMPONENT IN 1 connect the audio cable to COMPONENT IN 1 also Each DVD Player or Cable Box Satellite receiver Set Top Box has a different back panel configuration When connecting a DVD Player or Cable Box Satellite receiver Set Top Box match the color of the connection termin...

Page 5: ... the cable When connecting to AV NI the color of the AV IN Y VIDEO jack Green does not match the color of the video cable Yellow TV Rear Panel 3 RF Cable Not supplied 5 Audio Cable Not supplied VCR Rear Panel 4 Video Cable Not supplied 5 Connect the cable or antenna to the ANT IN terminal on the back of the VCR Connect an RF Cable between the ANT OUT terminal on the VCR and the ANT IN terminal on ...

Page 6: ...l sound to the Home theater receiver When the source is a digital component such as a DVD and is connected to the TV via HDMI only 2 channel sound will be heard from the Home Theater receiver If you want to hear 5 1 channel audio connect the DIGITAL AUDIO OUT OPTICAL jack on the DVD player or Cable Satellite Box directly to an Amplifier or Home Theater not the TV Connecting an Amplifier DVD Home T...

Page 7: ...ing a PC match the color of the connection terminal to the cable When using an HDMI DVI cable connection you must use the HDMI IN 2 terminal Using the D Sub Cable 1 Connect an HDMI DVI cable between the HDMI IN 2 jack on the TV and the PC output jack on your computer 2 Connect a 3 5 mm Stereo mini plug 2RCA Cable between the DVI IN HDMI2 R AUDIO L jack on the TV and the Audio Out jack of the sound...

Page 8: ... connection then press the ENTER button 4 When selecting the Cable TV system Press the ENTER button to start the auto program Press the or to select the correct analog signal cable system source among STD HRC and IRC Press the or button to select Start then press the ENTER button If you have Digital cable TV select the cable system signal source for both Analog and Digital Viewing the Menus 5 The ...

Page 9: ...button to select Picture 2 Press the ENTER button to select Mode Press the or button to select Dynamic Standard or Movie Press the ENTER button Customizing the Picture Settings Your television has several setting options that allow you to control the picture quality 1 To select the desired picture mode follow the Changing the Picture Standard instructions numbers 1 and 2 2 Press the or button to s...

Page 10: ...signal sources TV AV Component1 Component2 PC HDMI1 HDMI2 DVI You can choose only those external devices that are connected to the TV In the Source List connected inputs will be highlighted and sorted to the top Inputs that are not connected will be sorted to the bottom Using the Color buttons on the remote with the Source list Red Refresh Refreshes the connecting external devices TOOLS Option Dis...

Page 11: ...k Adjust the Brightness and Contrast Adjust the Fine tuning Black bars on the screen Make sure the broadcast you re receiving is High Definition HD HD channels sometimes broadcast Standard Definition SD programming which can cause black bars Set your cable satellite box to stretch or widescreen mode to eliminate the bars Picture has a Red Green or Pink tint Make sure the Component cables are conne...

Page 12: ...This page is intentionally left blank ...

Page 13: ...re Excellente Normale Guide d installation rapide Centre d appel heures de service du lundi au dimanche de 9 h à 12 h HNE Pour enregistrer ce produit veuillez SVP aller à www samsung com global register 1 800 SAMSUNG 7267864 Samsung Electronics America Inc 105 Challenger Road Ridgefield Park NJ 07660 0511 Samsung Electronics Canada Inc Customer Service 55 Standish Court Mississauga Ontario L5R 4B2...

Page 14: ...nder l enregistrement sur des enregistreurs Samsung avec la fonction Anynet SOURCE Appuyer sur cette touche pour afficher et choisir les sources vidéo accessibles PRE CH Permet d écouter le canal précédent CH CH Permettent de changer de canal MENU Affiche le menu à l écran principal CC Permet de commander la fonction de sous titrage RETURN Retourne au menu précédent HAUT BAS GAUCHE DROITE ENTER Au...

Page 15: ...tellite boîtier décodeur DVD ou du décodeur Câble récepteur satellite boîtier décodeur La configuration du panneau arrière de chaque lecteur DVD ou de chaque décodeur Câble récepteur satellite boîtier décodeur diffère Lorsque vous branchez un lecteur DVD ou un décodeur Câble récepteur satellite boîtier décodeur faites correspondre les couleurs de la borne de connexion à celles du Câble La prise d ...

Page 16: ...et les connexions audio Par exemple si un Câble vidéo Composante est branché à la prise d entrée COMPONENT IN 1 le Câble audio doit être branché à la prise d entrée COMPONENT IN 1 également La configuration du panneau arrière de chaque lecteur DVD ou de chaque décodeur Câble récepteur satellite boîtier décodeur diffère Lorsque vous branchez un lecteur DVD ou un décodeur Câble récepteur satellite b...

Page 17: ...ous connectez un magnétoscope faites correspondre les couleurs de la borne et du Câble La couleur de la prise d entrée AV IN Y VIDÉO vert ne correspond pas à la couleur du Câble vidéo jaune Pannear arrière de la télévision 3 Câble RF non fourni 5 Câble Audio non fourni Panneau arriére du magnétoscope 4 Câble Vidéo non fourni 5 Branchez le Câble ou l antenne à la prise ANT IN située à l arrière du ...

Page 18: ...éléviseur Lorsque le téléviseur émet des signaux numériques air il transmet le son en 5 1 canaux au récepteur de la chaîne de cinéma maison Lorsque la source est un composant numérique comme un lecteur DVD et que ce dernier est branché au téléviseur à l aide d un Câble HDMI seul un son deux canaux sera émis par le récepteur de la chaîne de cinéma maison Connexion d un amplificateur home cinéma DVD...

Page 19: ...orsque vous connectez un PC faites correspondre les couleurs de la borne et du Câble La prise d entrée HDMI IN 2 doit être utilisée pour un branchement de Câble HDMI DVI Câble HDMI DVI non fourni 1 Connectez le Câble HDMI DVI à la prise HDMI IN 2 PC à l arrière de votre unité 2 Branchez un Câble mini prise stéréo 3 5 mm 2RCA entre la prise DVI IN HDMI2 R AUDIO L du téléviseur et la prise Sortie au...

Page 20: ...ches ou pour choisir la source du signal analogique appropriée STD HRC ou IRC Appuyer sur la touche ou pour sélectionner Démarrer puis sur ENTER Si le Câble est numérique sélectionner la source de signal pour une diffusion analogique et numérique Visualisation des menus 5 Le téléviseur commence alors à mémoriser tous les canaux disponibles Appuyez sur le bouton EXIT pour quitter Pour arrêter la fo...

Page 21: ...r sélectionner Dynamique Standard ou Film Appuyez sur le bouton ENTER Personnalisation des réglages de l image Le téléviseur offre plusieurs options de réglage de la qualité de l image 1 Pour sélectionner le mode souhaité suivre les instructions 1 et 2 de la rubrique Changement du format normal de l image 2 Appuyez sur les bouton ou pour sélectionner Contre jour Contraste Luminosité Netteté Couleu...

Page 22: ...sante1 Composante2 PC HDMI1 HDMI2 DVI Vous pouvez sélectionner uniquement les appareils externes déjà branchés sur le téléviseur Dans la Liste source les entrées branchées sont en surbrillance et se trouvent en haut de la liste Les entrées non branchées figurent au bas de la liste Utilisation des touches de couleur de la télécommande avec la Liste source Rouge Rafraîchir permet de rafraîchir les a...

Page 23: ...n Assurez vous que votre réception est en haute définition HD Les stations des canaux à haute définition émettent parfois en signaux à définition standard SD ce qui peut causer la formation de barres noires Réglez votre câblosélecteur ou récepteur satellite sur le mode Étirer ou format large pour éliminer les barres L image a une teinte rouge verte ou rose Assurez vous que les câbles pour composan...

Page 24: ...Cette page est laissée intentionnellement en blanc ...

Page 25: ...ntario L5R 4B2 Horario de atención del centro de servicio Lun Dom 9AM 12AM ESTE Para registrar este producto visite www samsung com global register LN40A500T1F LN46A500T1F Panel Posterior 1 AUDIO OUT 2 DIGITAL AUDIO OUT OPTICAL 3 PC IN PC AUDIO 4 HDMI IN 1 2 DVI IN HDMI2 R AUDIO L 5 ANT IN 6 ENTRADA DE ALIMENTA CIÓN 7 SERVICE 8 COMPONENT IN 1 2 AV IN 9 EX LINK 0 BLOQUEO KENSINGTON Comparación del ...

Page 26: ...rolar la grabación en las grabadoras de Samsung con la función Anynet SOURCE Pulse este botón para ver y seleccionar las fuentes de vídeo disponibles PRE CH Sintoniza el canal anterior CH CH Permiten cambiar de canal MENU Muestra el menú de pantalla principal CC Controla el decodificador de subtítulos RETURN Vuelve al menú anterior ARRIBA ABAJO IZQUIERDA DERECHA ENTER Sirve para seleccionar los el...

Page 27: ...r de DVD o receptor de televisión por cable satélite decodificador tiene una configuración diferente del panel posterior Cuando conecte un reproductor de DVD o receptor de televisión por cable satélite decodificador debe hacer coincidir los colores del terminal de conexión y del cable Cuando se usa una conexión de cable HDMI DVI se debe conectar en el terminal HDMI IN 2 Cada reproductor de DVD o r...

Page 28: ...o y de vídeo componente deben coincidir Por ejemplo si conecta un cable de vídeo de componentes a COMPONENT IN 1 conecte también el cable de audio a la misma entrada COMPONENT IN 1 Cada reproductor de DVD o receptor de televisión por cable satélite decodificador tiene una configuración diferente del panel posterior Cuando conecte un reproductor de DVD o receptor de televisión por cable satélite de...

Page 29: ...a AV IN el color verde del terminal AV IN Y VIDEO no coincide con el color amarillo del cable de vídeo Panel posterior del TV 3 Cable RF No incluido 5 Cable de Audio No incluido Panel posterior del VCR 4 Cable de vídeo No incluido 5 Conecte el cable o la antena en el terminal ANT IN de la parte posterior del reproductor de vídeo Conecte el cable RF entre el terminal ANT OUT salida de antena del re...

Page 30: ...nido de 5 1 canales al receptor del sistema Home Cinema Cuando la fuente es un componente digital como un DVD y está conectada al televisor a través de HDMI sólo se oye el sonido de 2 canales del receptor del sistema Home Cinema Si desea oír audio de 5 1 canales conecte la toma DIGITAL AUDIO OUT OPTICAL del reproductor de DVD o del decodificador de cable satélite directamente a un amplificador o u...

Page 31: ...usa una conexión de cable HDMI DVI se debe conectar en el terminal HDMI IN 2 Uso del cable D Sub 1 Conecte un cable HDMI DVI entre la toma HDMI IN 2 del televisor y la toma de salida PC del ordenador 2 Conecte un cable estéreo miniclavija 2 RCA de 3 5 mm entre la toma DVI IN HDMI2 R AUDIO L del televisor y la toma de salida de audio de la tarjeta de sonido del ordenador Uso del cable HDMI DVI Pane...

Page 32: ...a seleccionar la fuente del sistema de cable de señal analógica correcta entre STD HRC e IRC pulse el botón ENTER Si tiene un televisor de cable digital seleccione la fuente de la señal del sistema de cable analógica y digital Visualización de los menús 5 El televisor empieza a memorizar todas las emisoras disponibles Pulse el botón EXIT para salir Para detener la función Auto Program Pulse el bot...

Page 33: ...sala oscura 3 Pulse los botón o para aumentar o reducir el valor de una opción concreta Pulse el botón EXIT para salir Cuando haga cambios en Luz de fondo Contraste Brillo Definición Color o Tinte el color del OSD también se ajustará En el modo PC sólo se pueden realizar cambios en las opciones Luz de fondo Contraste y Brillo La configuración de cada dispositivo externo conectado a la entrada del ...

Page 34: ... TV AV Component1 Component2 PC HDMI1 HDMI2 DVI Puede elegir solamente los dispositivos externos que estén conectados al televisor Uso de los botones de colores del mando a distancia con la lista de fuentes Rojo Actualizar Actualiza los dispositivos externos conectados TOOLS Opción Muestra los menús Editar Nombre e Información TV AV Componente1 Componente2 PC HDMI1 HDMI2 DVI Actualizar TOOLS Opció...

Page 35: ...endo es de alta definición HD Los canales HD en ocasiones emiten una programación en SD definición están dar que puede dar lugar a la aparición de barras negras Para eliminar las barras configure el decodificador de cable o satélite en los modos Alargar o Panorámica Las imágenes tienen un tono rojo verde o rosa Compruebe que los cables de los componentes estén conectados en los termina les correct...

Page 36: ...Esta pagina se ha dejado en blanco expresamente ...

Page 37: ...rvicio de Atención al Cliente Country Customer Care Center Web Site Address CANADA 1 800 SAMSUNG 726 7864 www samsung com ca Samsung Electronics Canada Inc Customer Service 55 Standish Court Mississauga Ontario L5R 4B2 Canada Samsung Electronique Canada Inc Service à la Clientèle 55 Standish Court Mississauga Ontario L5R 4B2 Canada U S A 1 800 SAMSUNG 726 7864 www samsung com Samsung Electronics A...

Reviews: