Samsung LN-R1550P Owner'S Instructions Manual Download Page 15

English-13

7.

How to set the FV, D, L, S, and V sub-ratings.

First, highlight one of these TV-Ratings: TV-Y7, TV-PG, TV-14, or TV-MA
(See Step 4, on previous page). Next, while the TV-Rating is selected, repeatedly 
press the

ENTER

button. This will cycle through the available sub-ratings (FV,L, S, D, or V).

A highlighted letter (“U” or “B”) will be displayed for each sub-rating. While the “U” or “B” is highlighted,
press the

ENTER

button to change the sub-rating.

Press

MENU

once to save the TV guidelines. A TV-Rating will be selected, and no letters “U” or “B” 

will be changed to yellow. To exit this screen, press the

MENU

button again. 

To select a different TV-Rating, press the 

or 

button and then repeat the process.

The V-chip will automatically block certain categories that are “More restrictive”. 
For example, if you block the “L” sub-rating in TV-PG, then the “L” sub-ratings in TV-14  and
TV-MA will automatically be blocked.

8.

Press the 

EXIT 

button to clear all the screens.

(Or proceed to the next section, and set up additional restrictions based on the MPAA codes).

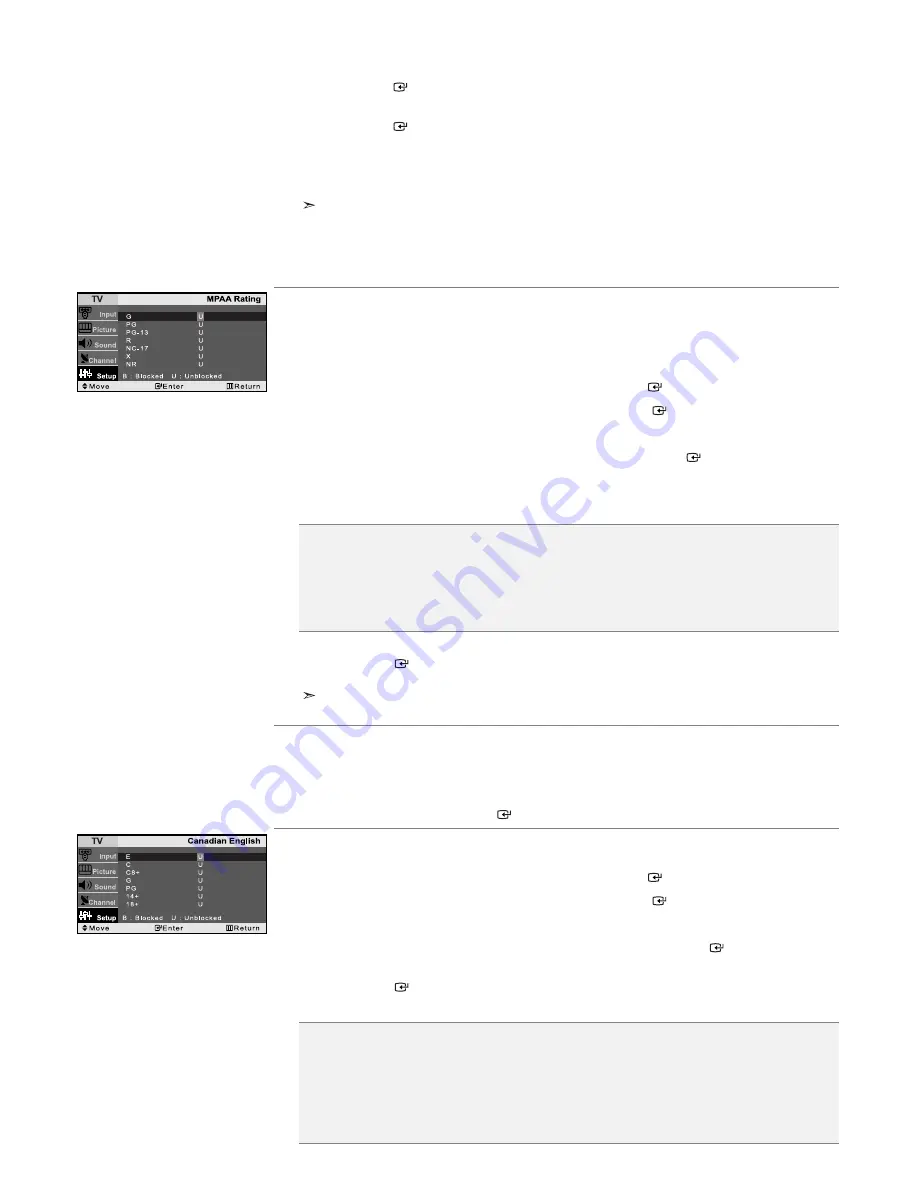
How to Set up Restrictions Using the MPAA Ratings: G, PG, PG-13, R, NC-17, X, NR

The MPAA rating system uses the Motion Picture Association of America (MPAA) system, and its main application is
for movies. When the V-Chip lock is on, the TV will automatically block any programs that are coded with 
objectionable ratings (either MPAA or TV-Ratings).

1.

Press the 

MENU 

button to display the menu.

Press the 

or 

button to select “Setup”, then press the

ENTER

button.

2.

Press the 

or 

button to select “V-Chip”, then press the

ENTER

button.

3.

The “Enter PIN” screen will appear. Enter your 4-digit PIN. 

4.

Press the 

or 

button to select “MPAA Rating”, then press the

ENTER

button.

5.

Repeatedly press the 

or 

button to select a particular MPAA category. 

(When a category is selected, its color changes to yellow.) 
Pressing the 

or 

button will cycle through the MPAA categories:

6.

Press the 

or 

button to select a category.

Press the

ENTER

button to select “U” or “B”. 

Press the 

EXIT 

button to save the settings and to clear all screens.

The V-Chip will automatically block any category that is “more restrictive”. For example, 
if you block the “PG-13” category, then “R”, “NC-17”, and “X” will automatically be blocked also.

How to Reset the TV after the V-Chip Blocks a Channel (‘Emergency Escape’)

If the TV is tuned to a restricted channel, the V-Chip will block it. The screen will go blank and the following 
message will appear: “Excessive rating”. To resume normal viewing, tune to a different channel using the number 
buttons. Under certain conditions (depending on the rating of the local TV programs) the V-Chip might lock out all
the channels. In this case, use the Menu button for an “emergency escape”: Select the V-Chip on the Menu. 
Enter your PIN number, and press the ENTER

button to temporarily disable the V-Chip Lock. 

How to Set up Restrictions Using the Canadian English

1.

Press the 

MENU 

button to display the menu.

Press the 

or 

button to select “Setup”, then press the

ENTER

button.

2.

Press the 

or 

button to select “V-Chip”, then press the

ENTER

button.

3.

The “Enter PIN” screen will appear. Enter your 4-digit PIN. 

4.

Press the 

or 

button to select “Canadian English”, then press the

ENTER

button.

5.

Press the 

or 

button to select a appropriate restriction.

Press the

ENTER

button to activate the restriction selected. The “B” is indicated.

6.

Press the 

EXIT 

button to exit.

• 

G:

General audience (no restrictions).

• 

PG:

Parental guidance suggested.

• 

PG-13:

Parents strongly cautioned.

• 

R:

Restricted. Children under 17 should be accompanied by an adult.

• 

NC-17:

No children under age 17. 

• 

X:

Adults only.

• 

NR:

Not rated.

• 

E:

Exempt programming includes...news, sports, documentaries and other information programming, 
talk shows, music videos, and variety programming.

• 

C:

Programming intended for children under age 8.

• 

C8+:

Programming generally considered acceptable for children 8 years and over to watch on their own.

• 

G:

General programming, suitable for all audiences.

• 

PG:

Parental Guidance.

• 

14+:

Programming contains themes or content which may not be suitable for viewers under the age of 14.

• 

18+:

Adult programming.

Summary of Contents for LN-R1550P

Page 1: ...ce Consommateurs Samsung Contacte con SAMSUNG WORLD WIDE Si tiene alguna pregunta o comentario referente a nuestros productos por favor contacte con nuestro Servicio de Atenci n al Cliente Country CAN...

Page 2: ...s traces de bordures gauche droite et au centre de l cran cause de la diff rence d mission de lumi re sur l cran La lecture d un DVD ou l utilisation d une console de jeu peut avoir un effet similaire...

Page 3: ...urce 7 Storing Channels Automatically 8 Storing Channels Manually 8 Fine Tuning Channels 8 PICTURE CONTROL Using Automatic Picture Settings 9 Customizing the Picture 9 Adjusting the Color Tone 9 SOUND...

Page 4: ...nstructions How to Adjust the Stand 1 2 1 Place the front of the TV onto a soft cloth or cushion on a table as in Figure 1 Align the TV bottom along the table edge 2 Press on the center of the TV back...

Page 5: ...Timer on or off The buttons on the lower right panel control your TV s basic features including the on screen menu To use the more advanced features you must use the remote control The product color a...

Page 6: ...that power on the unit is turned off When connecting an external device match the color of the connection terminal to the cable LN R1550P LN R2050P Use the rear panel jacks to connect an A V component...

Page 7: ...ess 2 and 1 Press to increase or decrease the volume Press to temporarily cut off the sound Press to select a time for the TV to turn off automatically Displays the main on screen menu Use to select o...

Page 8: ...channels When you press the CH or CH button the TV changes channels in sequence You will see all the channels that the TV has memorized The TV must have memorized at least three channels You will not...

Page 9: ...change or reset the settings Language Select your language Air Cable Select your local cable company TV system Auto Program Selects between terrestrial antenna connection or your local cable company...

Page 10: ...o select Channel then press the ENTER button 3 Press the or button to select Fine Tune then press the ENTER button 4 Press the or button to adjust the fine tuning 5 To store the fine tuning setting in...

Page 11: ...s several settings which allow you to control picture quality 1 Press the MENU button to display the menu Press the or button to select Picture then press the ENTER button 2 Press the or button to sel...

Page 12: ...signal conditions and it is inconvenient to adjust the volume every time the channel is changed Auto Volume automatically adjusts the volume of the desired channel by lowering the sound output when t...

Page 13: ...ess the EXIT button to exit The TV automatically turn off when the timer reaches 0 You can also press the SLEEP button on the remote control to set the sleep time You can set the On Off timers so that...

Page 14: ...previous section Parental restrictions can be set up using either of two methods The TV guidelines or the MPAA rating 1 Press the MENU button to display the menu Press the or button to select Setup t...

Page 15: ...s the ENTER button to select U or B Press the EXIT button to save the settings and to clear all screens The V Chip will automatically block any category that is more restrictive For example if you blo...

Page 16: ...select Caption then press the ENTER button 3 Press the ENTER button to select Caption 4 Press the or button to set caption Off or On then press the ENTER button 5 Depending on the particular broadcast...

Page 17: ...ource List 3 Press the or button to select the Input source then press ENTER button You can only select a source if it is connected to your TV Editing the Input Source Name You can name the input devi...

Page 18: ...utton to select Setup then press the ENTER button 3 Press the or button to select PC then press the ENTER button 4 Press the or button to select Position then press the ENTER button 5 Press the or but...

Page 19: ...is plugged in Check the antenna connections First check the volume of units connected to your TV Digital broadcasting receiver DTV DVD cable broadcasting receiver VCR etc Then adjust the TV volume ac...

Page 20: ...00 60 Hz AC 110 V 120 V 50 60 Hz 55 W 3 W 23 89 x 3 70 x 17 16 inches 607 0 x 94 0 x 436 0 mm 23 89 x 8 46 x 18 26 inches 607 0 x 215 0 x 464 0 mm 17 19 lbs 7 8 kg 50 F to 104 F 10 C to 40 C 10 to 80...

Page 21: ...es 8 Mise en m moire manuelle des cha nes 8 Syntonisation fine des canal 8 CONTROLE DE L IMAGE Utilisation des param tres automatiques d image 9 Personnalisation de l image 9 R glage des tons des coul...

Page 22: ...tilisation R glage du socle 1 2 1 Placez la partie avant du t l viseur sur une table en posant l cran sur un chiffon doux ou un coussin comme illustr la figure 1 Alignez le bas du t l viseur le long d...

Page 23: ...nt d utiliser les fonctions de base de votre t l vision y compris le menu l cran OSD Pour utiliser les fonctions plus avanc es vous devez utiliser la t l com mande La couleur et la forme de l appareil...

Page 24: ...que vous branchez un p riph rique externe faites correspondre les couleurs de la borne et du c ble LN R1550P LN R2050P Utilisez les prises du panneau arri re pour connecter un composant A V tel qu un...

Page 25: ...r ce bouton pour augmenter ou baisser le volume Appuyez sur le bouton pour couper temporairement le son Appuyez pour s lectionner l heure laquelle la t l vision va automatiquement s arr ter Pour affic...

Page 26: ...on change de canal de fa on s quentielle Vous pourrez voir toutes les canal que la t l vision a m moris es La t l vision doit avoir m moris au moins trois canal Vous ne pourrez pas voir les canal qui...

Page 27: ...le bouton ENTER 3 Les param tres sont modifi s ou r initialis s Langue S lectionnez votre langue Air c ble S lectionnez votre compagnie de t l vision c bl e locale Prog auto Permet de choisir une con...

Page 28: ...r Cha ne puis appuyez sur le bouton ENTER 3 Appuyez sur le bouton ou pour s lectionner Syn Pr cise puis appuyez sur le bouton ENTER 4 Appuyez sur le bouton ou pour r gler le r glage fin 5 Pour stocker...

Page 29: ...ieurs param tres qui vous permettent de contr ler la qualit de l image 1 Appuyez sur le bouton MENU pour afficher le menu Appuyez sur le bouton ou pour s lectionner Imagen puis appuyez sur le bouton E...

Page 30: ...ns de signaux et il n est pas tr s pratique de devoir ajuster le volume chaque fois qu on change de cha ne La fonction Volume auto ajuste automatiquement le volume de la cha ne choisie en baissant la...

Page 31: ...puyez sur le bouton EXIT pour quitter Le t l viseur s teint automatiquement lorsque le minuteur atteint 0 Vous pouvez galement appuyer sur le bouton SLEEP de la t l commande pour r gler la dur e de ve...

Page 32: ...ro d identification personnel NIP et activez la fonction puce V Voir section pr c dente Les restrictions parentales peuvent tre r gl es l aide de l une de ces deux m thodes Les guides TV ou la Classif...

Page 33: ...cat gorie Appuyez sur le bouton ENTER pour s lectionner B ou D Appuyez sur me bouton EXIT 3 fois pour enregistrer les param tres et pour remettre z ro tous les crans La fonction puce V bloque automati...

Page 34: ...Appuyez sur le bouton ou pour s lectionner Sous titres puis appuyez sur le bouton ENTER 3 Appuyez sur le bouton ENTER pour s lectionner Sous titres 4 Appuyez sur le bouton ou pour Off ou On les sous t...

Page 35: ...outon ENTER pour s lectionner Liste source 3 Appuyez sur le bouton ou pour s lectionner entr e source puis appuyez sur le bouton ENTER Vous pouvez galement s lectionner toute source raccord e votre t...

Page 36: ...z sur le bouton ou pour s lectionner PC puis appuyez sur le bouton ENTER 4 Appuyez sur le bouton ou pour s lectionner Position puis appuyez sur le bouton ENTER 5 Appuyez sur le bouton ou pour r gler l...

Page 37: ...ch e V rifiez les branchements de l antenne Dans un premier temps v rifiez le volume pour les l ments branch s sur votre t l viseur R cepteur de radiodiffusion num rique TV num rique DVD r cepteur de...

Page 38: ...110 V 120 V 50 60 Hz 55 W 3 W 607 0 x 94 0 x 436 0 mm 23 89 x 3 70 x 17 16 inches 607 0 x 215 0 x 464 0 mm 23 89 x 8 46 x 18 26 inches 7 8 kg 17 19 lbs 10 C 40 C 50 F 104 F 10 80 sans condensation 20...

Page 39: ...los canales 8 CONTROL DE LA IMAGEN Uso de los par metros de imagen autom ticos 9 Personalizaci n de la imagen 9 Ajuste del Color del fondo 9 CONTROL DEL SONIDO Uso de los par metros de sonido autom t...

Page 40: ...soporte 1 2 1 Coloque el frontal del televisor sobre un pa o suave o una almohadilla encima de una mesa tal como se muestra en la figura 1 Alinee la parte inferior del televisor con el borde de la mes...

Page 41: ...controlan las funciones b sicas del TV incluyendo los men s en pantalla Para usar las funciones m s avanzadas debe usar el mando a distancia El color y la forma del producto pueden variar seg n el mod...

Page 42: ...imentaci n Cuando conecte un dispositivo externo debe hacer coincidir los colores del terminal de conexi n y del cable LN R1550P LN R2050P Use las tomas del panel posterior para conectar componentes d...

Page 43: ...2 y 1 Pulse para aumentar o reducir el volumen Pulse para desactivar moment neamente el sonido Pulse para seleccionar una hora en la cual se apagar el TV autom ticamente Muestra el men de pantalla pr...

Page 44: ...CH o CH para cambiar los canales Cuando pulse el bot n CH o CH el TV cambiar los canales por orden Ver todos los canales que ha memorizado el TV El TV deber haber memorizado como m nimo tres canales...

Page 45: ...i n Idioma Seleccione el idioma Aire Cable Seleccione el sistema de su compa a local de televisi n por cable Prog Auto Selecciona entre la conexi n de una antena terrestre o el sistema de televisi n d...

Page 46: ...o para seleccionar Canal y despu s pulse el bot n ENTER 3 Pulse el bot n o para seleccionar Sintonia Fina y despu s pulse el bot n ENTER 4 Pulse el bot n o para ajustar la sintonizaci n fina 5 Para g...

Page 47: ...ios valores que le permiten controlar la calidad de imagen 1 Pulse el bot n MENU para visualizar el men Pulse el bot n o para seleccionar Imagen y despu s pulse el bot n ENTER 2 Pulse el bot n o para...

Page 48: ...misora tiene sus propias condiciones de se al y es muy inc modo ajustar el volumen cada vez que se cambia de canal Con la funci n Vol Auto el volumen del canal deseado se ajusta de forma autom tica re...

Page 49: ...bot n EXIT para salir El televisor se apaga autom ticamente cuando el temporizador llega a 0 Tambi n puede pulsar el bot n SLEEP del mando a distancia para ajustar el temporizador Puede establecer lo...

Page 50: ...cci n anterior Las restricciones del bloqueo de programas se pueden establecer mediante dos m todos Las gu a de programas o la clasificaci n MPAA 1 Pulse el bot n MENU para visualizar el men Pulse el...

Page 51: ...o para seleccionar una categor a Pulse el bot n ENTER para seleccionar D o B Pulse tres veces el bot n EXIT para guardar los ajustes y suprimir las pantallas La opci n V chip bloquear autom ticamente...

Page 52: ...pulse el bot n ENTER 3 Pulse el bot n ENTER para seleccionar Subt tulo 4 Pulse el bot n o para configurar la funci n de subt tulos en Apag u Enc y a continuaci n pulse el bot n ENTER 5 Dependiendo de...

Page 53: ...o para seleccionar Entrada 2 Pulse el bot n o para seleccionar Lista de origen 3 Pulse el bot n o para seleccionar origen entrada en seguida y despu s ENTER S lo puede seleccionar una fuente si est c...

Page 54: ...ionar Configuraci n y despu s pulse el bot n ENTER 3 Pulse el bot n o para seleccionar PC y despu s pulse el bot n ENTER 4 Pulse el bot n o para seleccionar Posici n y despu s pulse el bot n ENTER 5 P...

Page 55: ...mpruebe las conexiones de la antena Primero compruebe el volumen de los aparatos conectados al TV Receptor de emisiones digitales DTV DVD receptor de emisiones por cable v deo etc A continuaci n ajust...

Page 56: ...75 Hz 800 x 600 60 Hz AC 110 V 120 V 50 60 Hz 55 W 3 W 607 0 x 94 0 x 436 0 mm 23 89 x 3 70 x 17 16 pulgadas 607 0 x 215 0 x 464 0 mm 23 89 x 8 46 x 18 26 pulgadas 7 8 kg 17 19 lbs 10 C al 40 C 50 F a...

Reviews: