background image

English-5

 Connecting HDMI/DVI


-  Supports connections between HDMI-connection-enabled AV devices (Set-Top Boxes, DVD players, AV receivers and digital TVs).


-  No additional Audio connection is needed for an HDMI to HDMI connection.


What is HDMI? 

   - 

“High Definition Multimedia interface” allows the transmission of high definition digital video data and multiple channels of digital audio (5. 1 channels).


- The HDMI/DVI terminal supports DVI connection to an extended device with the appropriate cable (not supplied). 


  The difference between HDMI and DVI is that the HDMI device is smaller in size, has the HDCP


  (High Bandwidth Digital Copy Protection) coding feature installed, and supports multi - channel digital audio.


You should use the DVI-to-HDMI cable or DVI-HDMI Adapter for the connection, and the "R - AUDIO - L" terminal on DVI for sound output.


 - 

When connecting this product via HDMI or DVI to a Set Top Box, DVD Player or Games Console etc, make sure that it has been set to a  compatible 


  video output mode as shown in the table below. Failure to observe this may result in picture distortion, image breakup or no picture.     


Supported modes for DVI or HDMI


 - 

Do not attempt to connect the HDMI/DVI connector to a PC or Laptop Graphics Card.  (This will result in a blank screen being displayed)

 Connecting Set-Top Box, VCR or DVD


-  Inputs or outputs for external devices, such as VCR, DVD,  


  video game device or video disc players.

 Connecting External A/V Devices


-  Connect RCA or S-VIDEO cable to an appropriate external A/V device such as VCR, DVD or Camcorder.


-  Connect RCA audio cables to "R - AUDIO - L" on the rear of your set and the other ends to corresponding audio out connectors on the A/V device.


-  Headphone may be connected to the headphone output (

) on the rear of your set. While the headphone is connected, the sound from  


  the built-in speakers will be disabled. 

 SERVICE


-  Service connection for qualified service engineer.

 Connecting AUDIO


-  Connect RCA audio cables to "R - AUDIO - L" on the rear of your set and the other ends to corresponding audio in connectors on the  


Amplifier or DVD Home Theater.

 Connecting Computer 


-  Connect the D- Sub cable (optional) to "PC (PC IN)" on the rear of your set and the other end to the Video Card of your computer. 

 - 

Connect the stereo audio cable (optional) to "AUDIO (PC IN)" on the rear of your set and the other end to "Audio Out" of the sound card on your computer.

 Connecting Component Devices (DTV/DVD) 


-  Connect component video cables (optional) to component connector ("P

R

", "P

B

", "Y") on the rear of your set and the other ends to 


  corresponding component video out connectors on the DTV or DVD.


-  If you wish to connect both the Set-Top Box and DTV (or DVD), you should connect the Set-Top Box to the DTV (or DVD) and connect the   


DTV (or DVD) to component connector ("P

R

", "P

B

", "Y") on your set.


-  The PR, PB and Y connectors on your component devices (DTV or DVD) are sometimes labeled Y, B-Y and R-Y or Y, Cb and Cr.


-  Connect RCA audio cables (optional) to "R - AUDIO - L" on the rear of your set and the other ends to corresponding audio out connectors on the DTV or DVD.


- This LCD TV displays its optimum picture resolution in 720p mode.


- This LCD TV displays its maximum picture resolution in 1080i mode.
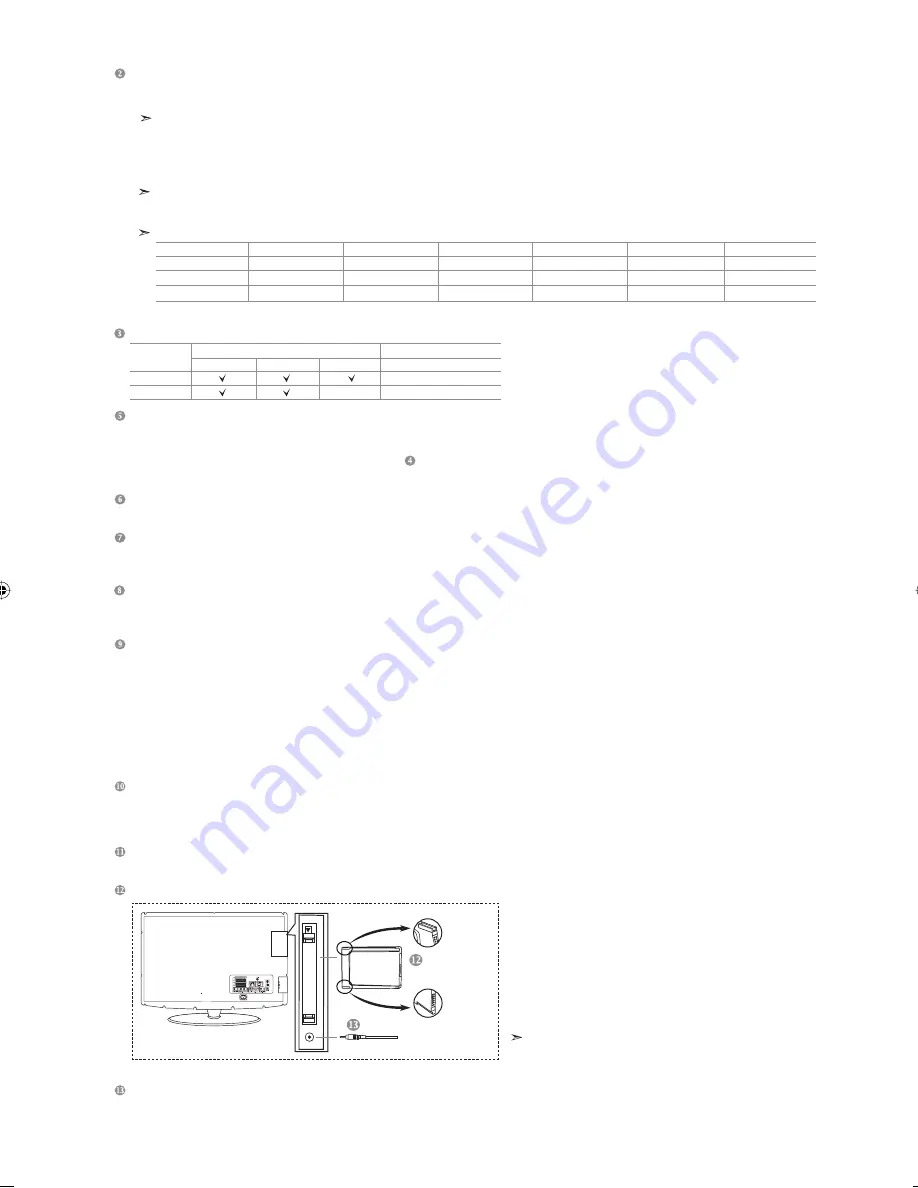
 Kensington Lock

 - The Kensington lock (optional) is a device used to physically fix the system when used in a public place. 


- If you want to use a locking device, contact the dealer where you purchased the TV. 


-


The place of the  Kensington Lock may be different depending on its model.

 DIGITAL AUDIO OUT (OPTICAL)

 - Connect to a Digital Audio Component.

 Connecting CI (Common Interface) CARD

- When not inserting "CI CARD" in some channels,
  "Scrambled Signal" is displayed on the screen.
- The pairing information containing a telephone number, 
  CI CARD ID, Host ID, and other information will be displayed
  in about 2~3 minutes. If an error message is displayed, 
  please contact your service provider.
- When the channel information configuration has finished, 
  the message "Updating Completed" is displayed, 
  indicating that the channel list is now updated.

You must obtain a CI CARD from a local cable service provider.
Remove the CI CARD by carefully pulling it out with your 


 hands since dropping the CI CARD may cause damage to it.

 Service Port

 - Service connection for qualified service engineer.

Please insert 
the card as 
shown

CI CARD

TV Rear Panel

50 Hz
60 Hz
Component

480i

X
X

O

480p

O
O
O

576i

X
X

O

576p

O

X

O

720p

O
O
O

1080i

O
O
O

Connector

EXT 1

EXT 2

Video

Audio (L/R)

RGB

Output

Video + Audio (L/R)

Only TV or DTV output is available.

Output you can choose.

Input

BN68-01007Y-00Eng.indd   5

BN68-01007Y-00Eng.indd   5

2006-08-09   

 3:59:18

2006-08-09   

 3:59:18

Summary of Contents for LE46M5

Page 1: ...123 989 902 10 11 30 08 585 367 87 0870 242 0303 8 800 502 0000 Web Site www samsung com be www samsung com cz www samsung com dk www samsung com fi www samsung com fr www samsung de www samsung com hu www samsung com it www samsung lu www samsung com nl www samsung com no www samsung com pl www samsung com pt www samsung ru www samsung com sk www samsung com es www samsung com se www samsung com ...

Page 2: ...WARNINGS Image retention commonly known as screen burn in can occur on most types of television if the same image is displayed continuously The most common causes of image retention are logos that remain stationary on the TV screen These logos are common on many programmes received via a Setop Box To reduce this risk avoid displaying still images for long durations and lower the brightness or cont...

Page 3: ...uage 17 Using Game Mode 17 Setting the Blue Screen Mode Selecting the Melody 17 Using the Energy Saving Feature 18 Selecting the Source 18 Editing the Input Source Names 18 USING THE DTV FEATURE Previewing the DTV Menu System 19 Updating the Channel List Automatically 19 Updating the Channel List Manually 20 Editing Your Favourite Channels 20 Selecting Channel Manager 21 Displaying Programme Infor...

Page 4: ...ount items sold separately allow you to mount the TV on the wall For detailed information on installing the wall mount see the instructions provided with the Wall Mount items Contact a technician for assistance when installing the wall mounted bracket Samsung Electronics is not responsible for any damage to the product or injury to yourself or others if you elect to install the TV on your own Remo...

Page 5: ...he volume In the on screen menu use the buttons as you use the and buttons on the remote control Press to change channels In the on screen menu use the buttons as you use the and buttons on the remote control Without the Remote Control you can turn on the TV by using the Channel buttons Speakers Remote Control Sensor Aim the remote control towards this spot on the TV Power Press to turn the TV on ...

Page 6: ... When connecting an external device match the colour of the connection terminal to the cable Side Panel Jacks Rear Panel Jacks Connecting an Aerial or Cable Television Network To view television channels correctly a signal must be received by the set from one of the following sources An outdoor aerial A cable television network A satellite network ...

Page 7: ... your set and the other end to the Video Card of your computer Connect the stereo audio cable optional to AUDIO PC IN on the rear of your set and the other end to Audio Out of the sound card on your computer Connecting Component Devices DTV DVD Connect component video cables optional to component connector PR PB Y on the rear of your set and the other ends to corresponding component video out conn...

Page 8: ...isplay Teletext index Teletext hold Teletext size selection Teletext mode selection LIST FLOF Teletext sub page P Teletext next page P Teletext previous page Teletext cancel Teletext reveal Alternately select Teletext Double or Mix Fastext topic selection Teletext store The performance of the remote control may be affected by bright light This is a special remote control for the visually impaired ...

Page 9: ...n at any time to interrupt the memorization process 6 Press the ENTER button Select the Hour or Minute by pressing the or button Set the Hour or Minute by pressing the or button You can also set the hour and minute by pressing the number buttons on the remote control 7 Press the ENTER button to confirm your setting The DTV channel scan menu appears and the DTV channel is automatically updated If t...

Page 10: ...ach stored channel which you wish to identify 1 Press the MENU button to display the menu Press the or button to select Channel then press the ENTER button 2 Press the or button to select Manual Store then press the ENTER button 3 Press the ENTER button to select Programme 4 To assign a programme number to a channel find the correct number by pressing the or button and then press the ENTER button ...

Page 11: ...ch as children from watching unsuitable programmes by muting out video and audio Child Lock cannot be released using the buttons on the side Only the remote control can release the Child Lock setting so keep the remote control away from children 1 Press the MENU button to display the menu Press the or button to select Channel then press the ENTER button 2 Press the or button to select Channel Mana...

Page 12: ...ress the or button to select Fine Tune then press the ENTER button 4 Press the or button to adjust the fine tuning Press the ENTER button 5 Press the EXIT button to exit Fine tuned channels that have been saved are marked with an asterisk on the right hand side of the channel number in the channel banner And the channel number turns red To reset the fine tuning select Reset by pressing the or butt...

Page 13: ...et has several settings which allow you to control picture quality 1 To select the desired picture effect follow the Changing the Picture Standard instructions number 1 to 3 2 Press the or button to select a particular item Press the ENTER button 3 Press the or button to decrease or increase the value of a particular item Press the ENTER button 4 Press the EXIT button to exit Adjusting the Custom ...

Page 14: ...ect by pressing the or buttons Use the or button to move the picture up and down After selecting use the or button to magnify or reduce the picture size in the vertical direction Resetting the Picture Settings to the Factory Defaults Changing the Picture Size If the broadcast signal received by your TV is weak you can activate the Digital Noise Reduction feature to help reduce any static and ghost...

Page 15: ...ss ENTER button Select a source of the sub picture by pressing the or button and press the ENTER button The sub picture can serve different source selections based on what the main picture is set to 5 Press the or button to select Swap To interchange the main picture and the sub picture select Swap option and press the ENTER button The main picture and the sub picture are interchanged If main pict...

Page 16: ...ct Sound then press the ENTER button 2 Press the or button to select Equalizer then press the ENTER button 3 Press the or button to select a particular item Press the ENTER button 4 Press the or button to reach the required setting Press the ENTER button 5 Press the EXIT button to exit If you make any changes to these settings the Sound Mode is automatically switched to Custom Adjusting the Sound ...

Page 17: ...on to exit You can select this option when the PIP is set to On refer to page 13 If you want to hear the sound through separate speakers cancel the internal amplifier 1 Press the MENU button to display the menu Press the or button to select Sound then press the ENTER button 2 Press the or button to select Internal Mute then press the ENTER button 3 Press the or button to select On or Off Press the...

Page 18: ...itches to standby mode when the timer reaches 0 You can set the On Off timers so that the set will Switch on automatically and tune to the channel of your choice at the time you select Switch off automatically at the time you select The first step is to set the television s clock 1 Press the MENU button to display the menu Press the or button to select Setup then press the ENTER button 2 Press the...

Page 19: ...Adjust the sound using the equalizer The Reset Sound function is activated Selecting the Reset function after setting the equalizer resets the equalizer setting to the factory defaults Using Game Mode Choosing Your Language Blue Screen If no signal is being received or the signal is very weak a blue screen automatically replaces the noisy picture background If you wish to continue viewing the poor...

Page 20: ...ted to your set only TV Ext 1 Ext 2 are activated in the Source List AV S Video Component PC HDMI DTV are activated only when they are connected to your set 3 Select the required device by pressing the or button Press the ENTER button Name the device connected to the input jacks to make your input source selection easier 1 Press the MENU button to display the menu Press the ENTER button to select ...

Page 21: ...ish Deutsch Italiano Français Svenska The sub items of the CI Menu may vary depending on the CAM model System Product Information Signal Information Software Upgrade Common Interface Reset Application Info CI Menu Module Information Smart card information Language Software Download Updating the Channel List Automatically You can update the channel list when the broadcaster adds new Services or if ...

Page 22: ... currently stored channels 5 Press the or button to select a channel you want Press the ENTER button A icon is shown next to the selected channel and the channel will be added to the favourite channel list To undo press the ENTER button again Select All Select all channels currently displayed Select None Deselect all selected channels Preview Displays a currently selected channel s The Favorite Ch...

Page 23: ...om the channels you have scanned When you scan through the stored channels those you have chosen to skip are not displayed All channels that you do not specifically choose to skip are displayed during scanning 1 Press the D MENU button to display the DTV menu 2 Press the or button to select Channel then press the ENTER button 3 Press the or button to select Channel Manager Press the ENTER button 4...

Page 24: ...ded on the detailed information will be appeared if the summary is long Six channels are displayed To scroll between channels move to a channel using the or button To display page by page use the P or button Viewing the EPG Electronic Programme Guide Information The EPG Electronic Programme Guide information is provided by the broadcasters Programme entries may appear blank or out of date as a res...

Page 25: ... the time Date SetYear Month and Day Frequency Set the frequency Once Daily or Weekly 6 After setting the schedule Press the red button 7 Press the EXIT button to exit The Scheduled list may be displayed in the EPG menu Save Save the adjusted schedule Cancle Cancel the adjusted schedule Add Programme Add a new schedule Edit Re adjust the selected schedule Delete Delete the selected schedule Using ...

Page 26: ...avourite Channels menu refer to page 20 Viewing All Channels and Favourite Channels Using this feature users can select one of the four languages English Welsh Gaelic Irish The language selected here is the default when the user selects a channel 1 Press the D MENU button to display the DTV menu 2 Press the or button to select Preference then press the ENTER button 3 Press the or button to select ...

Page 27: ...e that is defined by the user The on screen menu will instruct you to assign a PIN code you can change it later if necessary 1 Press the D MENU button to display the DTV menu 2 Press the or button to select Preference then press the ENTER button 3 Press the or button to select Parental Lock then press the ENTER button 4 The Enter PIN is displayed 5 Enter your current 4 digit PIN code by using the ...

Page 28: ...ected language is unavailable in the broadcast 5 Press the EXIT button to exit While viewing a programme the subtitle can be selected While viewing a programme audio languages can be selected If the programme is broadcast with digital text this feature is enabled 1 Press the D MENU button to display the DTV menu 2 Press the or button to select Feature then press the ENTER button 3 Press the or but...

Page 29: ...software upgrades are periodically broadcast as part of the normal Television signal It will automatically detect these signals and display the software upgrade banner You are given the option to install the upgrade Upgrade Now If you select Upgrade Now the iDTV immediately installs the new upgrade and then restarts Upgrade Later If you select Upgrade Later the upgrade is postponed until the next ...

Page 30: ...r 5 Enter your current 4 digit PIN code by using the numeric buttons 0 9 The warning message is displayed All values will be reset by pressing the coloured buttons red green yellow and blue in turn 6 Press the EXIT button to exit Resetting Viewing Common Interface This contains information on CAM inserted in the CI slot and displays it 1 Press the D MENU button to display the DTV menu 2 Press the ...

Page 31: ...e pages may not be displayed To activate the Teletext mode and display the contents page 1 Using the P or P button select the channel providing the Teletext service 2 Press the TTX MIX button to activate the Teletext mode The contents page is displayed It can be redisplayed at any time by pressing the MENU button 3 Press the TTX MIX button again The actual broadcast will be displayed with Teletext...

Page 32: ...en A secondary page by entering its 4 digit number The next page The previous page Double size letters in the Upper half of the screen Lower half of the screen Normal screen Press the TTX MIX INFO INFO PRE CH P P P MODE Once Twice Three times Using Fastext to Select a Teletext Page The various topics included in the Teletext pages are colour coded and can be selected by pressing the coloured butto...

Page 33: ... up repeat steps 2 3 and 4 but try one of the other codes listed for your brand of VCR If no other codes are listed try each VCR code 000 through 080 Note on Using Remote Control Modes VCR When your remote control is in VCR mode the volume buttons still control your TV s volume Setting Up the Remote to Operate Your Cable Box 1 Turn off your cable box 2 Press the CABLE button on your TV s remote co...

Page 34: ... Control Modes DVD When your remote control is in DVD mode the volume buttons still control your TV s volume Setting Up the Remote to Operate Your STB 1 Turn off your STB 2 Press the STB button on your TV s remote control 3 Press the SET button on your TV s remote control 4 Using the number buttons on your remote control enter three digits of the STB code listed on page 35 of this manual for your ...

Page 35: ... 021 026 037 062 MARTA 006 MEI 021 MEMOREX 006 021 024 025 MGA 034 MIDLAND 005 MINOLTA 019 041 075 MITSUBISHI 019 034 041 046 Brand Code MONTGOMERYWARD 020 MTC 002 025 MULTITECH 002 005 025 038 NEC 007 008 018 026 037 062 064 OPTIMUS 020 ORION 073 074 075 076 PANASONIC 021 056 071 072 PENTAX 019 041 075 PENTEX RESEARCH 008 PHILCO 021 056 059 PHILIPS 021 080 PIONEER 019 026 039 053 PORTLAND 015 049...

Page 36: ... 018 STB DVD COMBO 019 DVD Receiver 020 AV Receiver 021 DVD Brand Code ANAM 030 AUDIOVOX 075 AUDIOLOGIC 085 ANABA 072 APEX DIGITAL 070 071 074 086 083 084 088 111 112 AIWA 114 BROKSONIC 062 BLAUPUNKT 074 B K 122 123 CURTIS MATHES 027 CYBER HOME 077 078 079 082 CLARION 080 125 CIRRUS 081 CYBER HOME 065 CINEVISION 095 DAEWOO 066 DENON 146 FARENHEIT 067 068 FISHER 090 GPX 060 GO VIDEO 061 089 133 135...

Page 37: ...lite STB HDD COMBO Standard 009 SET TOP BOX Brand Code ALPHASTAR 023 ANAM 043 CHANNEL MASTER 018 034 CROSSDIGITAL 019 CHAPARRAL 035 DIRECT TV 015 016 017 019 022 045 060 061 062 065 066 067 068 DAEWOO 074 DISHNETWORKSYSTEM 069 070 DISHPRO 069 DRAKE 018 024 032 DX ANTENNA 027 ECHOSTAR 025 069 070 071 EXPRESSVU 069 GOI 069 GE 065 GENERALINSTRUMENT 046 047 048 063 064 HTS 069 HOME CABLE 056 HITACHI 0...

Page 38: ... box the correct value is 60 or 60 Hz Otherwise just click OK and exit the dialog box Setting up Your PC Software Based on Windows XP The interface mode is not supported The set might operate abnormally if a non standard video format is selected DVI does not support PC function Separate and Composite modes are supported SOG is not supported Display Modes Both screen position and size will vary dep...

Page 39: ...screen positioning if it does not fit the TV screen 1 Follow the Coarse and Fine Tuning of the Image Image Lock instructions number 1 to 3 2 Press the or button to select Position then press the ENTER button 3 Press the or button to adjust the Vertical Position Press the or button to adjust the Horizontal Position Press the ENTER button 4 Press the EXIT button to exit Adjusting the PC Screen Autom...

Page 40: ... move it further away Plug your set into a different mains socket Check the direction location and connections of your aerial This interference is often due to the use of an indoor aerial Replace the remote control batteries Clean the upper edge of the remote control transmission window Check the battery terminals Check that the signal cable is firmly connected to the PC or video sources Check tha...

Page 41: ...ut Frequency Response Sound Output 3D Surround Stereo LE46M5 46 inch 1360 x 768 60 Hz H V Separate TTL P or N 0 7 Vp p 75 ohm PAL SECAM B G D K I I I L L NTPB AV3 58 4 43 BG DK I L Channel 21 68 474 850 MHz Bandwidth 8 MHz DVB T MPEG2 DVB Compliant Main Profile Main Level UP to 15 Mb s 720 x 576 pixels MPEG 2 Layer I II Mono Stereo PAL NTSC SECAM CVBS S VHS RGB 1 0 Vp p 75 ohm 0 7 Vp p 75 ohm 500 ...

Page 42: ... for long periods of time unplug it from the wall outlet and disconnect the antenna or cable system This will prevent damage to the set due to lightning and power line surges Before connecting the AC power cord to the DC adaptor outlet make sure the voltage designation of the DC adaptor corresponds to the local electrical supply Never insert anything metallic into the open parts of this apparatus ...

Page 43: ...ctronics U K Ltd Unit C Customer Care Centre Stafford Park 12 TELFORD Shropshire TF3 3BJ Tel 0870 242 0303 Fax 01952 297617 UNITED KINGDOM Wiring the Mains Power Supply Plug UK Only Warranty Card IMPORTANT NOTICE The mains lead on this equipment is supplied with a moulded plug incorporating a fuse The value of the fuse is indicated on the pin face of the plug and if it requires replacing a fuse ap...

Page 44: ...This page is intentionally left blank ...

Page 45: ...r human health from uncon trolled waste disposal please separate this from other types of wastes and recycle it responsibly to promote the sustainable reuse of material resources Household users should contact either the retailer where they purchased this product or their local government office for details of where and how they can take this item for environ mentally safe recycling Business users...

Reviews: