background image

This page is intentionally

left blank.

148 X 210UK.indd   3

2006-01-02   ¿ÀÈÄ 2:35:47

Summary of Contents for LE32R71B

Page 1: ...RG NETHERLANDS NORWAY POLAND PORTUGAL RUSSIA SLOVAKIA SPAIN SWEDEN U K UKRAINE Customer Care Center 02 201 2418 844 000 844 38 322 887 09 693 79 554 08 25 08 65 65 0 15 Min 01805 121213 0 12 Min 06 40 985 985 199 153 153 02 261 03 710 0900 20 200 88 0 10 Min 231 627 22 0 801 801 881 80 8 200 128 8 800 200 0400 0850 123 989 902 10 11 30 08 585 367 87 0870 242 0303 8 800 502 0000 Web Site www samsun...

Page 2: ...g a still image Watching the LCD TV in 4 3 format for a long period of time may leave traces of borders displayed on the left right and center of the screen caused by the difference of light emission on the screen Playing a DVD or a game console may cause a similar effect to the screen Damages caused by the above effect are not covered by the Warranty Displaying still images from Video games and P...

Page 3: ... Sound Settings 15 Setting the TruSurround XT SRS TSXT 16 Adjusting the Volume Automatically 16 Selecting the Internal Mute 16 Listening to the Sound of the Sub Picture 17 Resetting the Sound Settings to the Factory Defaults 17 Connecting Headphones 17 Setting the Time Setting and Displaying the Current Time 17 Setting the Sleep Timer 18 Switching the Television On and Off Automatically 18 Setting...

Page 4: ...ide Registration Cards Not available in all locations The stand and stand screw may not be included depending on the model Wall mount items sold separately allow you to mount the TV on the wall For detailed information on installing the wall mount see the instructions provided with the Wall Mount items Contact a technician for assistance when installing the wall mounted bracket Samsung Electronics...

Page 5: ...een menu use the buttons as you use the and buttons on the remote control Press to change channels In the on screen menu use the buttons as you use the and buttons on the remote control Without the Remote Control you can turn on the TV by using the Channel buttons Speakers Power Press to turn the TV on and off Power Indicator Blinks and turns off when the power is on and lights up in stand by mode...

Page 6: ...vice to your TV make sure that power on the unit is turned off When connecting an external device match the colour of the connection terminal to the cable Side Panel Jacks 26 inch model does not have the side panel jacks Rear Panel Jacks 32 inch 37 inch 40 inch Rear Panel Jacks 26 inch ...

Page 7: ...external A V device such as VCR DVD or Camcorder Connect RCA audio cables to R AUDIO L on the rear of your set and the other ends to corresponding audio out connectors on the A V device Headphone may be connected to the headphone output on the rear of your set While the headphone is connected the sound from the built in speakers will be disabled SERVICE Service connection for qualified service eng...

Page 8: ...se Volume decrease Temporary sound switch off Menu display and change confirmation Sound mode selection Picture In Picture On Off Picture effect selection PIP FUNCTIONS SOURCE Input source selection SWAP Interchange the main and sub picture SIZE PIP size selection POSITION PIP position selection P Next channel P Previous channel Sound effect selection SRS TSXT selection Available source selection ...

Page 9: ...h the menus are to be displayed 4 To switch your set off press the POWER button again When the TV is initially powered on several basic settings proceed automatically and subsequently The following settings are available 1 Press the POWER button on the remote control The message Start Plug Play is displayed with OK selected 2 Select the appropriate language by pressing the or button Press the ENTE...

Page 10: ...ess the or button to select Setup then press the ENTER button 2 Press the ENTER button again to select Plug Play 3 The message to Start Plug Play is displayed You can scan for the frequency ranges available to you and availability depends on your country Automatically allocated programme numbers may not correspond to actual or desired programme numbers However you can sort numbers manually and cle...

Page 11: ...te control 5 Press the or button to select Colour System then press the ENTER button 6 Select the colour standard required by pressing the or button then press the ENTER button 7 Press the or button to select Sound System then press the ENTER button 8 Select the sound standard required by pressing the or button then press the ENTER button If there is an abnormal sound or no sound re select the sou...

Page 12: ...e Stored Channels This feature allows you to prevent unauthorized users such as children from watching unsuitable programmes by muting out video and audio Child Lock cannot be released using the buttons on the side Only the remote control can release the Child Lock setting so keep the remote control away from children 1 Press the MENU button to display the menu Press the or button to select Channe...

Page 13: ... Fine Tuning Channel Reception Channel names will be assigned automatically when channel information is broadcast These names can be changed allowing you to assign new names 1 Press the MENU button to display the menu Press the or button to select Channel then press the ENTER button 2 Press the or button to select Name then press the ENTER button 3 If necessary select the channel to be assigned to...

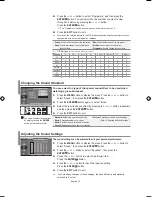
Page 14: ...icture effect follow the Changing the Picture Standard instructions number 1 to 4 2 Press the or button to select Colour Tone then press the ENTER button 3 Press the or button to select the desired colour tone setting Press the ENTER button 4 Press the EXIT button to exit Changing the Colour Tone Cool2 Makes the colour temperature bluer than Cool1 menu Cool1 Makes whites bluish Normal Keeps whites...

Page 15: ...he or buttons Use the or button to move the picture up and down After selecting use the or button to magnify or reduce the picture size in the vertical direction Ex sub pict sou unn to v You can return to the factory defaults picture settings 1 To select the desired picture effect follow the Changing the Picture Standard instructions number 1 to 4 on page 12 2 Press the or button to select Reset t...

Page 16: ...of the sub picture and then press the ENTER button Select a size of the sub picture by pressing the or button and then press the ENTER button If main picture is in PC mode Size is not available 7 Press the or button to select Position then press the ENTER button Select the position of the sub picture by pressing the or button and then press the ENTER button Viewing the Picture In Picture PIP Press...

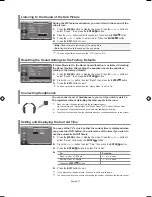
Page 17: ...O O X X Sub Main Source Used to select a source of the sub picture Swap Used to interchange the main picture and the sub picture Size Used to select a size of the sub picture Position Used to move the sub picture Programme Used to Change the sub picture 8 Press the or button to select Programme and then press the ENTER button You can select the channel that you want to view through sub picture by ...

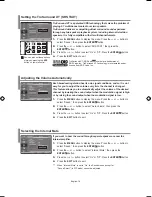
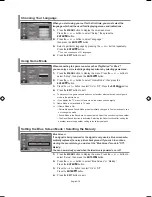
Page 18: ...then press the ENTER button 2 Press the or button to select SRS TSXT then press the ENTER button 3 Press the or button to select On or Off Press the ENTER button 4 Press the EXIT button to exit Setting the TruSurround XT SRS TSXT Each broadcasting station has its own signal conditions and so it is not easy for you to adjust the volume every time the channel is changed This feature allows you to au...

Page 19: ...nd minute by pressing the number buttons on the remote control To Move to Hour or Minute Set the Hour or Minute Press the ENTER button Press the or button or button Setting and Displaying the Current Time Listening to the Sound of the Sub Picture During the PIP features activation you can listen to the sound of the sub picture 1 Press the MENU button to display the menu Press the or button to sele...

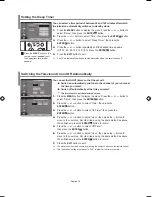
Page 20: ...ice at the time you select Switch off automatically at the time you select The first step is to set the television s clock 1 Press the MENU button to display the menu Press the or button to select Setup then press the ENTER button 2 Press the or button to select Time then press the ENTER button 3 Press the or button to select On Timer then press the ENTER button 4 Press the or button to adjust Hou...

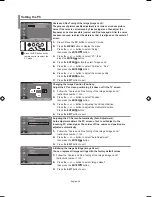
Page 21: ...ess the or button to select On or Off Press the ENTER button 4 Press the EXIT button to exit To disconnect the game console and connect another external device cancel game mode in the picture menu If you display the TV menu in Game mode the screen shakes slightly Game Mode is not available in TV mode If Game Mode is On Picture Mode and Sound Mode are automatically changed to Custom and users can n...

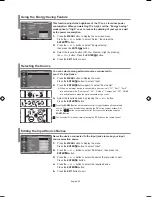
Page 22: ... to your set only TV Ext 1 Ext 2 are activated in the Source List AV S Video Component PC HDMI are activated only when they are connected to your set 3 Select the required device by pressing the or button Press the ENTER button Selecting the Source Press the SOURCE button on the remote control to toggel between all the available source TV mode can be selected by pressing the TV button number butto...

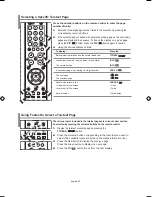
Page 23: ...letext service 2 Press the TTX MIX button to activate the teletext mode The contents page is displayed It can be redisplayed at any time by pressing the MENU button 3 Press the TTX MIX button again The actual broadcast will be displayed with Teletext Double and Mix in order on the screen 4 Press the TV button to exit from the Text display If any broken character appears while Text is being viewed ...

Page 24: ...g its 4 digit number The next page The previous page Double size letters in the Upper half of the screen Lower half of the screen Normal screen Press the TTX MIX INFO INFO PRE CH P P SOURCE Once Twice Three times Selecting a Specific Teletext Page The various topics included in the teletext pages are colour coded and can be selected by pressing the coloured buttons on the remote control 1 Display ...

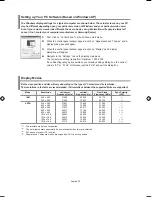
Page 25: ... box the correct value is 60 or 60 Hz Otherwise just click OK and exit the dialog box Setting up Your PC Software Based on Windows XP The interface mode is not supported The set might operate abnormally if a non standard video format is selected DVI does not support PC function Separate and Composite modes are supported SOG is not supported Display Modes Both screen position and size will vary dep...

Page 26: ...it the TV screen 1 Follow the Coarse and Fine Tuning of the Image Image Lock instructions number 1 to 3 2 Press the or button to select Position then press the ENTER button 3 Press the or button to adjusting the Vertical Position Press the or button to adjust the Horizontal Position Press the ENTER button 4 Press the EXIT button to exit Adjusting the PC Screen Automatically Auto Adjustment Auto ad...

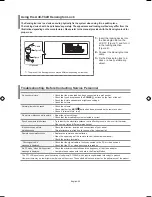
Page 27: ... move it further away Plug your set into a different mains socket Check the direction location and connections of your aerial This interference is often due to the use of an indoor aerial Replace the remote control batteries Clean the upper edge of the remote control transmission window Check the battery terminals Check that the signal cable is firmly connected to the PC or video sources Check tha...

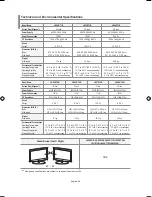
Page 28: ...ng 20 20 LE26R71B LE26R72B LE32R71B LE32R72B LE37R72B LE40R71B LE40R72B Stand Swivel Left Right Yes Model Name Screen Size Diagonal Power Supply Power Consumption PC Resolution Sound Output Dimension WxDxH Body With stand Weight With stand Environmental Considerations Operating Temperature Operating Humidity Storage Temperature Storage Humidity LE26R72B 26 inch AC220 240V 50 Hz 120 W 1360 x 768 60...

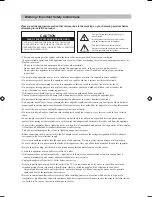
Page 29: ... for long periods of time unplug it from the wall outlet and disconnect the antenna or cable system This will prevent damage to the set due to lightning and power line surges Before connecting the AC power cord to the DC adaptor outlet make sure the voltage designation of the DC adaptor corrsponds to the local electrical supply Never insert anything metallic into the open parts of this apparatus D...

Page 30: ...ELLOW Wiring the Mains Power Supply Plug UK Only United Kingdom This Samsung product is warranted for a period of twelve 12 months from the original date of purchase against defective materials and workmanship In the event that warranty service is required you should return the prod uct to the retailer from whom it was purchased However Samsung Authorised Dealers and Authorised Service Centres in ...

Page 31: ...This page is intentionally left blank ...

Page 32: ...This page is intentionally left blank ...

Page 33: ...or human health from uncontrolled waste disposal please separate this from other types of wastes and recycle it responsibly to promote the sustainable reuse of material resources Household users should contact either the retailer where they purchased this product or their local government office for details of where and how they can take this item for environmentally safe recycling Business users ...

Reviews: